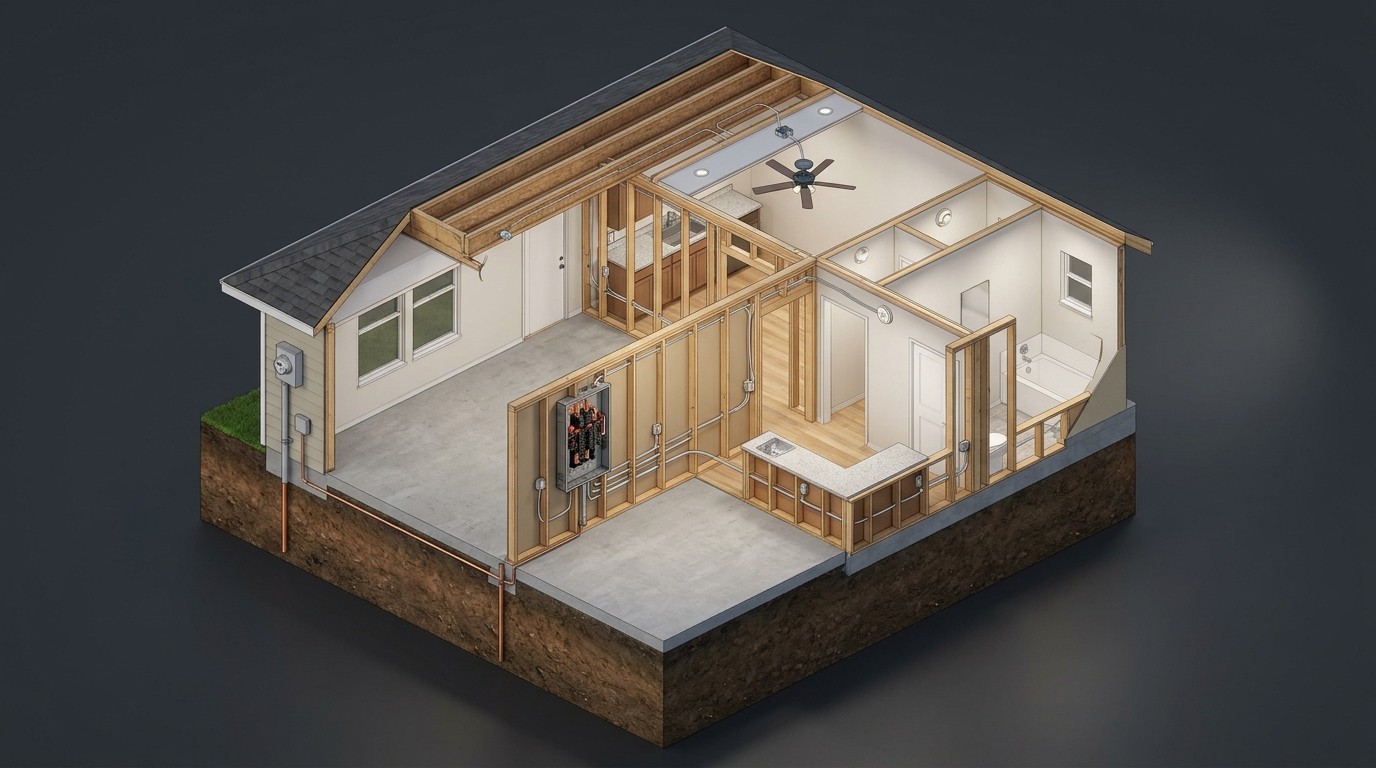
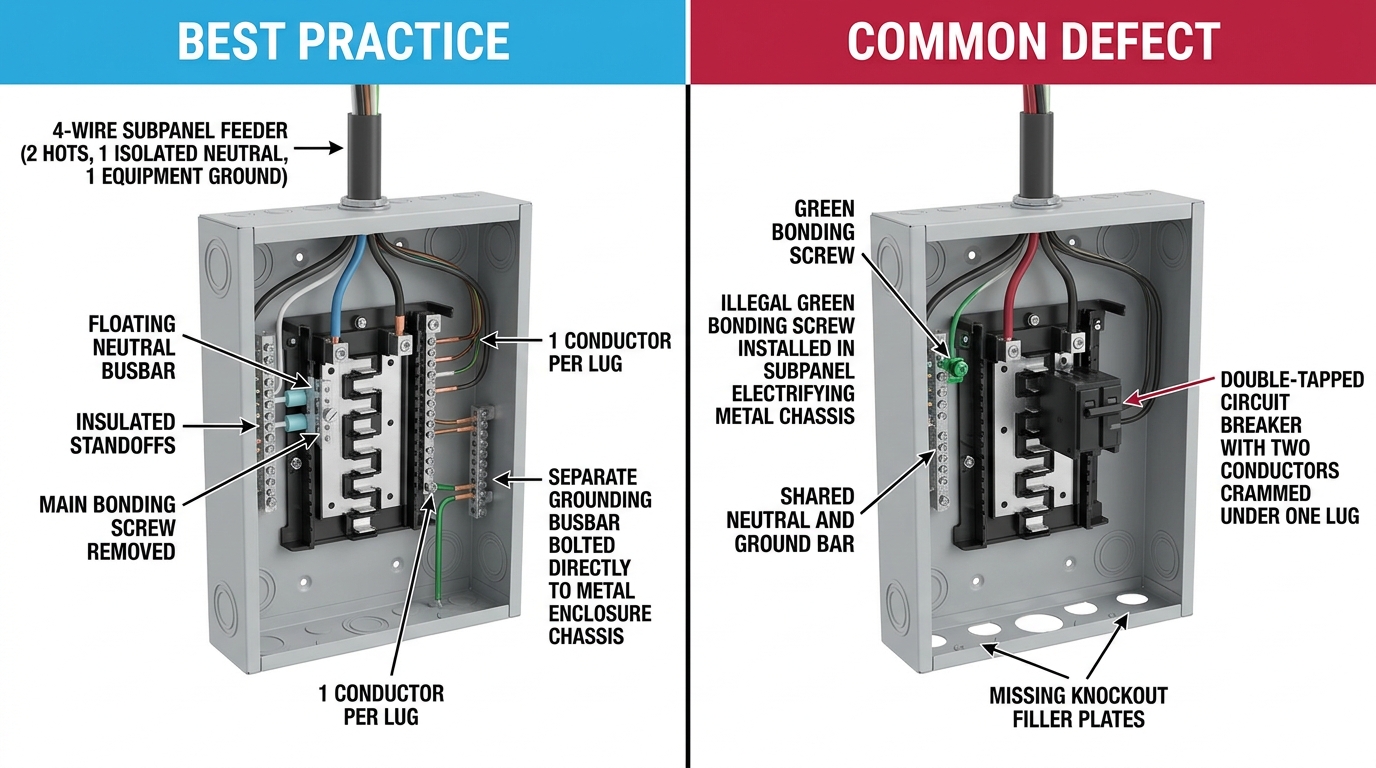
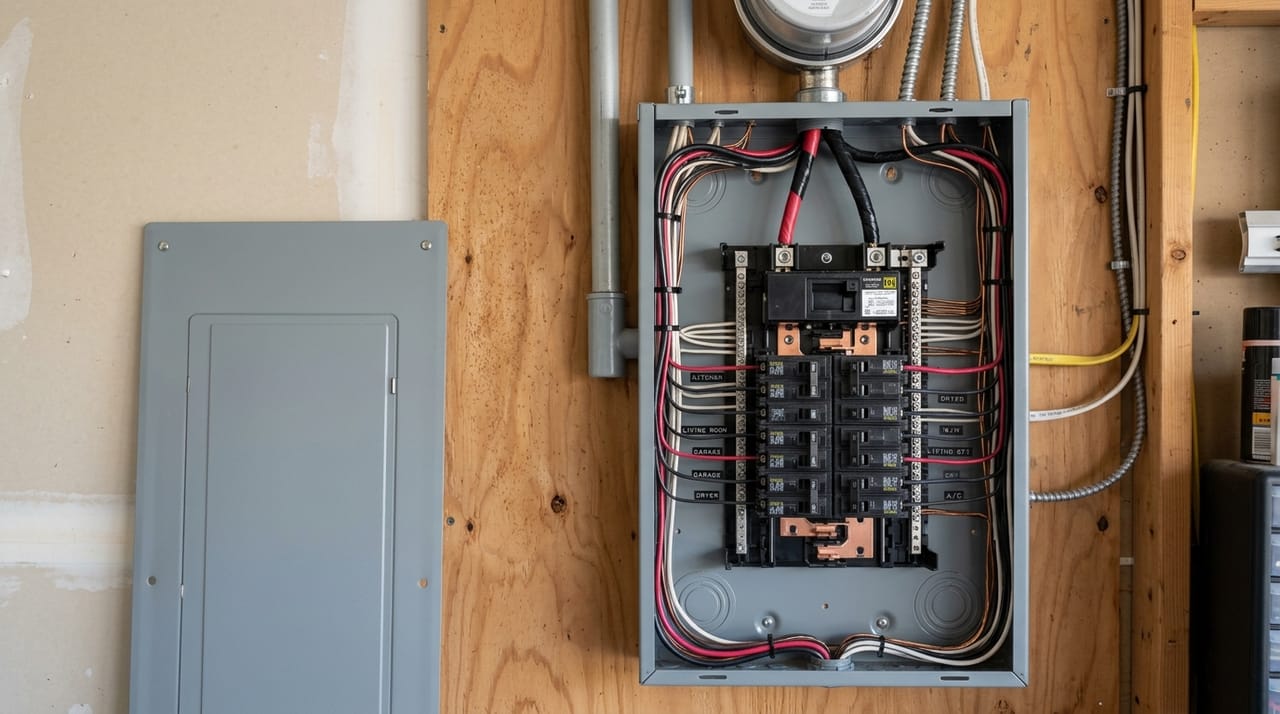
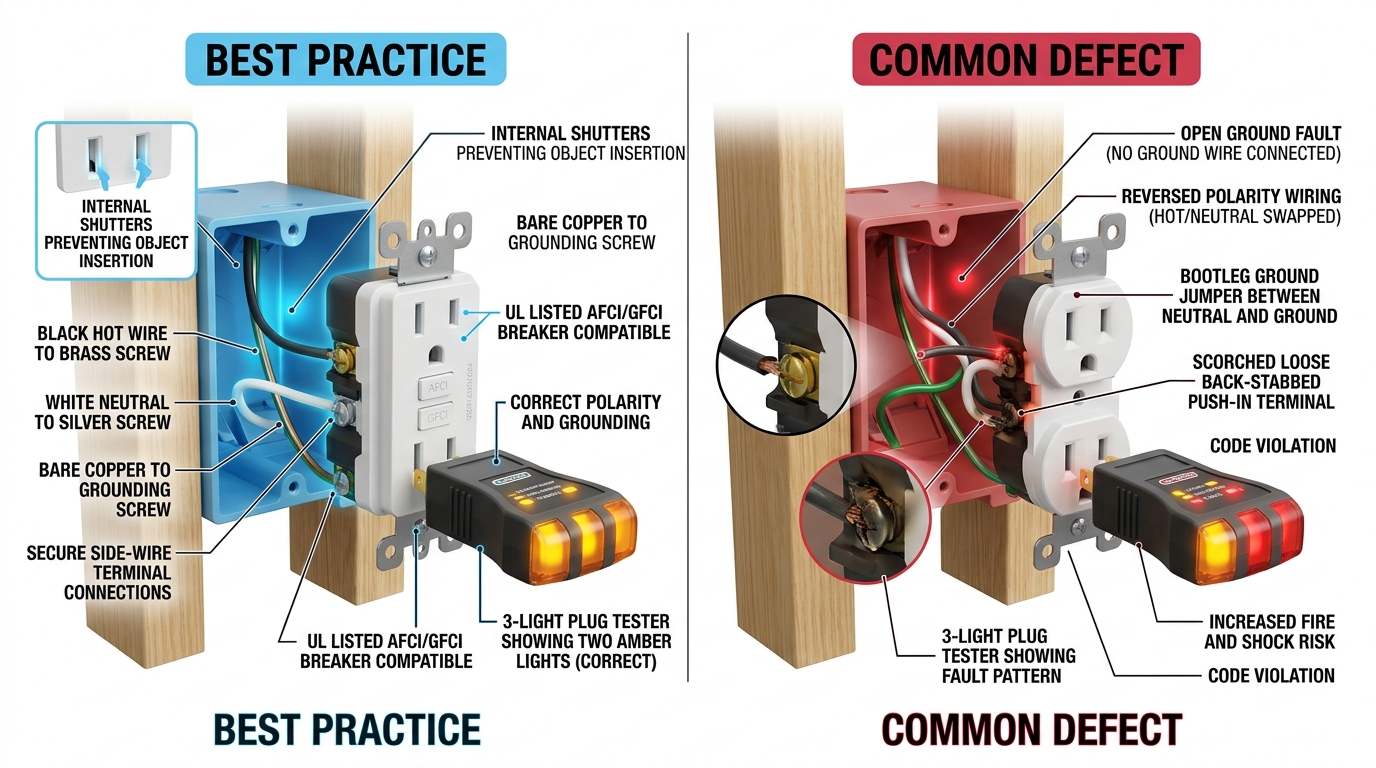
Dr. Charles Lehnhoff, MHA, MS, PhD, CA(TDA), LRA(DHHS), MAC(TDLR), MLS(ASCP), MRC(TDLR), PRI(TREC), RESA(TREC) (Texas Professional Inspector Lic. #23070) is the Laboratory Director and Principal Building Scientist at Secured Inspections LLC, a U.S. Veteran-owned Texas property inspection and environmental diagnostics firm.
Educational Disclaimer: This reference book is published for educational and informational purposes only. Building assemblies, local municipal code amendments, and site conditions vary across Texas. Always consult a licensed professional inspector (Lic. #23070), structural engineer, or licensed MEP contractor for site-specific evaluations.
Visual Reading Key & Guide Icons
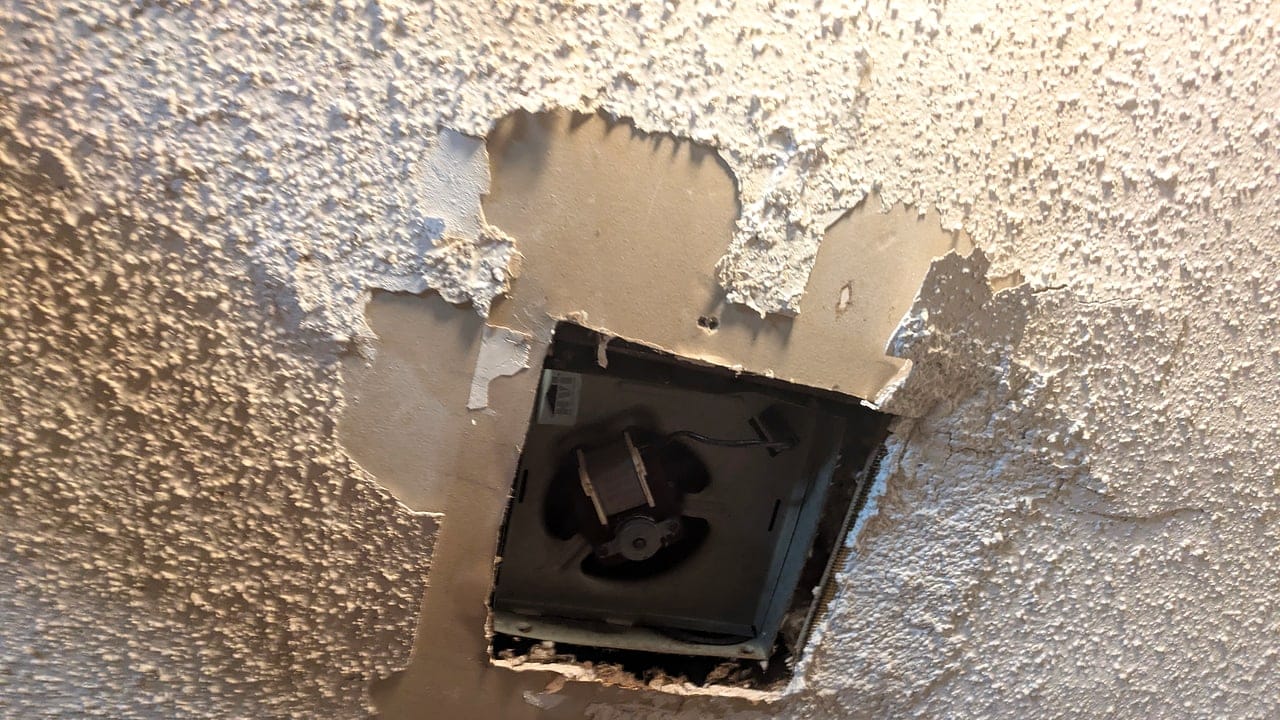
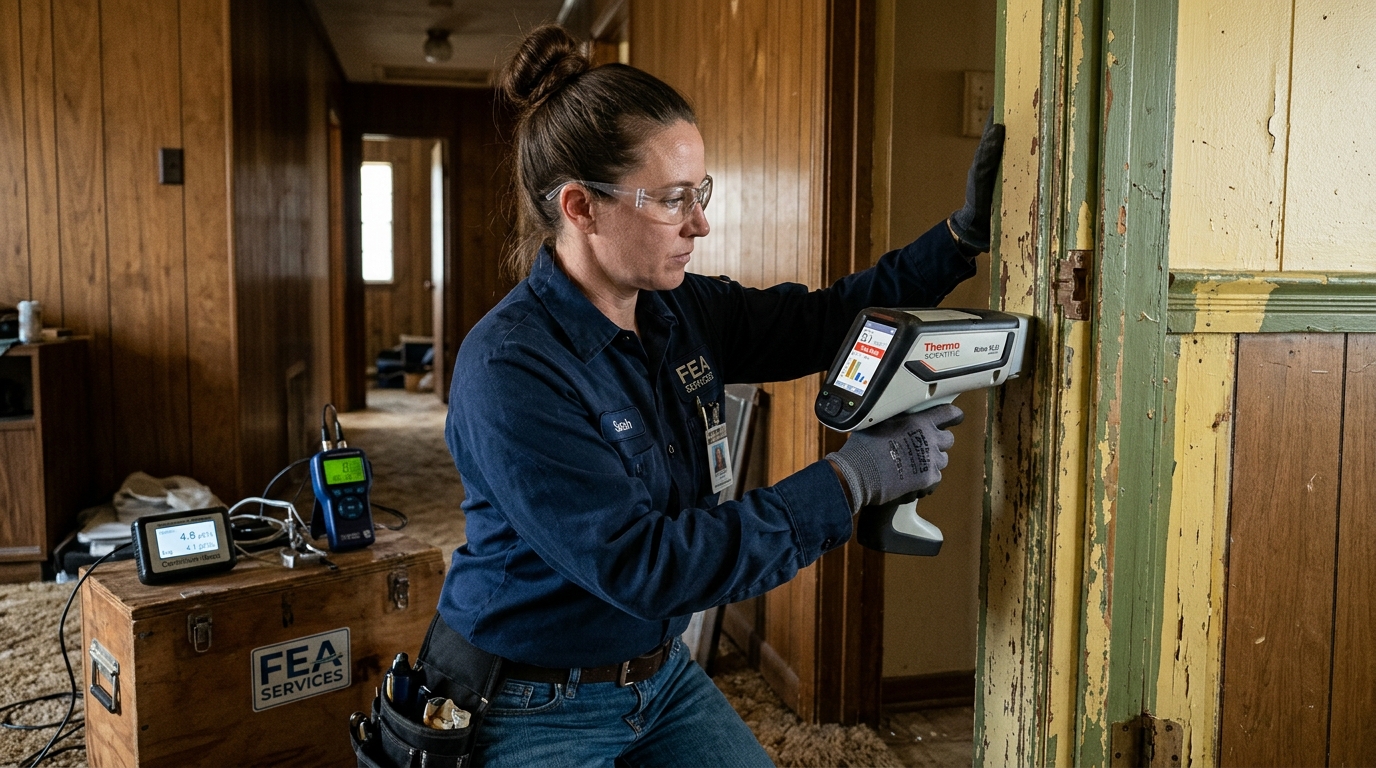
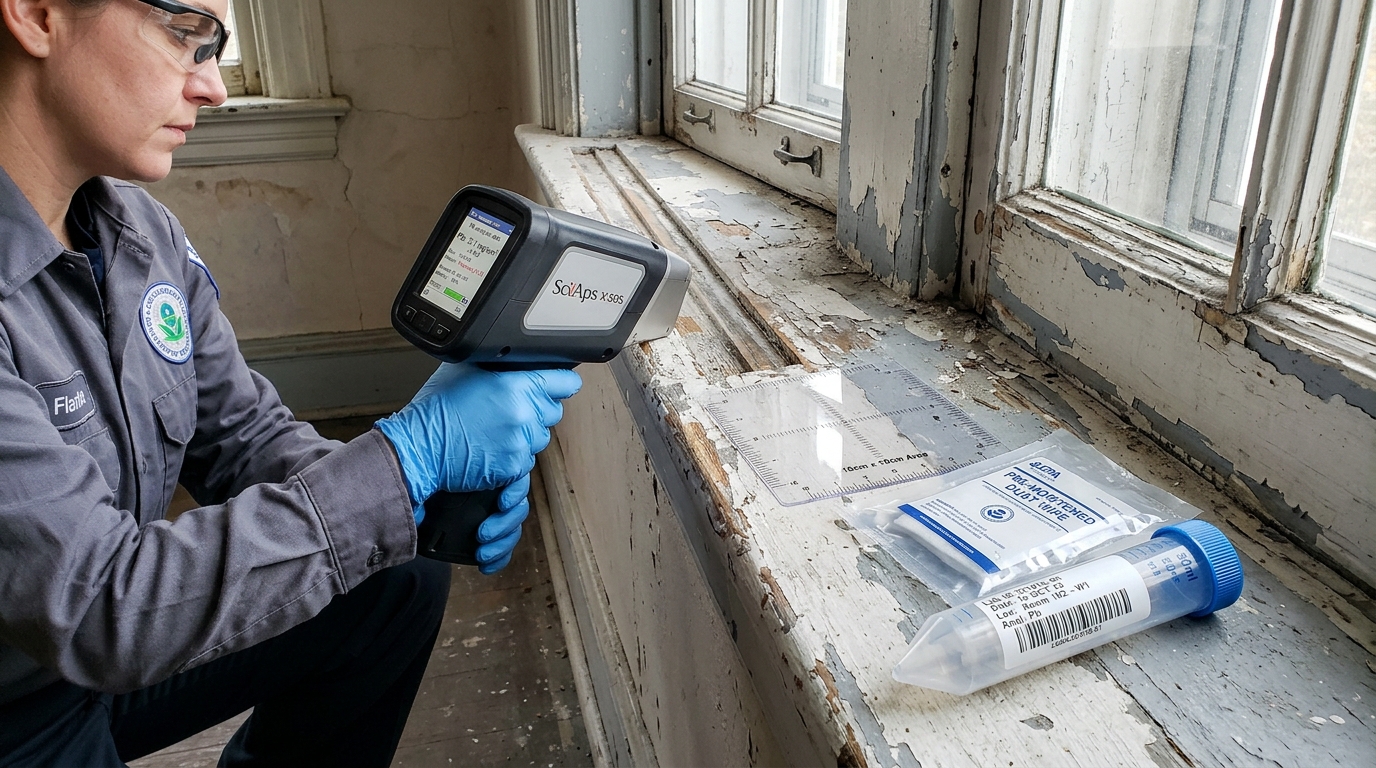
Real-Life Field Photography124+ on-site Texas inspection photos documenting assemblies, defects, and maintenance.
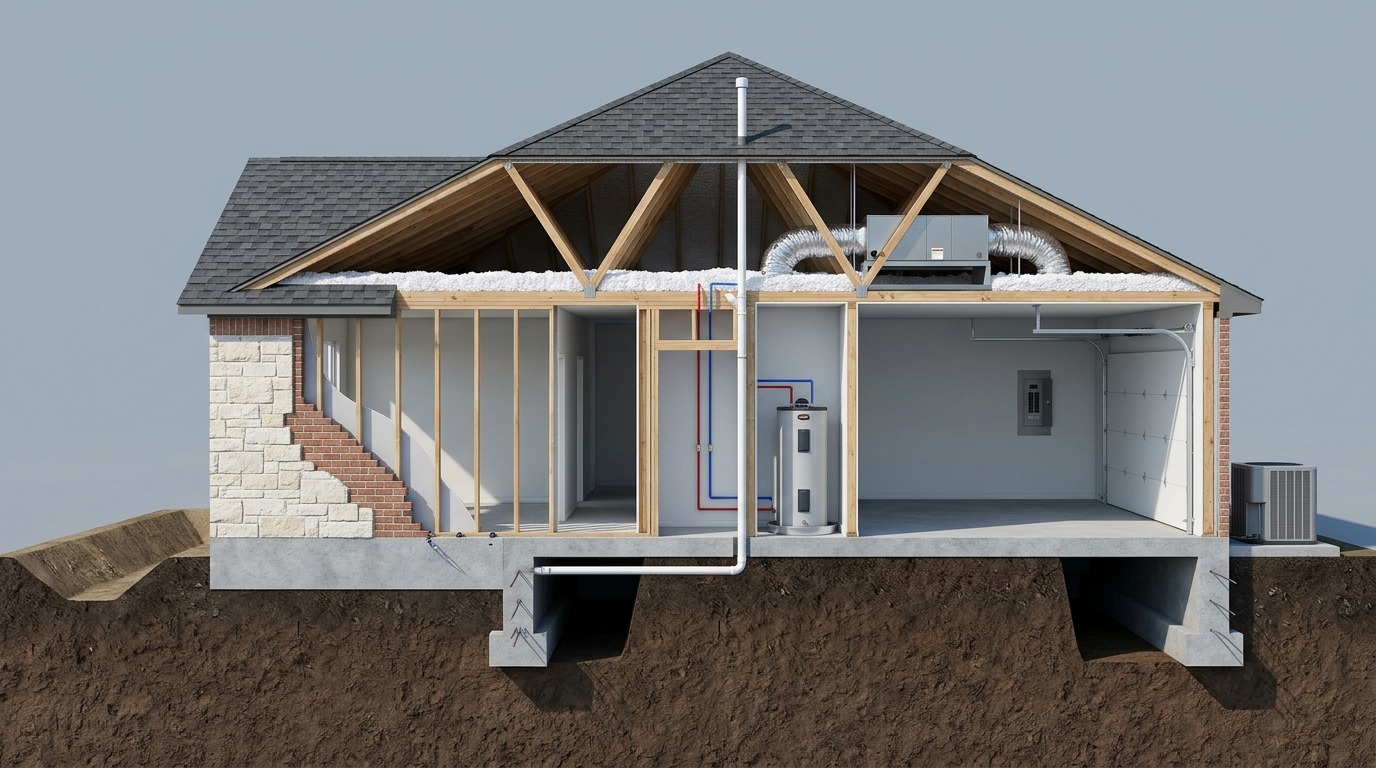
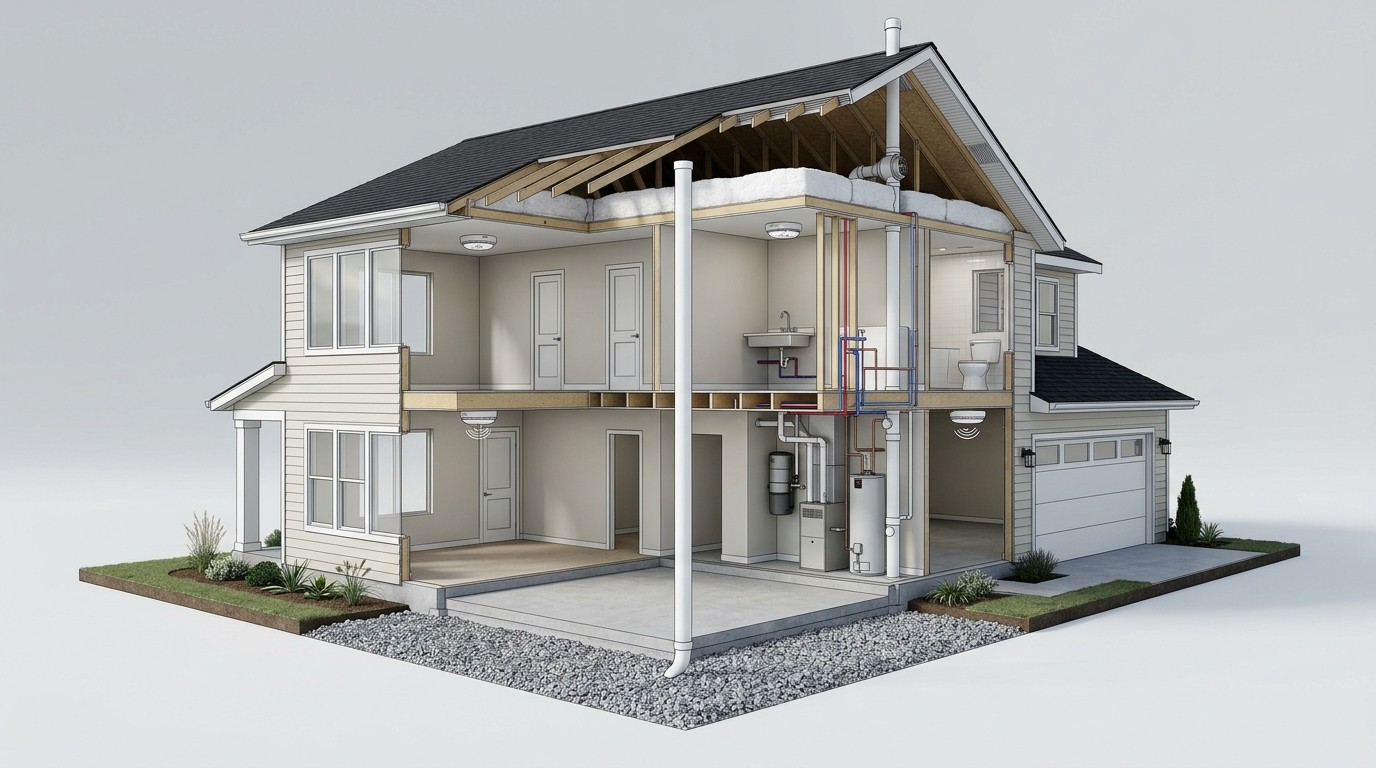
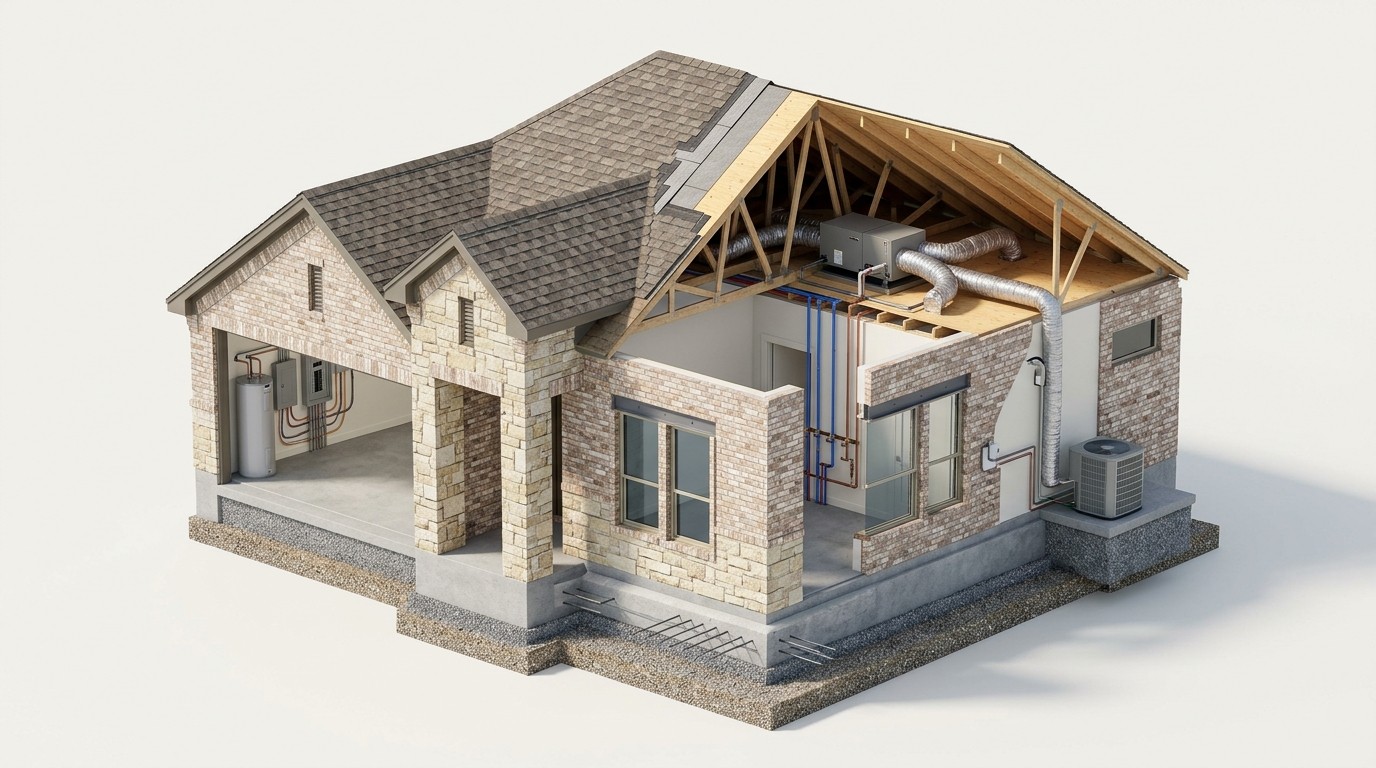
Studio 3D Architectural CutawaysPhotorealistic cross-sections comparing code-compliant installation vs. common hazards.
Building Code Reference InsertOfficial model code standards (IRC, NEC, ISPSC) with plain-English translations.
Interactive Checklists • Video Procedures • Emergency Guides
Scan with your smartphone camera for instant mobile access to the interactive inspection book, emergency shutoff videos, and real-time Texas building code updates.
Third Edition (Visual Magazine & Print Reference Volume) — Includes 11 system chapters, 62 assembly deep dives, 2021/2024 IRC & 2023 NEC model code translations, psychrometric & thermal case studies, glossary, and subject index.
Houston, Texas • Secured Inspections® Publishing
Critical 48-Hour Emergency Home Shutoffs
Locate, test, and tag these four primary residential shutoffs within 48 hours of taking possession of any Texas home.
Every Homeowner Must Know
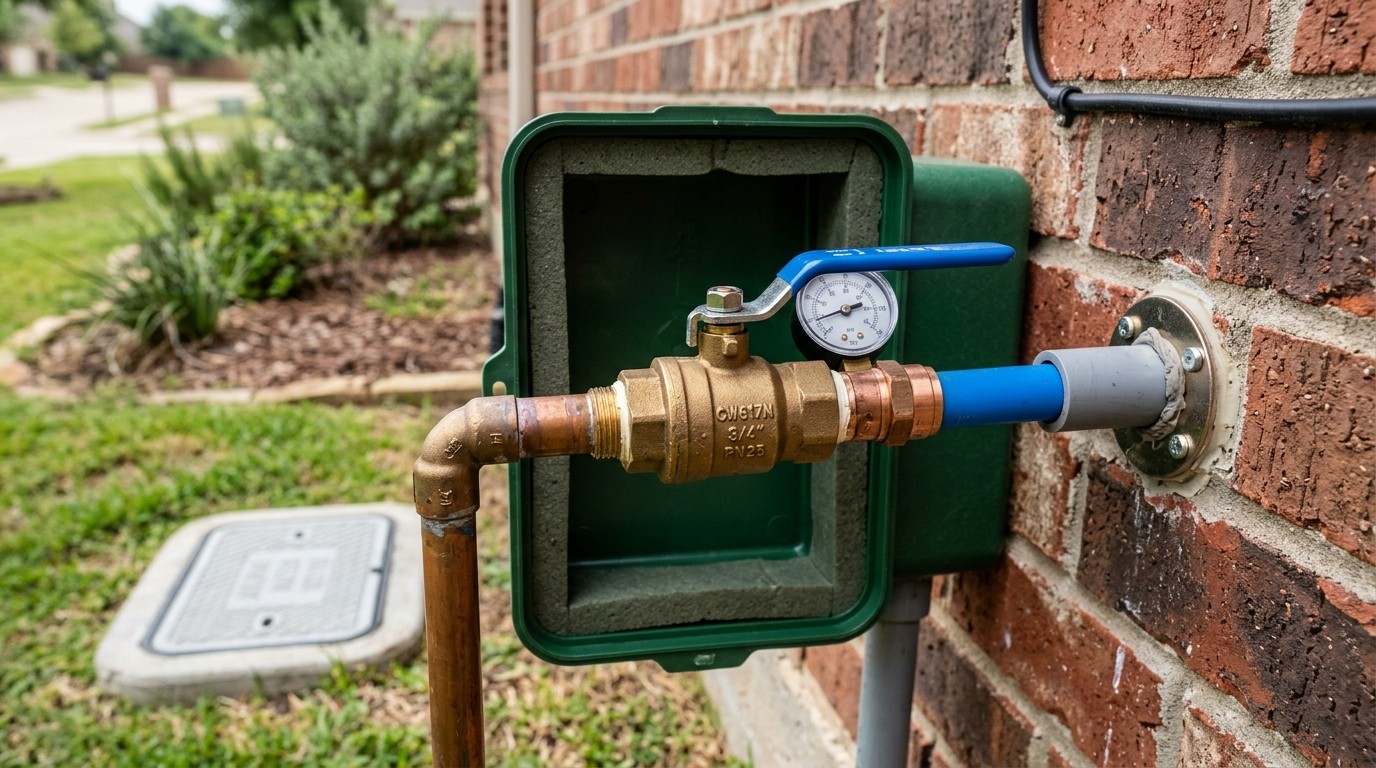
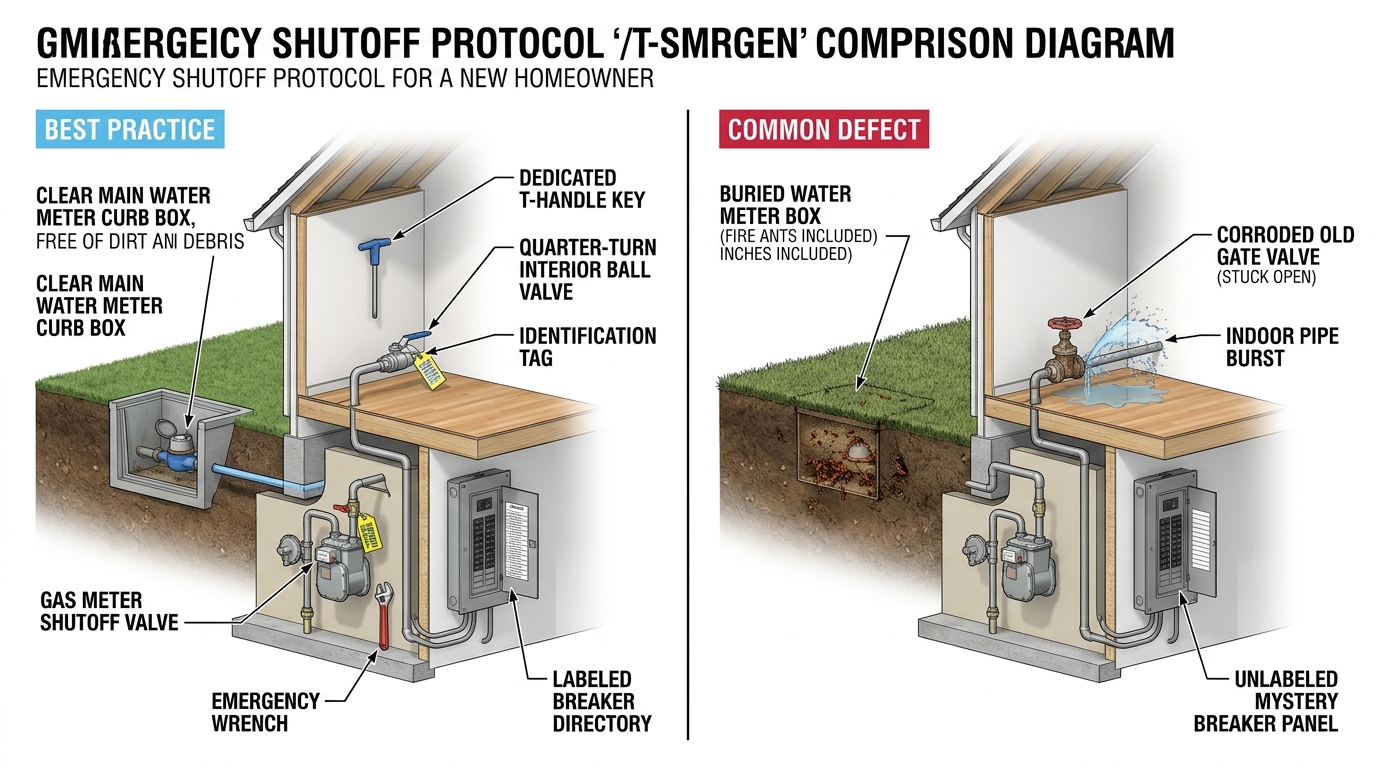
Main Water Shutoff ValveSHUTOFF 1
Location:Typically located in a ground meter box near the front curb, or where the main water line enters the home (often near an exterior hose bib or garage).
Operation:Turn the brass ball valve handle 90 degrees until perpendicular to the pipe (or use a meter curb key on municipal valves) to stop all incoming water immediately during a freeze or pipe burst.
Warning: Test your main shutoff valve annually to ensure it does not freeze or bind from mineral buildup.
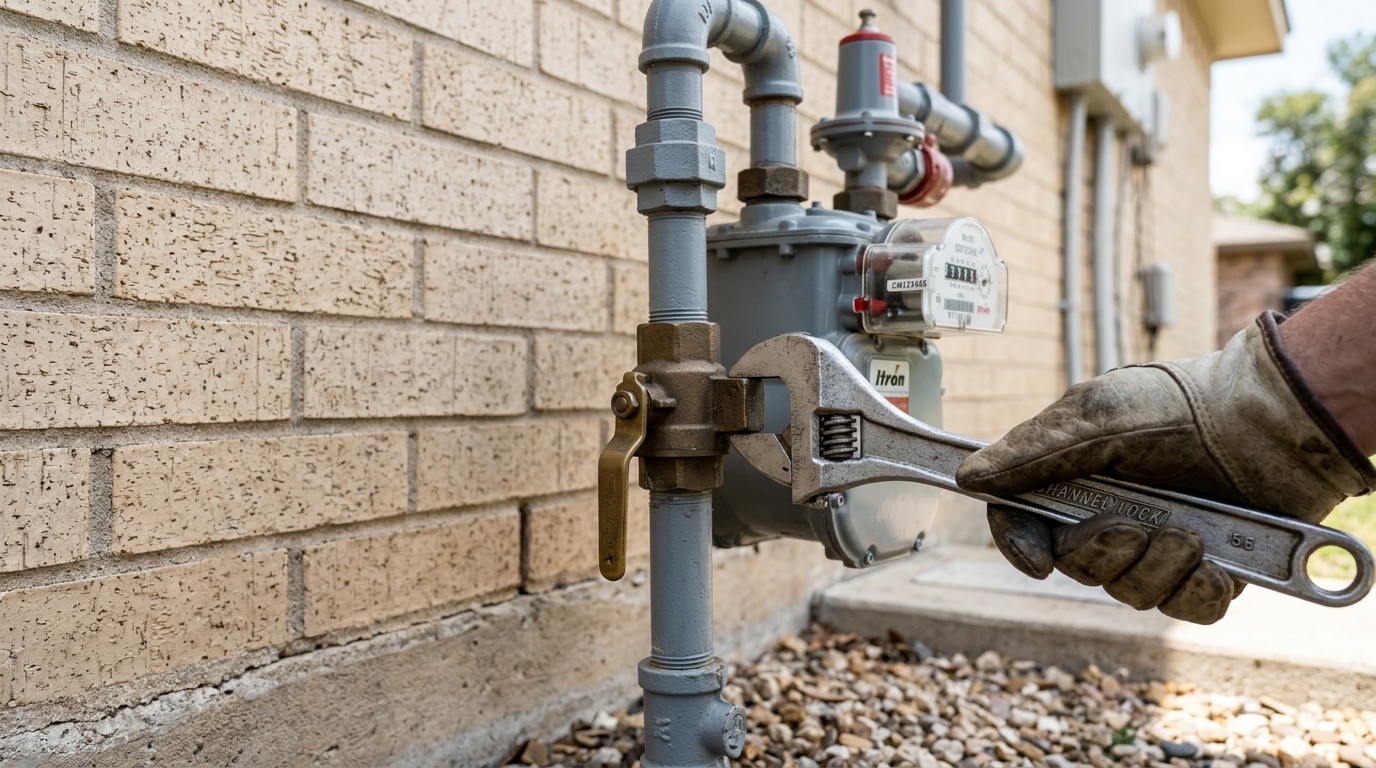
Natural Gas Meter & Main ValveSHUTOFF 2
Location:Located at the exterior gas meter manifold along an exterior wall of the home.
Operation:Use an adjustable wrench to turn the rectangular valve lug one-quarter turn so the lug is perpendicular to the gas pipe.
Warning: Only shut off gas if you smell gas or suspect a leak. Once shut off, do not turn gas back on yourself; call your utility company or a licensed plumber.
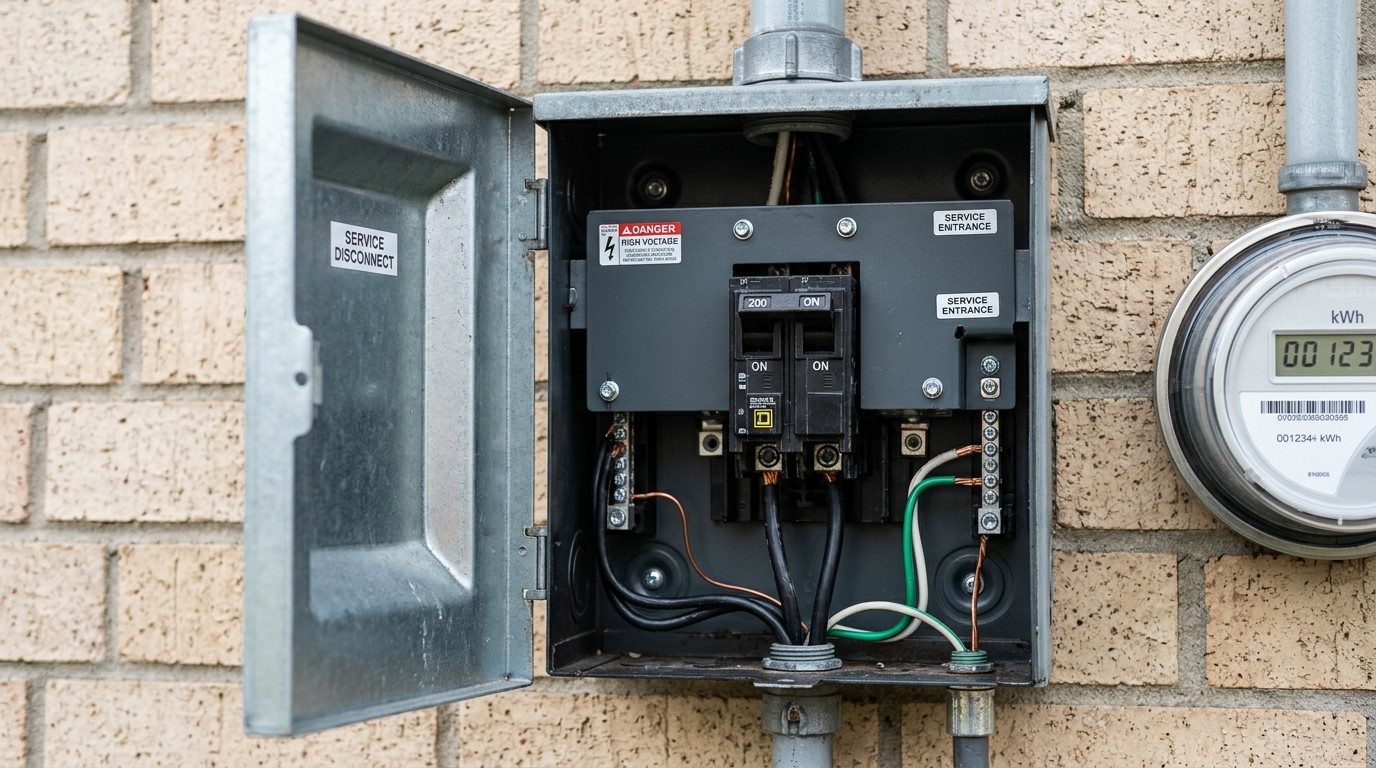
Electrical Service DisconnectSHUTOFF 3
Location:Located at the main exterior service panel next to the electric utility meter or at the top of the main breaker panel.
Operation:Firmly switch the large two-pole main service breaker (typically 150A to 200A) to the OFF position. This de-energizes all electrical circuits in the home.
Warning: Stand to the side and wear safety glasses when operating large main breakers. Never touch wet electrical panels.
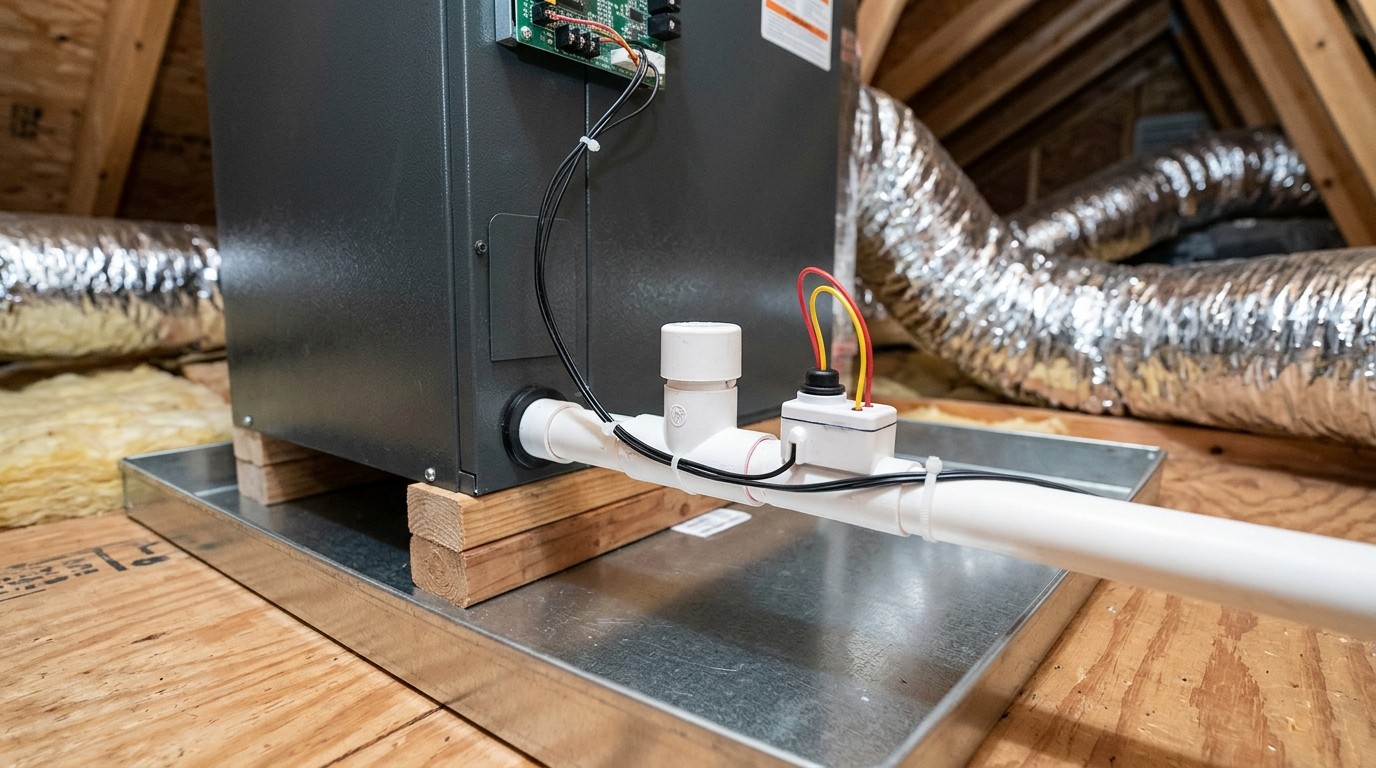
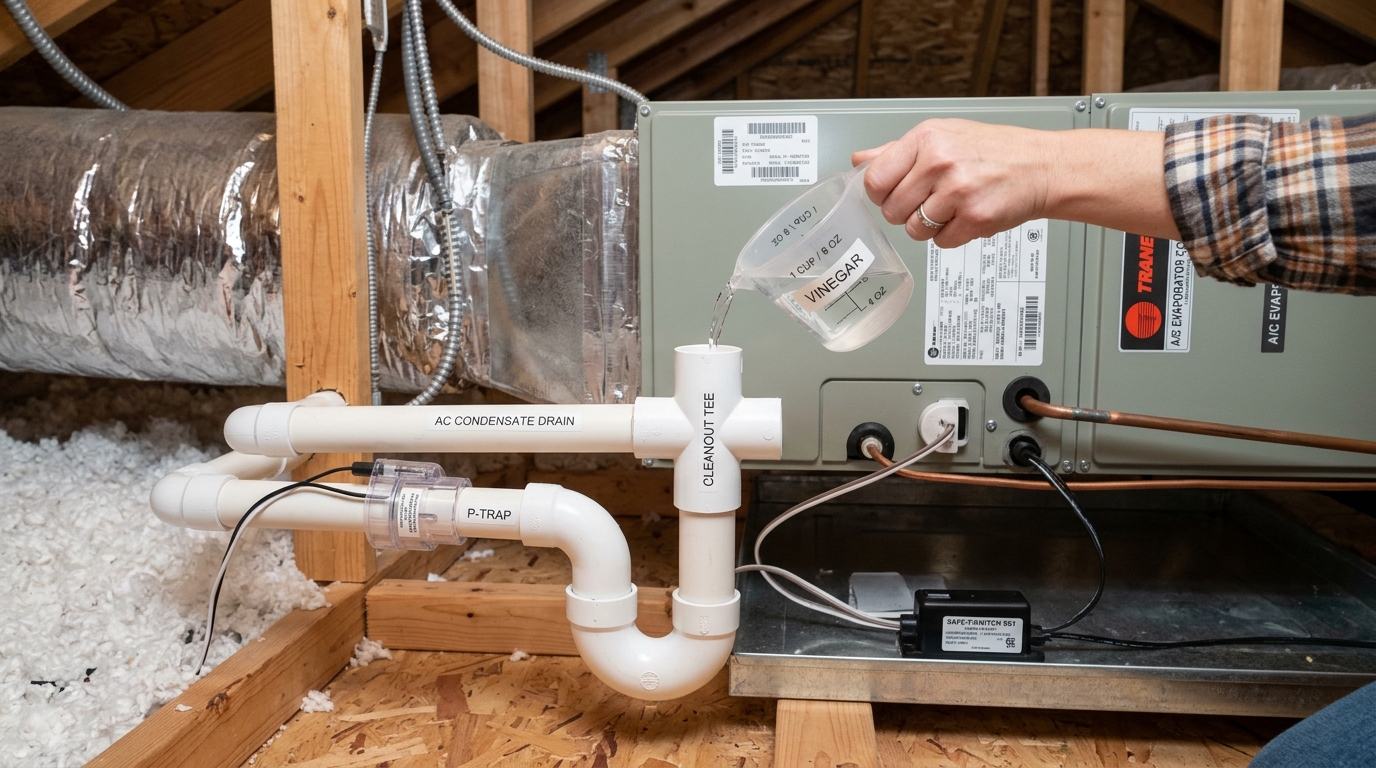
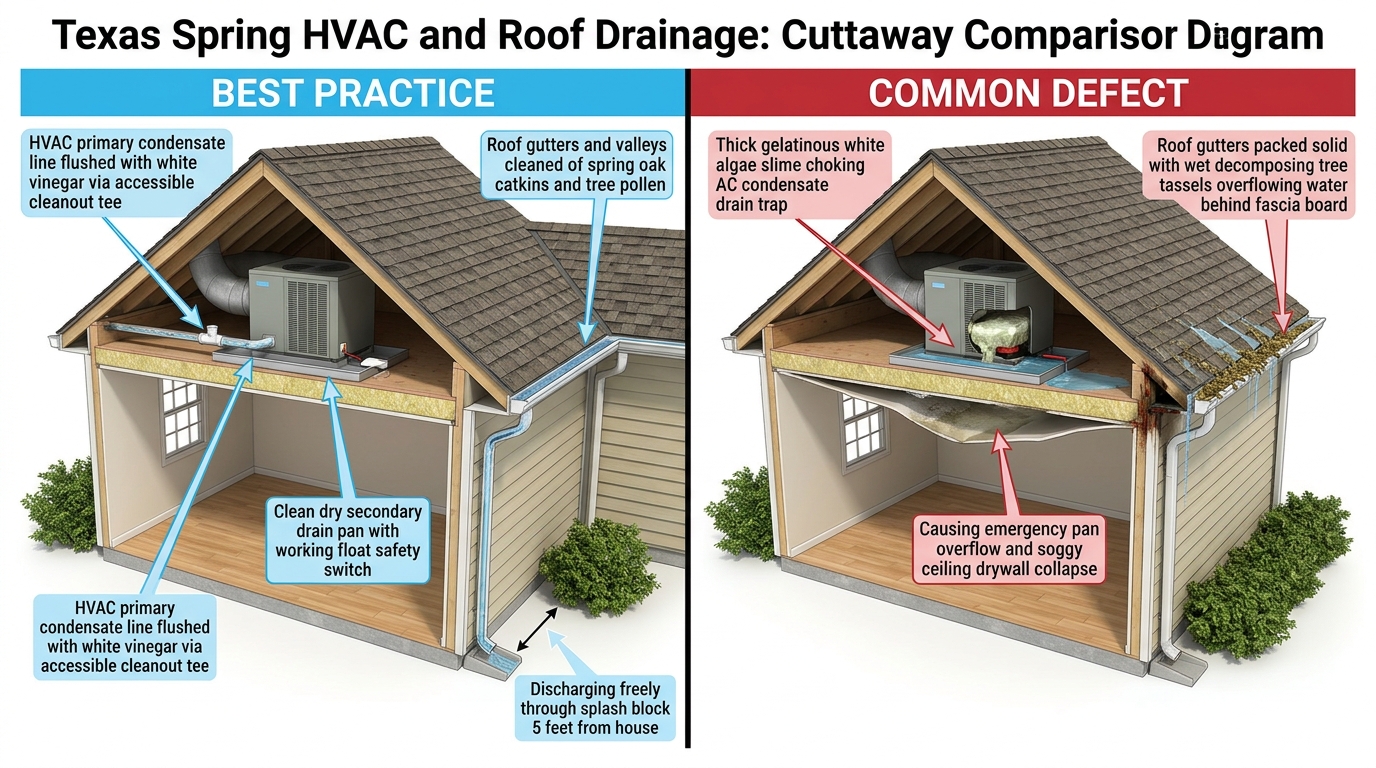
Air Conditioner Primary Condensate DrainSHUTOFF 4
Location:Located at the indoor air handler or evaporator coil drain pan in the attic or utility closet.
Operation:Pour 1 cup of distilled white vinegar into the primary drain cleanout tee every 30 to 60 days during cooling season to clear algae and prevent drain backups.
Warning: A backed-up condensate drain can trip the secondary float switch, shutting down your AC, or overflow and ruin ceilings.
Welcome Home: A Letter to Texas Homeowners
Understanding the Living Machine That Is Your Texas Home
PROLOGUE • WELCOME HOMEA home is not a static object; it is a complex, interrelated system engineered to shelter your family against extreme climate stresses.
Buying a home in Texas is one of the most rewarding milestones of American life. It is where memories are created, children grow, and generational equity is established. Yet, the moment the transaction closes and the keys are placed in your hand, a quiet reality sets in: a home is not merely four walls and a roof. It is a living, breathing mechanical and structural system that interacts continuously with its environment.
Texas homes operate in one of the most demanding environmental crucibles on the North American continent. In a single calendar year, a home along the Gulf Coast or across North and Central Texas can experience 105°F heatwaves, prolonged summer droughts that contract heavy clay soils like stone, sudden tropical deluges dropping ten inches of rain in hours, destructive baseball-sized hail, and sub-freezing Arctic cold snaps that turn uninsulated plumbing into ice. Every component in your home—from the post-tension concrete slab beneath your feet to the ridge vents crowning your roof—was engineered to withstand these stresses, but only if properly understood, monitored, and maintained.
Throughout thousands of professional property inspections across Texas, we observed a consistent pattern: homeowners rarely suffer catastrophic structural or mechanical failures without warning. Instead, homes speak to us in subtle signals long before major failures occur. A hairline diagonal crack in drywall near a doorframe, a faint damp ring on a ceiling under an attic coil, a missing kickout flashing diverting rainwater behind brick veneer, or mulch piled too high against foundation weep holes—these are the quiet indicators that distinguish minor preventative maintenance from multi-thousand-dollar repairs.
This book was written to be your companion throughout your homeownership journey. We stripped away regulatory inspection checkboxes and statutory legal jargon, replacing them with clear, visual building science explanations of how your home actually works. For every major assembly, you will find four practical dimensions: how the system operates, what visible defects to look for, how Texas weather and expansive soils test it, and concrete maintenance steps to protect it.
At the end of each section, we have included an official building code reference card modeled on the International Residential Code (IRC) and National Electrical Code (NEC). These cards provide the exact technical standard used by professional builders and inspectors, paired with a one-sentence plain-English translation so you always have the authoritative benchmark at your fingertips.
Your home is likely your most significant financial asset and the sanctuary of your family. Treat this book as an owner's operating manual. Learn the location of your emergency shutoffs, observe the changes in your yard as the seasons turn, and take pride in the stewardship of your home. Welcome to Texas homeownership—we are honored to stand with you as your trusted reference.
Dr. Charles Lehnhoff, MHA, MS, PhD, CA(TDA), LRA(DHHS), MAC(TDLR), MLS(ASCP), MRC(TDLR), PRI(TREC), RESA(TREC)Laboratory Director & Principal Building ScientistSecured Inspections LLC • Houston, Texas
Table of Contents
Jump directly to visual diagnostics, regional Texas climate guides, any of the 11 residential building systems, 62 technical topic deep dives, or homeowner logs and glossary below.
BUILDING SCIENCE DIAGNOSTICS • NON-INVASIVE THERMOGRAPHY
Beyond the Naked Eye: How Infrared Thermography Reveals Hidden Defects
Side-by-Side Visible Light vs. Long-Wave Infrared (FLIR®) Field Comparisons Across Four High-Risk Home Systems
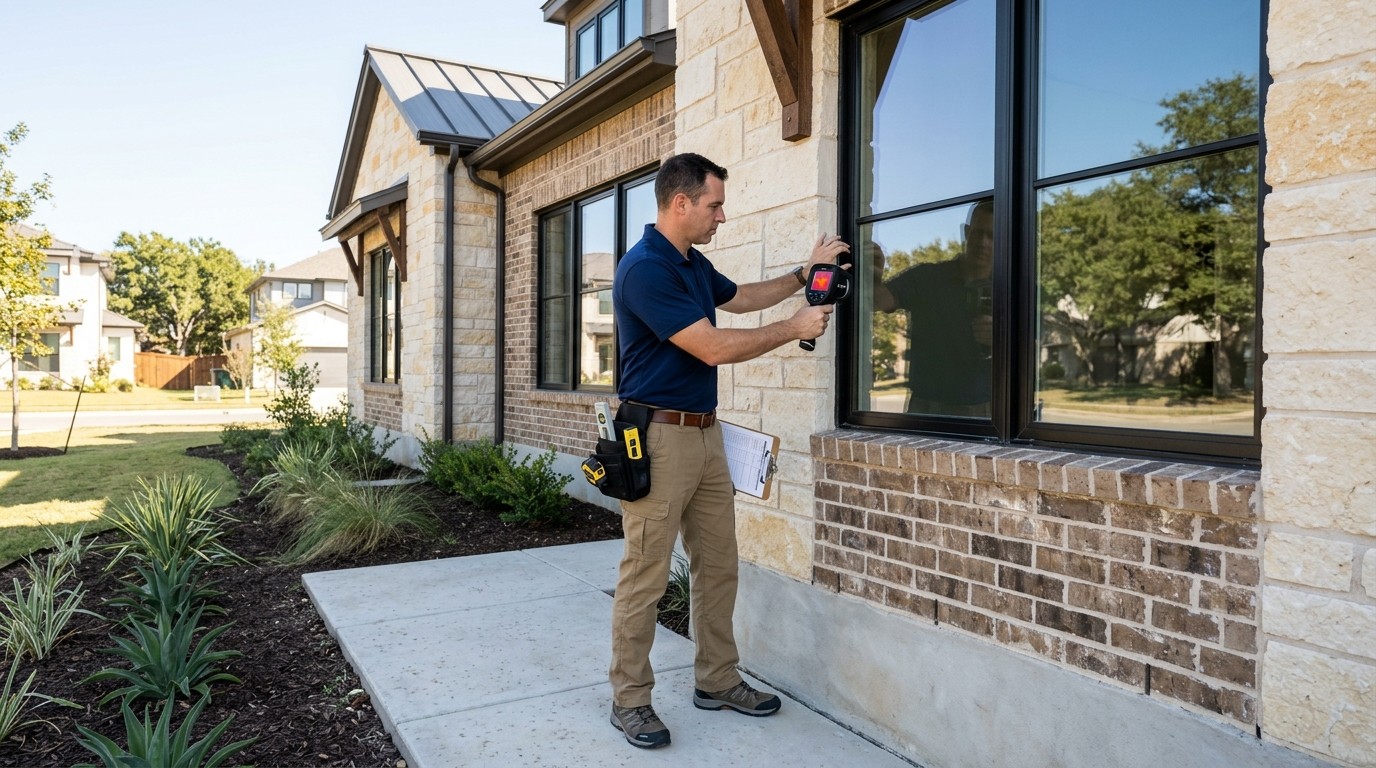
Fresh interior paint, pristine textured drywall, and closed metal breaker dead-fronts routinely conceal active residential failures until catastrophic water damage or electrical arcing occurs. High-resolution long-wave infrared cameras detect surface temperature differentials as subtle as 0.1°F—allowing trained building scientists to visualize evaporative moisture cooling, missing attic insulation, and overloaded electrical connections without cutting a single hole in your walls.
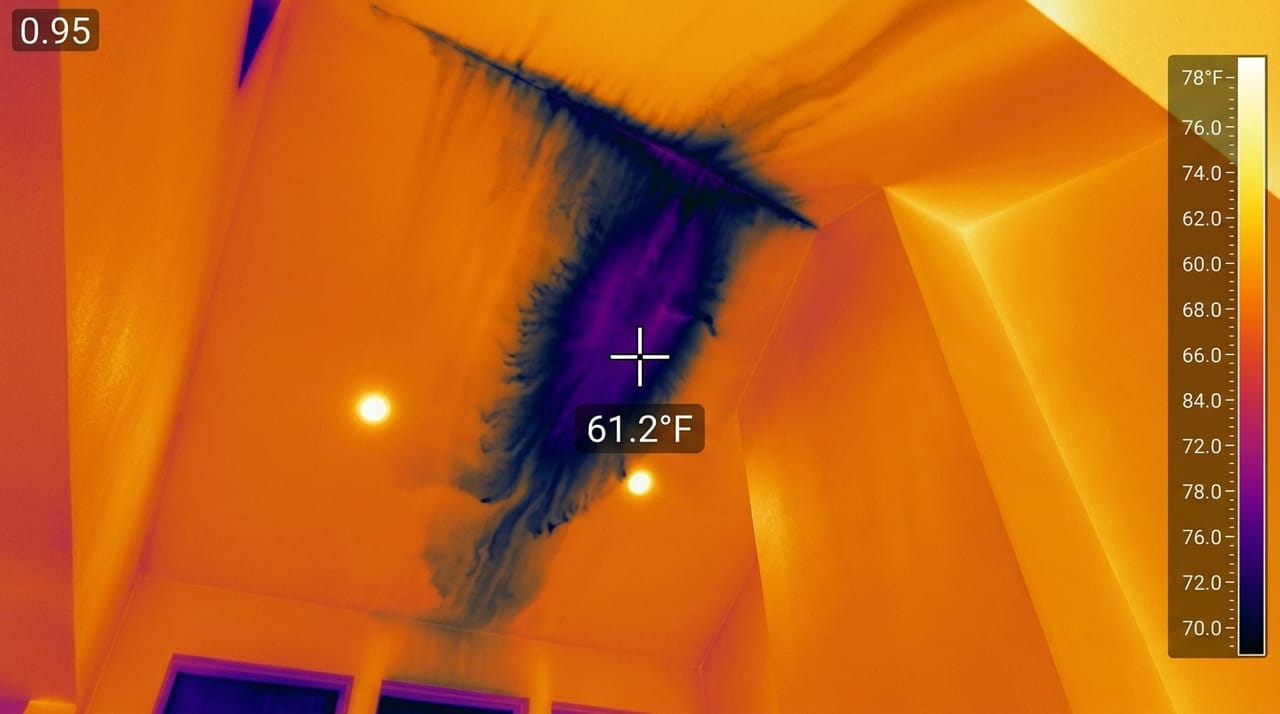
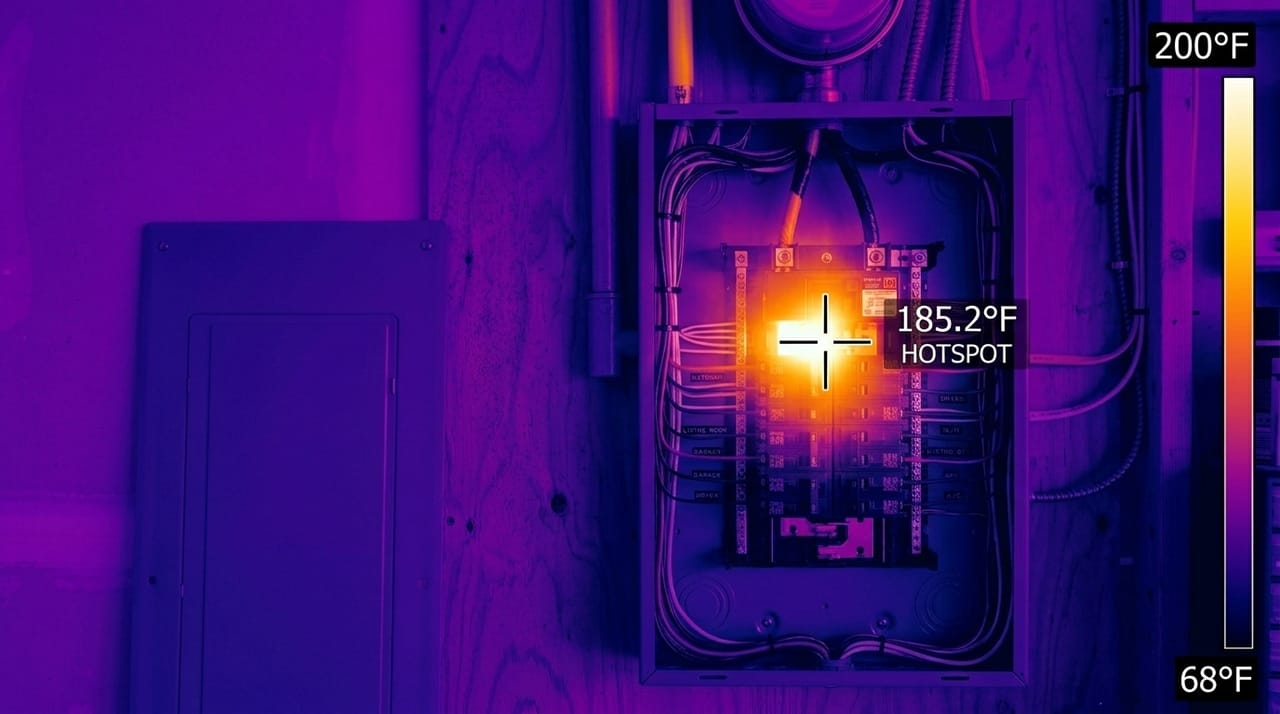
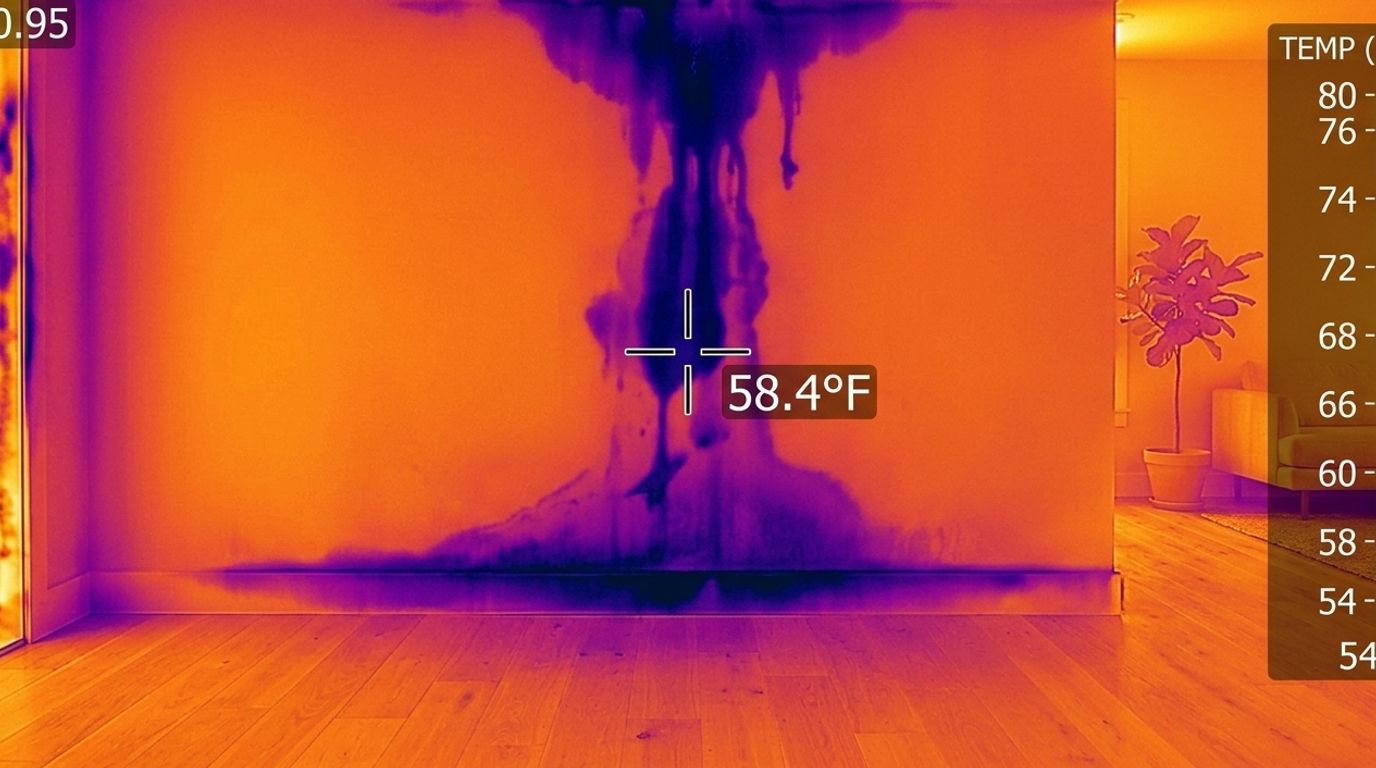
How Building Scientists Interpret Thermal SignaturesInfrared cameras do not “see through walls.” Instead, they map surface thermal radiation: wet drywall cools via evaporation (appearing dark violet/navy), while loose electrical lugs resist current flow and radiate intense heat (appearing bright white-hot). Every thermal anomaly is verified on-site with calibrated pinless capacitance and pin-type moisture meters or clamp ammeters.
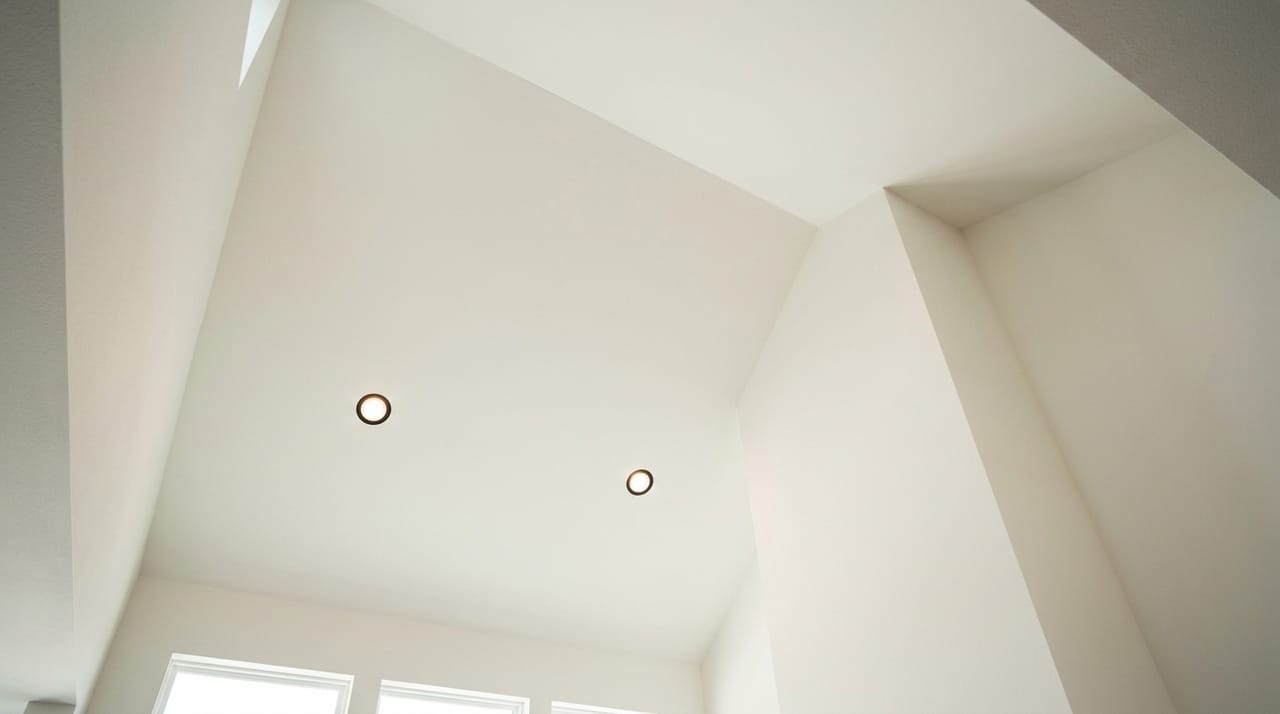
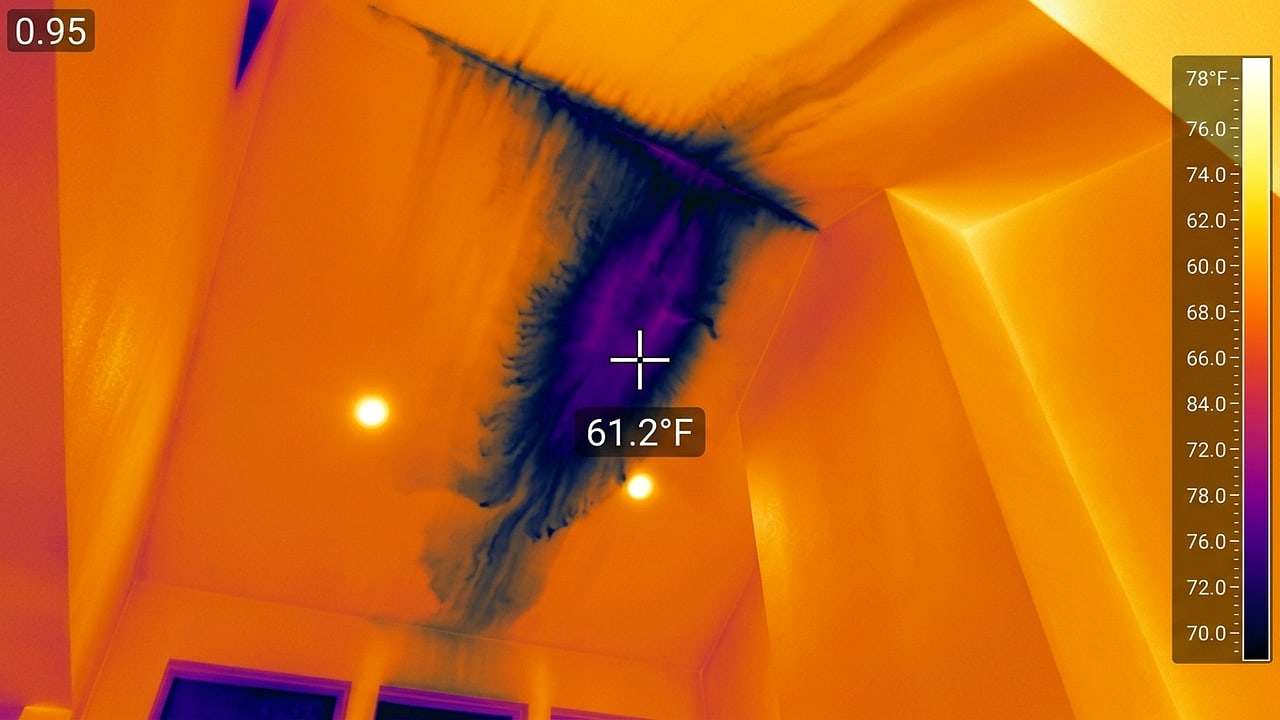
CASE 1 • ROOF & ATTIC ENVELOPE−14.8°F Evaporative Drop
Vaulted Ceiling Roof Valley Leak Invisible Under Fresh Paint
Visible Light
FLIR® • 61.2°F Wet Core
Side-by-Side Plate
Naked-Eye Illusion: Latex ceiling paint bridges damp gypsum paper for weeks before tannins bleed through or drywall tape sags.
Infrared Physics: Evaporating moisture absorbs latent heat from the gypsum board, creating a sharp cold-signature plume matching the rafter bay.
Homeowner Action: Confirm moisture with a non-marring pinless meter, inspect roof valley and pipe-boot flashings above, and dry the cavity within 48 hours to prevent mold.
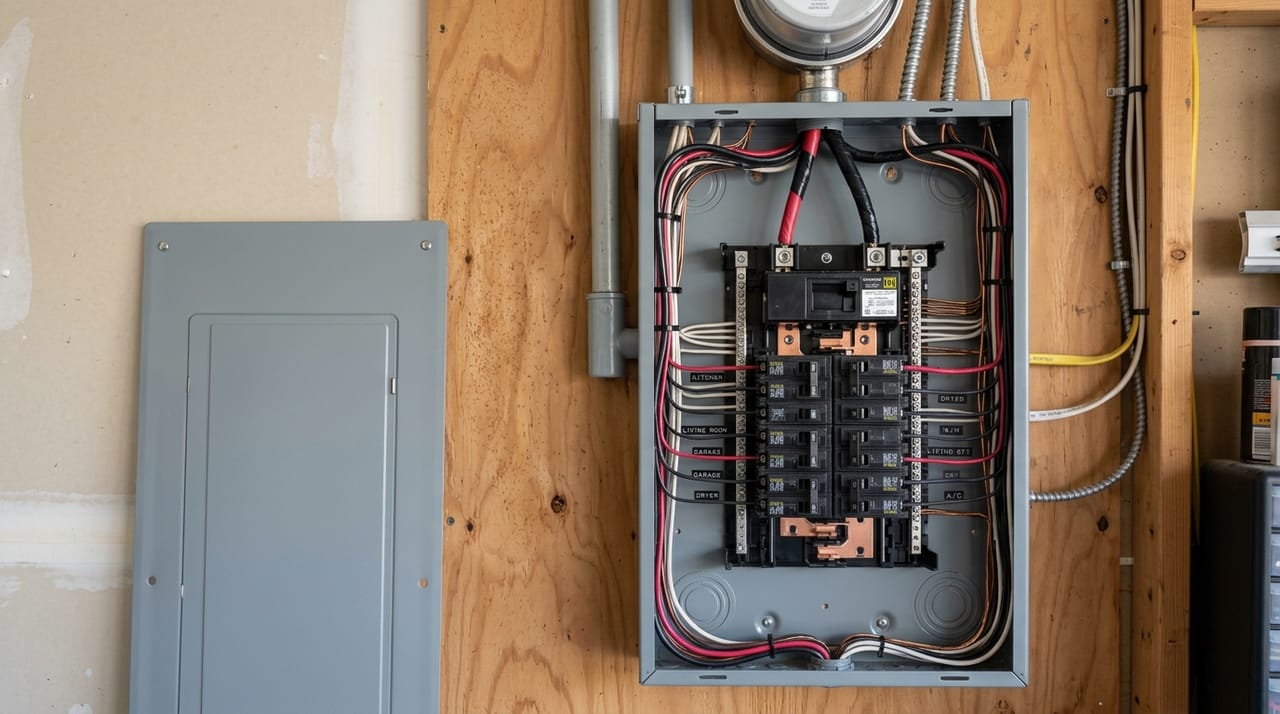
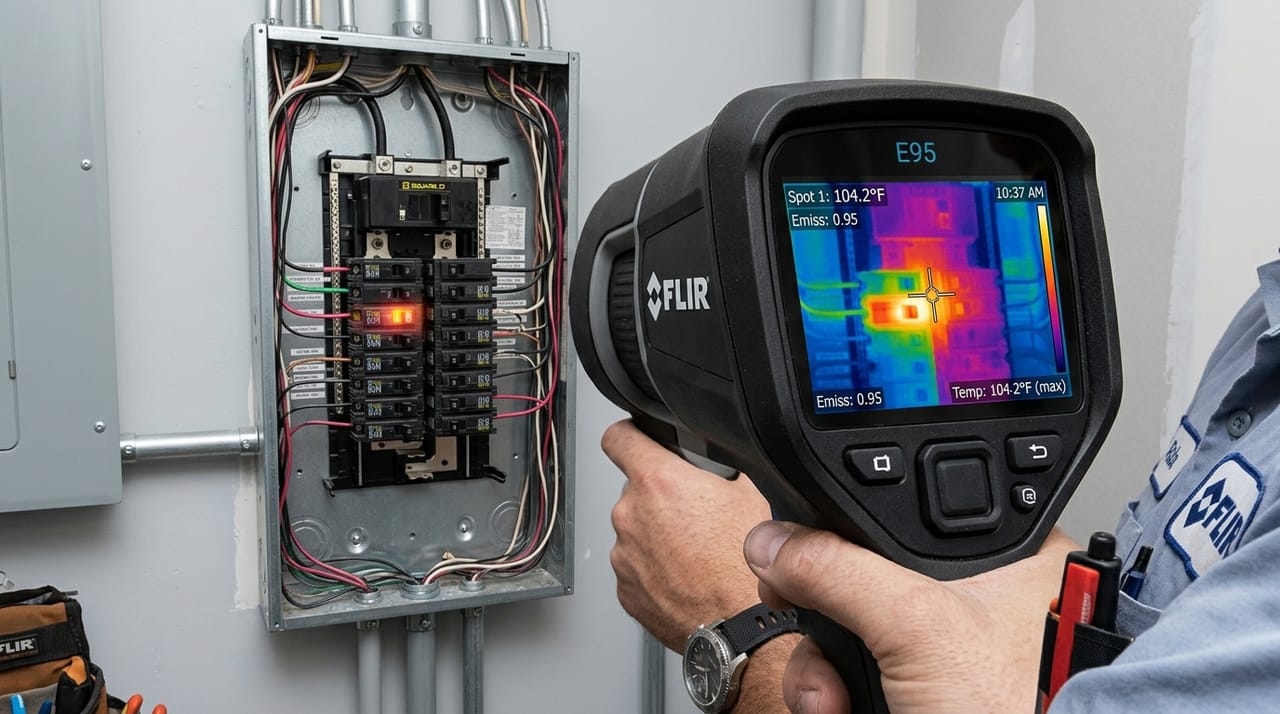
CASE 2 • ELECTRICAL SERVICE PANEL+117.2°F Above Ambient
Naked-Eye Illusion: Oxidized busbar stabs and under-torqued lugs hide beneath molded black thermoset breaker housings with no outward scorch marks.
Infrared Physics: Joule heating (I²R loss) across a loose connection converts electrical energy directly into concentrated heat under normal household load.
Homeowner Action: De-energize the affected circuit immediately and hire a licensed electrician to replace the heat-damaged breaker and inspect the copper busbar stab.
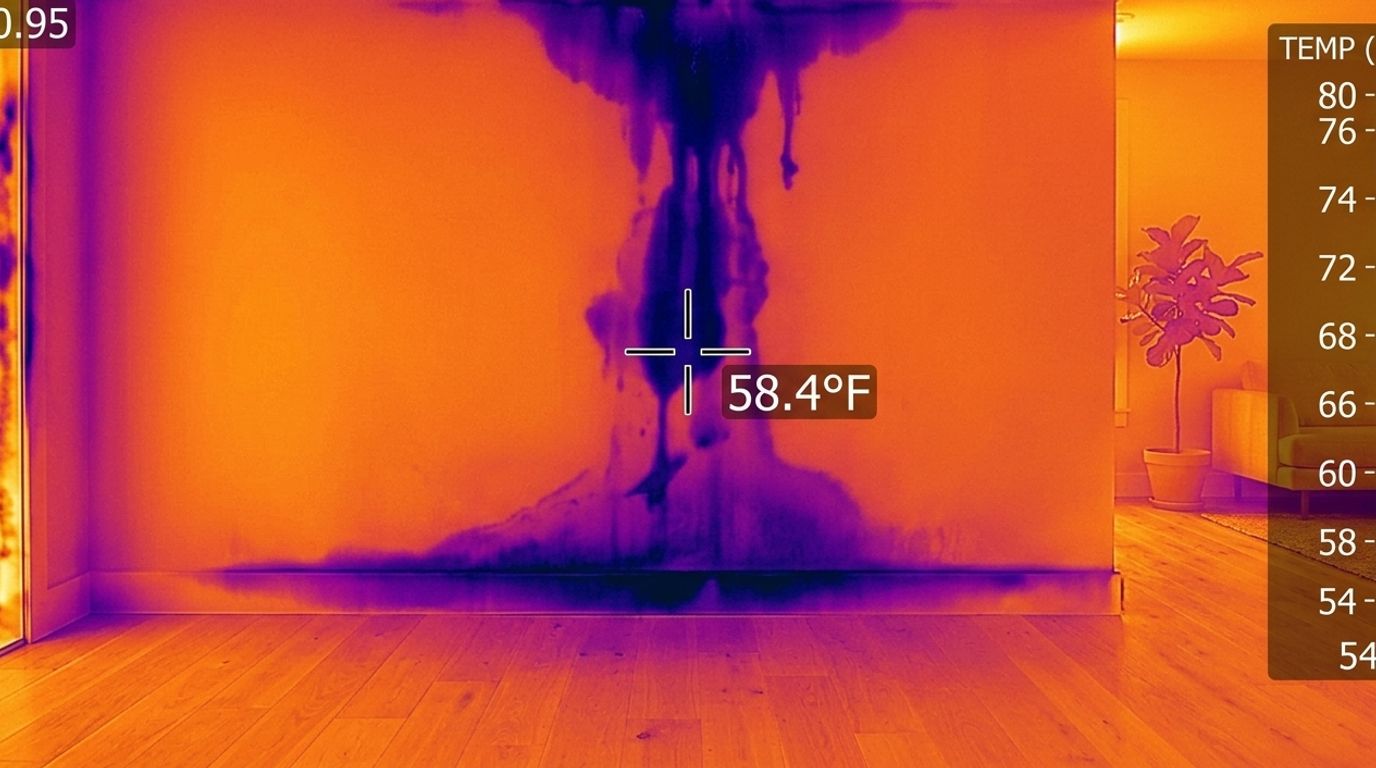
CASE 3 • INTERIOR PLUMBING CAVITY−17.6°F Moisture Plume
Concealed In-Wall Plumbing Pinhole Leak Pooling at Baseboard
Visible Light
FLIR® • 58.4°F Stud Cavity
Side-by-Side Plate
Naked-Eye Illusion: Slow PEX crimp weeps or upstairs shower-pan leaks wet the backside of drywall and wood sill plates weeks before wood floors cup.
Infrared Physics: Cool municipal supply water and capillary wicking chill the gypsum board and baseboard trim along the exact gravity drainage path.
Homeowner Action: Shut off the branch manifold or main water valve, open a targeted access port to repair the fitting, and run dehumidification until wood studs read below 16% MC.
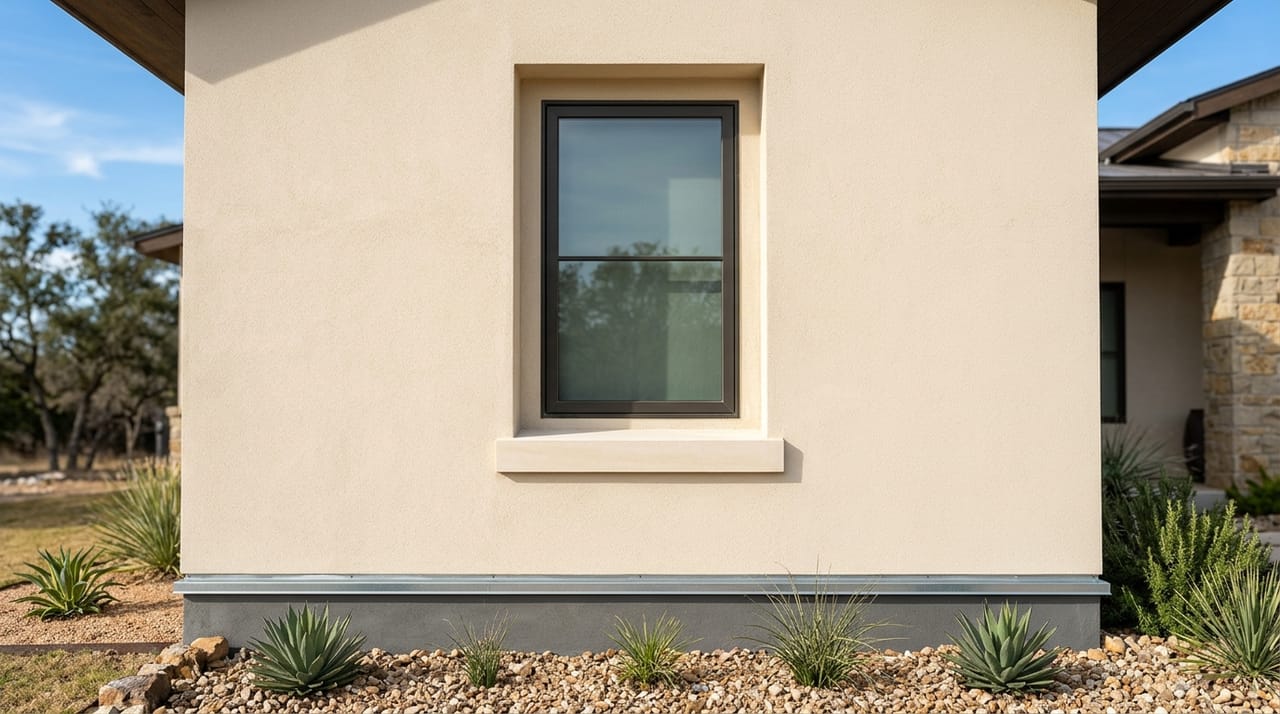
CASE 4 • EXTERIOR CLADDING & FLASHING−15.2°F Retained Water
Naked-Eye Illusion: Hard-coat stucco acts as a rigid shell that remains structurally flat outside even while OSB sheathing and wood framing rot behind it.
Infrared Physics: Solar-warmed stucco dries rapidly after afternoon sun, while trapped water behind the weather-resistive barrier stays measurably cooler into dusk.
Homeowner Action: Commission an invasive stucco moisture probe check at window corners, install flexible sill-pan flashing and backer-rod sealant, and keep weep screeds 4 inches above grade.
REGIONAL BUILDING SCIENCE • TEXAS CLIMATE ZONES 2A–3B
The Texas 4-Region Micro-Climate & Soil Defense Matrix
How Local Geology, Humidity, Hail Alleys, and Coastal Windstorms Dictate Your Home’s Maintenance Schedule
Texas spans more than 800 miles across subtropical coastal plains, expansive Blackland Prairie clays, fractured karst limestone plateaus, and semi-arid ranchlands. A maintenance schedule written for a dry climate will fail in Houston’s 80% Gulf humidity, just as an unwatered Dallas clay perimeter can drop a slab corner three inches in a single August drought. Locate your region below to tailor this book’s guidance to your exact zip code.
3D TEXAS REGIONAL DIORAMASTUDIO 3D TEXAS BUILDING-SCIENCE RELIEF MAP: Four distinct residential stress zones—Gulf Coast hurricane & smectite clay plains (Southeast), North Texas Blackland Prairie shrink-swell & supercell hail corridor (North), Central Texas Balcones limestone fault & flash-flood escarpment (Central), and South/Rural caliche solar & private well/septic terrain (South/West).
TEXAS REGION 1PI 35 – 65+ (Very High Expansion Potential)
Gulf Coast & Greater Houston
Houston, Katy, Sugar Land, The Woodlands, Pearland, League City, Galveston, Beaumont, Corpus Christi
Soil & Geology: Beaumont & Lake Charles “Gumbo” Smectite Clay — extreme volumetric shrink-swell with shallow perched water tables.
Flush AC condensate drains monthly (Mar–Nov) and verify auxiliary pan float switches before peak Gulf humidity.
Maintain 6-inch perimeter grade fall-away and root barriers where mature live oaks or pines sit within 15 feet of the slab.
Rinse coastal salt mist from outdoor AC condenser coils quarterly and apply corrosion inhibitor to exterior electrical disconnects.
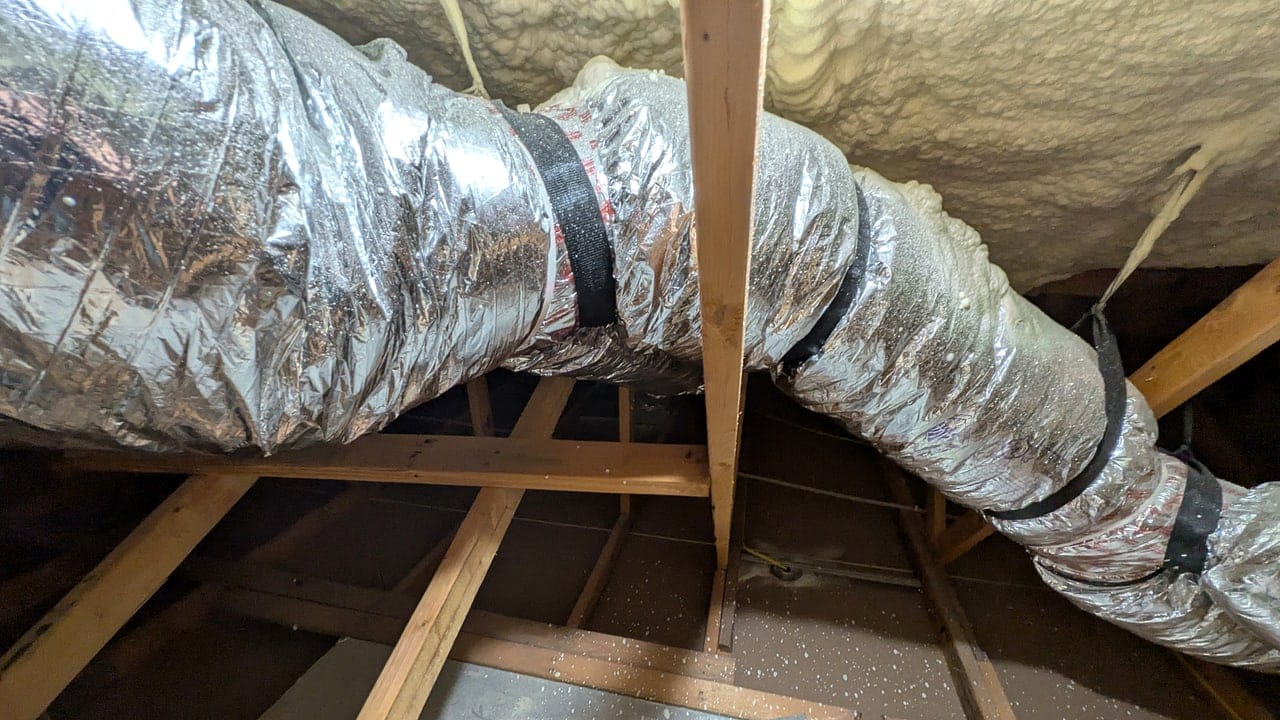
Regional Defect Watchlist: Attic ductwork condensation (“sweating” plenums), stucco moisture trapping, subterranean & Formosan termites, and flat-lot street ponding.
TEXAS REGION 2PI 30 – 60 (Severe Seasonal Shrink-Swell)
North Texas & DFW Metroplex
Dallas, Fort Worth, Frisco, Plano, McKinney, Allen, Arlington, Southlake, Denton, Waco
Soil & Geology: Eagle Ford Shale & Taylor Blackland Prairie Clay — notorious for deep summer desiccation fissures and rapid storm heave.
Primary Weather Hazards: Severe springtime supercell hail (1.5"–3.0" stones), 105°F+ August droughts, straight-line 70 mph winds, and sudden 10°F Arctic blue-norther freezes.
Code & Insurance Focus: UL 2218 Class 4 impact-resistant roofing shingles (major insurance premium discounts), perimeter foundation hydration, and attic pipe freeze protection.
Top 3 Regional Maintenance Priorities
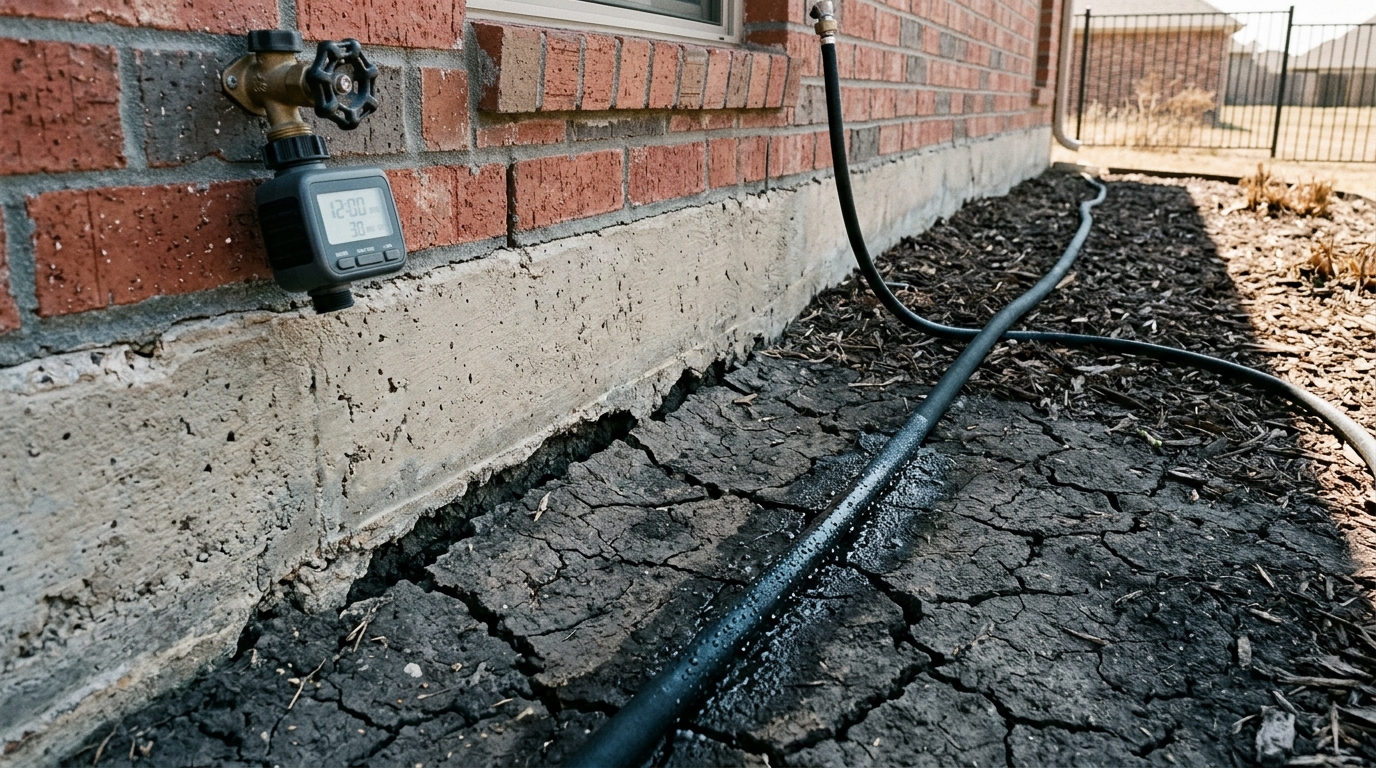
Run automated drip/soaker hoses 12–18 inches off the slab perimeter during July–September droughts to prevent soil pull-away gaps.
Inspect roof ridge caps, soft-metal box vents, and window screens after every spring hail event—before insurance filing windows expire.
Insulate attic tankless water heaters and exterior-wall hose bibbs before November Arctic cold fronts arrive.
Regional Defect Watchlist: Differential slab settlement & corner pops, hail-bruised asphalt shingle mat fractures, cast-iron under-slab drain shears in pre-1985 homes.
TEXAS REGION 3PI 8 – 18 (Limestone West) / PI 35 – 55 (Clay East)
Central Texas, Austin & Hill Country
Austin, Round Rock, Cedar Park, Georgetown, Lakeway, Dripping Springs, New Braunfels, San Marcos
Soil & Geology: Balcones Escarpment Split-Geology — abrupt transition between hard Edwards Limestone west of I-35 and expansive Blackland clay east of I-35.
Primary Weather Hazards: Flash-flood hillside sheet flow (“Flash Flood Alley”), split-bearing cut-and-fill lot settlement, extreme limestone water hardness (15–25 gpg), and wildfire embers.
Code & Insurance Focus: Engineered retaining walls & French drains on sloped lots, Pressure Reducing Valves (PRVs) on high-pressure hilly water mains (>80 PSI), and Class A roofs.
Top 3 Regional Maintenance Priorities
Descale tankless water heaters annually with food-grade vinegar to prevent limestone calcium carbonate from clogging heat exchangers.
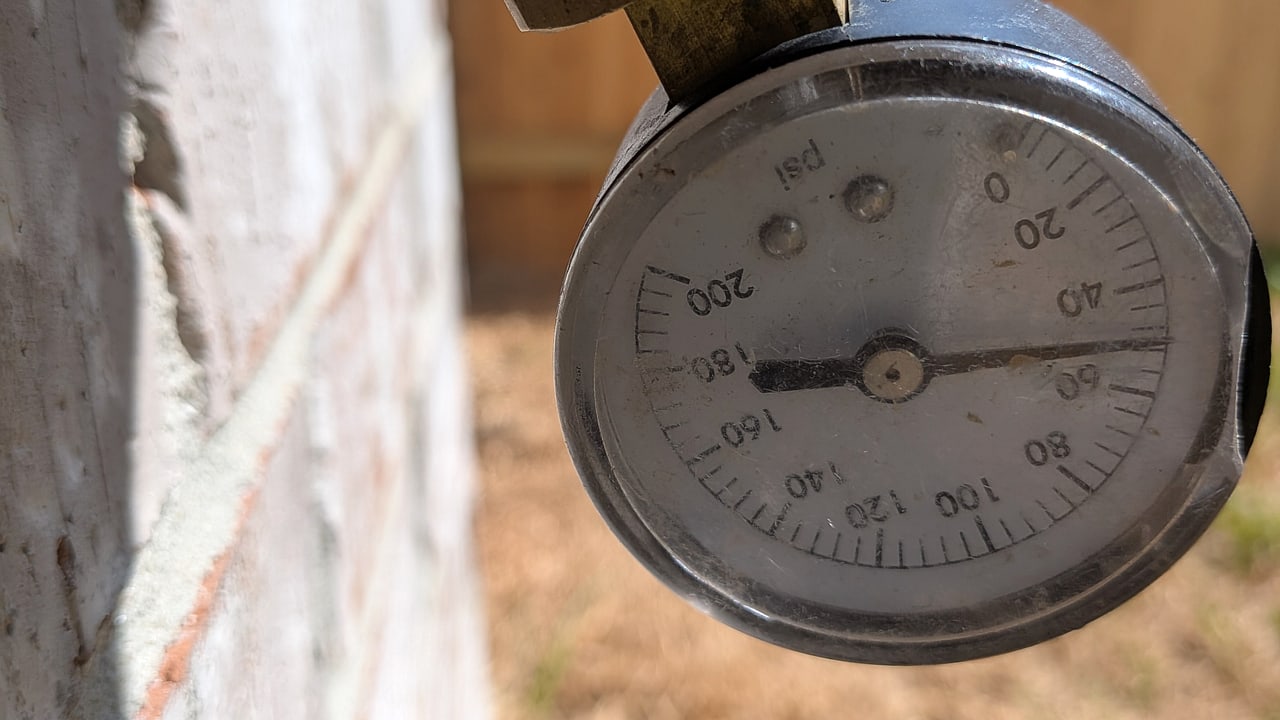
Test municipal water static pressure at a hose bibb annually; replace PRVs whenever pressure exceeds 80 PSI.
Keep hillside French drains, catch basins, and retaining-wall weep pipes clear ahead of May and October flash-rain seasons.
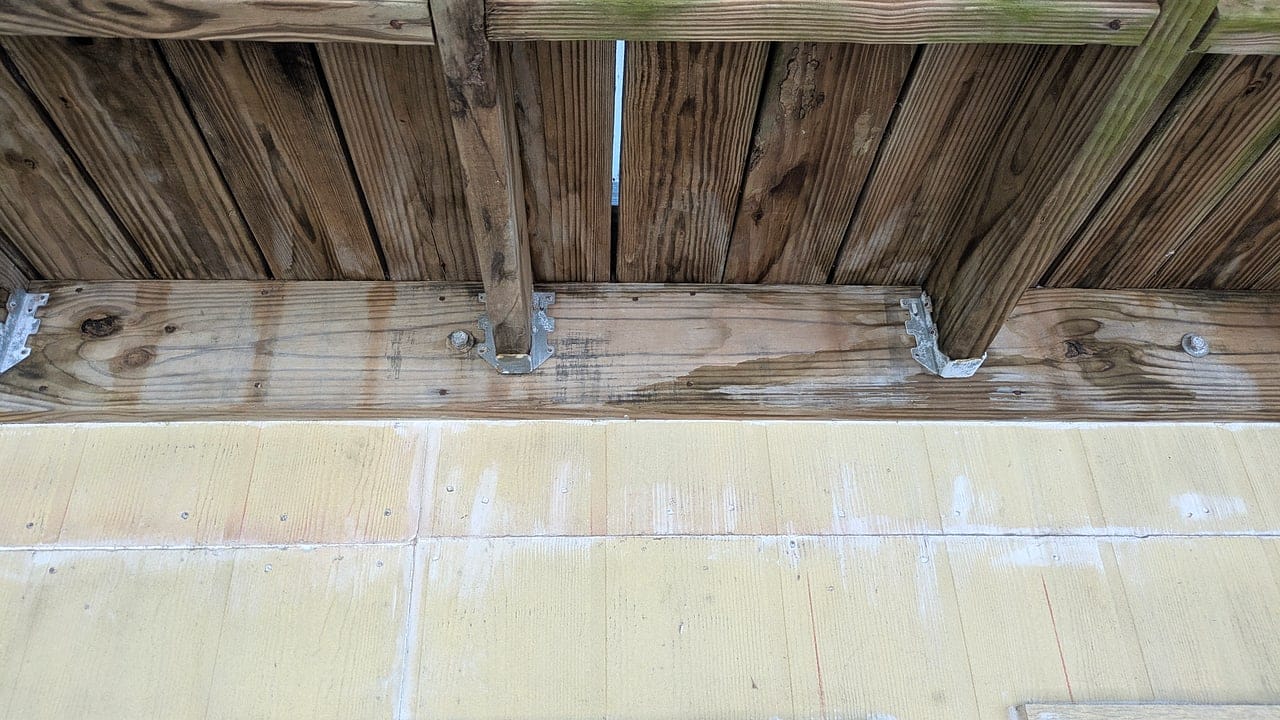
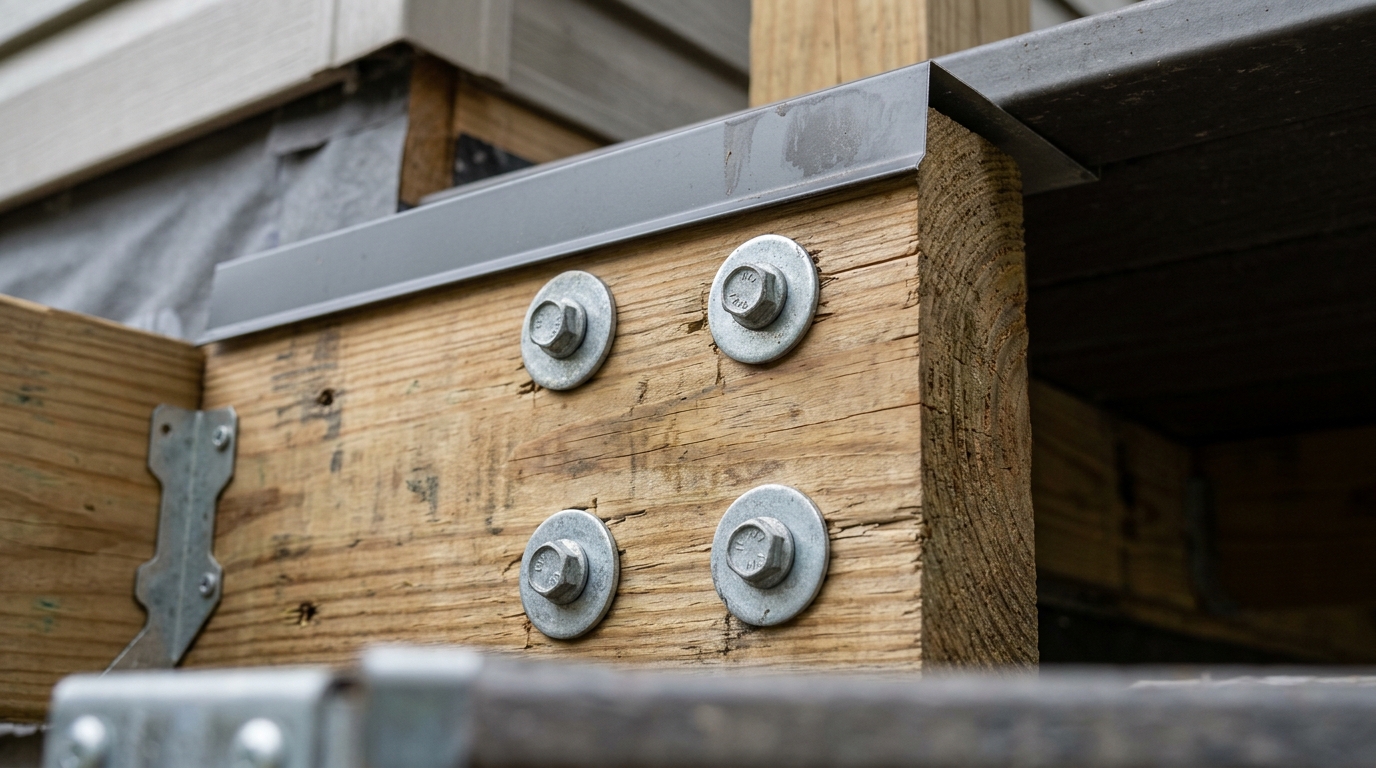
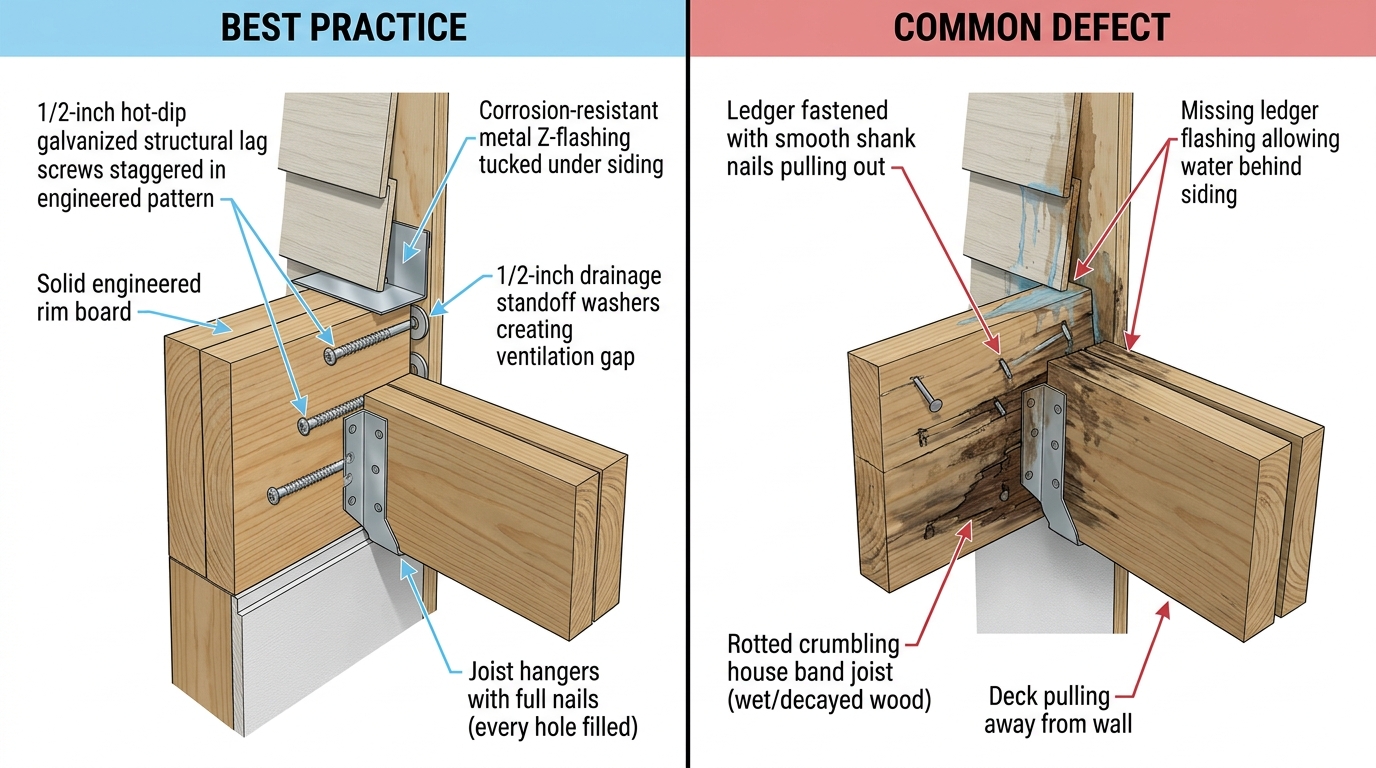
Regional Defect Watchlist: Cut-and-fill lot differential settlement (half on rock, half on fill), failed retaining walls, calcified water heater TPR valves, and wood deck ledger rot.
Building Science By the Numbers: 36 Critical Thresholds Every Texas Homeowner Must Know
Instant field benchmarks across structural, mechanical, electrical, plumbing, moisture, and environmental assemblies—so you never have to guess whether a measurement is normal or urgent.
Residential systems rarely fail overnight without warning; they drift across measurable physical thresholds first. Comparing a $15 water-pressure gauge, digital hygrometer, pinless moisture meter, or infrared thermometer against these 36 building-science benchmarks separates benign seasonal variation from urgent life-safety and structural repairs.
Act When: < 2 in. visible concrete or buried weep holes
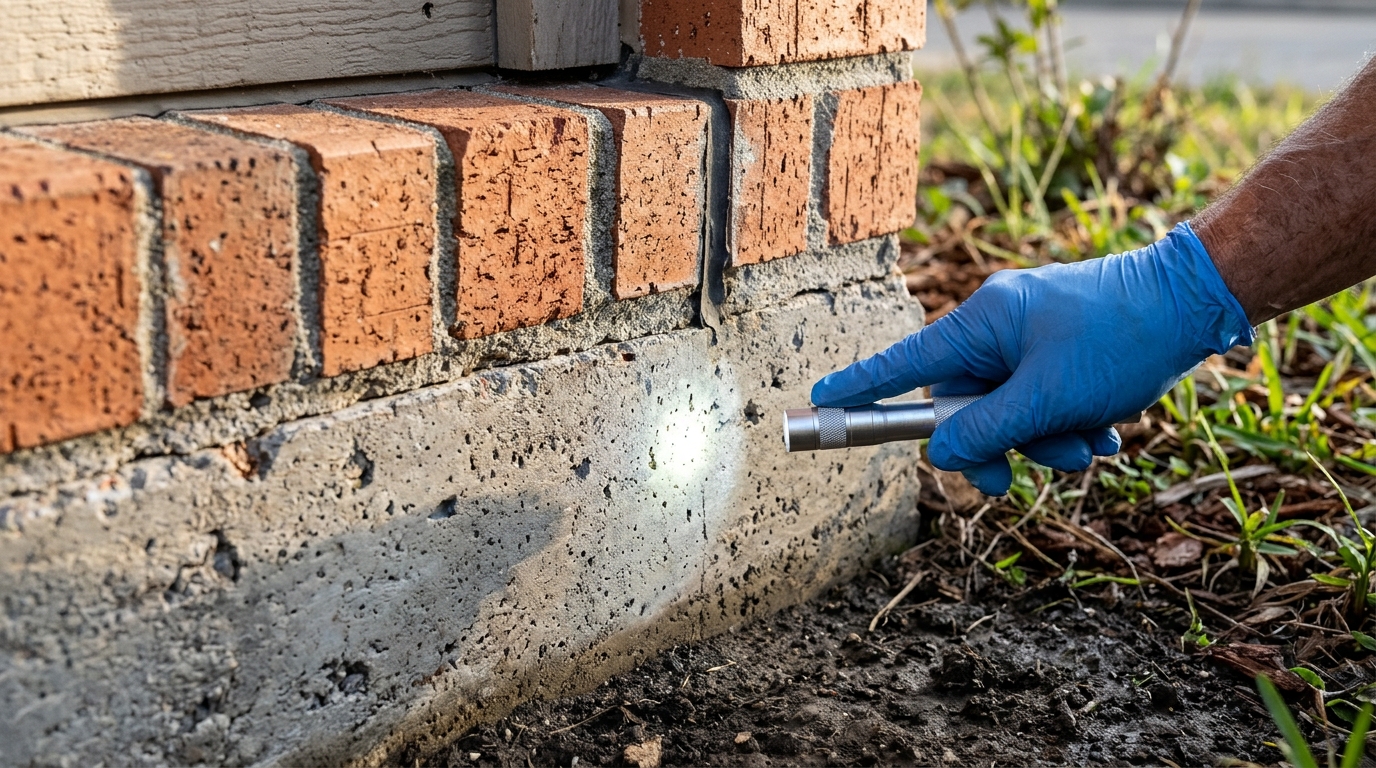
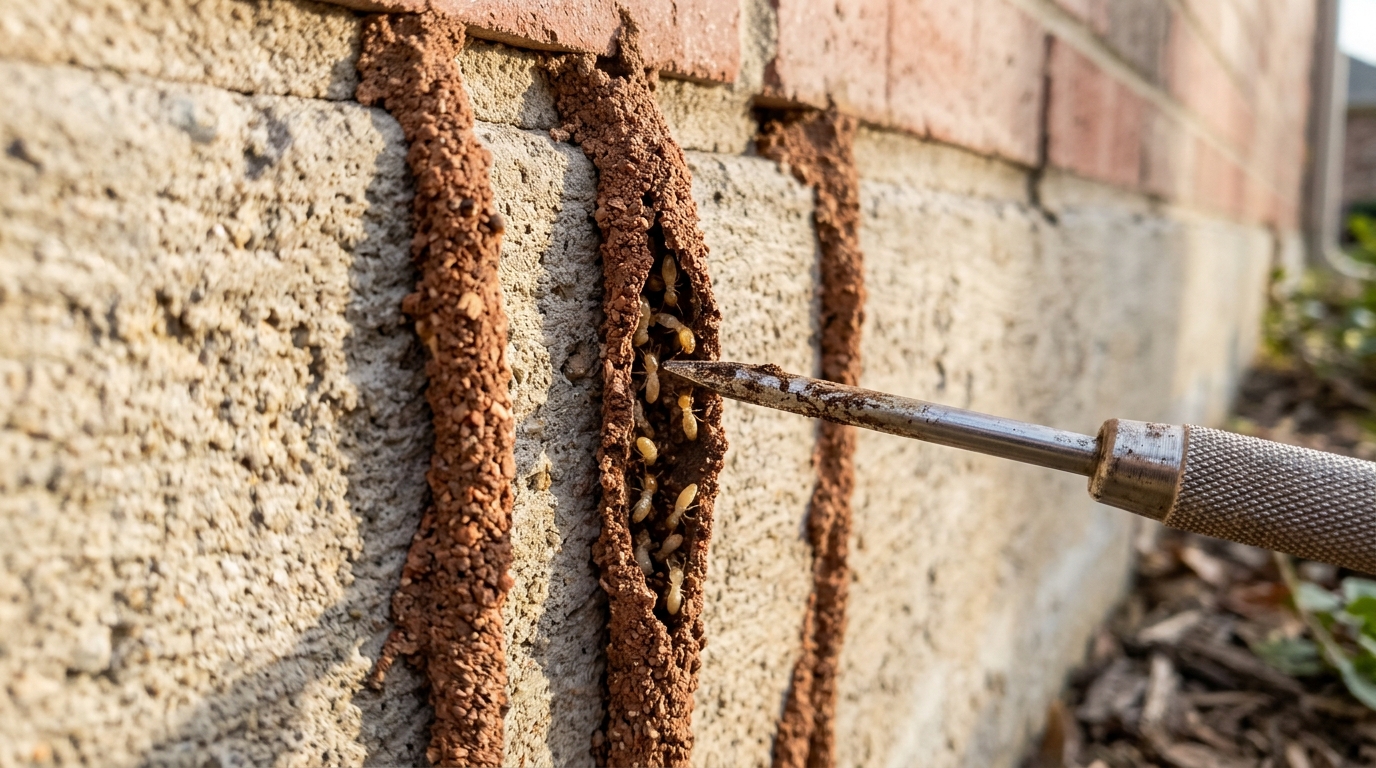
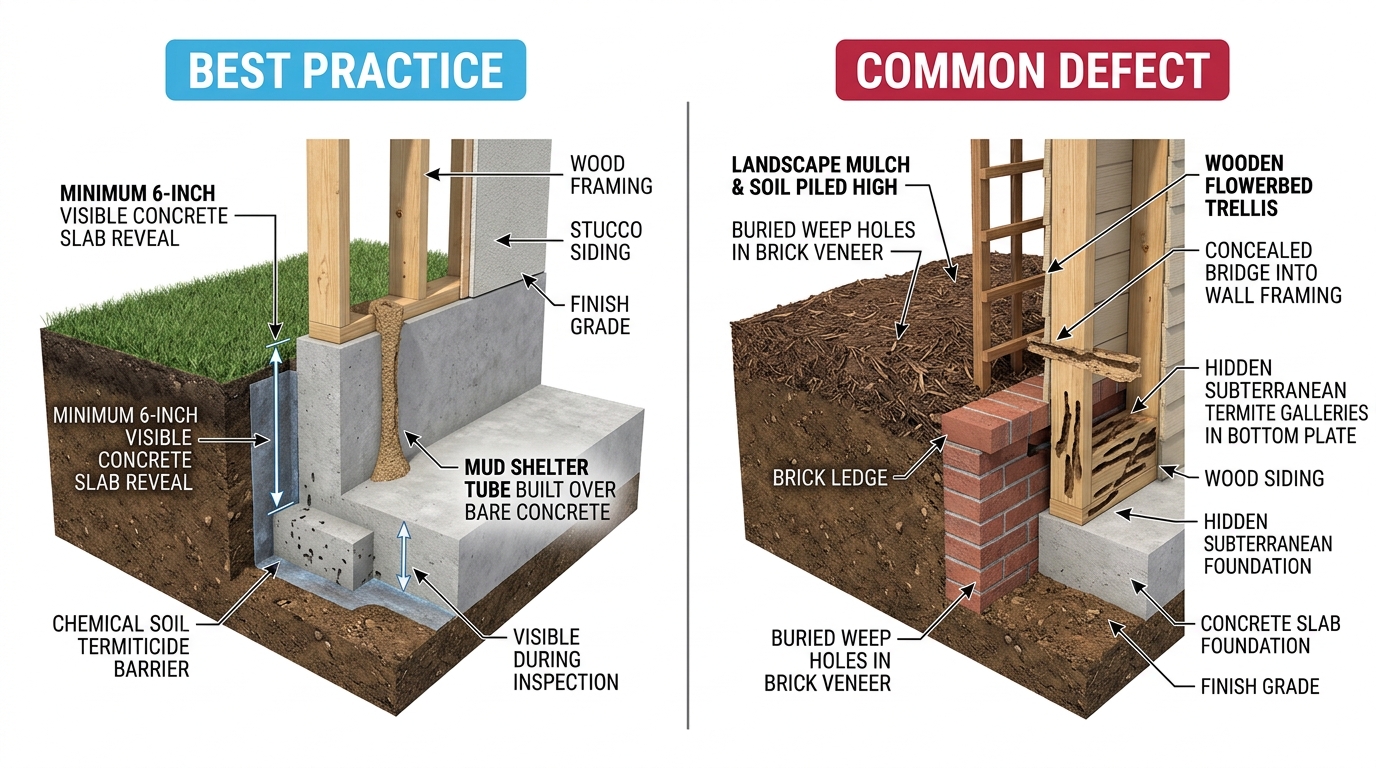
Maintaining an unbroken band of visible concrete blocks concealed subterranean termite mud tubes and stops soil moisture from wicking into sill plates.
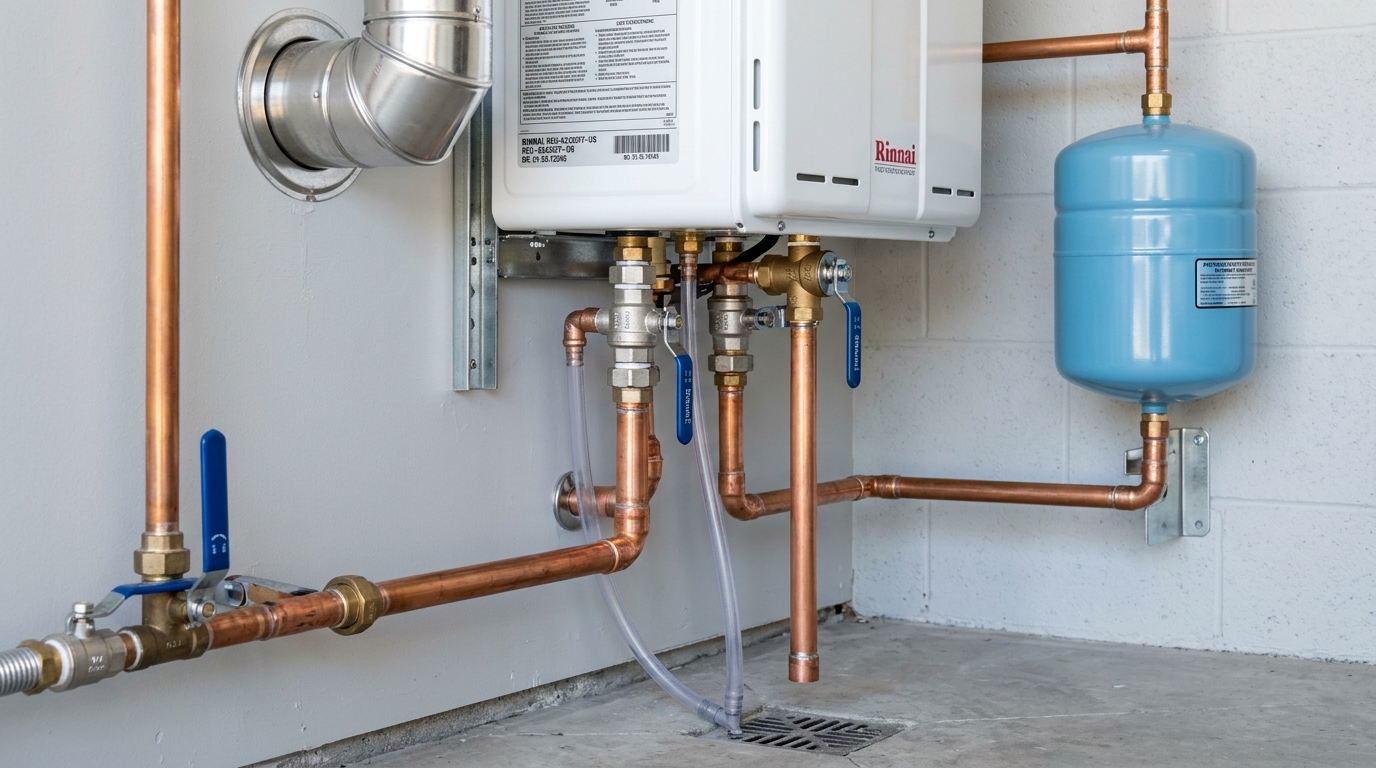
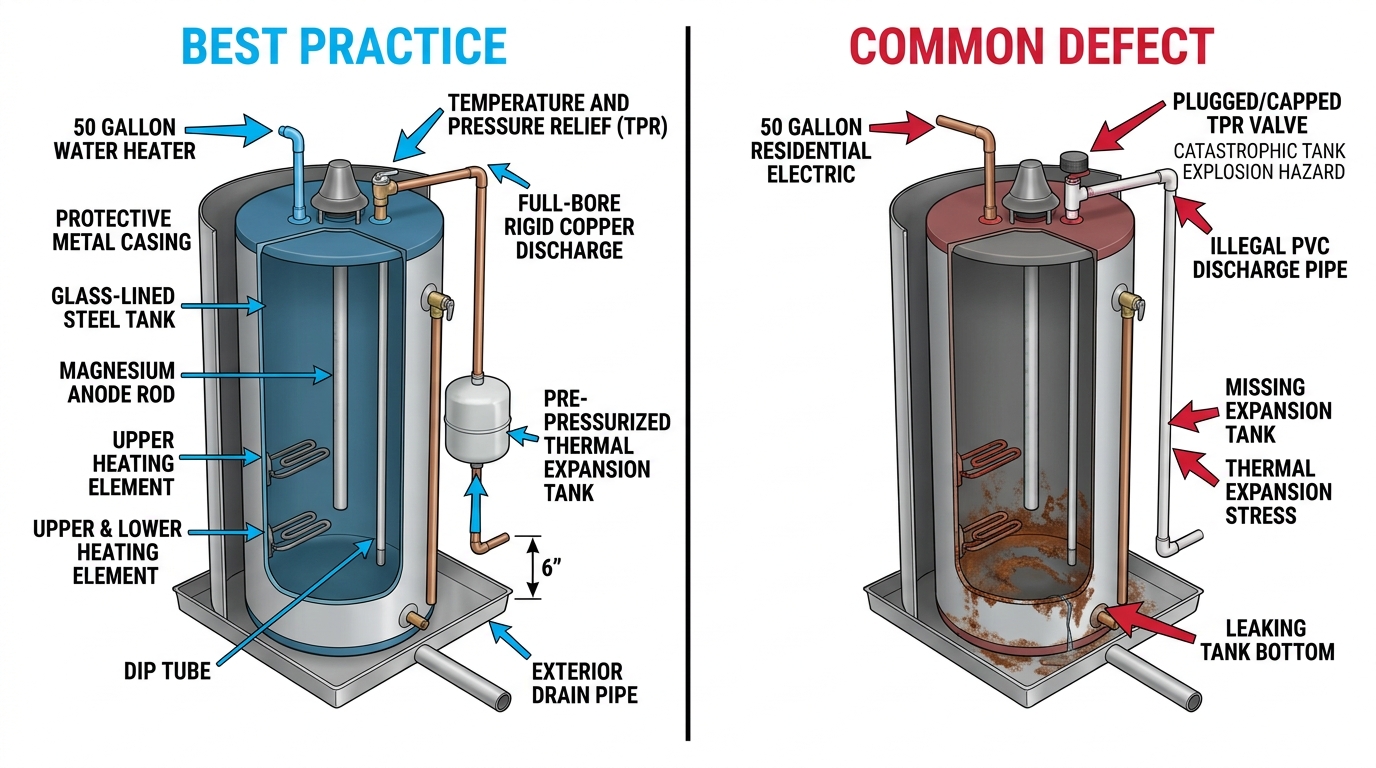
Target: 120°F at tap; T&P 150 PSI / 210°F w/ 3/4 in. drain
Act When: > 125°F scald hazard, capped/threaded T&P, or uphill run
Water at 140°F inflicts third-degree burns in under 5 seconds, while a plugged T&P relief discharge turns a runaway tank into an explosive pressure vessel.
Target: Matched to incoming house static PSI (± 2 PSI)
Act When: Water spurts from Schrader air stem (ruptured bladder)
In closed plumbing loops with a PRV or check valve, heated water expands and spikes line pressure past 150 PSI unless an intact air bladder absorbs it.
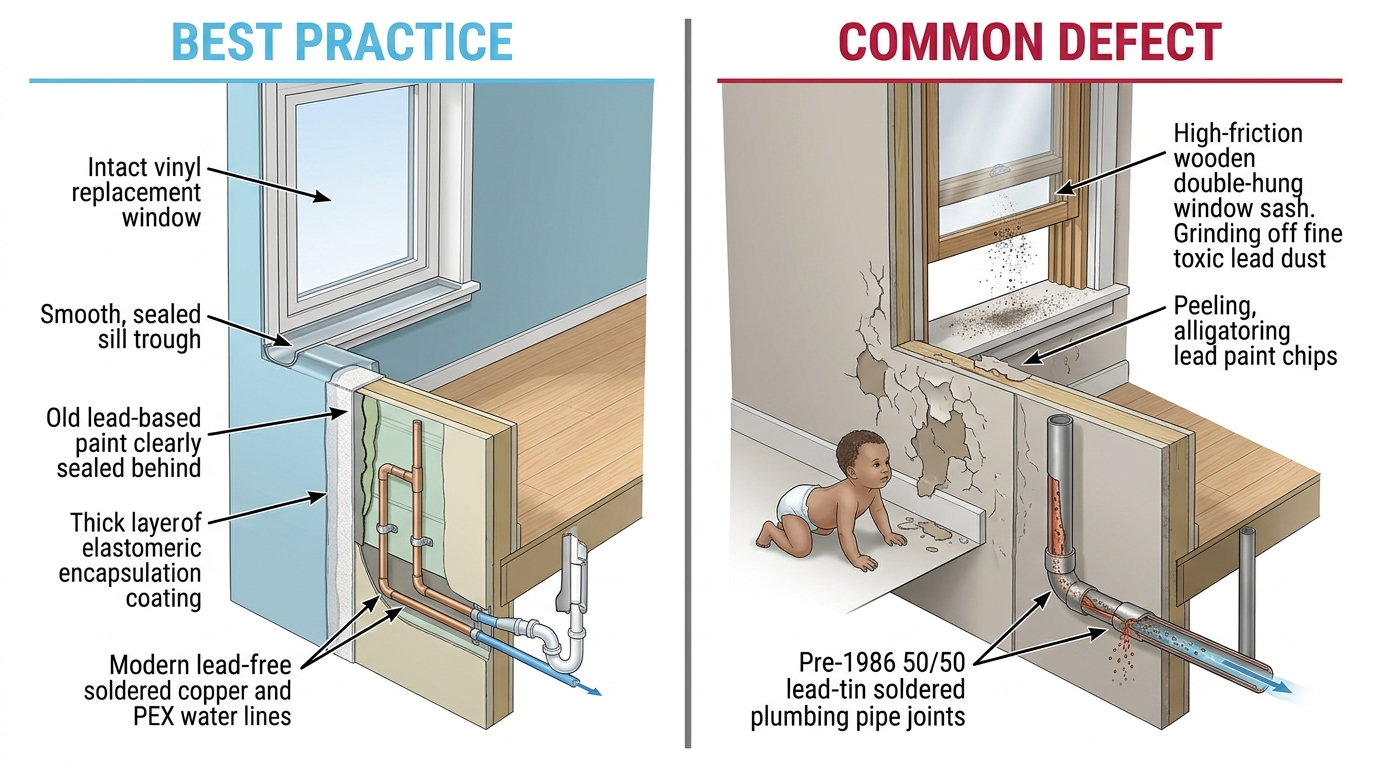
Target: 0 ppm indoor CO; intact paint films in pre-1978 homes
Act When: CO ≥ 9 ppm sustained / ≥ 35 ppm acute; > 6 sq ft disturbed paint
Chronic low-level CO causes headaches and cognitive harm below standard 70 ppm UL alarm thresholds, while dry-sanding pre-1978 paint disperses neurotoxic lead dust.
Corrosive water strips copper heat exchangers and etches plaster, while #8 AWG equipotential bonding prevents lethal voltage gradients across wet decks.
Target: 0.5–2.0 mg/L free chlorine at spray; pump tank every 3–5 yrs
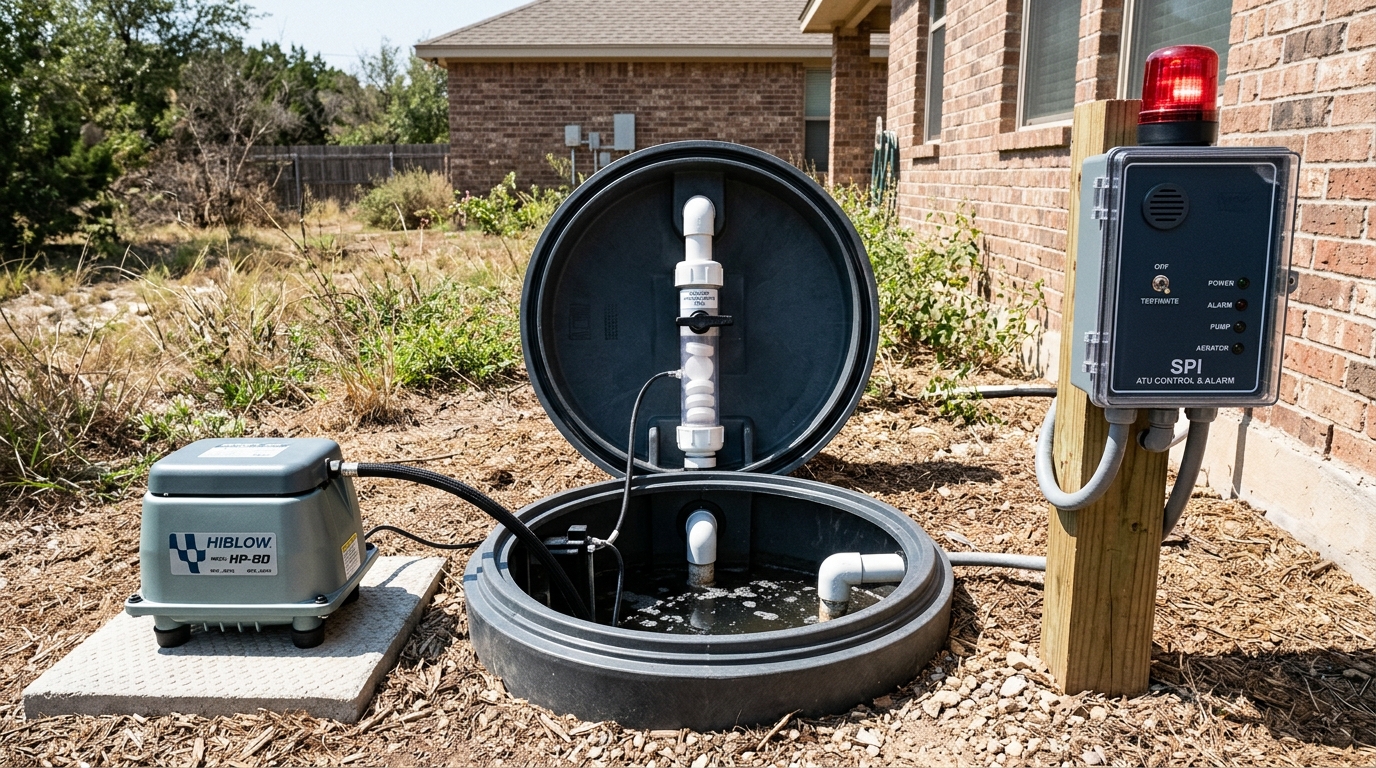
Act When: High-water/air alarm active, pool trichlor tabs used, or ponding
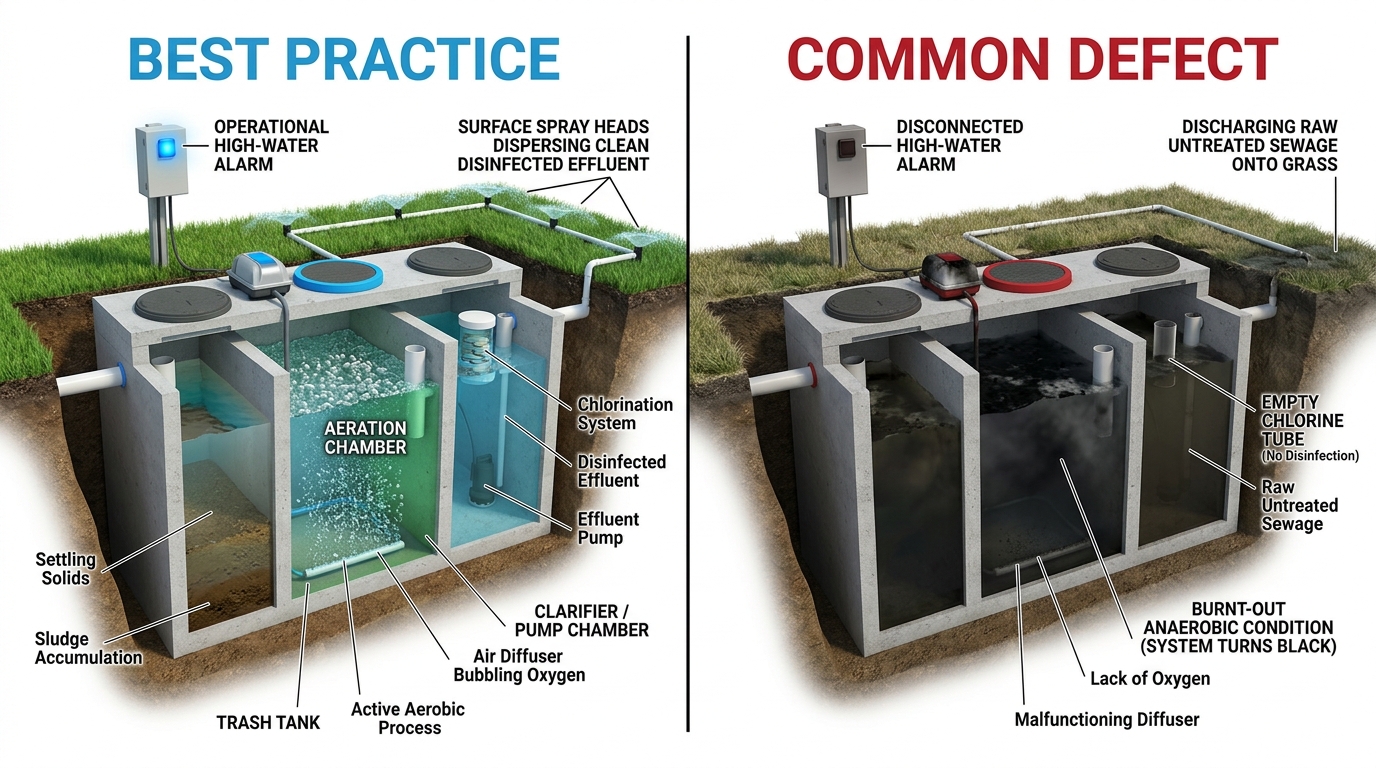
Surface spray aerobic units require EPA-labeled wastewater calcium hypochlorite or liquid bleach disinfection—swimming-pool trichlor tablets can explode in feeders.
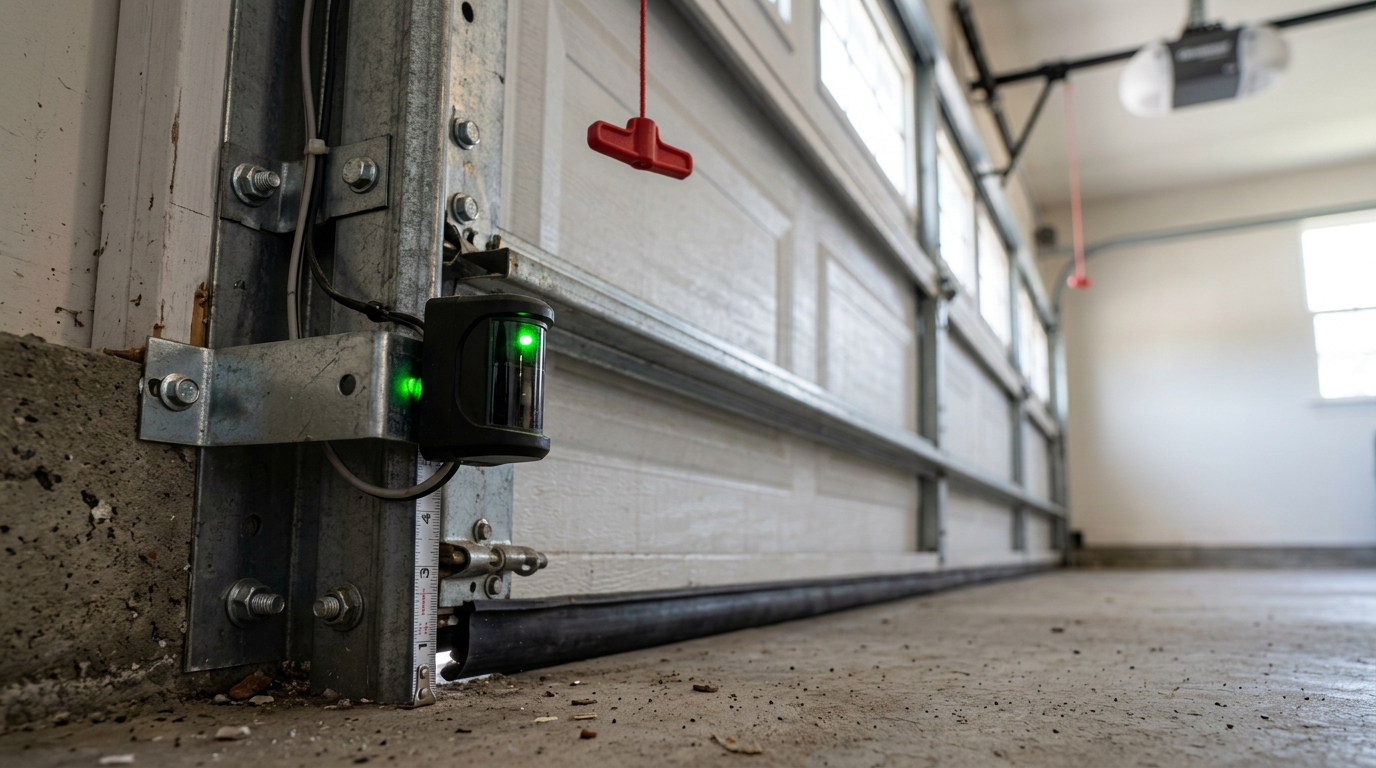
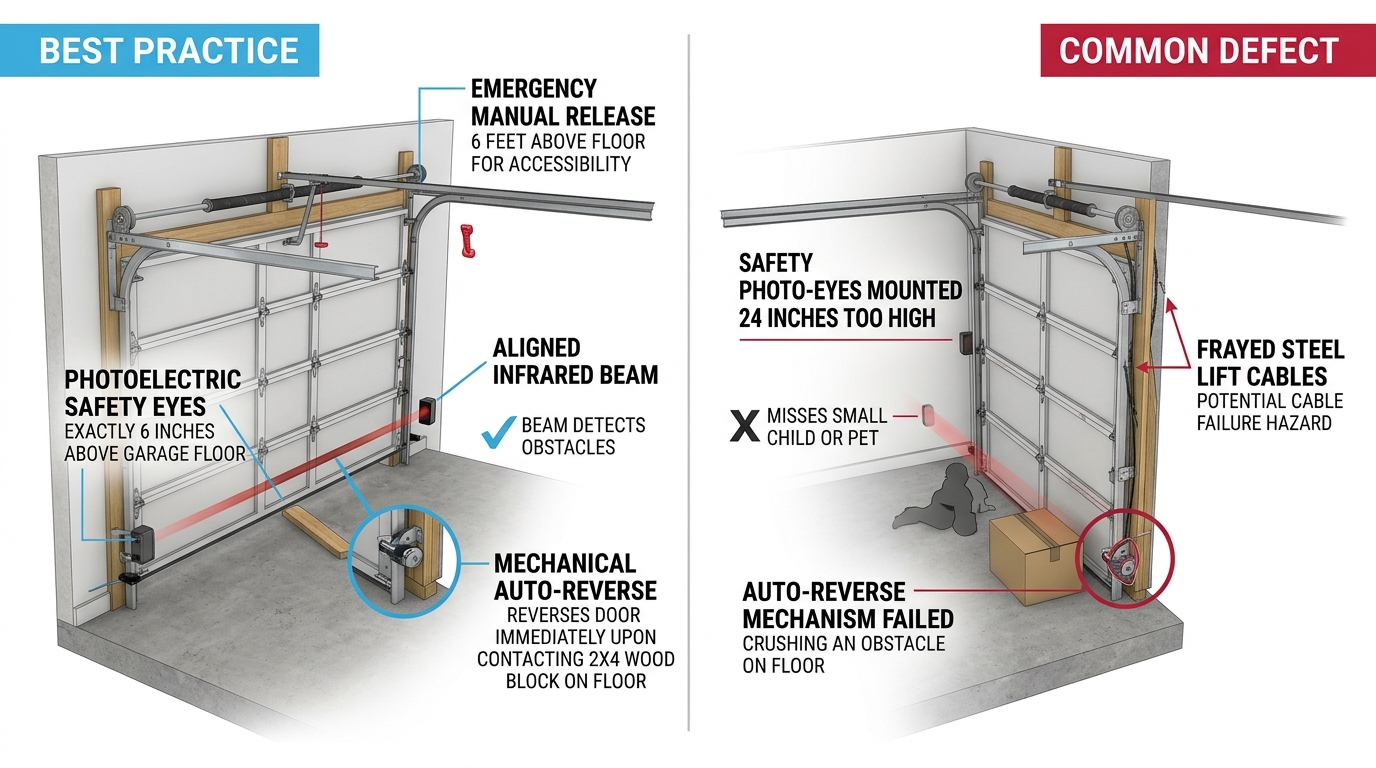
Target: Sensors ≤ 6 in. above floor; reverses in ≤ 2 sec on 1.5 in. block
Act When: Photo-eyes mounted > 6 in. high or crushes flat 2×4 test block
UL 325 dual-entrapment protection ensures heavy overhead sectional doors reverse immediately upon beam interruption or physical obstruction.
EQUIPMENT FORENSICS & SAFETY RECALL SPOTTER
Equipment Data Plate & Safety Recall Decoder: Read Any Serial Number in 30 Seconds
How to extract exact manufacturing age, cooling tonnage, and recalled fire/flood hazards from HVAC condensers, water heaters, breaker panels, and piping.
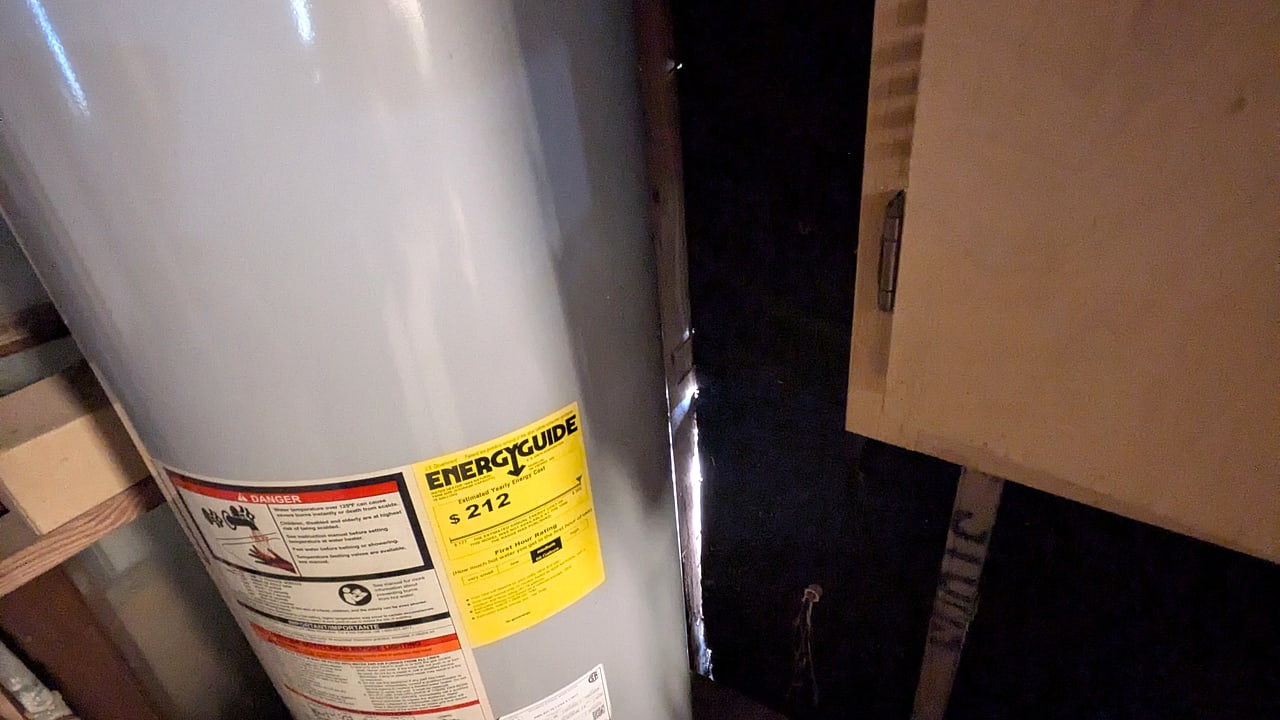
FORENSIC FIELD GUIDEEvery UL/AHRI equipment rating plate is a permanent birth certificate: four digits in the serial number reveal exact manufacturing week and year, while a three-digit middle code in the model number locks in cooling BTU tonnage.
1. HVAC & Water Heater Serial-Number Manufacturing Age Decoder8 Major Brand Families
Manufacturer Family
Serial Number Rule
Sample Serial
Decoded Date
Texas Lifespan
Carrier / Bryant / Payne
Standard post-1980 4-digit prefix: Digits 1–2 = Week of manufacture (01–52); Digits 3–4 = Two-digit Year of manufacture.
2419E14892
Week 24 of 2019 (manufactured June 2019)
10–14 yrs inland Texas; 7–10 yrs within 15 miles of Gulf Coast
Trane / American Standard
Post-2002 numeric prefix: Digit 1 = Last digit of Year (confirm decade via R-410A/SEER2 plate); Digits 2–3 = Week (01–52). (1983–2001 used single-letter year codes.)
Standard 10-digit numeric format (Houston-built): Digits 1–2 = Two-digit Year of manufacture; Digits 3–4 = Month of manufacture (01 = Jan through 12 = Dec).
1807394821
18 = 2018, 07 = July (manufactured July 2018)
10–13 yrs inland Texas; 7–9 yrs coastal salt mist
Lennox
Standard 10-character code: Digits 1–2 = Assembly plant (e.g., 58 or 19); Digits 3–4 = Two-digit Year; Character 5 = Month letter (A = Jan through M = Dec, skipping I).
5820F09412
Plant 58, Year 2020, F = June (manufactured June 2020)
11–14 yrs inland Texas; monitor indoor evaporator coil for leaks at yr 7+
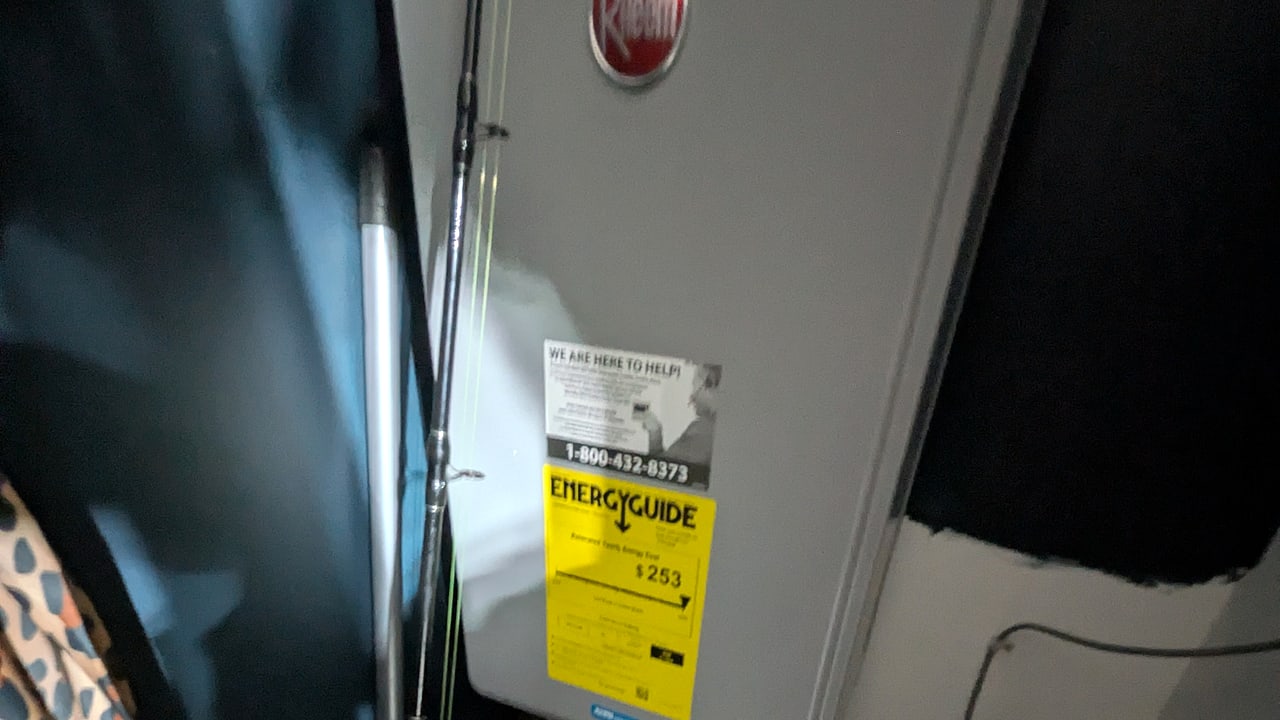
Rheem / Ruud (HVAC & Water Heaters)
Four-digit date block (either first 4 digits MMYY/WWYY or immediately following a single plant letter such as M or W): Digits 1–2 = Month/Week; Digits 3–4 = Year.
M281734910
Plant M, Week 28 of 2017 (manufactured July 2017)
HVAC: 11–14 yrs; Tank Water Heater: 8–12 yrs in Texas hard water
Bradford White Water Heaters
20-year repeating two-letter prefix (skipping I, O, Q, V): Char 1 = Year (J=2012, K=2013, L=2014, M=2015, N=2016, P=2017, R=2018, S=2019, T=2020, W=2021, X=2022, Y=2023, Z=2024); Char 2 = Month (A=Jan..M=Dec, skipping I).
PB41928374
P = 2017, B = February (manufactured February 2017)
8–12 yrs (6–9 yrs if un-flushed in > 180 ppm calcium-carbonate water)
A.O. Smith / State / Reliance
Modern post-2008 10-character serial (optional 1–2 letter prefix followed by 4 date digits): Digits 1–2 = Two-digit Year; Digits 3–4 = Production Week (01–52).
1634109823
16 = 2016, Week 34 (manufactured August 2016)
8–12 yrs storage tank life; check sacrificial anode rod at yr 4
Rinnai / Navien Tankless
Both manufacturers print an explicit YYYY.MM manufacture date directly beside the UL rating barcode; Rinnai serials also encode Year/Month in the first two alpha characters.
MFG 2021.03 / RB.CA-104928
March 2021 manufacture (read explicit YYYY.MM stamp on cabinet side plate)
15–20 yrs WITH annual vinegar flush; 6–9 yrs if scaled in hard water
2. HVAC Model-Number Tonnage & CFM Key
Code
Capacity
Airflow
Typical Texas Zone
018
1.5 Tons / 18,000 BTU
600 CFM
Bonus suite, garage apartment, or tight 750–1,000 sq ft zone
024
2.0 Tons / 24,000 BTU
800 CFM
Upper-floor bedroom zone or 1,000–1,300 sq ft townhome floor
030
2.5 Tons / 30,000 BTU
1,000 CFM
Well-sealed 1,300–1,650 sq ft single-story or split-level zone
036
3.0 Tons / 36,000 BTU
1,200 CFM
Standard 1,650–2,000 sq ft Texas home (verify via Manual J load)
042
3.5 Tons / 42,000 BTU
1,400 CFM
Mid-size 2,000–2,350 sq ft footprint or high-ceiling main floor
048
4.0 Tons / 48,000 BTU
1,600 CFM
Larger 2,350–2,800 sq ft single-system home with adequate return ducts
060
5.0 Tons / 60,000 BTU
2,000 CFM
Maximum residential split-system size (requires dual/oversized return trunks)
3. Refrigerant Generation & Phase-Down Guide
Refrigerant
Production Era
Homeowner Cost & Service Impact
R-22 HCFC Legacy
Pre-2010 (EPA virgin production & import banned Jan 1, 2020)
Obsolete and non-economical to recharge with reclaimed R-22; any major leak or compressor failure warrants full matched condenser + coil replacement.
R-410A Puron Standard
2010–2024 (EPA AIM Act equipment mfg transition Jan 1, 2025)
Parts and refrigerant remain widely available for servicing existing systems for years, though new complete systems now transition to low-GWP A2L blends.
Delivers superior heat-transfer efficiency and long-term serviceability; indoor air handlers include integrated refrigerant-detection sensors that run the blower to dilute any coil leak.
Visual Clue: Embossed "Federal Pacific" or "Stab-Lok" script on panel cover; thin breakers with bright red-orange amperage handle tips.
Failure Mechanism: Independent UL and CPSC laboratory testing showed 25% to 60% of 2-pole Stab-Lok breakers jam internally under overcurrent or dead-short faults, energizing glowing wires until ignition.
Required Action: Budget $2,200–$4,200 for complete load-center replacement by a licensed Texas electrical contractor; routinely flagged as uninsurable by homeowners carriers.
Failure Mechanism: Corroded aluminum busbars arc against loose breaker spring clips, melting the breaker housing and welding the contacts directly onto the live busbar even when switched OFF.
Required Action: Never attempt to pull Zinsco breakers yourself; schedule full replacement with a modern 200A copper-bus panel and whole-house surge protection.
Visual Clue: Gray steel Challenger enclosure (sometimes co-labeled Westinghouse or Eaton) populated with Type C, AC, or G plug-on circuit breakers.
Failure Mechanism: Loose busbar stab jaws and recalled GFCI/two-pole trip mechanisms overheat under sustained Texas summer AC amperage, carbonizing bus insulation.
Required Action: Have a licensed electrician perform an infrared scan and inspect bus stabs for pitting; replace the entire panel or re-populate undamaged stabs with UL-classified breakers.
Visual Clue: Silvery solid-core 12 AWG or 10 AWG 15A/20A branch wires stamped "AL" or "ALUMINUM" feeding standard wall outlets, switches, and light fixtures.
Failure Mechanism: First-generation AA-1350 aluminum alloy expands 30% more than copper when warm, creeping out from under standard copper-only terminal screws and forming 1,000°F oxide-film glow arcs.
Required Action: Require CPSC-accepted copper pigtailing (COPALUM cold-weld crimps or torqued AlumiConn 3-port lugs) at every device and junction box—never rely on standard twist-on wire nuts.
Visual Clue: Flexible dull-gray plastic water tubing stamped "PB2110" visible at water heater connections, under-sink stub-outs, manifold closets, or meter boxes.
Failure Mechanism: Municipal chlorine and chloramine disinfectants chemically embrittle the inner pipe wall and acetal fittings from within, causing sudden longitudinal splits without prior exterior bulging.
Required Action: Confirm house water pressure is regulated at or below 60 PSI immediately and plan a whole-house PEX-A or Type L copper repipe to protect floors and insurance eligibility.
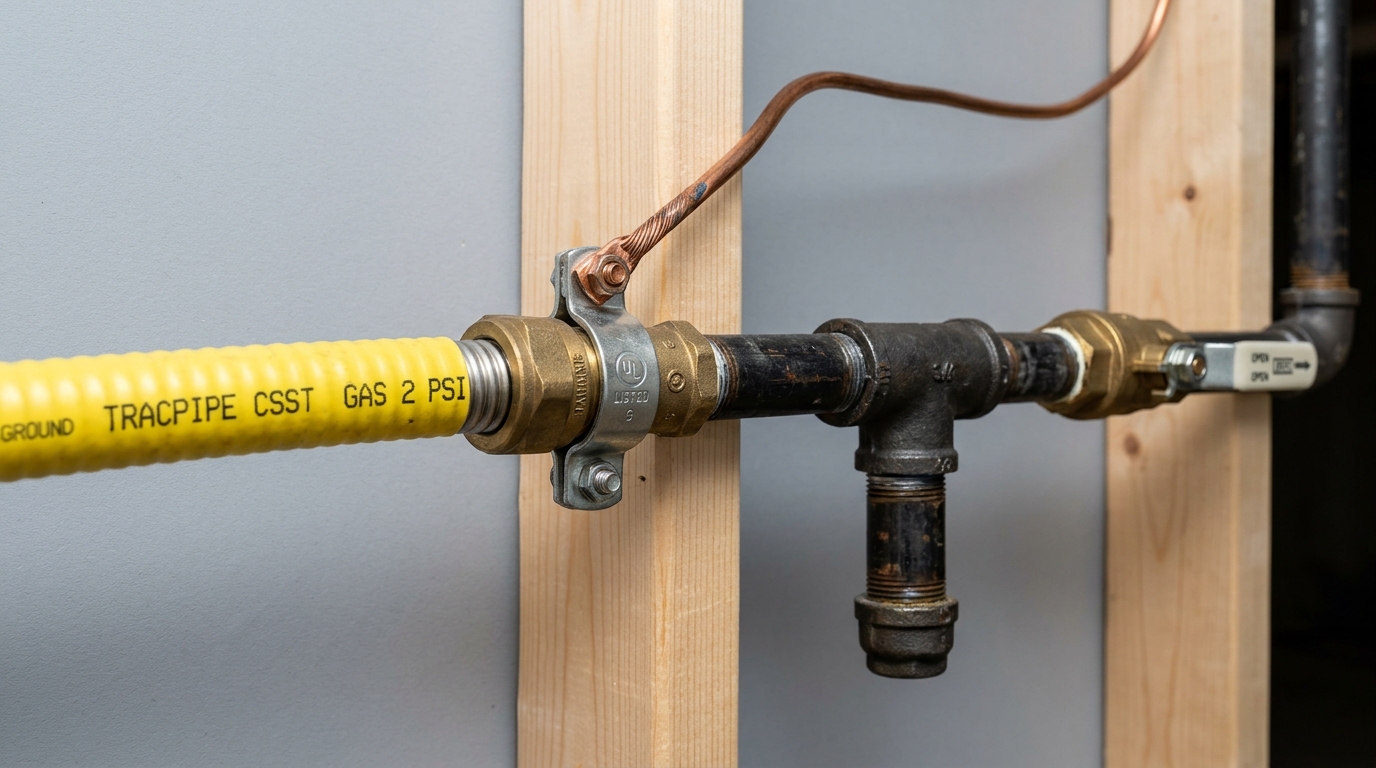
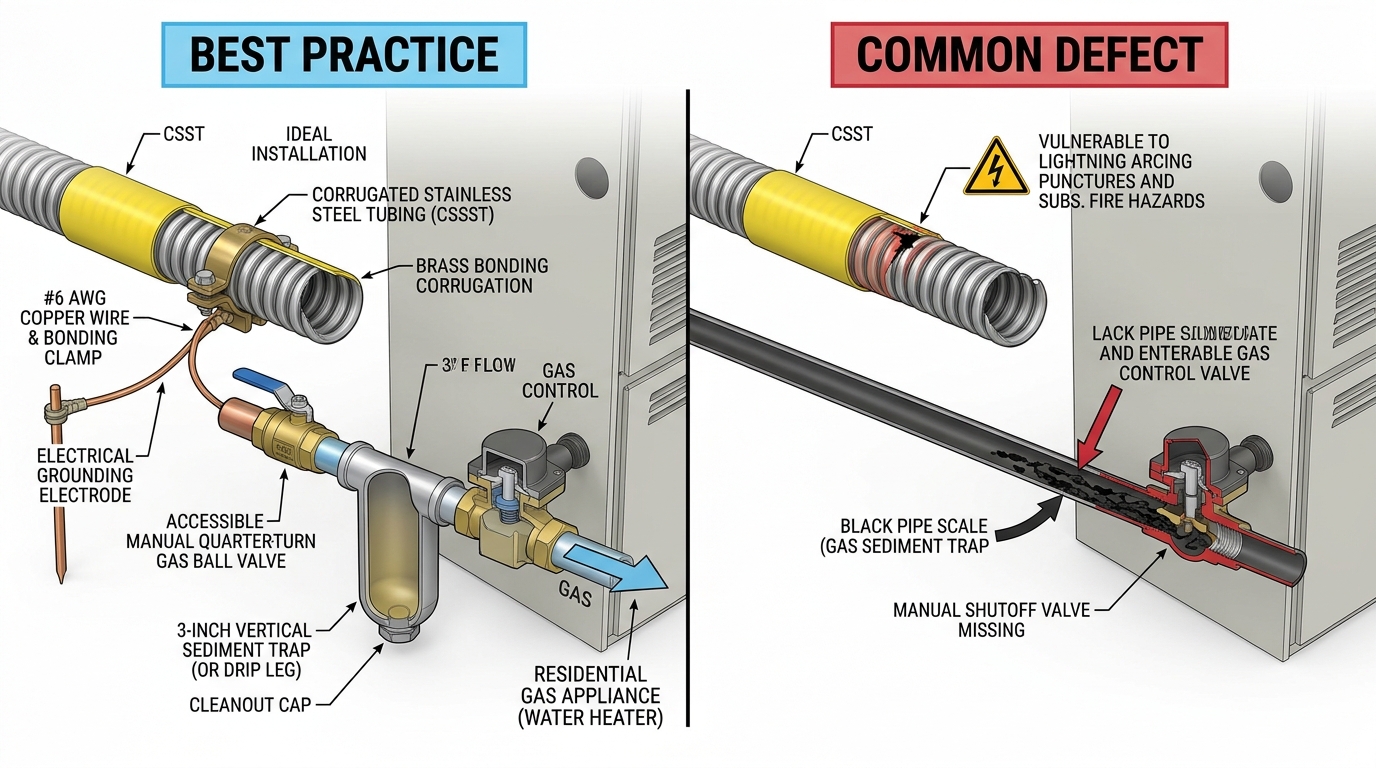
Visual Clue: Flexible corrugated stainless-steel gas tubing in a polymer jacket lacking a #6 AWG copper bonding clamp; magnetic threaded steel water pipes with rust-crusty elbows.
Failure Mechanism: Nearby Texas lightning strikes induce voltage spikes that arc blowholes through thin 0.008-inch CSST gas walls; old galvanized water lines rust inward until sediment chokes flow and threads rupture.
Required Action: Install a direct #6 AWG copper bonding jumper on the rigid gas manifold tied to the electrical grounding electrode system, and budget phased PEX/copper replacement of galvanized supply piping.
Chronological damage-mitigation protocols for Arctic freezes, Gulf hurricanes and hailstorms, sudden slab/pipe bursts, and indoor life-safety alarms.
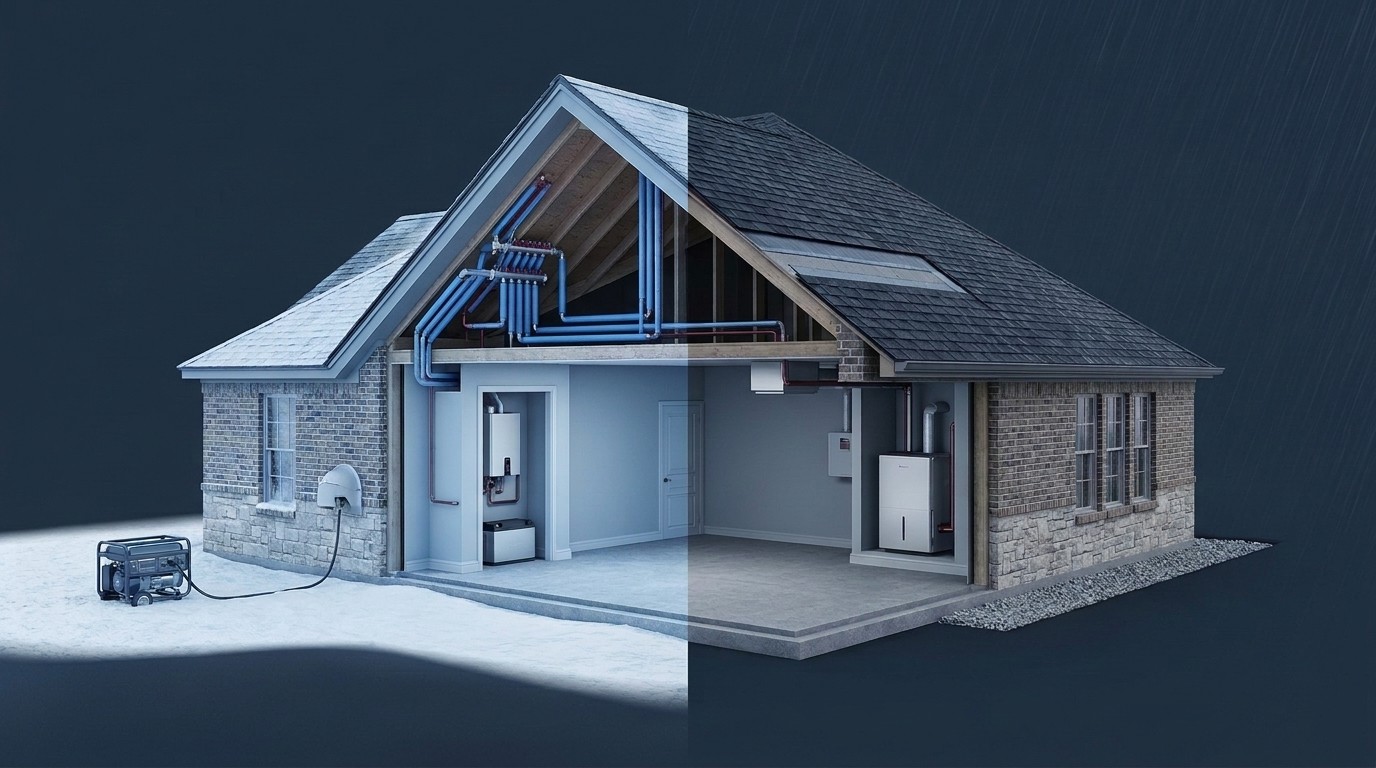
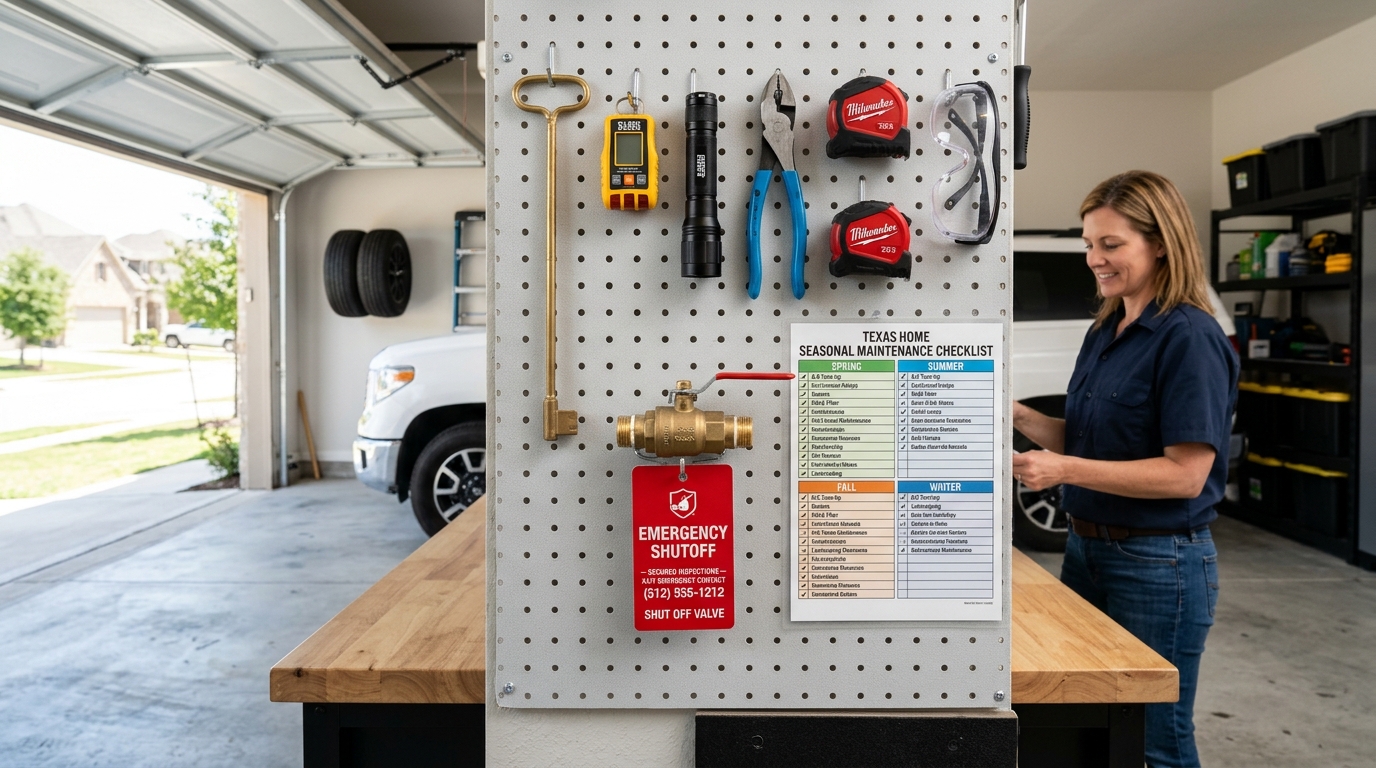
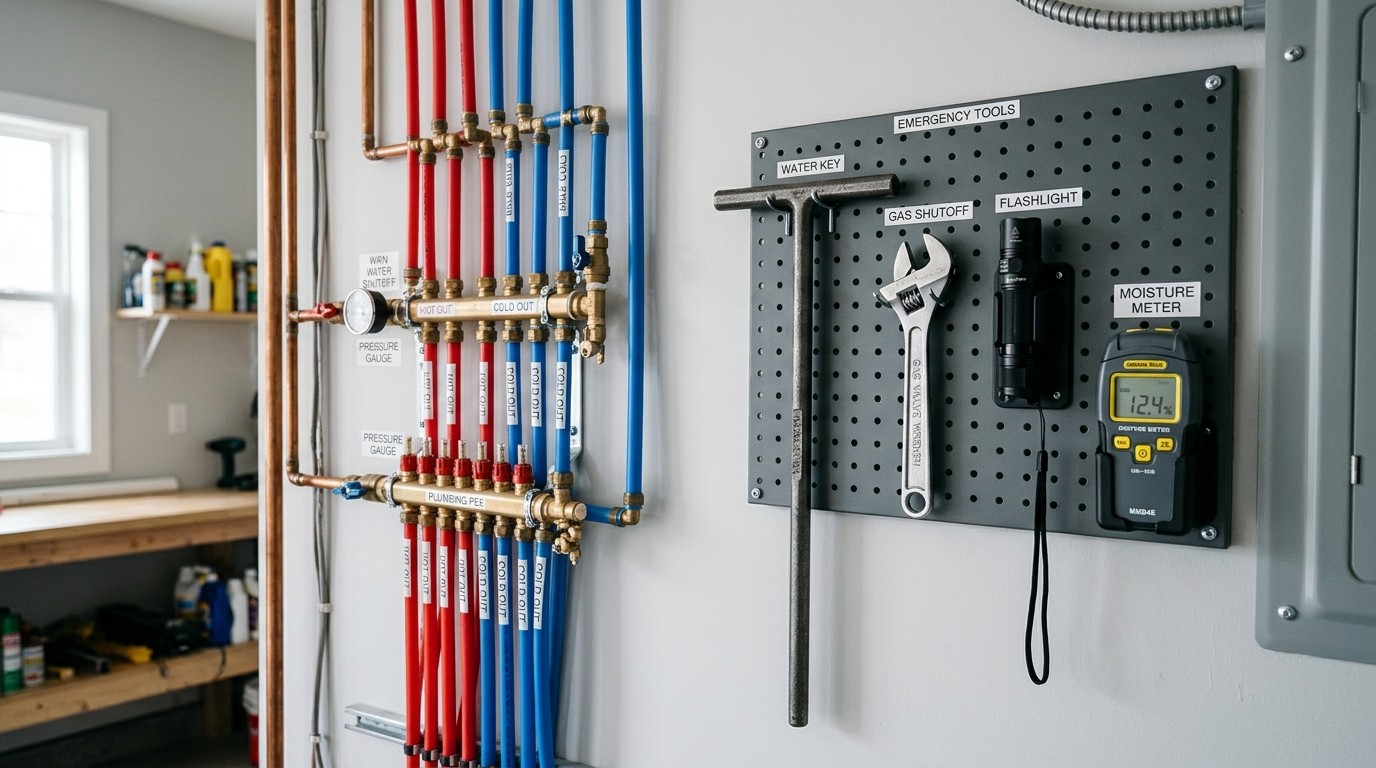
72-HOUR EMERGENCY PROTOCOLIn a residential emergency, 90% of preventable financial and structural damage happens in the first 30 minutes of confusion. Bookmark this spread and keep a steel curb key, 10-inch adjustable wrench, and headlamp mounted inside your garage utility door.
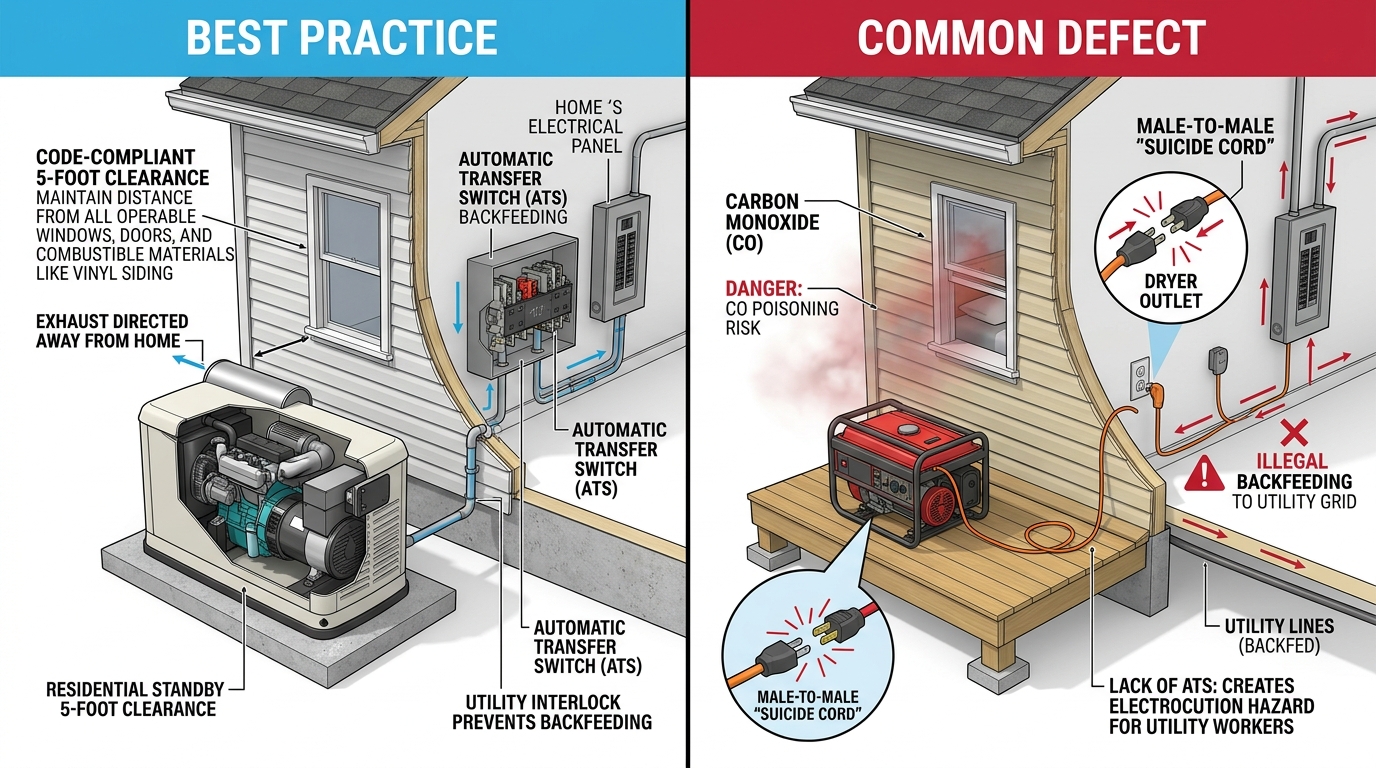
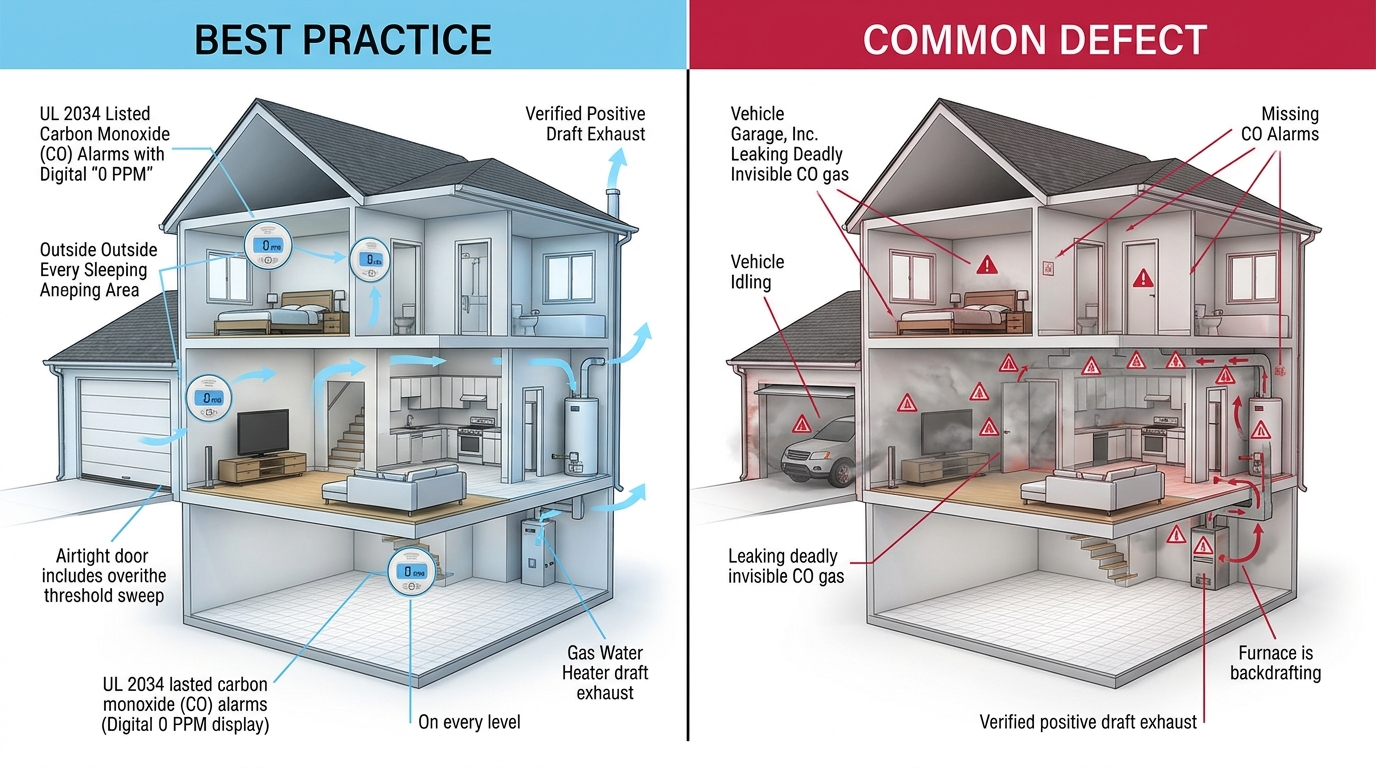
Life-Safety Rule: NEVER run a portable generator, gas pressure washer, charcoal grill, or unvented camp heater inside a garage, covered porch, or within 20 feet of any window or soffit—odorless carbon monoxide penetrates walls and kills within minutes.
Phase 1: T-Minus 24 Hours Before Sub-25°F Front
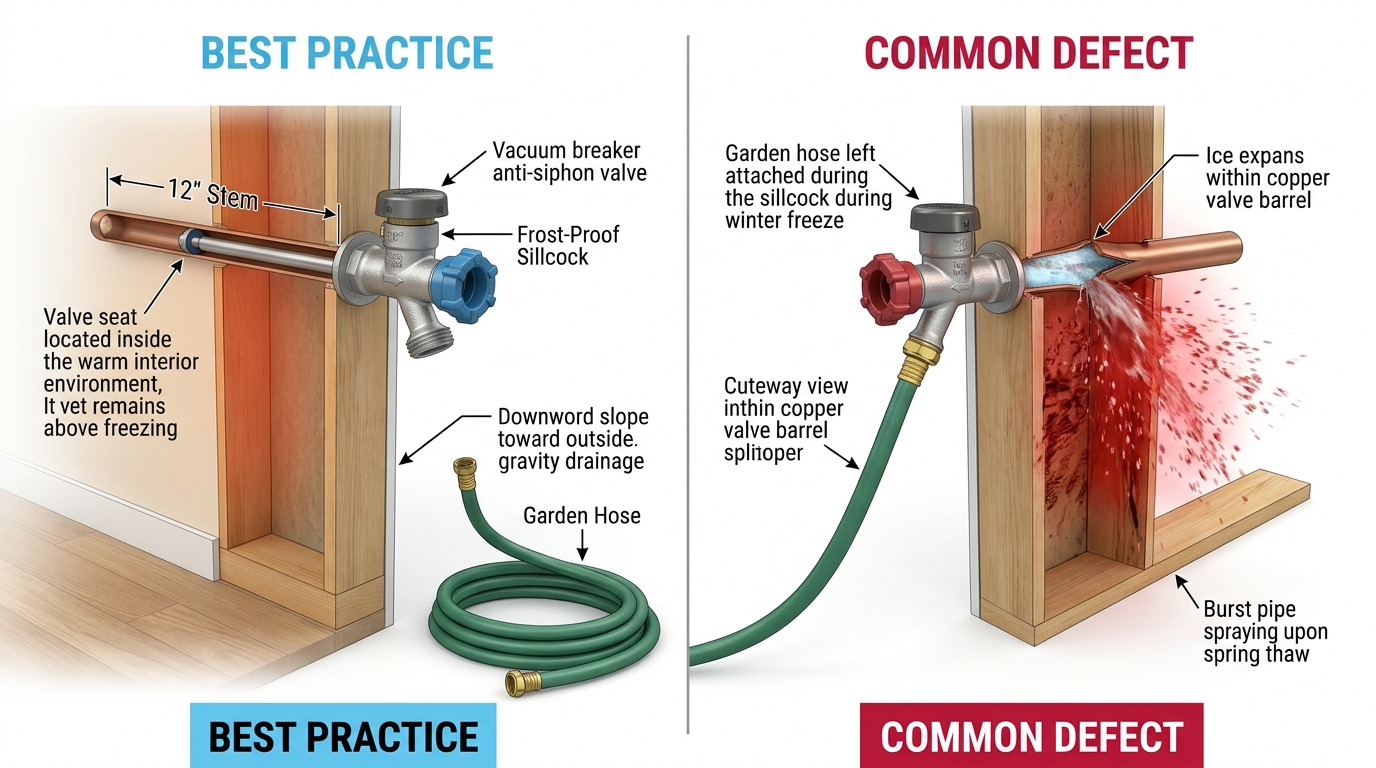
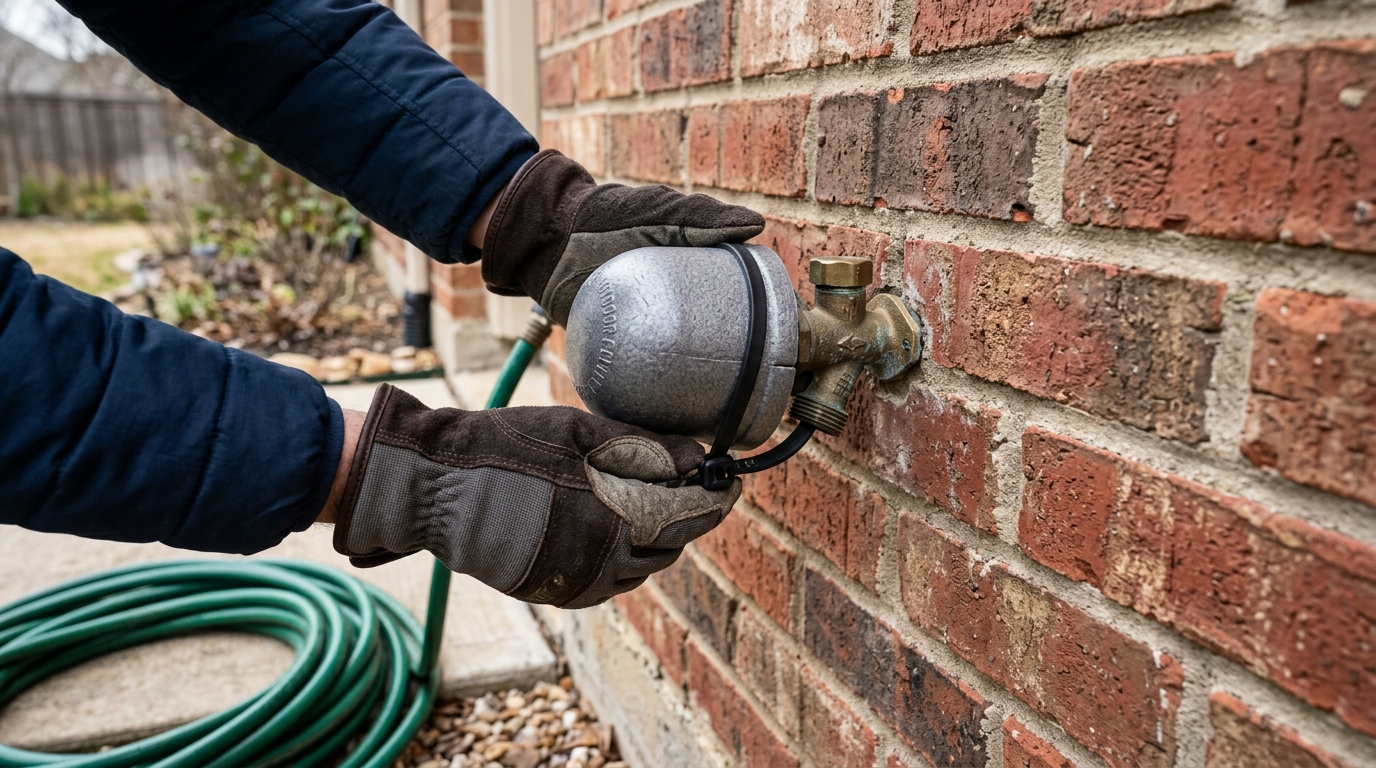
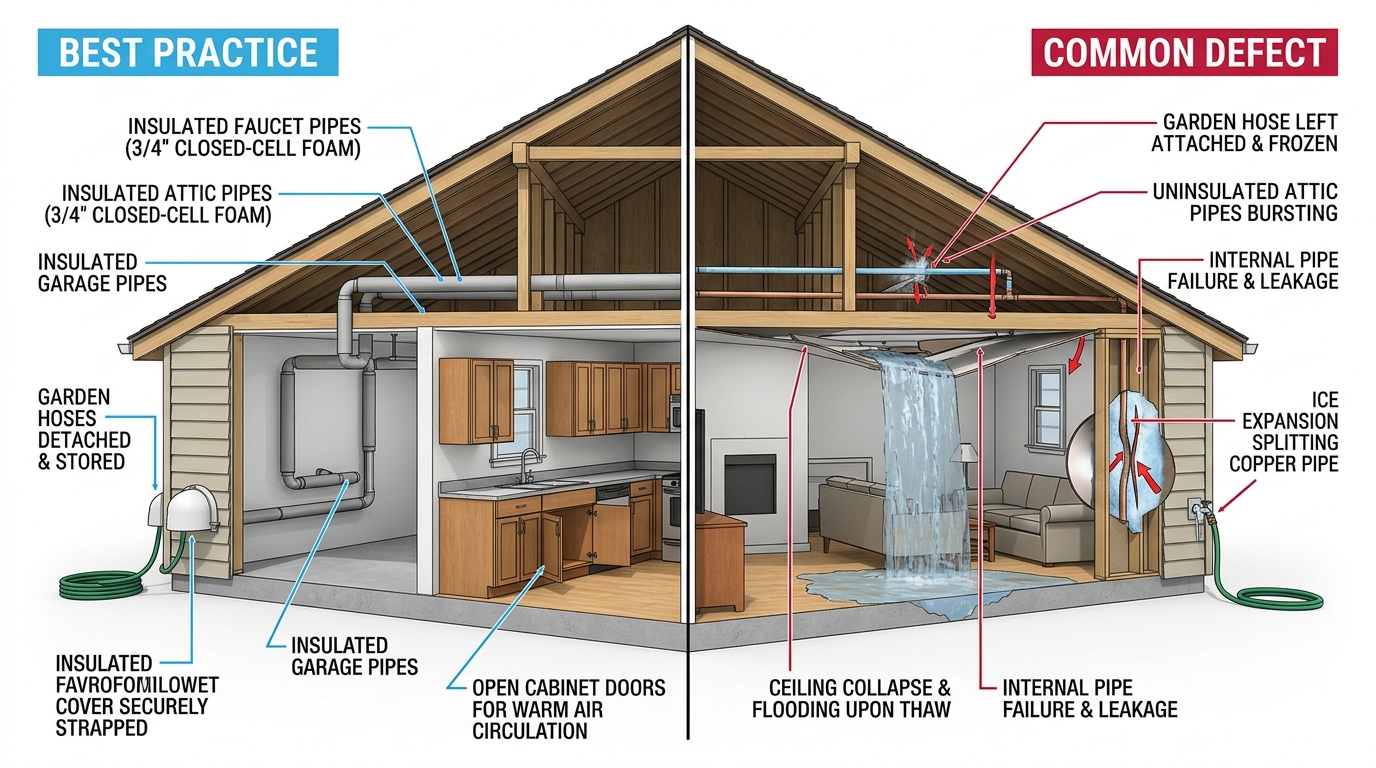
Disconnect every garden hose (attached hoses trap ice inside frost-proof stems and split pipe walls inside brick), wrap hose bibbs, and open kitchen/bath vanity doors on exterior walls.
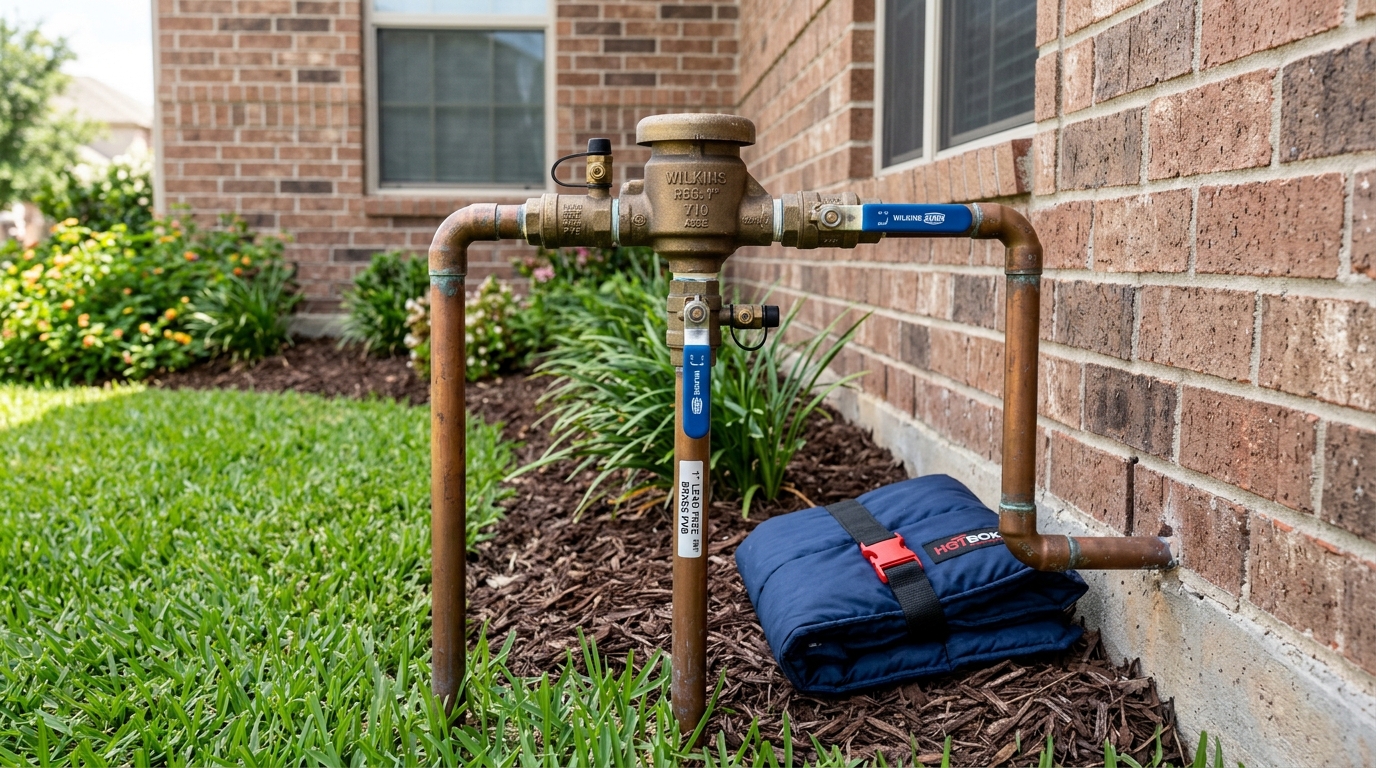
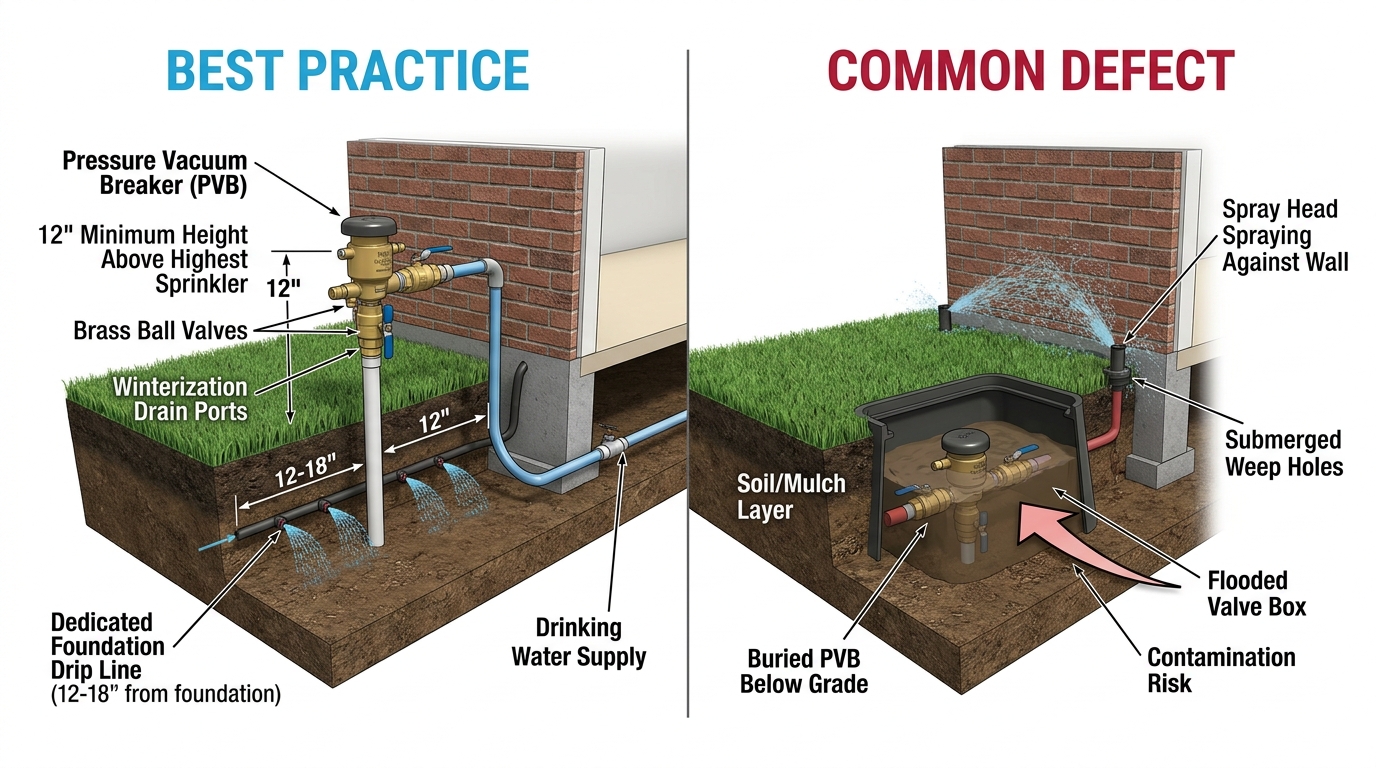
Close the isolation ball valves feeding your exterior lawn-sprinkler backflow preventer (PVB) and open its two small test cocks at a 45-degree angle so trapped water drains before freezing.
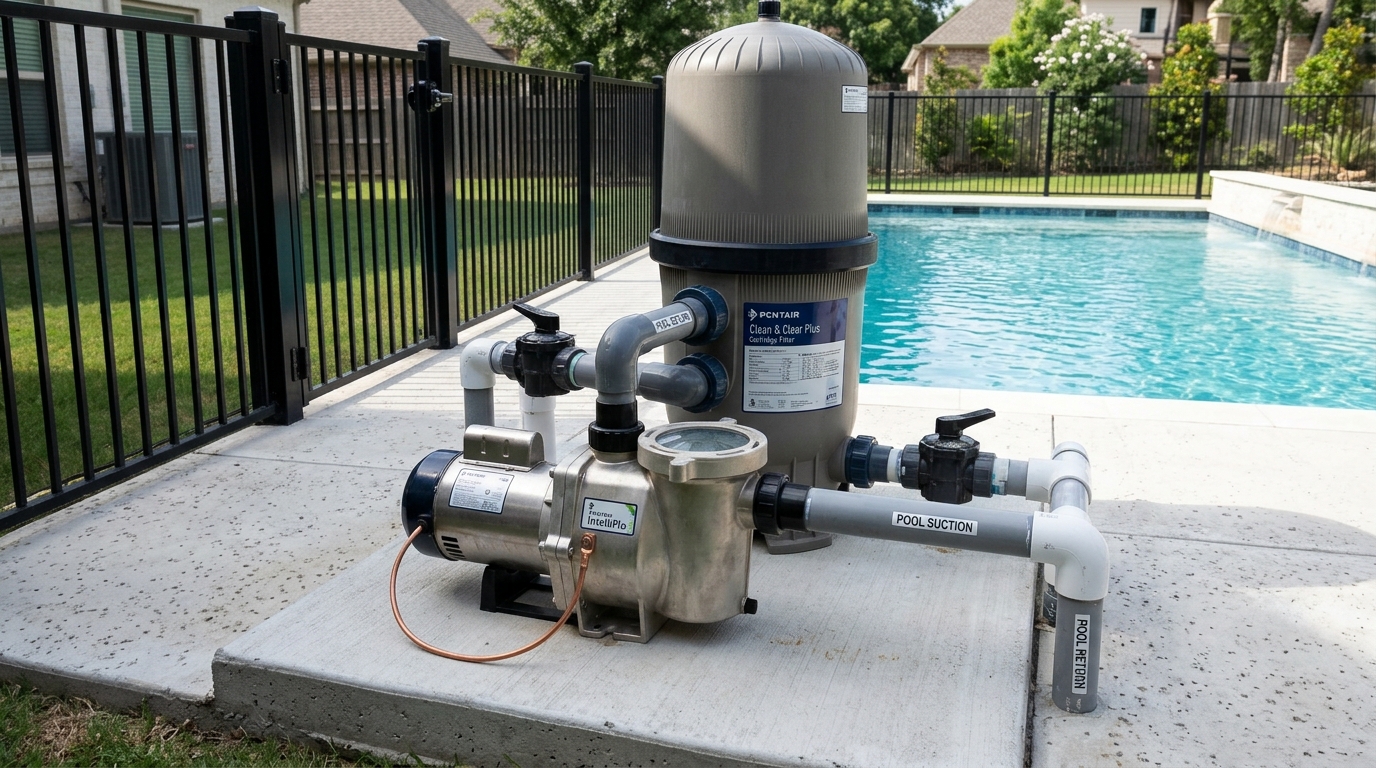
Verify pool freeze-guard automation is running continuous circulation—or pull pump/filter/heater drain plugs completely if prolonged grid outages are forecast—and confirm your exterior tankless water heater has battery backup power.
Phase 2: Grid Power Loss During Sub-Freezing Temperatures
If indoor temperatures drop toward 45°F during an outage, shut OFF the house main water valve (or street curb meter) immediately and open the lowest indoor and outdoor faucets to depressurize overhead attic PEX and copper lines.
Unplug and drain any exterior-mounted tankless water heater via its bottom filter/drain screw once grid and backup battery power are lost—frozen copper heat exchangers cost $1,200–$2,400 to replace.
Consolidate family members and pets into one interior room, close unused room doors, and switch off major 240V HVAC/water-heater breakers to prevent compressor surge damage when utility power flickers back on.
Once temperatures climb above 36°F, close all indoor/outdoor faucets, crack the main water valve open just 1/4 turn until pipes fill and hiss stops, then close it and confirm silent walls before opening fully.
Watch the small low-flow triangle on the street water meter for 2 full minutes with all fixtures off—any rotation signals a split pipe in an attic, garage ceiling, or exterior wall cavity.
Inspect attic insulation, garage ceilings, and exterior hose-bibb rooms while testing each hose bibb individually before restoring normal domestic water pressure and staged HVAC heating.
Life-Safety Rule: Stay clear of downed utility lines (treat every fallen wire and wet metal fence as energized at 7,200V) and never stand beneath a sagging, water-blistered drywall ceiling—saturated gypsum and wet insulation collapse suddenly at 8+ lbs/sq ft.
Walk all four exterior elevations and photograph roof slopes, window frames, fencing, and AC condenser fins with smartphone timestamps to establish indisputable pre-storm condition proof.
Clear leaves from gutters and yard catch basins, anchor or store patio furniture and grill tanks, and install TDI-rated coastal windstorm shutters or pre-cut structural panels where equipped.
Shut off automatic lawn irrigation, fully charge portable power banks, fill clean drinking-water containers, and photograph contents of refrigerators/freezers for food-spoilage riders.
Inspect the exterior from the ground first: check the overhead electric weatherhead, gas meter risers, leaning brick chimneys, missing ridge/hip shingles, and hail-spattered window screens or soft aluminum AC fins.
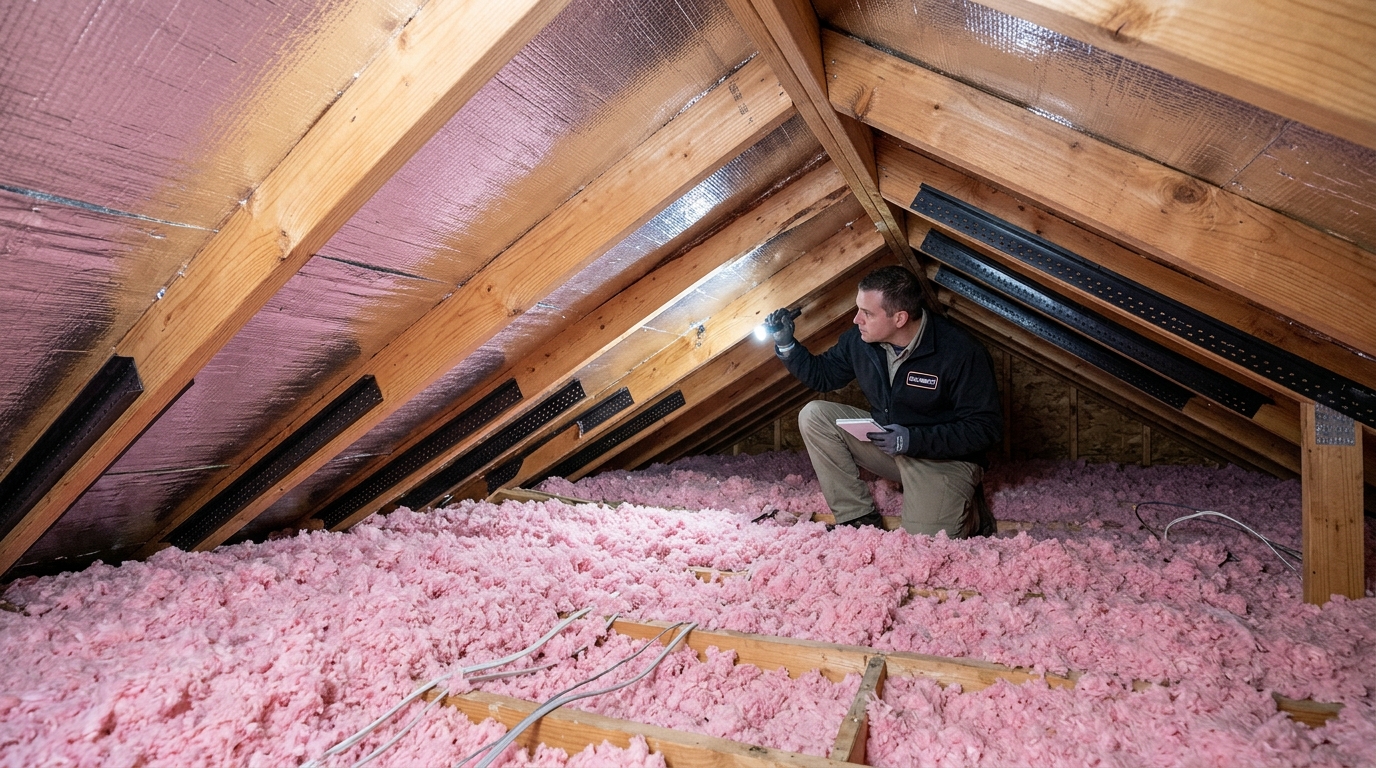
Enter the attic safely with a bright flashlight to check roof decking around plumbing vents, valleys, and chimney crickets—dark wet OSB rings or daylight pinholes appear in the attic days before staining living-room ceilings.
If a ceiling paint blister bulges with trapped rainwater, place a 5-gallon bucket underneath and pierce a small relief hole at the lowest point with a screwdriver to drain weight safely before the whole sheet tears down.
Phase 3: Hours 12–72 — Dry-Out & Claim Protection
Have a reputable local roofer secure weighted/batten tarps over active roof openings and save all invoices—Texas homeowners policies require reasonable emergency mitigation to prevent secondary interior rain damage.
Run AC plus portable dehumidifiers immediately to pull indoor relative humidity below 55% within the critical 24-to-48-hour window before damp drywall triggers mold colonization.
File your carrier claim yourself, require a physical Texas office address and general liability certificate from any contractor, and never sign a blanket Assignment of Benefits or pay cash deductibles upfront to storm chasers.
PLAYBOOK 3 • PRESSURIZED FLOOD & SLAB DIAGNOSTIC
Sudden Pipe Burst, Slab Leak & The 2-Minute Curb-Meter Triangle Test
Life-Safety Rule: If pressurized water reaches wall outlets, submerged extension cords, or the floor beneath your electrical panel, DO NOT step into the water—evacuate and call your electric utility emergency line for a remote smart-meter disconnect.
Phase 1: Minutes 0–5 — Isolate Water & Protect Heater
Close your house main water shutoff valve (garage wall, utility closet, or front flowerbed valve box) clockwise/90-degrees; if stuck or bypassed, use a steel curb key at the street meter box to turn the curb stop lug 90 degrees until padlock holes align.
Switch OFF the 240V water-heater breaker (electric tank) or rotate the gas valve dial to PILOT/OFF (gas tank) immediately so siphoning water does not expose upper heating elements or overheat the tank flue.
Open the lowest outdoor hose bibb and a first-floor bathtub spout to relieve residual line pressure and stop overhead ceiling/attic water flow within seconds.
Phase 2: The 2-Minute Curb-Meter Triangle Test (Hidden Leaks)
Perform this test immediately if you feel a localized warm spot on tile/LVP flooring, hear faint pipe hissing when quiet, spot dome-shaped flooring buckles, or receive an unexplained water-bill jump.
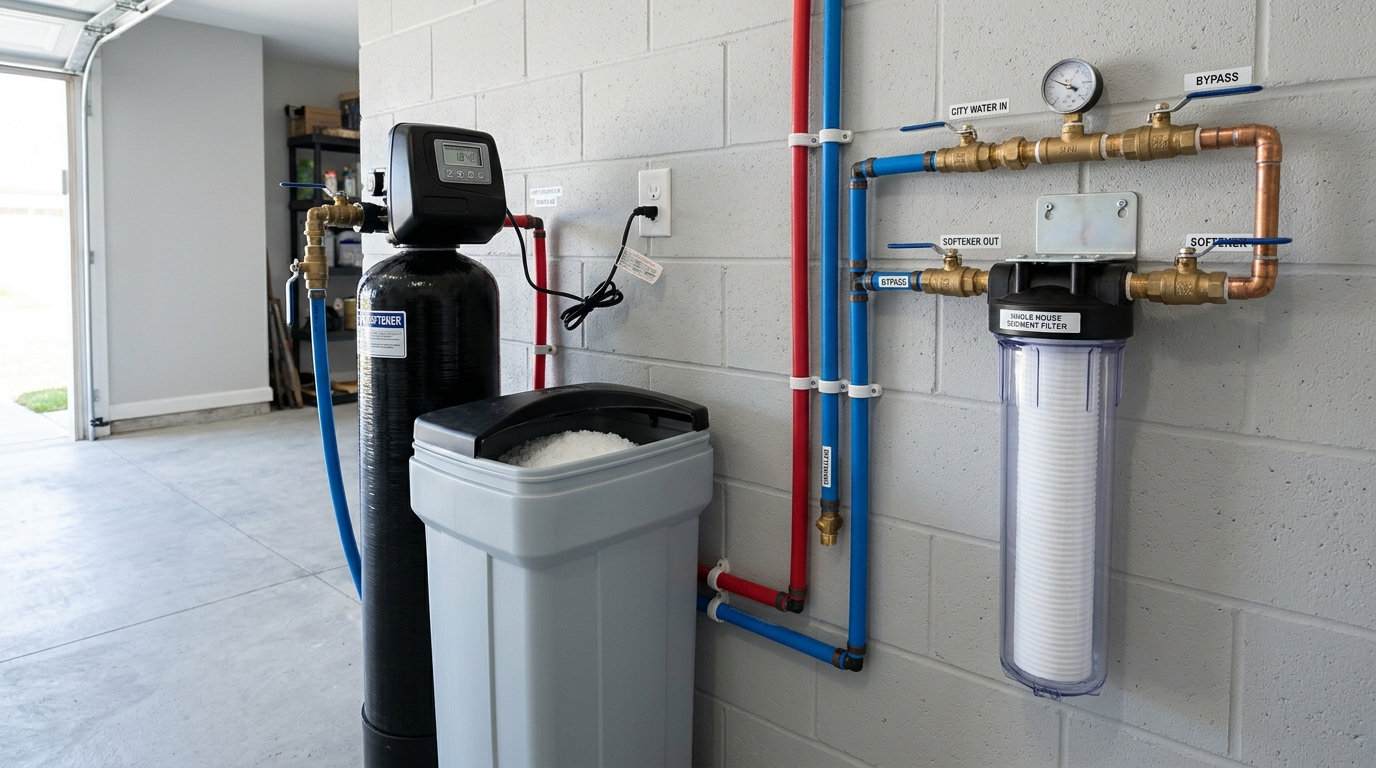
Verify every indoor faucet, toilet fill valve, refrigerator ice maker, water softener regeneration cycle, and irrigation zone is completely OFF, then lift the street meter lid and wipe the glass lens clean.
Watch the tiny red/black low-flow leak-detector triangle or gear for 2 minutes: if it turns, close your house main shutoff valve—if the meter stops turning, the leak is inside the house or under the slab; if it keeps turning, the leak is in the buried yard service line between street and house.
Phase 3: Hours 2–48 — Structural Extraction & Plumb Plan
Extract standing water immediately with a wet/dry shop vacuum, pull saturated carpet padding (pad acts like a sealed sponge against concrete), and remove baseboards to ventilate damp drywall bottom edges.
Run LGR dehumidifiers and high-airflow fans continuously until a moisture meter confirms wood bottom plates read under 15% MC—document daily readings with photos if filing a sudden-discharge claim.
Hire a TSBPE-licensed Texas Master Plumber equipped with acoustic and tracer-gas detection to compare overhead PEX manifold rerouting (zero slab jackhammering) against exterior perimeter tunneling.
PLAYBOOK 4 • ACUTE INDOOR LIFE-SAFETY ALARMS
Natural Gas Odor, Carbon Monoxide Alarm, Electrical Burning Smell & Main Sewer Backup
Life-Safety Rule: When you smell mercaptan ("rotten eggs") or hear a hissing gas line, NEVER flip a light switch, unplug an appliance, use a garage door button, or make a phone call inside—a single contact arc can ignite an explosive air-gas mixture.
Phase 1: Natural Gas Odor or Sounding Carbon Monoxide Alarm
Evacuate every occupant and pet into fresh outdoor air immediately, leaving doors open as you exit without operating any light switches, exhaust fans, or garage openers.
From across the street, call 911 and your natural gas utility emergency dispatch; rotate the exterior gas meter supply lug 90 degrees OFF with an adjustable wrench ONLY if it is outdoors, uninvolved in fire, and safe to approach.
Never turn a closed gas meter valve back ON yourself, and do not re-occupy after a CO alarm until fire crews measure 0 ppm indoor CO and a licensed HVAC/plumbing technician repairs the cracked heat exchanger or backdrafting flue.
Phase 2: Acrid "Fishy" or Melting-Plastic Electrical Odor
Recognize the signature warning: overheating thermoset plastic in breakers, receptacles, and wire nuts emits a sharp, unmistakable chemical "dead-fish" or ammonia-like odor before visible smoke appears.
Check suspect outlets, light switches, and the closed breaker panel face cautiously using the back of a dry hand; if smoking, buzzing loudly, or hot to touch, flip the main disconnect OFF only if dry and safe—otherwise evacuate and call 911.
Switch individual suspect branch breakers (AC, water heater, space-heater outlet, range) OFF and leave them off until a TDLR-licensed electrician locates and replaces the high-resistance arcing connection.
Phase 3: Main Sanitary Sewer Backup (Category 3 Blackwater)
If flushing a toilet makes dark water gurgle up inside a ground-floor shower or tub, halt ALL household water drains immediately—do not run sinks, laundry, dishwashers, or toilets.
Locate your 4-inch white PVC exterior yard cleanout caps and unscrew carefully while standing back: if sewage overflows outdoors, the blockage is downstream toward the municipal main (relieving indoor pressure); if the pipe is dry, the clog is upstream under your house slab.
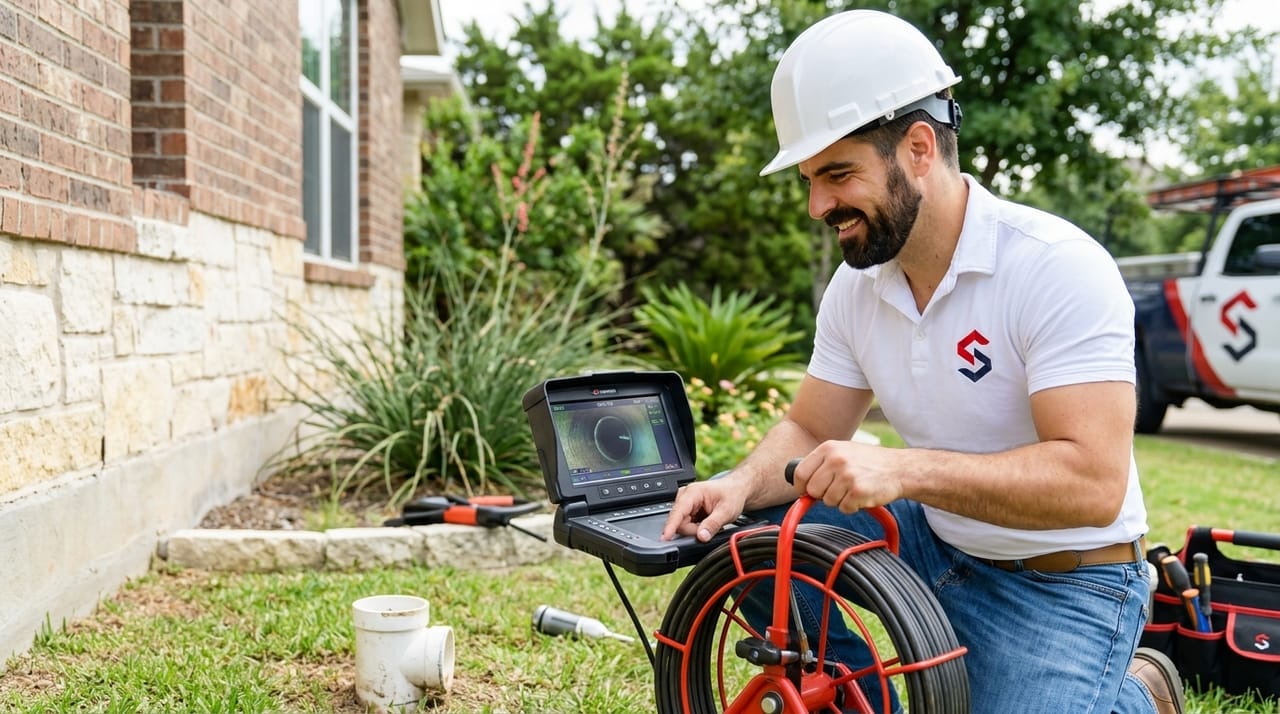
Treat all backed-up sanitary sewage as pathogenic Category 3 blackwater—keep children and pets out, wear nitrile gloves and N95 protection, discard saturated porous carpet/pad, and hire a licensed plumber with a sewer camera inspection.
How One $0 Oversight Triggers a $35,000 Chain Reaction — Plus the 11th-Month Builder Warranty Playbook
Understanding cross-system building physics and capturing builder-covered defects before Texas 1-Year, 2-Year, and 10-Year express warranties expire.
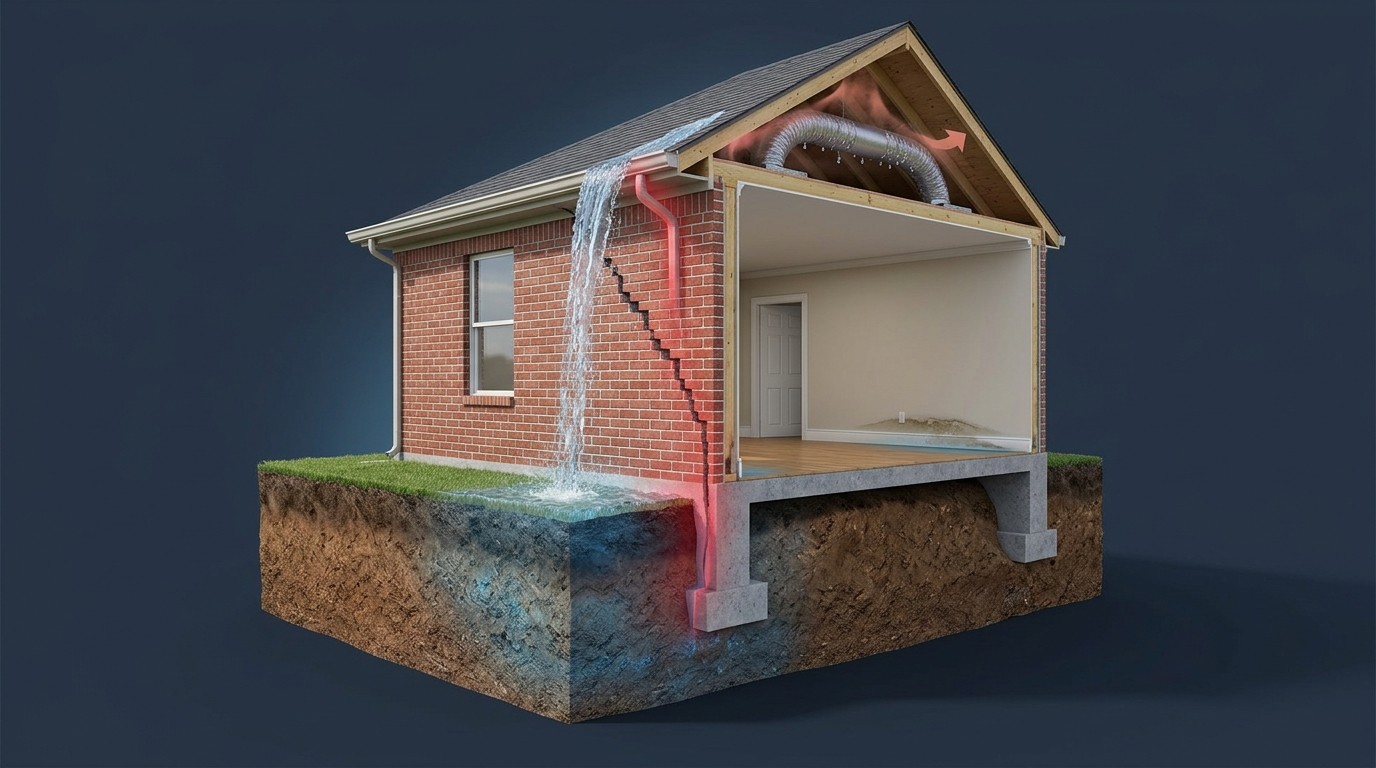
COMPOUNDING DEFECT PHYSICSA house is a single coupled thermodynamic and structural machine. Stopping a defect at Stage 1 with a $12 downspout splash extension prevents five downstream trades from ever needing to visit your driveway.
Part A: The $0-to-$35,000 Roof-to-Foundation Water Failure CascadeBreak the Chain at Stage 1 or 2
Live-oak leaves choke a corner downspout elbow during spring storms, dumping 620 gallons of roof runoff per inch of rainfall into a concentrated mud pocket right against the concrete slab.
STAGE 2$4,500–$12,000 French drain + corner foundation piers
Stage 2: Expansive Clay Saturation & Corner Slab Movement ($4,500–$12,000)
High-plasticity Texas smectite clay absorbs ponded water and heaves upward at the corner while drought-dried soil 20 feet away contracts, twisting the perimeter grade beam past L/360.
Brittle masonry steps open along mortar joints and racked window frames pull 3/16 inch away from sun-hardened perimeter caulk, opening direct bulk-water funnels behind the cladding.
Framing movement gaps attic access hatches and ceiling chases; unconditioned 75°F dew-point air infiltrates and condenses continuously onto cold 52°F sheet-metal supply boots and plenums.
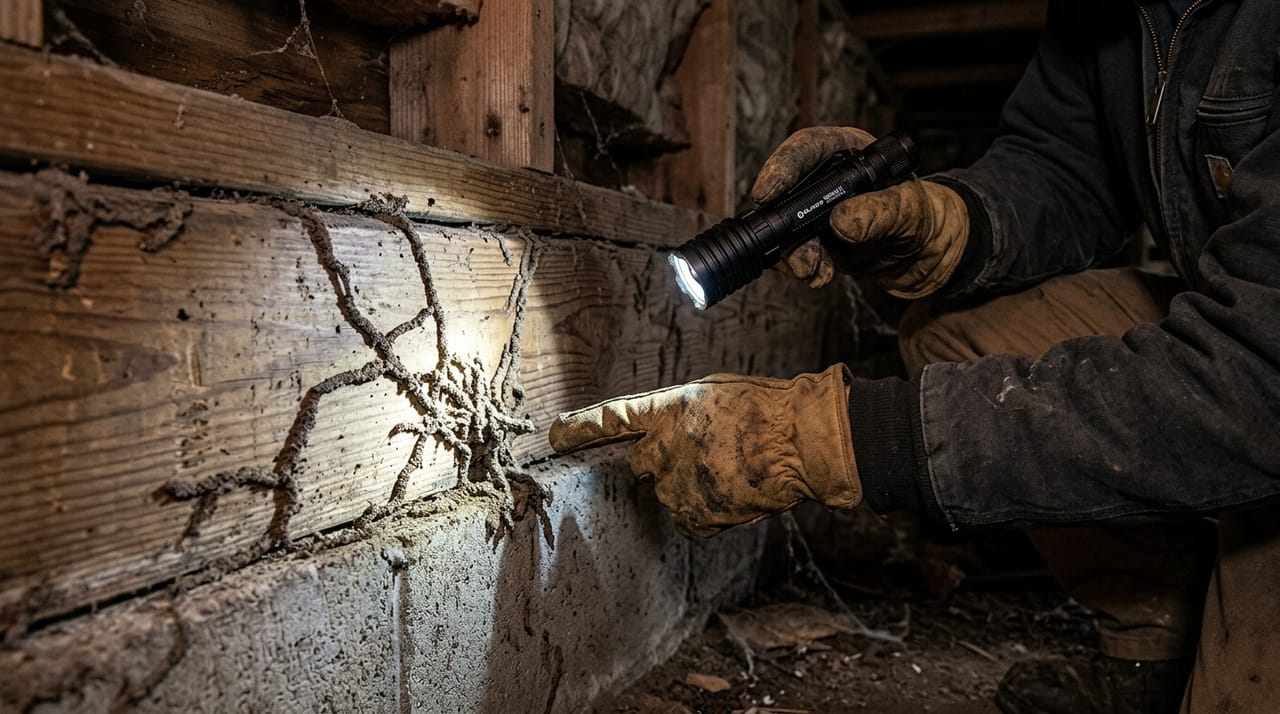
Chronically wet sill plates emit wood-decay chemical cues that guide subterranean termite colonies up through slab shrinkage cracks and buried brick weeps into load-bearing wall studs.
11TH-MONTH WARRANTY AUDITNever wait until Month 12 to schedule your new-build warranty inspection: book an independent full-system diagnostic in Month 10 or early Month 11 so your written defect list is timestamped inside the builder portal AND sent via USPS Certified Mail before Day 365.
Part B: Texas 1-2-10 New-Construction & 11th-Month Builder Warranty Master WalkthroughAudit Before Deadlines Expire
Year 1: Workmanship & Materials (Month 11 Walkthrough Deadline)
Broadest "bumper-to-bumper" builder obligation covering roof flashings, siding/masonry joints, lot grading settlement, doors, windows, cabinetry, tile/grout, drywall nail pops, and trim workmanship. Expires strictly at midnight on the first anniversary of closing.
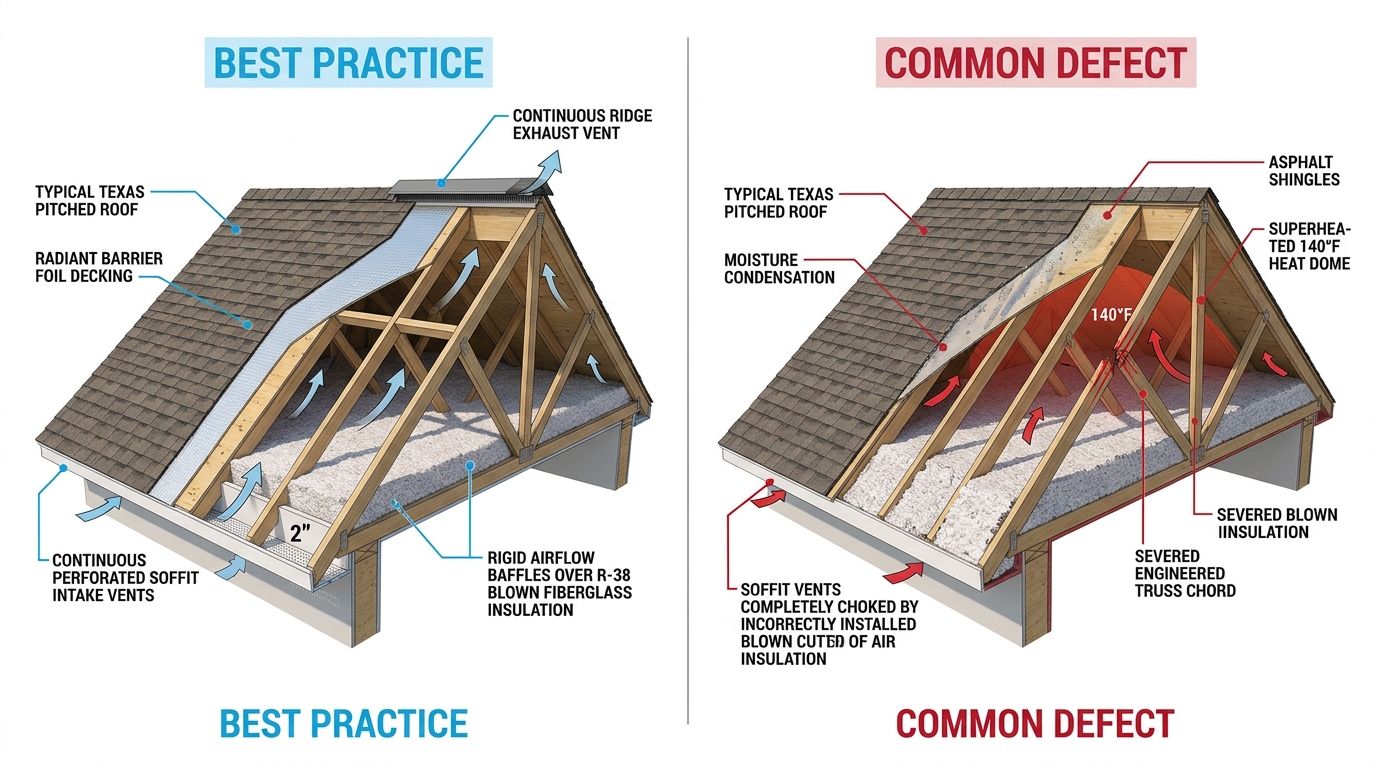
Roof plumbing-vent boots, lifted ridge/valley shingles, unpainted flashing nails, and attic insulation blown over soffit intake vents during production rush
Backfill trench settlement along foundation perimeters creating negative yard drainage, plus popped mortar patches over post-tension cable pockets
Out-of-square interior/exterior doors failing to latch, separated elastomeric window perimeter caulk, and uncaulked tub/backsplash change-of-plane joints
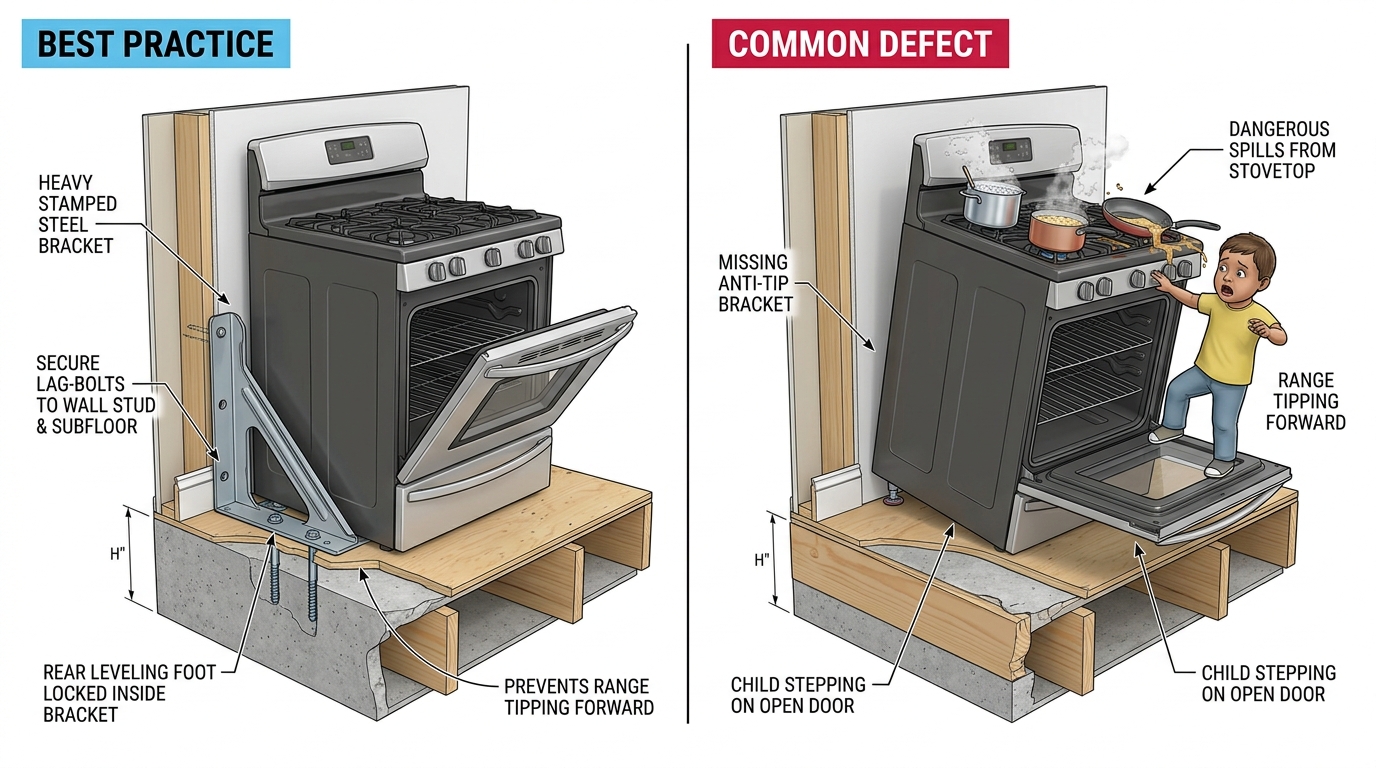
Unlabeled electrical panel directories, non-tripping GFCI/AFCI circuits, missing anti-tip range brackets, and starved second-floor bedroom AC airflow
Year 2: Mechanical, Electrical & Plumbing Delivery Systems
Covers concealed distribution systems behind drywall, in attics, and beneath slabs—supply and sanitary drain piping, gas lines, HVAC ductwork and refrigerant circuits, and branch/feeder wiring—for twelve months after cosmetic Year 1 coverage ends.
Attic supply plenum and flex-duct mastic collar separations leaking conditioned air into hot attics or sweating onto ceiling drywall
Slow evaporator coil refrigerant micro-leaks, improperly pitched primary/secondary condensate drains, and disconnected auxiliary pan float switches
Weeping PEX manifold crimps, gurgling or slow-draining sanitary branch bellies, and loose supply pipes causing water hammer inside walls
Nuisance AFCI/GFCI trips caused by shared neutral wiring errors or loose high-resistance panel lugs revealed under infrared thermal load
Years 1–10: Major Structural Load-Bearing Components
Covers load-bearing structural failure affecting residential habitability—post-tension slab foundations, grade beams, framing columns, floor joists, and roof trusses—subject to written third-party warranty tolerances (note: Texas Civil Practice & Remedies Code Sec. 16.009 shortens the builder statute of repose to 6 years when a qualifying written 1-2-6 warranty is provided, making early elevation baselines critical).
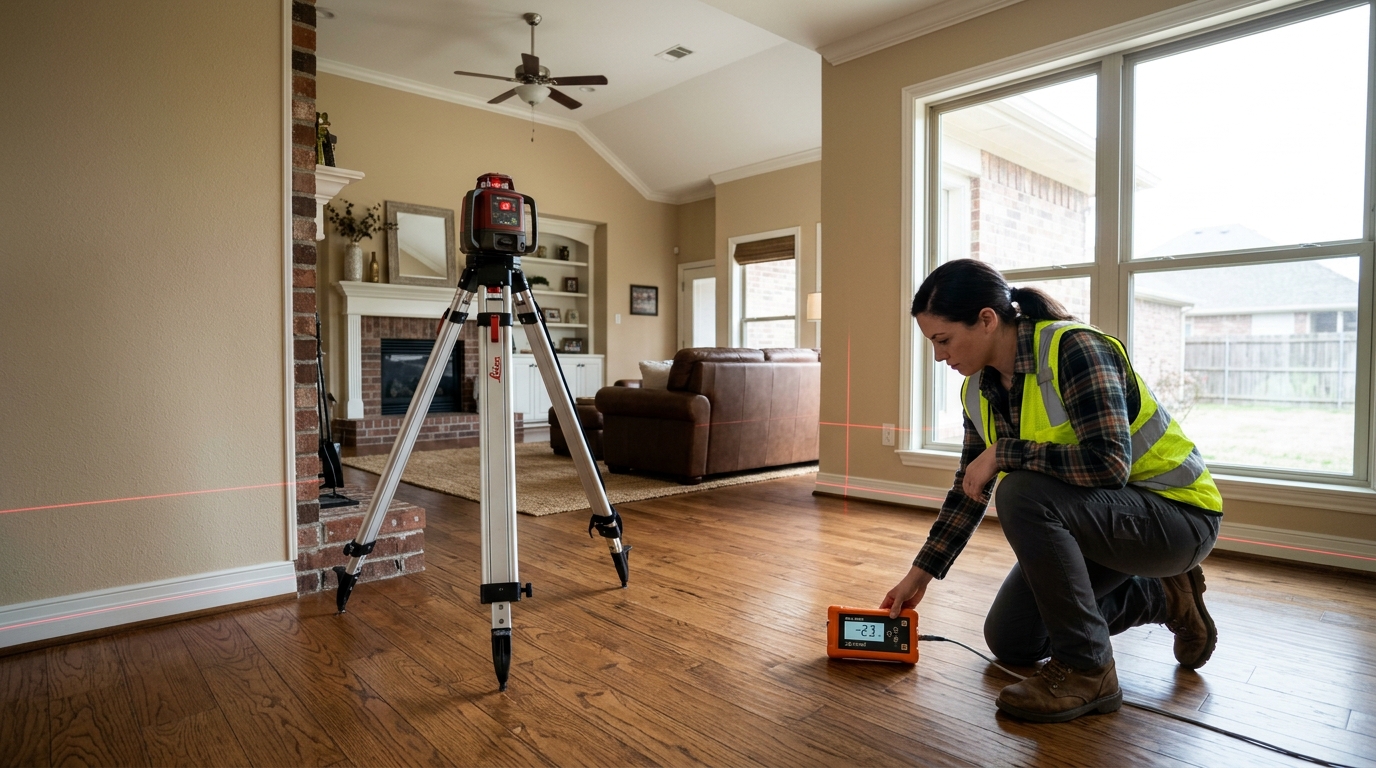
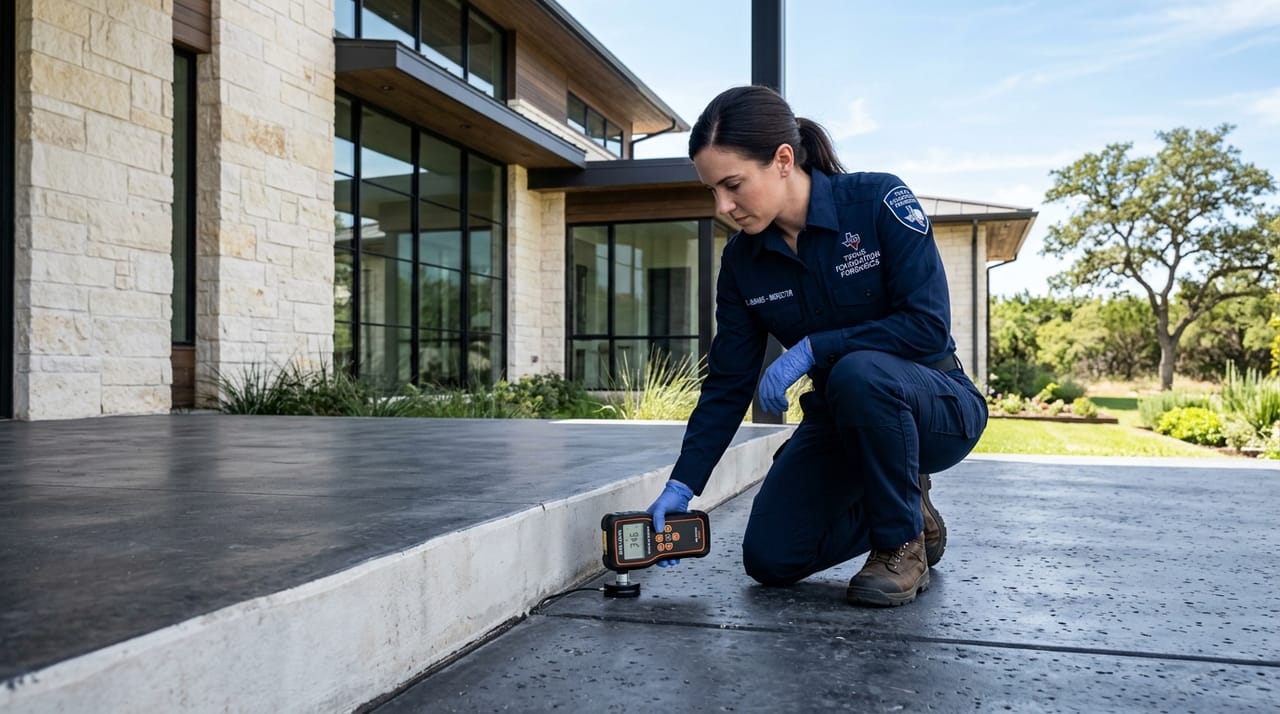
Quantitative digital elevation survey verifying whether slab differential curvature exceeds L/360 or overall planar tilt exceeds 1% across the foundation
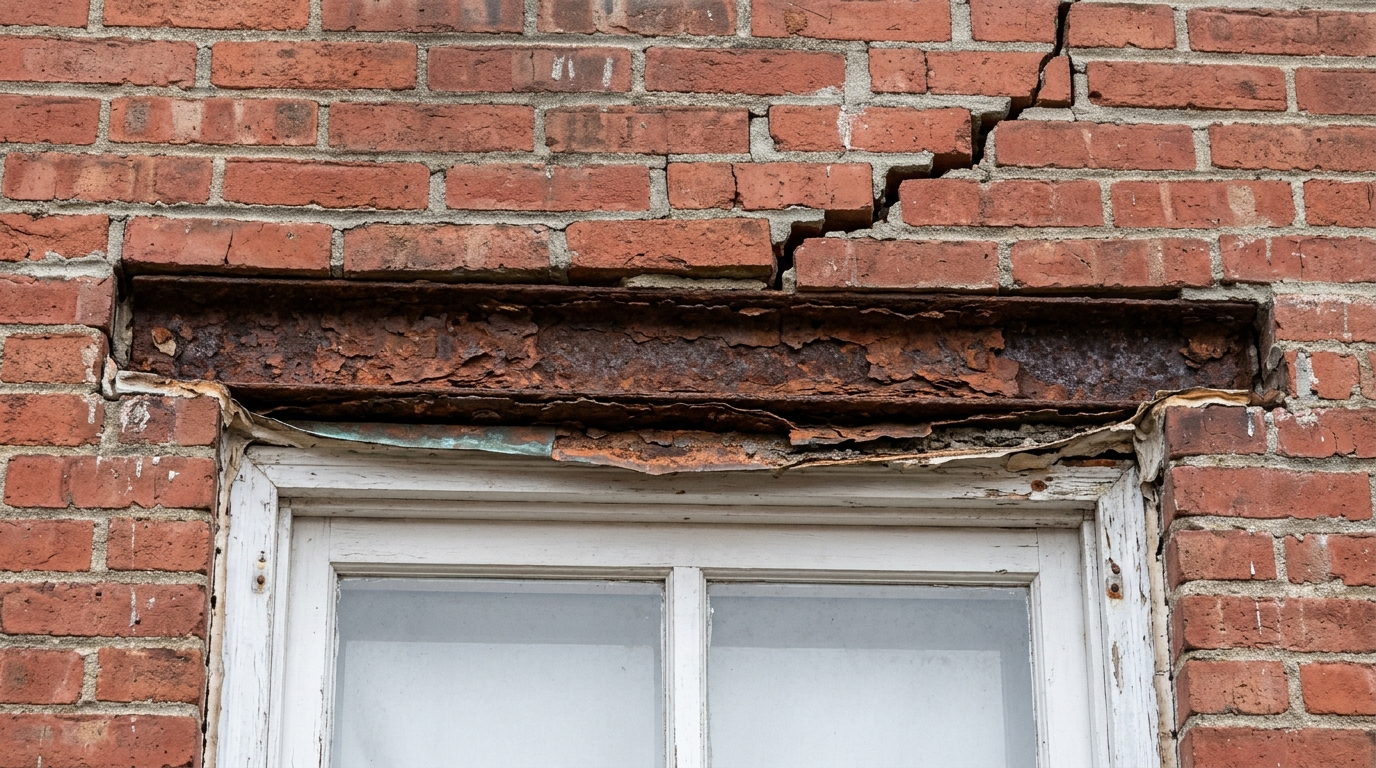
Widening diagonal shear cracks at window/door headers paired with stair-stepped exterior brick veneer separations exceeding 1/4 inch
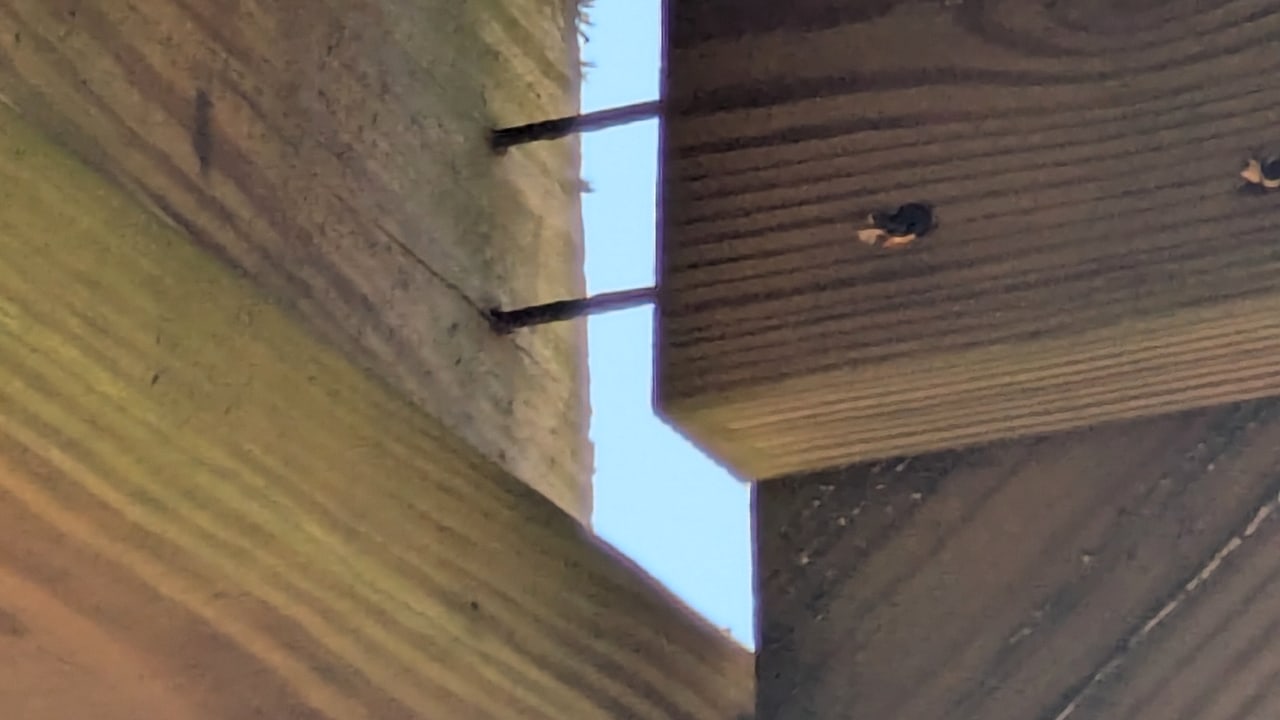
Split, bowed, or gusset-plate-separated engineered roof trusses, sagging ridge boards, or crushed load-bearing header framing
Sheared, corroded, or erupting post-tension steel tendon anchors pushing concrete spalls off the perimeter foundation beam
Chapter 1 covers the physical bones of your home from post-tensioned foundation slabs and roof framing down to doors, windows, fireplaces, and exterior decks. Learn how Texas soils, heat, and coastal storms affect each structural component.
SCAN FOR LIVE DIGITAL TOOLS & UPDATES
Chapter 1 Digital Companion
Foundations, Roof & Framing
Instant mobile access to foundation elevation inspection checklists, roof slope diagrams, and Texas framing code references.
Photorealistic 3D structural cross-section tracing gravity and wind loads from roof rafters and collar ties down through braced stud walls into a post-tensioned monolithic concrete slab resting on expansive Texas clay.
Tendon Grout Pocket:Recessed circular perimeter pocket where high-strength steel cable was stressed to 33,000 lbs and sealed with grout.
2
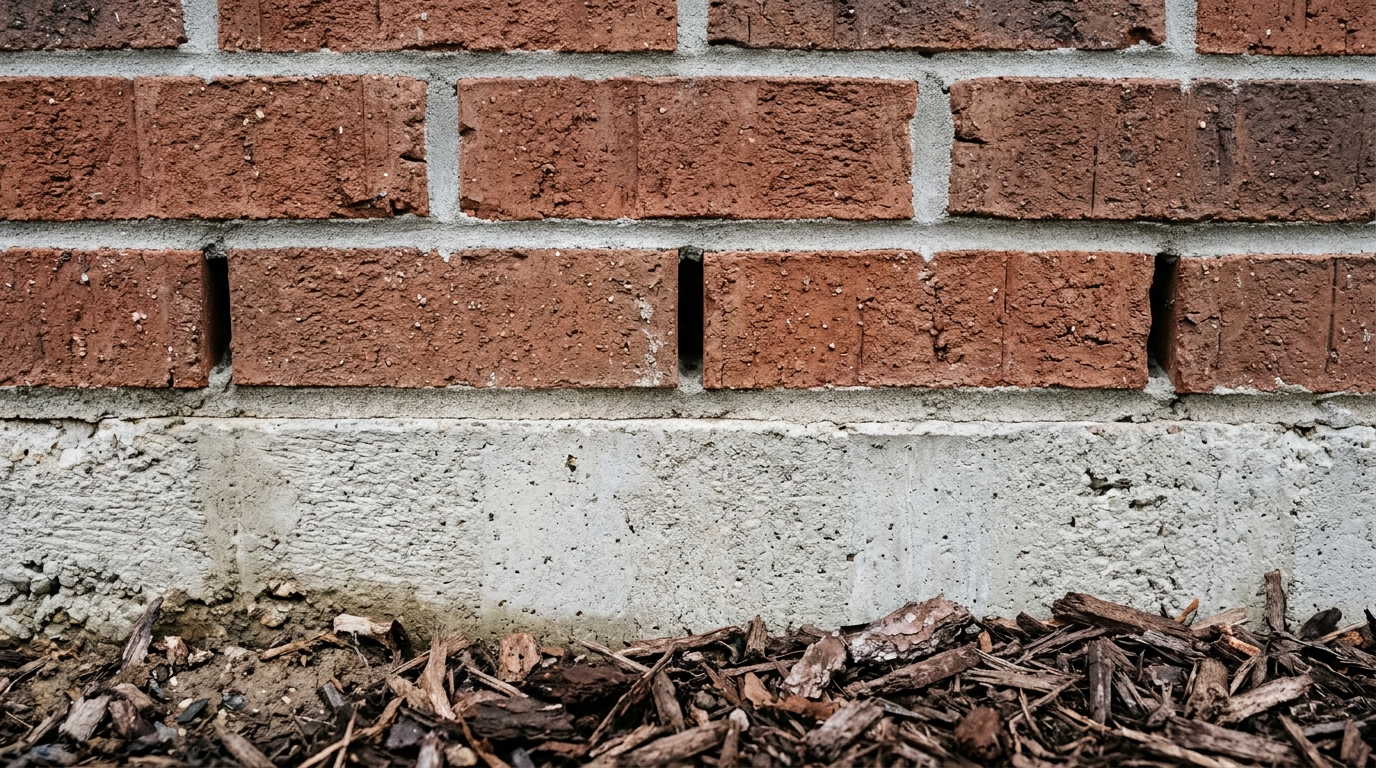
4-Inch Foundation Reveal:Clear vertical band of bare concrete slab required between ground soil and the bottom edge of brick veneer.
3
Brick Mortar Bed Joint:Sound horizontal mortar joint showing absence of diagonal stair-step shear cracking.
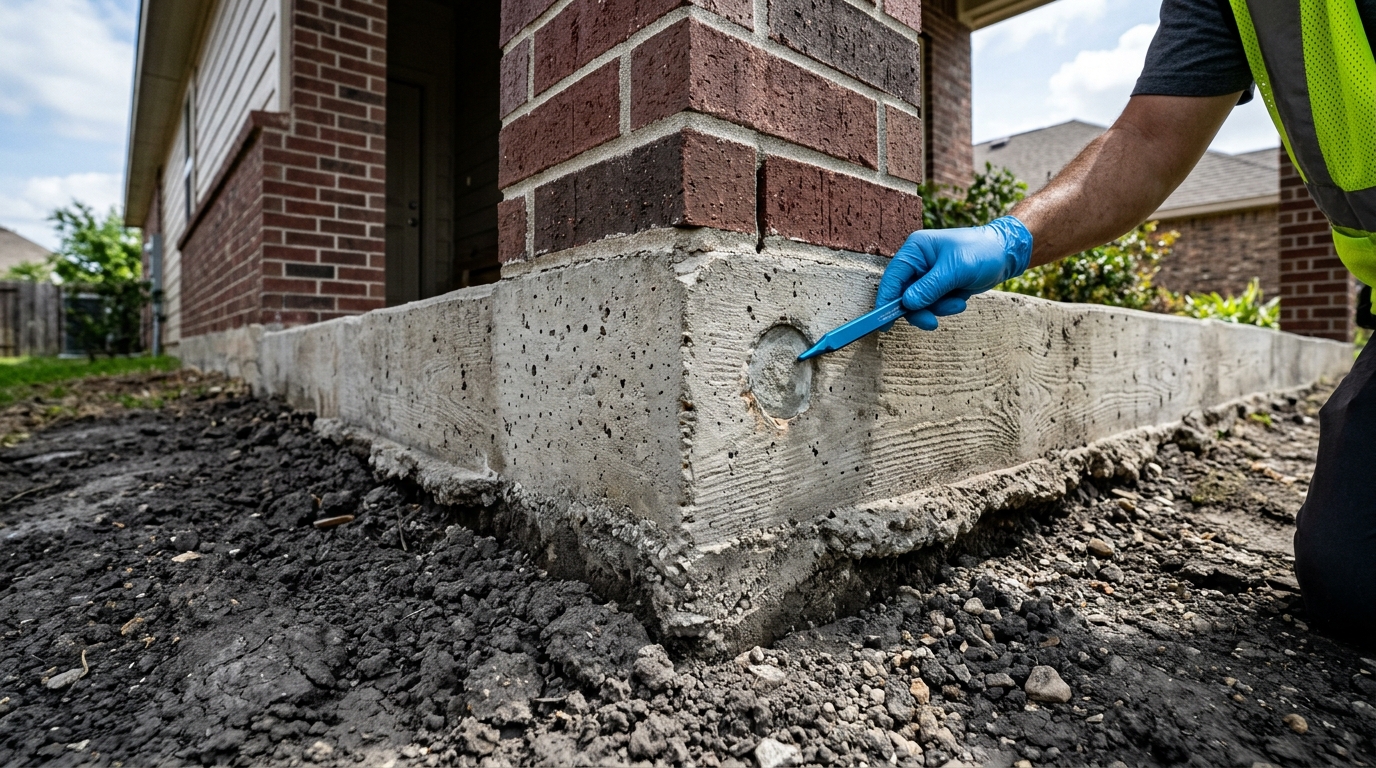
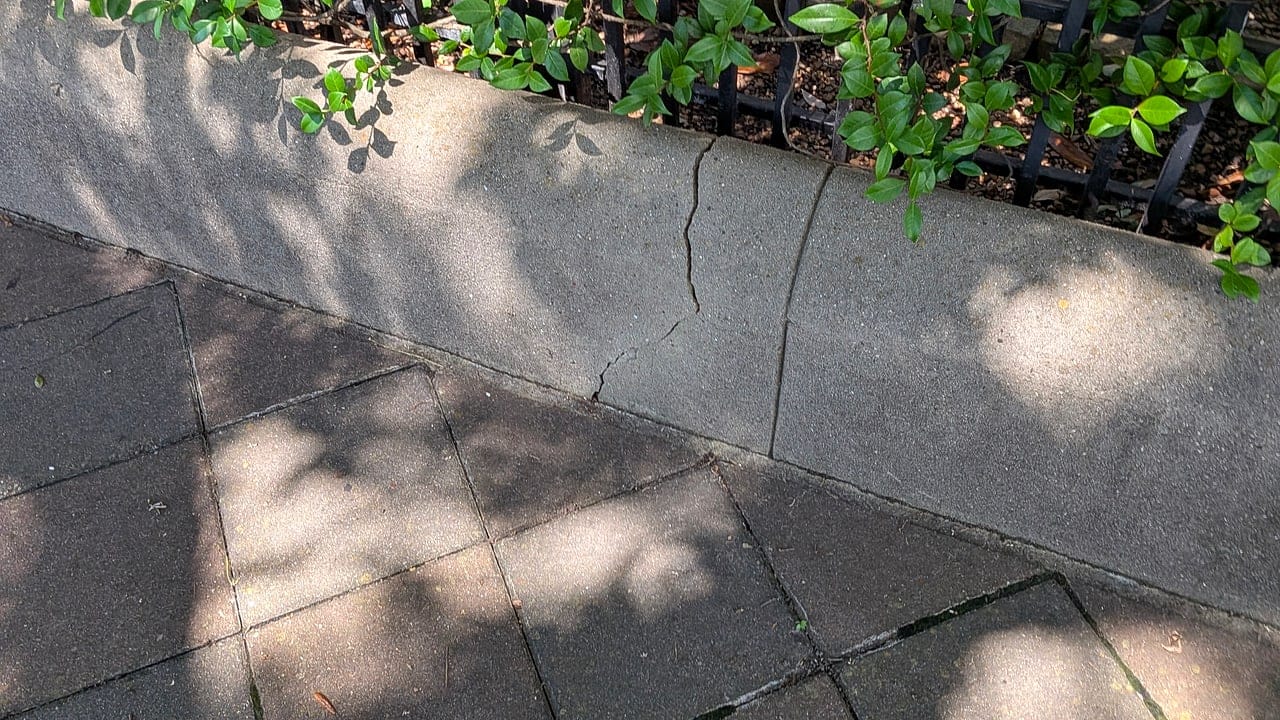
FIELD OBSERVATION • POST-TENSION SLAB CORNERClose-up field inspection of a residential post-tension slab edge in Texas showing the stamped tendon anchor pocket, proper 4-inch soil clearance, and absence of diagonal shear cracking.
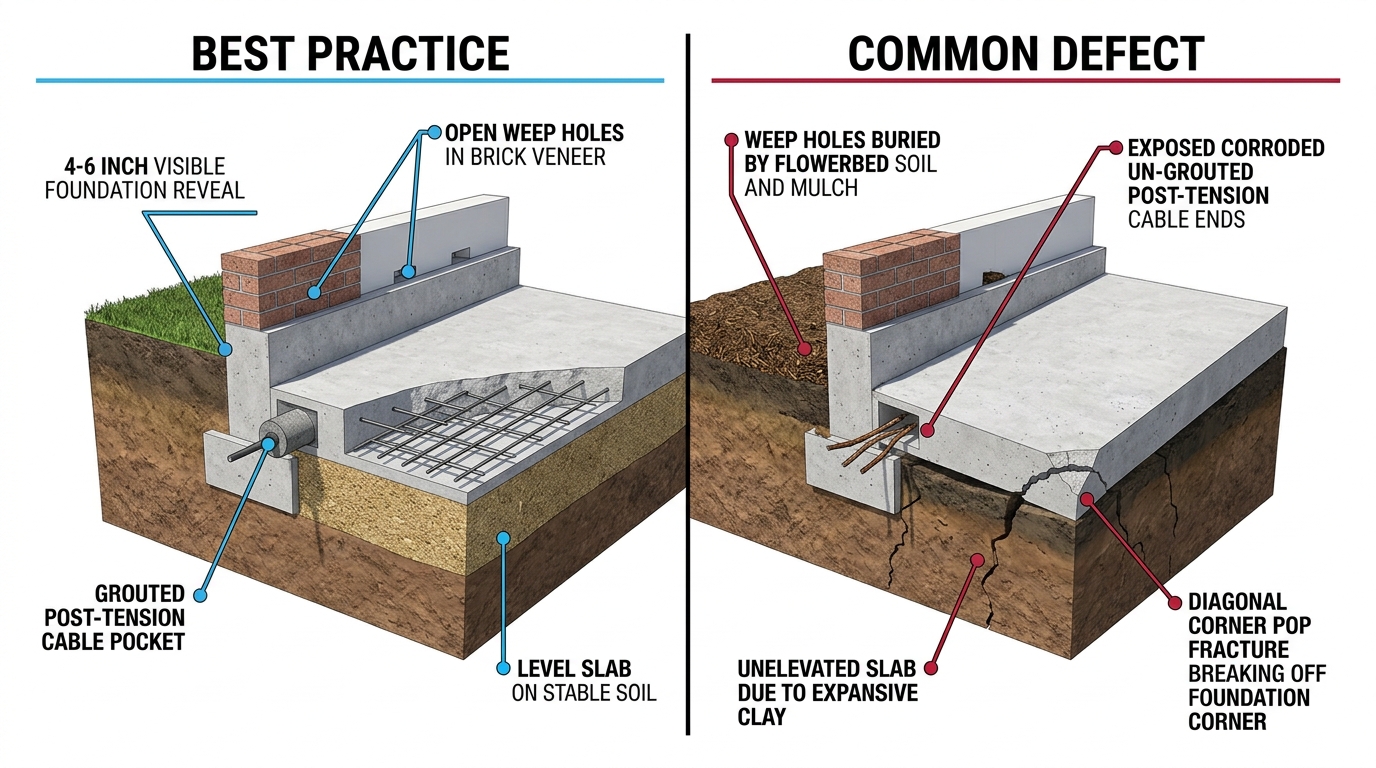
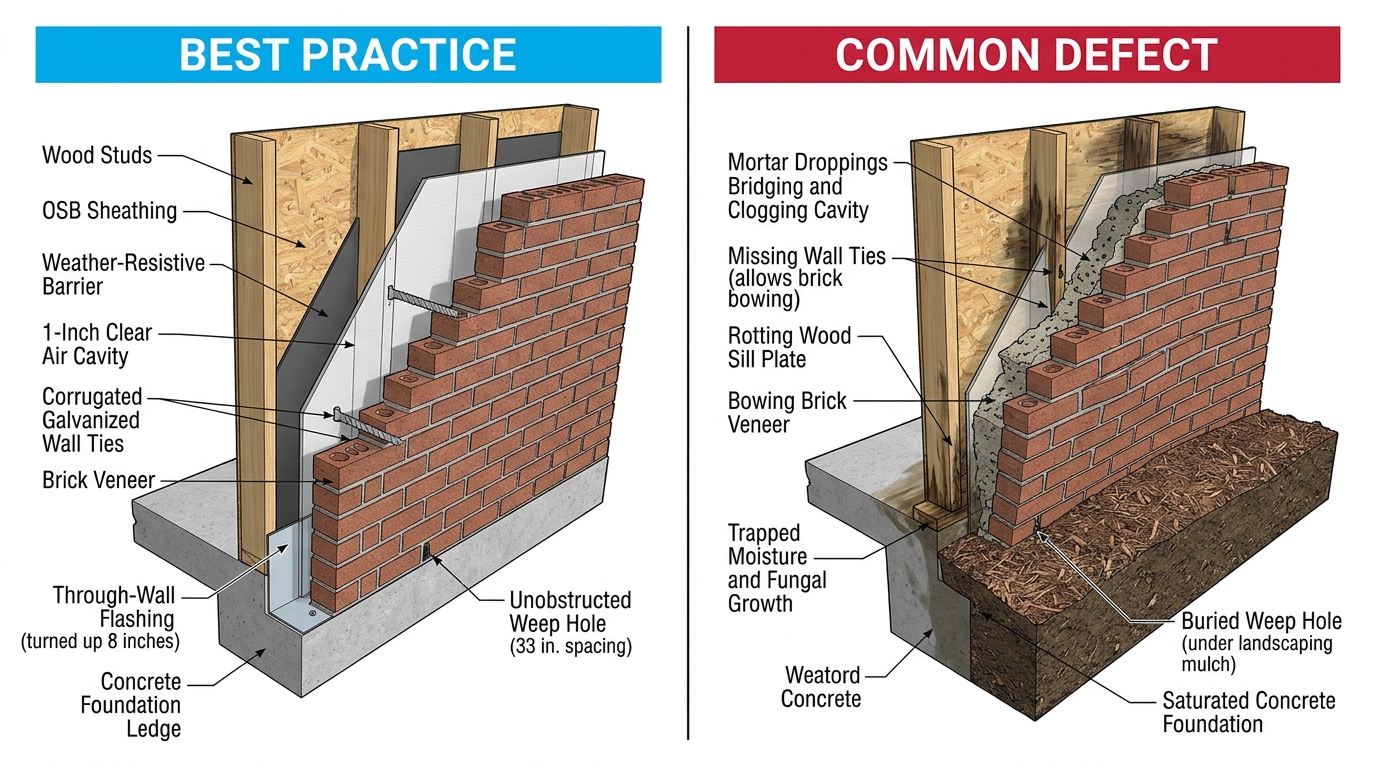
Clear, open weep holes spaced maximum 33 inches apart along brick ledge
Post-tension cable ends recessed in grout pockets sealed with waterproofing compound
Even soil grading sloping away at 6 inches over the first 10 feet
COMMON DEFECT (HAZARD / AT-RISK)
Mulch and flowerbed soil piled over brick line concealing foundation edge
Weep holes plugged with mortar, caulk, or dirt, trapping moisture in wall cavity
Corner pop exposing bare steel post-tension cable to ground moisture and corrosion
Negative grade funneled toward foundation causing localized soil saturation
Side-by-side comparison of a code-compliant slab foundation with 4-inch reveal and unblocked brick weeps versus common foundation defects including mulch-blocked weep holes and corroding post-tension cable ends.
TEXAS FIELD TRIAGE: 3-STAGE SEVERITY SCALEField Inspection Progression Rubric
STAGE 1NORMAL TEXAS AGING (COSMETIC)
Condition:Hairline shrinkage crack (<1/16") in concrete corner pop or garage floor with no exposed rebar/cables.
Action:Photo-log in annual journal; no repair required.Annual Log
STAGE 2WATCH & MAINTAIN (30–90 DAYS)
Condition:Brick mortar crack (1/8") or interior door rubbing top jamb during summer drought.
Action:Run soaker hoses on automated timers; monitor soil gap for 30–60 days.30–60 Days
STAGE 3ACT IMMEDIATELY (URGENT)
Condition:Shear crack (>1/4") through grade beam, binding exterior doors, or exposed/snapped post-tension tendon.
Action:Contact licensed Professional Engineer (PE) immediately for elevation survey.Immediate
How It Works in Your Home
Your foundation is the bedrock of your home, engineered to carry the entire downward weight of framing, roofs, furniture, and family into the earth while resisting the intense upward and lateral pressures of shifting subsoils.
In Texas, over 90% of suburban homes rest on post-tensioned concrete slab-on-grade foundations. A post-tension slab is a monolithic sheet of concrete, typically 4 to 5 inches thick across living areas, integrated with reinforced perimeter and interior grade beams extending 18 to 36 inches deep into trenches. High-strength 1/2-inch steel cables (tendons) encased in plastic sheathing and coated in corrosion-inhibiting grease are laid in an engineered grid before pouring. Once the concrete reaches approximately 75% cured strength, hydraulic jacks pull these cables to roughly 33,000 pounds of tension and wedge them permanently in place. This continuous compression allows the foundation to flex as a unified rigid raft over shifting ground without cracking.
In historic Texas neighborhoods—such as the Houston Heights, San Antonio's King William district, or older neighborhoods in Austin and Dallas—homes frequently feature pier-and-beam crawlspace foundations. Reinforced concrete or cedar piers descend deep into stable earth or bedrock, supporting heavy horizontal beams and floor joists that elevate the living structure 18 to 36 inches above the soil. This elevated design provides unmatched airflow, cooler crawlspaces, and convenient access for plumbing modifications.
Grade Beams:Deep reinforced concrete perimeter and interior trenches that stiffen the slab against bending forces.
Post-Tension Tendons:High-tensile steel cables placed under 33,000 lbs of hydraulic tension to hold the concrete slab in constant compression.
Vapor Retarder:A puncture-resistant 10-mil to 15-mil polyethylene membrane beneath the slab that stops subterranean ground dampness from permeating flooring.
Grout Pockets:Recessed concrete pockets at the perimeter where cut cable ends are sealed with waterproof epoxy mastic.
What Can Go Wrong & What to Look For
Because foundations bear dynamic load across moving soil, structural distress manifests through visible symptoms across exterior brickwork, drywall, and interior doors.
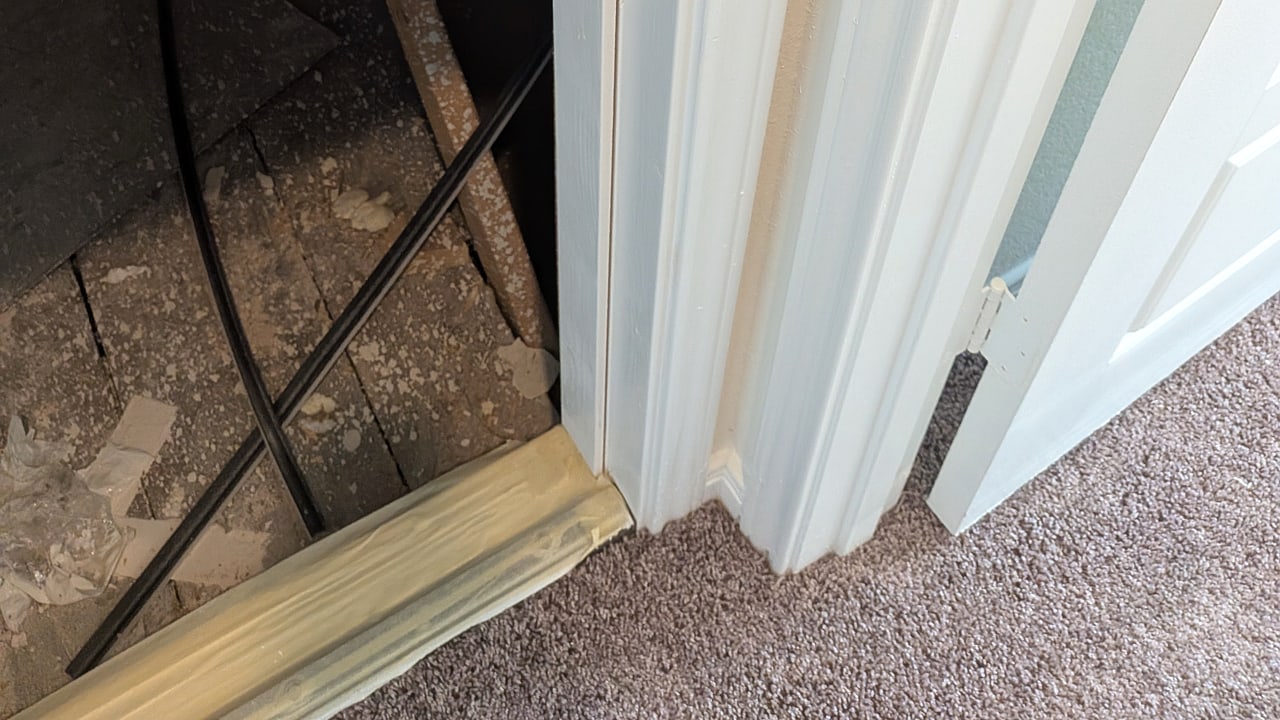
The primary threat to Texas foundations is differential settlement—when one corner or side of the house sinks or heaves significantly relative to the rest of the structure. When this occurs, the framing twists, causing doors to bind in their jambs, floor tiles to crack in continuous linear paths, and drywall to tear diagonally outward from door and window headers at 45-degree angles.
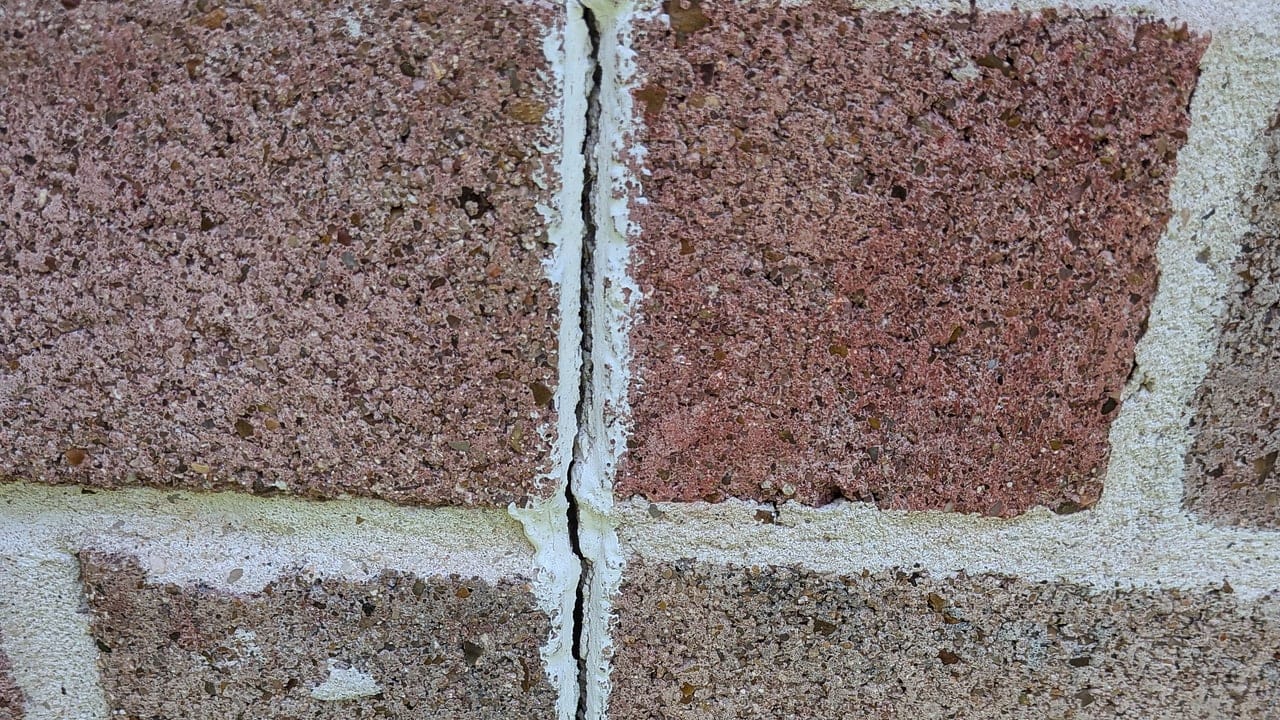
On exterior brick walls, foundation shifting produces stair-step cracks through mortar joints, particularly near building corners and large window openings. Homeowners should distinguish between hairline cosmetic mortar separation (under 1/16-inch wide) and active structural fractures exceeding 1/4-inch that indicate ongoing foundation movement. Additionally, triangular concrete spalls at exterior corners—known as 'corner pops'—occur when hot exterior brick expands faster than the cool slab beneath it. A corner pop is cosmetic unless it exposes high-strength post-tension cables to rain and soil, in which case immediate epoxy sealing is necessary to prevent cable corrosion.
Early Warning Signs & Red Flags
Interior doors sticking, rubbing against top door jambs, or swinging open unassisted
Diagonal drywall cracks running upward from the corners of door and window openings
Stair-step mortar fractures through exterior brick veneer wider than 1/8-inch
Gaps exceeding 1/2-inch opening between brick veneer and exterior soffit/frieze boards
Noticeable floor slope or out-of-level sensation across open living rooms
Exposed Post-Tension TendonsIMMEDIATE ACTION
Unsealed or chipped cable ends exposed to moisture and soil, risking severe rust and catastrophic tendon snapping.
Buried Foundation Reveal & Obstructed WeepsIMMEDIATE ACTION
Soil or mulch piled directly against brick veneer, burying weep holes and inviting subterranean termites.
Cosmetic shear spall of exterior concrete corner with no steel rebar or cables visible.
FIELD DEFECT CASE • § 1.1
Differential Clay Shrink-Swell Stress vs. Cosmetic Wedge Cracks
Inspectors distinguish harmless brick-to-slab thermal corner wedges from structural grade-beam flexural cracks that widen vertically and track into interior doorframes.
How Texas Weather & Soil Affect It
Much of North, Central, and Coastal Texas sits atop dense smectite clay formations colloquially known as 'Black Gumbo'—one of the most active expansive soil types on Earth.
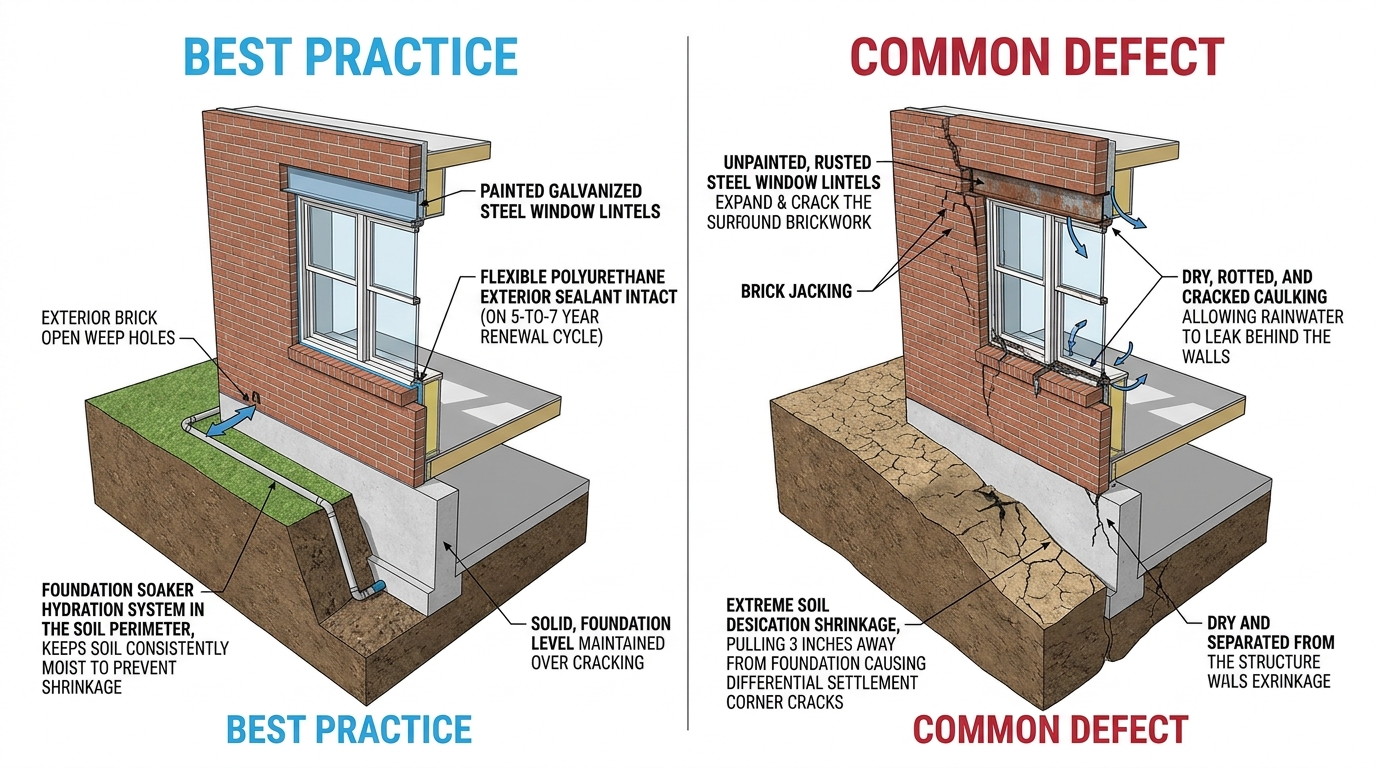
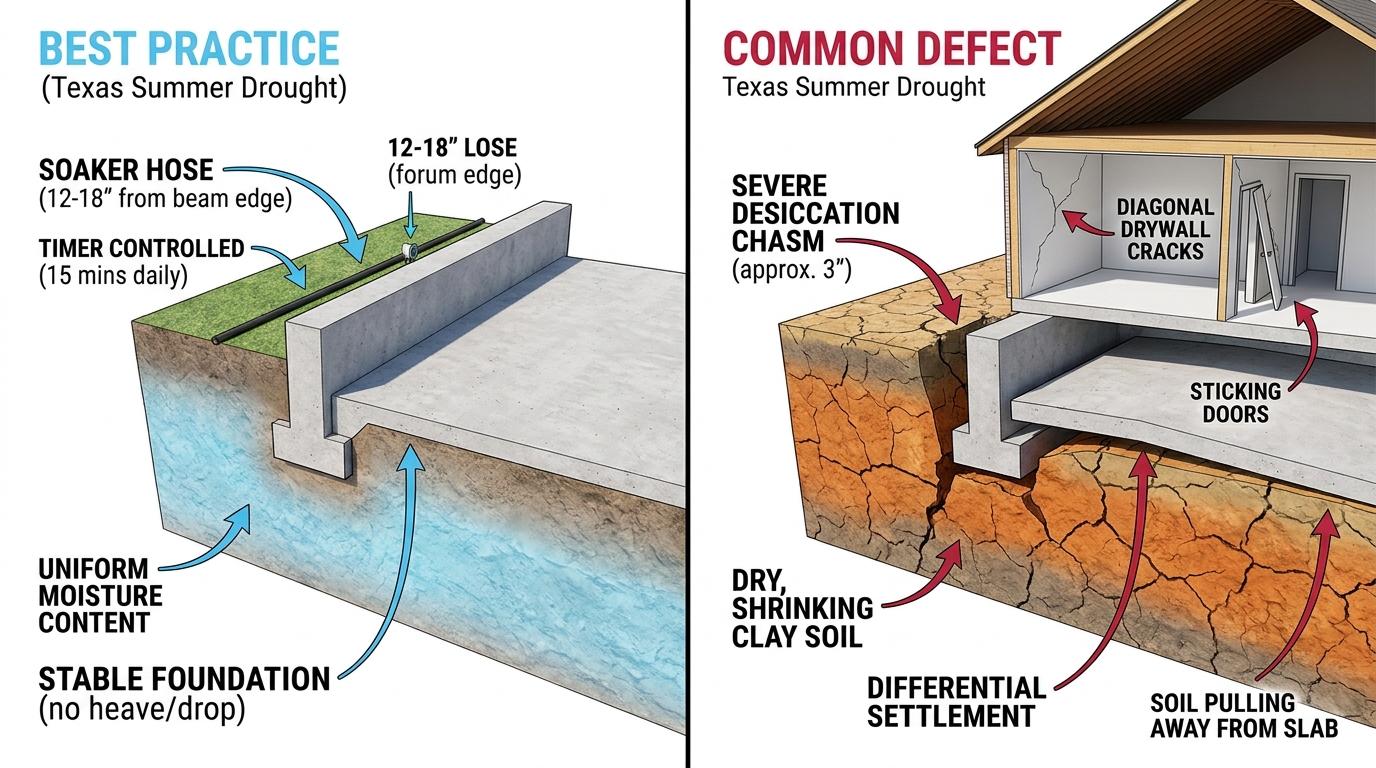
Expansive clays expand by up to 20% to 30% in volume when saturated by heavy Gulf storm systems, exerting thousands of pounds of upward hydrostatic heave beneath grade beams. Conversely, during blistering 100°F summer droughts, these clays surrender their moisture, shrinking dramatically and opening fissures several feet deep. As the soil pulls away from the perimeter, the slab edge loses support and drops, bending downward under gravity.
The greatest danger is not uniform expansion or uniform shrinkage, but uneven moisture conditions. If lawn sprinklers soak the front yard while the backyard bakes in drought, or if a roof downspout dumps hundreds of gallons at one rear corner while another corner stays bone-dry, differential movement snaps foundations. Consistent perimeter hydration is the single most important defense for every Texas homeowner.
Texas Climate & Soil Stresses
Smectite clay expansion and contraction cycles along the I-35 and I-45 corridors
Summer drought soil shrinkage pulling away 1 to 2 inches from foundation edges
Flash flood deluges saturating perimeter soil within minutes
Mature oak or crepe myrtle root systems drinking hundreds of gallons daily directly under slab edges
Texas Field Pro Tips
Place soaker hoses 12 to 18 inches away from the slab perimeter, running them on timers 2 to 3 times weekly during summer droughts.
Aim for soil moisture consistency that feels like a firmly squeezed, damp household sponge—never boggy mud and never cracked dust.
Install root barriers if large shade trees are located within 15 to 20 feet of the foundation perimeter.
How to Maintain & Protect It
Proactive foundation stewardship requires zero specialized tools—just consistent perimeter moisture management, clean clearances, and seasonal visual walkthroughs.
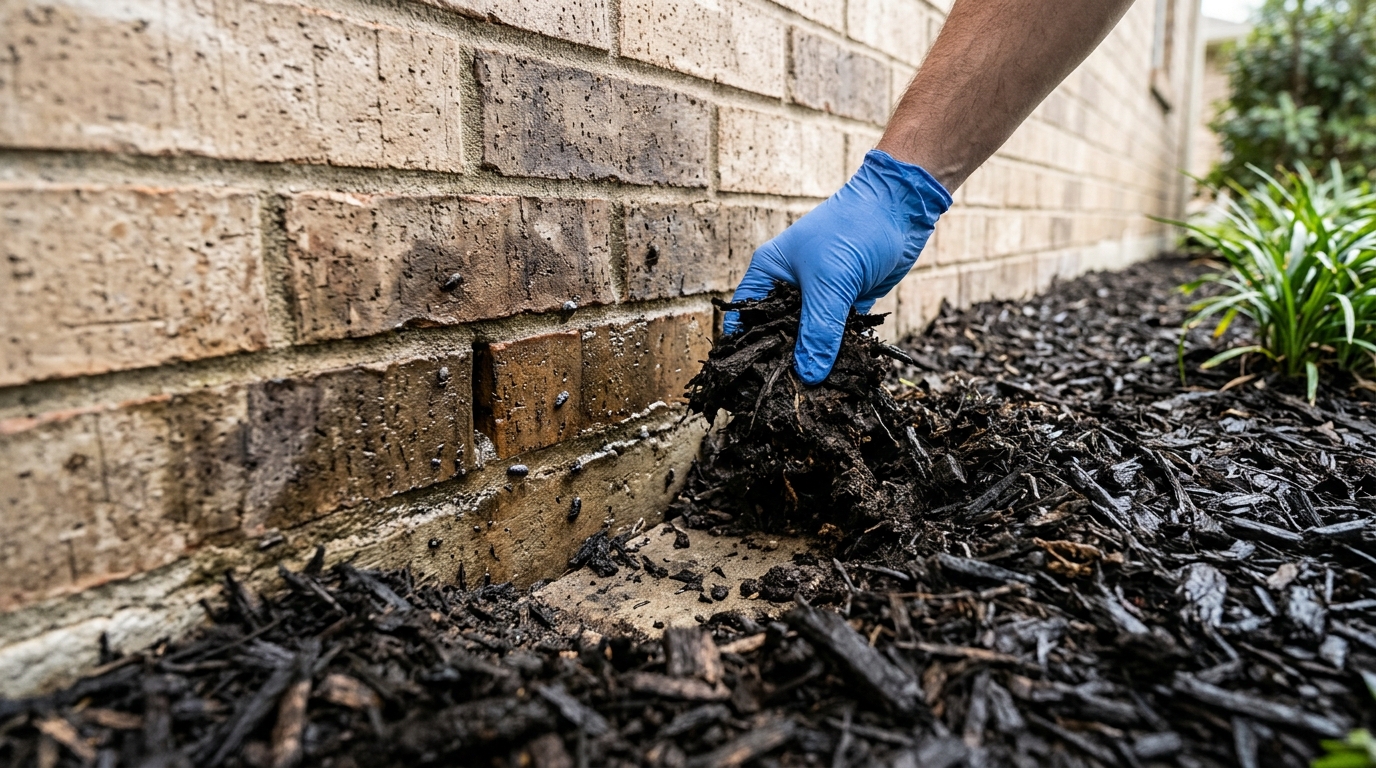
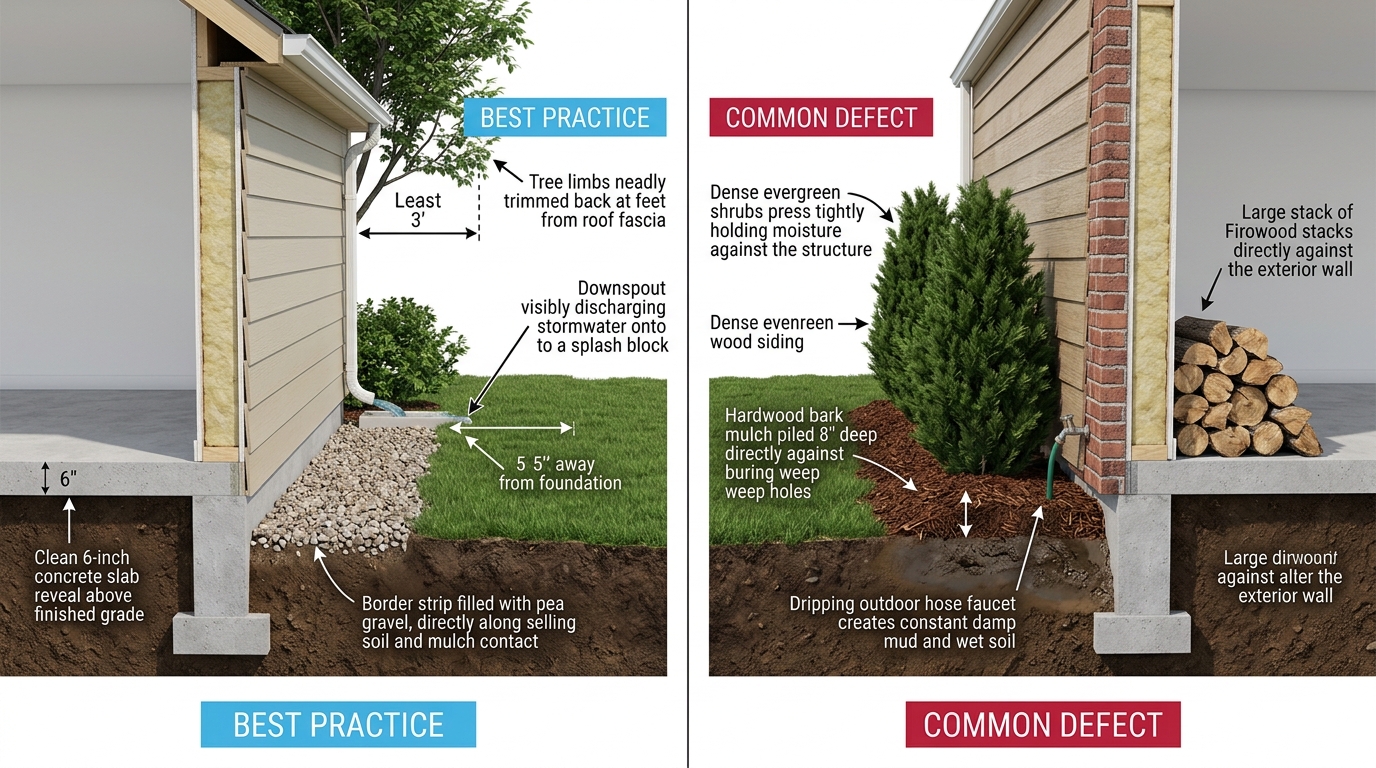
Maintain a minimum 4-inch vertical reveal of bare concrete foundation slab beneath the bottom row of brick veneer (and a 6-inch reveal beneath wood or fiber-cement siding). Never pile flowerbed mulch, topsoil, or decorative river rocks against the brick line. Keeping this concrete band clearly visible prevents moisture from entering weep holes and creates a clean inspection zone where subterranean termite mud tubes cannot enter undetected.
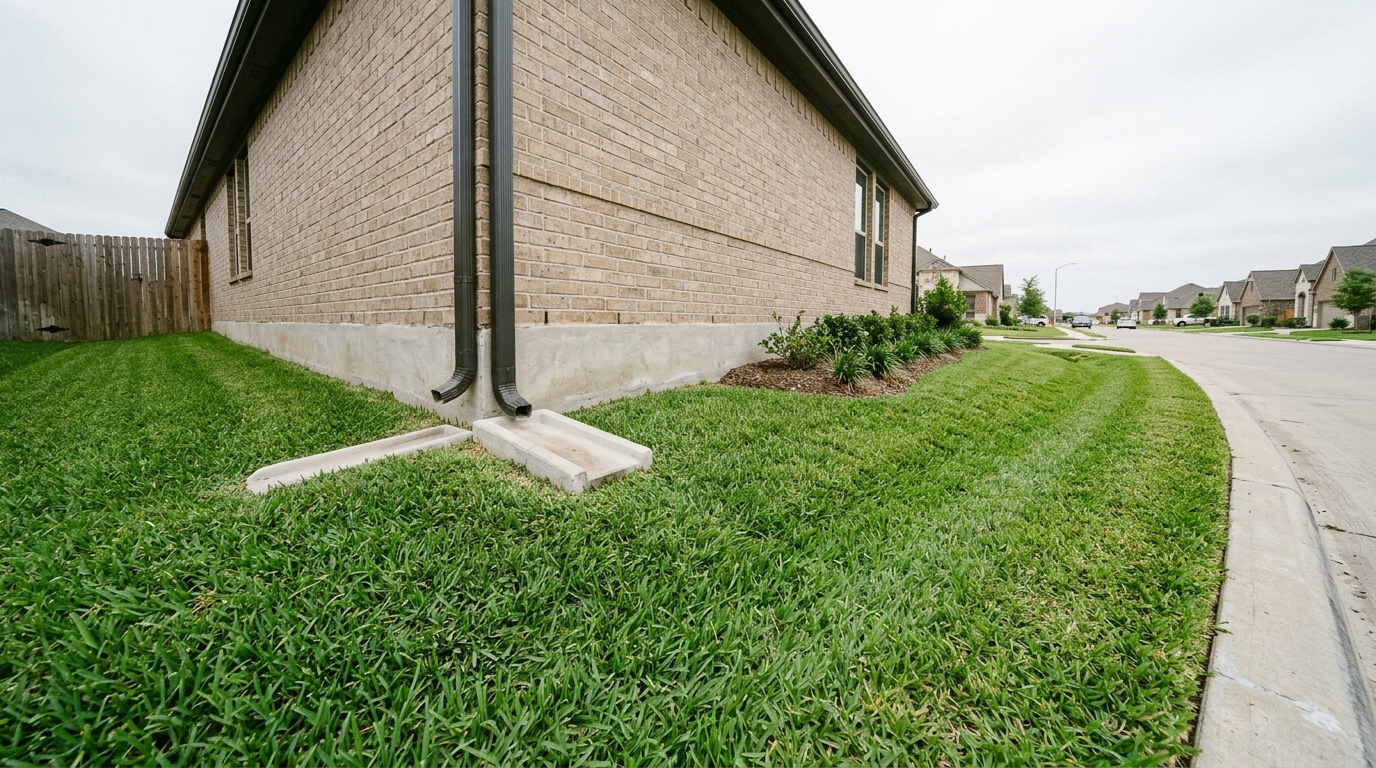
Inspect downspout discharge zones quarterly. Ensure downspouts extend at least 5 feet away from the slab edge onto rigid splash blocks or underground corrugated drains that route water toward the street or swale. If your home has a crawlspace, verify that foundation vent screens remain intact and that the crawlspace floor remains completely free of standing water.
Seasonal Walkthrough Checklist
Spring: Check perimeter grading to verify soil slopes away from the house without low spots or ponding.
Summer: Activate perimeter soaker hose systems on automated timers; monitor soil gap around foundation edges.
Fall: Clear leaves and landscape debris away from all brick weep holes and crawlspace vent grates.
Winter: Inspect exposed foundation corners for chipped concrete and ensure garden hose bibbs do not leak against the slab.
HOMEOWNER DECISION MATRIX
DIY Weekend Maintenance vs. Call a Qualified Pro
SAFE 15-MINUTE DIY CARE
Install and maintain soaker hoses 18 inches from the foundation perimeter.
Keep mulch and garden soil at least 4 inches below the brick veneer line.
Clear debris and vegetation from all foundation weep holes.
WHEN TO CALL A QUALIFIED PRO
Licensed Professional Engineer (PE) foundation elevation survey if floors slope noticeably or cracks exceed 1/4 inch.
Foundation repair contractor for steel or concrete underpinning piers.
Epoxy injection and sealing for exposed post-tension tendon anchor pockets.
CLINICAL DIFFERENTIAL FIELD TRIAGE & CONNECTED SYSTEMS§ 1.1 Diagnostic Rubric
Harmless Cosmetic Baseline
Hairline concrete curing shrinkage cracks (<1/16 inch) in garage floors and small triangular corner-pop wedges at brick slab edges are normal thermal stress.
Active Failure Signal
Diagonal drywall cracks radiating from door corners, stair-step exterior brick fractures widening upward, and doors refusing to latch signal differential slab movement.
60-Second Homeowner Check
Walk the exterior perimeter confirming 4 to 6 inches of visible concrete slab edge, and test nearby bedroom doors to see if latches strike smoothly.
BEFORE YOU SIGN A BID • TEXAS CONTRACTOR VETTING & SCAM DEFENSE
Foundation Repair & Structural Engineering
§ 1.1 Playbook
Texas Credential to VerifyIndependent Texas Licensed Professional Engineer (PE) — verify active roster status at pels.texas.gov BEFORE soliciting pier bids.
Municipal Permit & Inspection RuleMost Texas municipalities require a city structural permit plus pre- and post-lift PE elevation letters.
3 Questions You Must Ask Before Hiring
“Will an independent Licensed Professional Engineer (not on your foundation company’s payroll) design the pier layout and verify post-lift elevations?”
“Will you perform a pre-lift and post-lift hydrostatic plumbing drain test so we know immediately if lifting shears an under-slab sewer pipe?”
“Is your lifetime warranty backed by an independent third-party trust fund, and what exact elevation tolerance triggers free warranty adjustments?”
3 High-Pressure Red Flags & Scams
A commission-paid “foundation evaluator” drawing a 22-pier map on clipboard paper without a calibrated zip-level survey or PE seal.
Skipping plumbing drain testing after lifting a post-tension slab—hiding broken cast-iron or PVC lines beneath your floors.
Pushing shallow concrete pressed pilings in high-PI clay without disclosing breakout depth or drainage root-cause corrections.
HOMEOWNER ACTION TAKEAWAYRISK LEVEL: HIGH
Foundation Stewardship Summary
Post-tension concrete slabs are engineered to float safely on expansive Texas clay, but they depend entirely on balanced perimeter moisture. Maintaining proper soil grading and consistent summer hydration will protect your home's structural integrity for generations.
Recommended Action Steps
Maintain a continuous 4-inch clear concrete reveal between surrounding soil and the bottom of your brick veneer.
Run perimeter soaker hoses on automated timers 2 to 3 times a week during hot Texas summer droughts.
Ensure all roof downspouts discharge water at least 5 feet away from the foundation perimeter.
Immediate Priorities
Inspect all foundation corners for exposed steel cables and seal any exposed metal immediately.
Pull mulch away from the foundation perimeter to uncover buried weep holes.
Correct any negative yard slope that funnels rainwater toward exterior walls.
Ongoing Annual Maintenance
Conduct a semi-annual foundation walkaround checking for new drywall or brick fractures.
Verify that automatic lawn sprinklers spray outward away from foundation beams.
Check crawlspaces (if pier-and-beam) for standing water or plumbing drain leaks.
Typical Repair / Replacement Budget:$500 – $12,000($500–$1,500 for grading corrections and soaker hose automation; $5,000–$15,000+ if hydraulic underpinning piers are required.)
Expected Assembly Lifespan:50–100+ years with proper moisture management
ICC DIGITAL CODES2021 / 2024 IRC
2021/2024 IRC R401.3 / R403.1—Foundation Support & Expansive Soil Clearance
STATUTORY MODEL CODE TEXT
Foundations shall be constructed on undisturbed natural soil or engineered fill. Lots shall be graded to drain surface water away from foundation walls. Concrete slabs supported directly on expansive soils shall be designed in accordance with approved engineering standards.
Exception: Where foundation elevations or local topography restrict gravity drainage, approved swales or subsoil drainage systems shall be installed to direct runoff away from the building envelope.
IN PLAIN ENGLISH
Your foundation must be engineered to float uniformly across shifting soil, keeping concrete grade beams elevated at least 4 to 6 inches above surrounding flowerbeds to prevent moisture intrusion.
HOMEOWNER PRO TIP:Maintain consistent perimeter soil moisture using soaker hoses in summer drought, and never pile mulch over your foundation edge.
1.2
Grading and Drainage: Yard Slope, Swales, Gutters & Foundation Protection
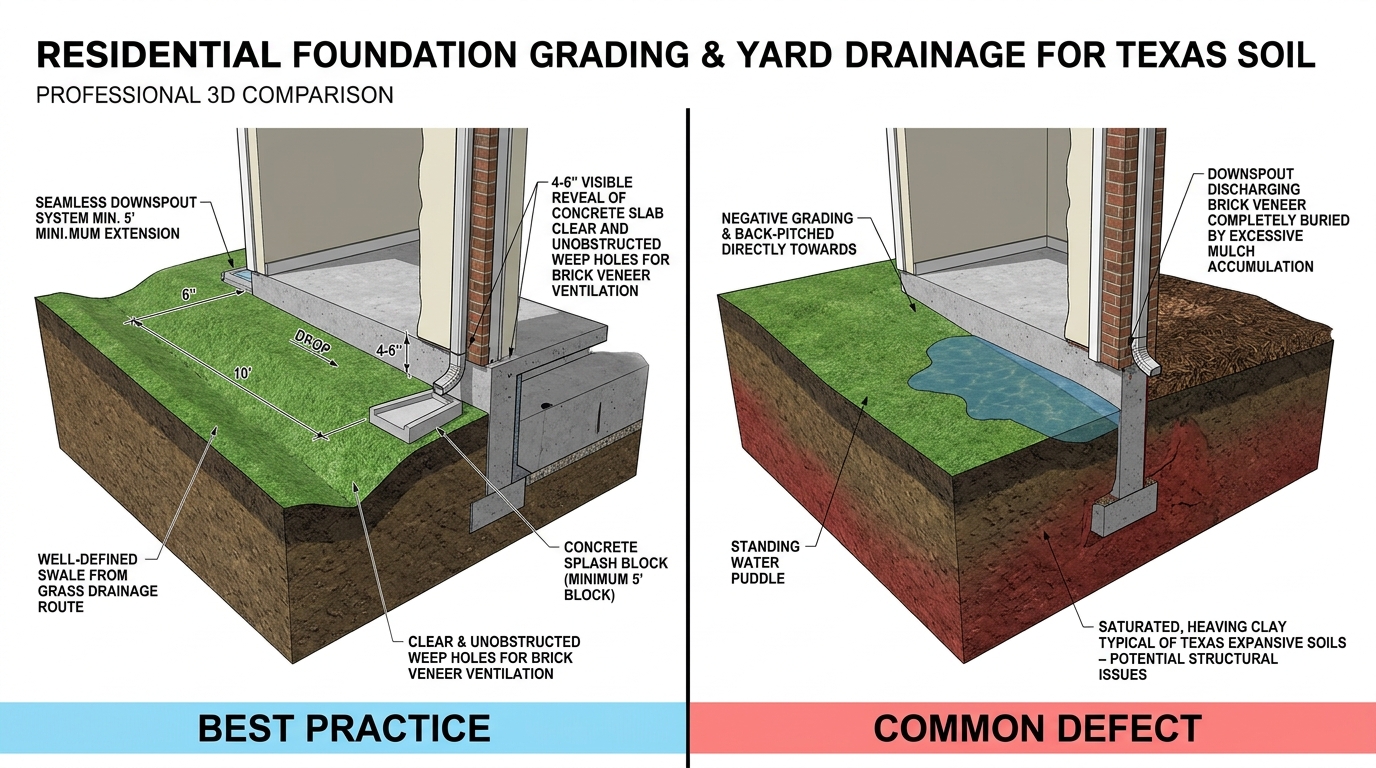
Ground slopes downward at least 6 inches over the first 10 feet away from slab
Grass-lined drainage swale safely channels runoff around side yards to street
Seamless downspout discharges onto splash block 5 feet away from foundation
Foundation grade beam maintains clean 4 to 6 inches of clear reveal
COMMON DEFECT (HAZARD / AT-RISK)
Negative grade funnels surface runoff directly against concrete slab beam
Downspout terminates at foundation corner without extension, creating water puddle
Subsoil saturation beneath foundation causes localized differential heave
Mulch and dirt piled against exterior brick line bury weep holes
Side-by-side comparison of positive 6-inch outward yard slope and drainage swale versus negative grade ponding against slab beams and saturated subgrades.
TEXAS FIELD TRIAGE: 3-STAGE SEVERITY SCALEField Inspection Progression Rubric
STAGE 1NORMAL TEXAS AGING (COSMETIC)
Condition:Minor mulch displacement or shallow turf depression dry within 12 hours post-rain.
Action:Rake mulch level; verify splash blocks point away.Annual Log
STAGE 2WATCH & MAINTAIN (30–90 DAYS)
Condition:Standing water ponding within 10 ft of slab 12–24 hrs post-rain; soil gap 1" from slab.
Action:Install 5-ft downspout extensions and add native clay fill within 30–60 days.30–60 Days
STAGE 3ACT IMMEDIATELY (URGENT)
Condition:Negative grade funneling storm runoff against foundation, ponding >24 hrs, or slab undermining.
Action:Dispatch drainage contractor immediately for swale regrading or catch basin.24–48 Hrs
How It Works in Your Home
Proper site grading and surface drainage form your home's primary hydrological shield, diverting thousands of gallons of stormwater safely away from structural foundations.
Every time a tropical disturbance or thunderstorm rolls across Texas, your roof collects thousands of gallons of water. A standard 2,500-square-foot roof sheds roughly 1,550 gallons during a single 1-inch rainfall. Where that water goes determines whether your foundation remains solid or experiences severe structural upheaval.
Positive grading requires the ground surface to fall away from exterior foundation walls at a minimum slope of 6 inches over the first 10 feet (a 5% grade). Where side yards are narrow or lot lines prevent a 10-foot run, shallow contoured valleys called drainage swales must catch runoff and carry it toward the street gutter or municipal stormwater system. Seamless aluminum gutters paired with rigid downspout extensions complete this defense by gathering concentrated roof runoff and discharging it well past the foundation perimeter.
Positive Slope:Ground contour sloping downward at least 6 inches across the first 10 feet away from the slab perimeter.
Drainage Swale:A broad, shallow grass-lined ditch engineered to channel side-yard stormwater away from neighboring properties toward street drains.
Gutters & Downspouts:Seamless metal troughs collecting roof runoff and routing it away through downspouts terminating at least 5 feet from the home.
Catch Basins & French Drains:Subsurface perforated pipes wrapped in geotextile fabric embedded in gravel to relieve chronic standing water in flat yards.
What Can Go Wrong & What to Look For
Negative slope, settled backfill, and disconnected downspouts concentrate water against grade beams, causing localized soil saturation and structural foundation heave.
Negative grading—where soil slopes toward the house rather than away—is one of the most widespread defects observed during Texas home inspections. As roof runoff sheets off eaves or exits short downspouts, water ponds against the concrete foundation. The underlying clay soil swells dramatically, lifting that portion of the house while drier sections remain stationary. Over time, hydrostatic pressure forces moisture through microscopic concrete pores, damaging interior flooring adhesives, buckling wood planks, and elevating indoor humidity.
Look for telltale indicators of poor drainage: standing water that lingers for more than 24 hours after a rainfall, muddy depressions along the side yard, erosion rills washing soil away from beneath grade beams, or dark green moss growing on the bottom courses of exterior brickwork.
Early Warning Signs & Red Flags
Standing water ponding within 10 feet of the foundation more than 24 hours after rain
Soil sloping downward toward the house foundation along side yards or flowerbeds
Downspouts terminating within 2 to 3 feet of exterior walls without splash blocks
Exposed grade beam bottom edges where soil has washed away due to concentrated erosion
Musty odors or damp spots on concrete garage floors and baseboards
Ground pitched toward foundation walls, pooling storm runoff directly against grade beams.
Short Downspout DischargesIMMEDIATE ACTION
Downspouts dumping roof runoff directly at slab corners without extensions, super-saturating local clay.
Obstructed Drainage SwaleMONITOR
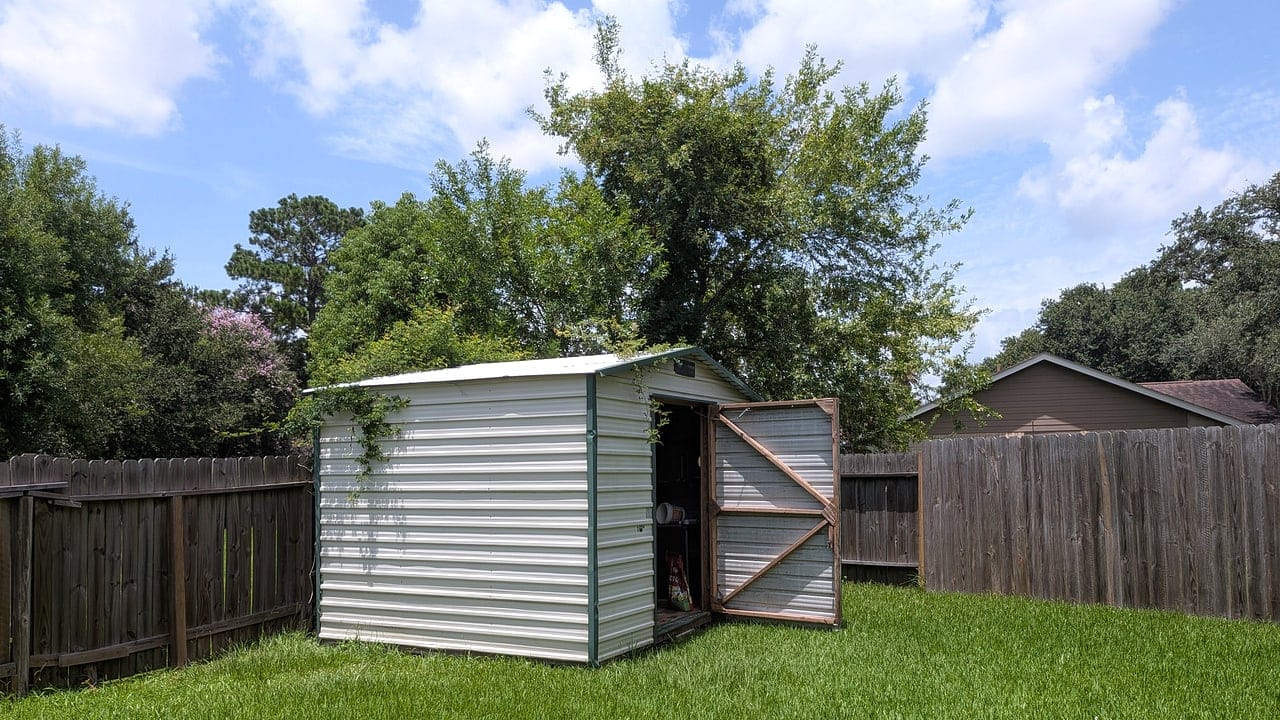
Fences, storage sheds, or raised garden beds built across side swales, damming natural water escape routes.
Erosion Channeling Beneath SlabIMMEDIATE ACTION
Heavy runoff washing soil out from beneath the foundation beam, creating structural voids.
TEXAS SOIL CASE • § 1.2
August Drought Pull-Away Gaps Along Perimeter Grade Beams
When summer droughts bake smectite clay, soil shrinks 1–2 inches away from the slab—removing lateral support in August and funneling gully-washer rainwater straight under the footing in October.
How Texas Weather & Soil Affect It
Texas experiences extreme precipitation swings—from months of arid drought to torrential tropical storms dumping 5 to 10 inches in an afternoon.
During prolonged Texas summer droughts, clay soils shrink and pull away from foundation grade beams, leaving a 1-to-2-inch air gap between the soil and concrete. When an intense Gulf tropical downpour hits, torrential runoff takes the path of least resistance: directly into that gap. Thousands of gallons fill the subterranean space, super-saturating the subgrade within minutes and causing localized upheaval called foundation heave.
In flat coastal plains (such as Houston and Galveston) and gently rolling North Texas prairies, natural gravity fall is often minimal. Without properly maintained grass swales and clean curbside gutters, entire subdivisions experience sheet-flow ponding that tests exterior door thresholds and garage slabs.
Texas Climate & Soil Stresses
Tropical storm deluges dumping several inches of rain in a few hours
Flat coastal topography with minimal natural slope toward drainage outfalls
Severe soil cracking allowing surface water to bypass topsoil and reach deep subgrades instantly
Heavy clay soils with extremely slow percolation rates (under 0.1 inch per hour)
Texas Field Pro Tips
Walk your entire property perimeter during a heavy rainstorm to see exactly where water flows and pools.
Add rigid downspout extensions that discharge at least 5 feet away from the slab into grassy areas.
Never install landscape edging or borders that create miniature dams trapping water against the house.
How to Maintain & Protect It
Regular drainage maintenance is your highest-return investment in structural foundation longevity.
Inspect and clean gutters at least twice a year—late spring after pollen and seed pods fall, and late autumn after deciduous trees shed leaves. Clogged gutters overflow, creating heavy waterfalls that erode perimeter soil and scour trenches beside grade beams. Verify that all downspout elbows remain tightly fastened and that discharge splash blocks route flow away from the structure.
If your property features side swales between neighboring fences, ensure neither you nor your neighbor blocks the swale with landscaping timbers, air conditioning condenser pads, or storage sheds. Swales must remain clear channels to carry water smoothly to the street.
Seasonal Walkthrough Checklist
Spring: Clean all gutters and downspouts; verify downspout extensions are securely attached.
Summer: Fill in any sunken soil spots or erosion rills near the foundation with heavy clay-loam fill.
Fall: Remove fallen leaves from gutters, valley flashings, and yard drainage collection basins.
Winter: Check that underground French drain exit grates are clear of mud, turf roots, and leaves.
HOMEOWNER DECISION MATRIX
DIY Weekend Maintenance vs. Call a Qualified Pro
SAFE 15-MINUTE DIY CARE
Attach 5-foot downspout extensions or flexible corrugated pipes routing water away from the slab.
Add clean clay soil to low spots near the foundation to restore a positive outward slope.
Clear debris and leaves from surface gutter grates and swales.
WHEN TO CALL A QUALIFIED PRO
Landscape drainage contractor to regrade yards or cut new drainage swales.
Installation of deep gravel-trench French drains or automated catch basin sump pumps.
Seamless gutter installation with 6-inch commercial gutters and oversized 3×4-inch downspouts.
CLINICAL DIFFERENTIAL FIELD TRIAGE & CONNECTED SYSTEMS§ 1.2 Diagnostic Rubric
Harmless Cosmetic Baseline
Shallow puddles that drain or evaporate within 24 hours of a heavy Texas cloudburst—and soil sloping away from the slab—reflect healthy yard drainage.
Active Failure Signal
Standing mud against the foundation 48 hours after rain, clogged overflowing gutters, or 2-inch summer drought gaps along the slab invite heave and settlement.
60-Second Homeowner Check
During a steady rain, step onto the porch to spot waterfalling gutters, and confirm every downspout discharges 4 to 5 feet past the foundation.
BEFORE YOU SIGN A BID • TEXAS CONTRACTOR VETTING & SCAM DEFENSE
Yard Regrading, French Drains & Seamless Gutter Systems
§ 1.2 Playbook
Texas Credential to VerifyTexas Licensed Professional Engineer (TBPE P.E. at pels.texas.gov) for complex drainage plans; TCEQ Licensed Irrigator (LI) if rerouting sprinkler mains.
Municipal Permit & Inspection RuleTexas 811 utility locate ticket mandatory 48 hours before trenching; municipal curb-coring permit required when discharging storm drains to the street.
3 Questions You Must Ask Before Hiring
“Will you shoot laser-level elevations confirming a continuous 1% to 2% slope on rigid Schedule 40 PVC catch-basin pipes all the way to daylight?”
“Did you call Texas 811 to mark shallow fiber-optic, gas, and electrical lines before trenching along my perimeter foundation beam?”
“Are you wrapping perforated gravel French drains in non-woven geotextile filter fabric so expansive Texas clay silt does not pack the pipe solid in one storm?”
3 High-Pressure Red Flags & Scams
Burying thin, unsloped black corrugated accordion pipe directly in clay mud without washed gravel or filter fabric—creating a collapsed mud trap within months.
Piling heavy topsoil up against brick weep holes or wood siding to create slope instead of excavating a lowered swale 5 to 10 feet away from the slab.
Selling expensive sump-pump French drains around a slab when simple 6-inch seamless gutters and 5-foot downspout extensions would solve 90% of roof runoff.
HOMEOWNER ACTION TAKEAWAYRISK LEVEL: HIGH
Grading & Drainage Stewardship Summary
Water is your foundation's greatest adversary. Ensuring that your yard slopes downward away from exterior walls and routing roof runoff at least 5 feet past the slab will protect against expensive structural heave and interior moisture issues.
Recommended Action Steps
Verify that yard soil slopes downward at least 6 inches over the first 10 feet away from your foundation.
Extend all gutter downspout discharge pipes a minimum of 5 feet away from the home.
Keep side drainage swales open and unobstructed by landscaping, fences, or storage sheds.
Immediate Priorities
Install splash blocks or extensions on any downspout discharging within 3 feet of the slab.
Regrade any area where soil slopes toward exterior brickwork or stucco.
Unclog leaf-filled gutters to prevent overflow waterfalls along exterior walls.
Ongoing Annual Maintenance
Inspect yard drainage paths during or immediately following heavy rain events.
Clear yard drain grates and subterranean discharge outlets semi-annually.
Maintain proper foundation soil reveal while adding topsoil for positive slope.
Typical Repair / Replacement Budget:$150 – $4,500($150–$400 for DIY downspout extensions and topsoil grading; $1,500–$4,500 for professional French drain or swale regrading.)
Expected Assembly Lifespan:10–20+ years for drainage swales and French drain systems with regular clearing
ICC DIGITAL CODES2021 / 2024 IRC
2021/2024 IRC R401.3—Drainage and Surface Water Disposal
STATUTORY MODEL CODE TEXT
Surface drainage shall be diverted to a storm sewer conveyance or other approved point of collection that does not create a hazard. Lots shall be graded to drain surface water away from foundation walls. The grade shall fall not fewer than 6 inches within the first 10 feet.
Exception: Where lot lines, walls, slopes or other physical barriers prohibit 6 inches of fall within 10 feet, drains or swales shall be constructed to ensure drainage away from the structure. Impervious surfaces within 10 feet of the building foundation shall be sloped not less than 2 percent away from the building.
IN PLAIN ENGLISH
Your yard must slope downward at least 6 inches over the first 10 feet away from the slab so rainwater flows safely away from your foundation rather than ponding against the concrete.
HOMEOWNER PRO TIP:Extend downspout discharge pipes at least 5 feet away from the foundation and keep drainage swales free of leaves and landscaping debris.
1.3
Roof Coverings: Asphalt Shingles, Tiles, Metal & Texas Hail Defenses
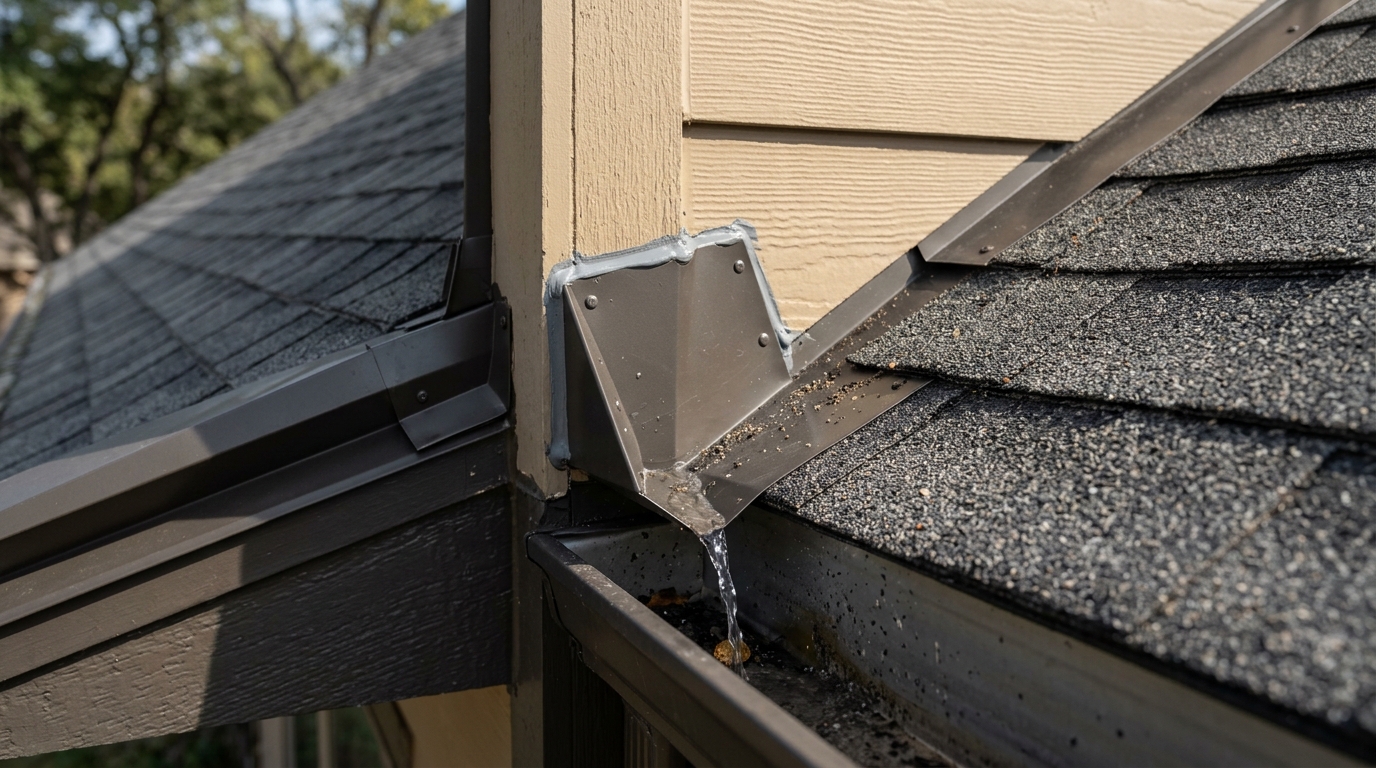
CRITICAL DETAIL • KICKOUT FLASHINGCorrectly installed angled kickout flashing at the roof-to-siding wall intersection, directing torrential roof runoff safely into the gutter and protecting exterior wall framing from rot.
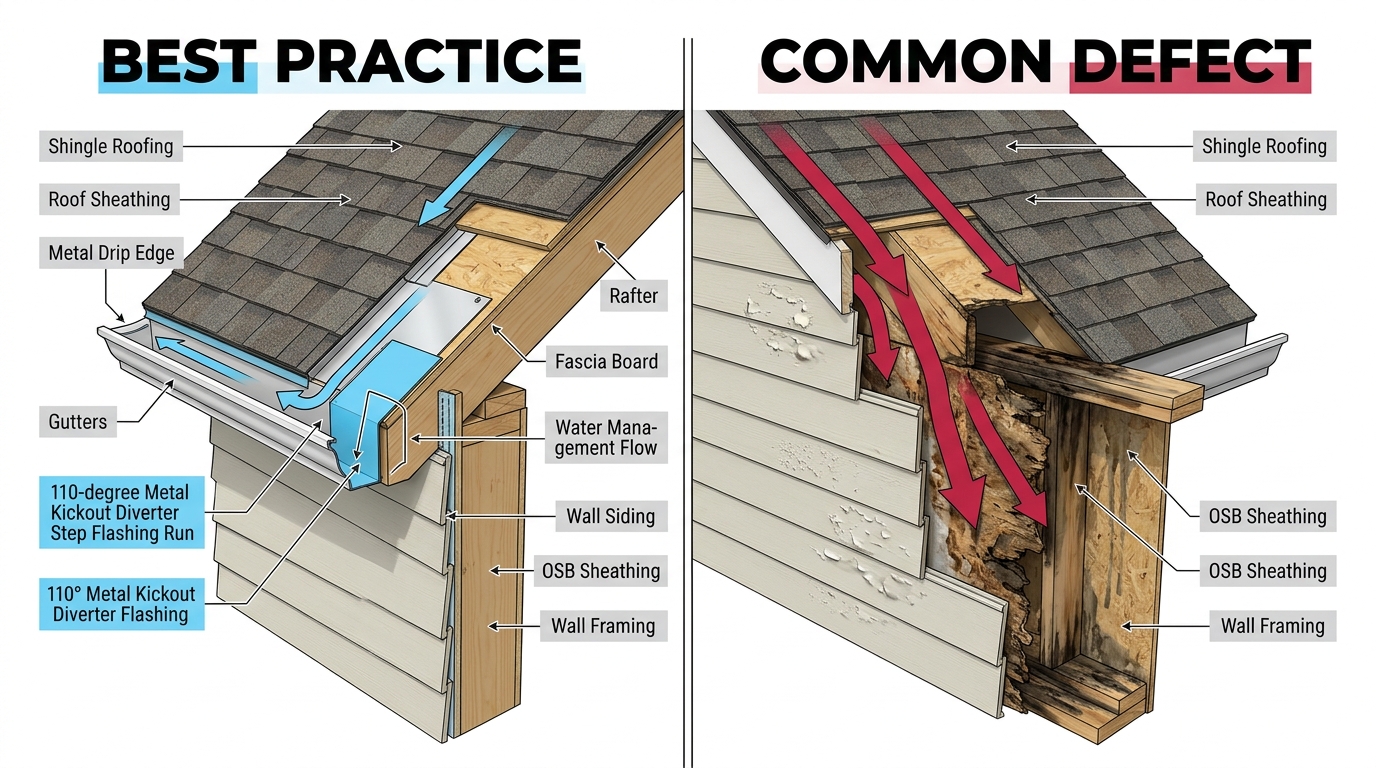
3D ARCHITECTURAL CUTAWAY • FIGURE 1.3
FIGURE 1.3: STEP & KICKOUT FLASHING WITH DRIP EDGE VS. MISSING KICKOUT & WATER DAMAGE
BEST PRACTICE (CODE-COMPLIANT)
Kickout flashing diverts torrential roof runoff directly into seamless gutter
Corrosion-resistant metal drip edge installed along eaves over underlayment
Step flashing integrated seamlessly under each course of siding and shingles
Class 4 architectural composition shingles with intact ceramic granules
COMMON DEFECT (HAZARD / AT-RISK)
Missing kickout flashing channels water behind siding into structural wall framing
Hidden rot and mold develop in wall sheathing, studs, and sill plates
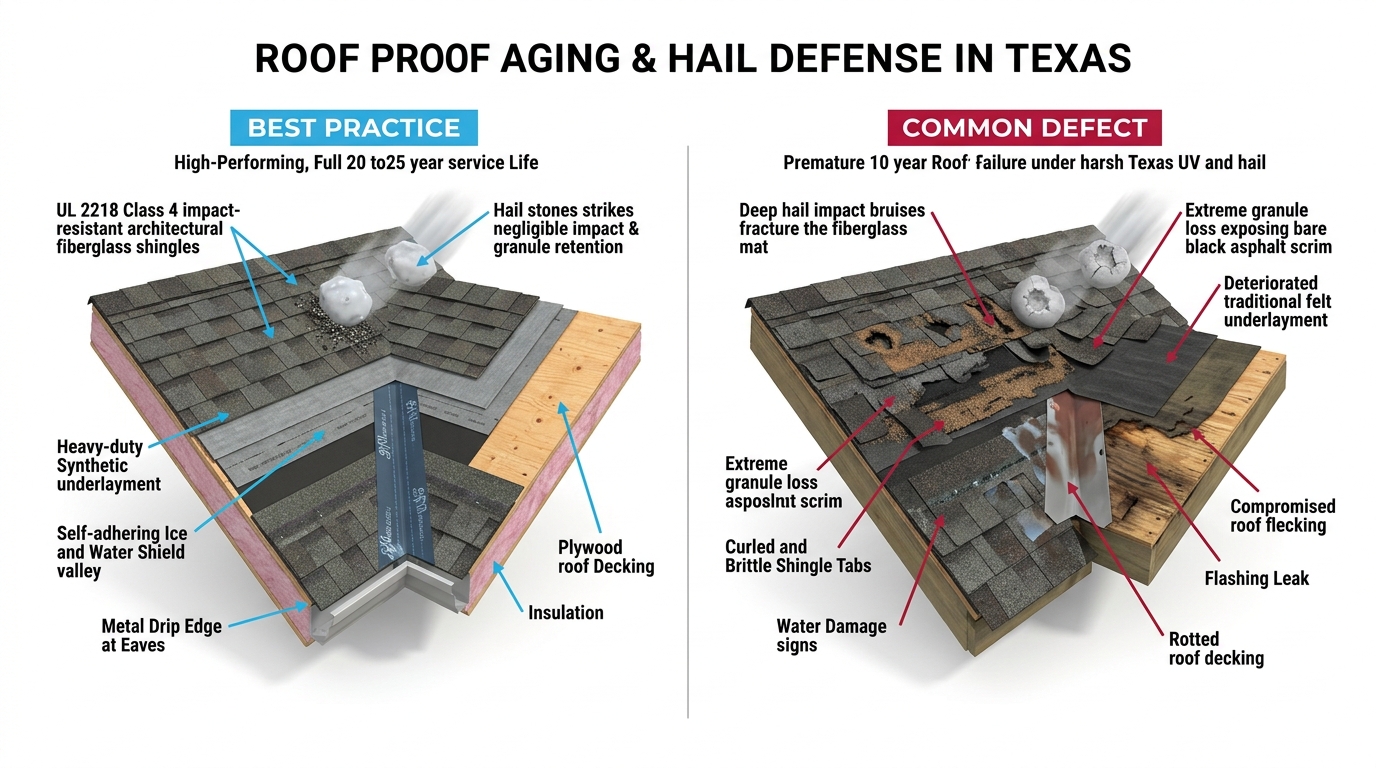
Hail impact fractures dislodge granules, exposing vulnerable asphalt mat
Missing drip edge allows water to wick into roof deck edges and fascia
Side-by-side comparison of proper kickout diverter flashing and metal drip edge versus missing flashing channeling storm runoff behind exterior siding.
TEXAS FIELD TRIAGE: 3-STAGE SEVERITY SCALEField Inspection Progression Rubric
STAGE 1NORMAL TEXAS AGING (COSMETIC)
Condition:Uniform shingle granule wash in gutters from normal weathering; minor Texas UV surface fading.
Action:Secure lifted tabs with roofing mastic or swap shingles within 30–60 days.30–60 Days
STAGE 3ACT IMMEDIATELY (URGENT)
Condition:Widespread missing shingles after windstorm, punctured roof deck, or missing kickout causing ceiling leak.
Action:Dispatch roofing contractor immediately for emergency tarping and repair.24–48 Hrs
How It Works in Your Home
Your roof covering is your home's exterior umbrella, deflecting torrential downpours, absorbing blistering ultraviolet solar radiation, and shedding gale-force winds.
In Texas residential construction, architectural fiberglass composition shingles are the dominant roof covering, installed on over 85% of homes. These shingles consist of a woven fiberglass mat coated in asphalt and surfaced with ceramic-coated mineral granules that reflect UV rays and resist fire. Shingles are installed in overlapping courses starting from the eaves and proceeding upward to the ridge, secured with corrosion-resistant roofing nails driven through designated nail lines.
Beneath the shingles lies a vital secondary defense: underlayment. Modern Texas building standards favor synthetic polymer underlayment over traditional asphalt-saturated felt paper because synthetic membranes are tear-resistant, water-repellent, and do not degrade when exposed to high attic temperatures. Along the eaves and valleys, self-adhering modified bitumen ice-and-water shield membranes adhere directly to the roof decking. Metal drip edge flashing along eaves and rakes prevents water from curling under the decking edge, while step flashing and angled kickout flashing seal intersections where roof planes meet vertical siding walls.
Architectural Shingles:Multi-layered fiberglass composition shingles providing dimension, wind resistance up to 110–130 mph, and UV shielding.
Synthetic Underlayment:Tear-resistant polymer barrier installed over roof decking beneath shingles to provide secondary water resistance.
Drip Edge Flashing:L-shaped or T-shaped corrosion-resistant metal flashing along eaves and rakes that guides water directly into gutters.
Kickout Flashing:Angled metal diverter installed at roof-to-wall intersections that steers roof runoff cleanly into the gutter rather than behind exterior siding.
What Can Go Wrong & What to Look For
Hail impacts, solar granule depletion, wind lift, and missing kickout flashing cause roof leaks that rot structural decking and wall framing.
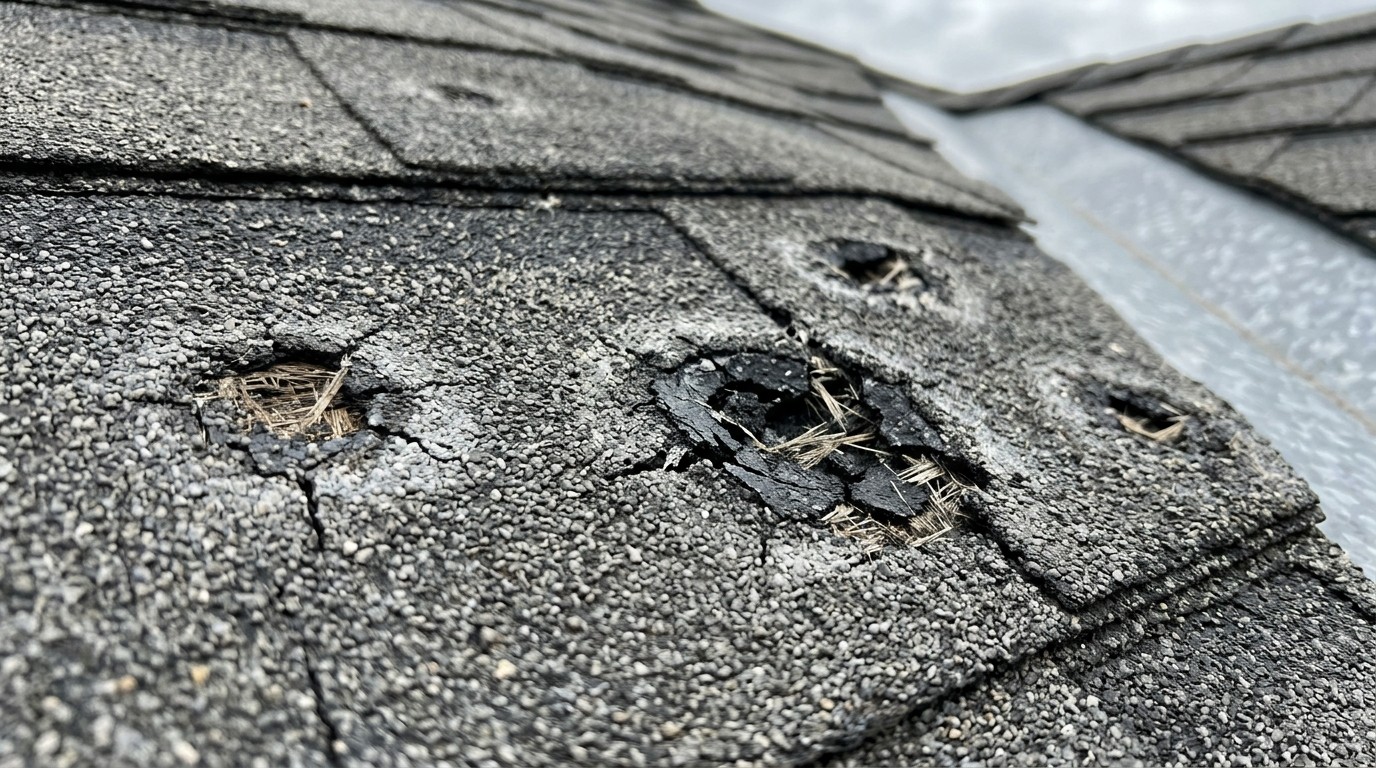
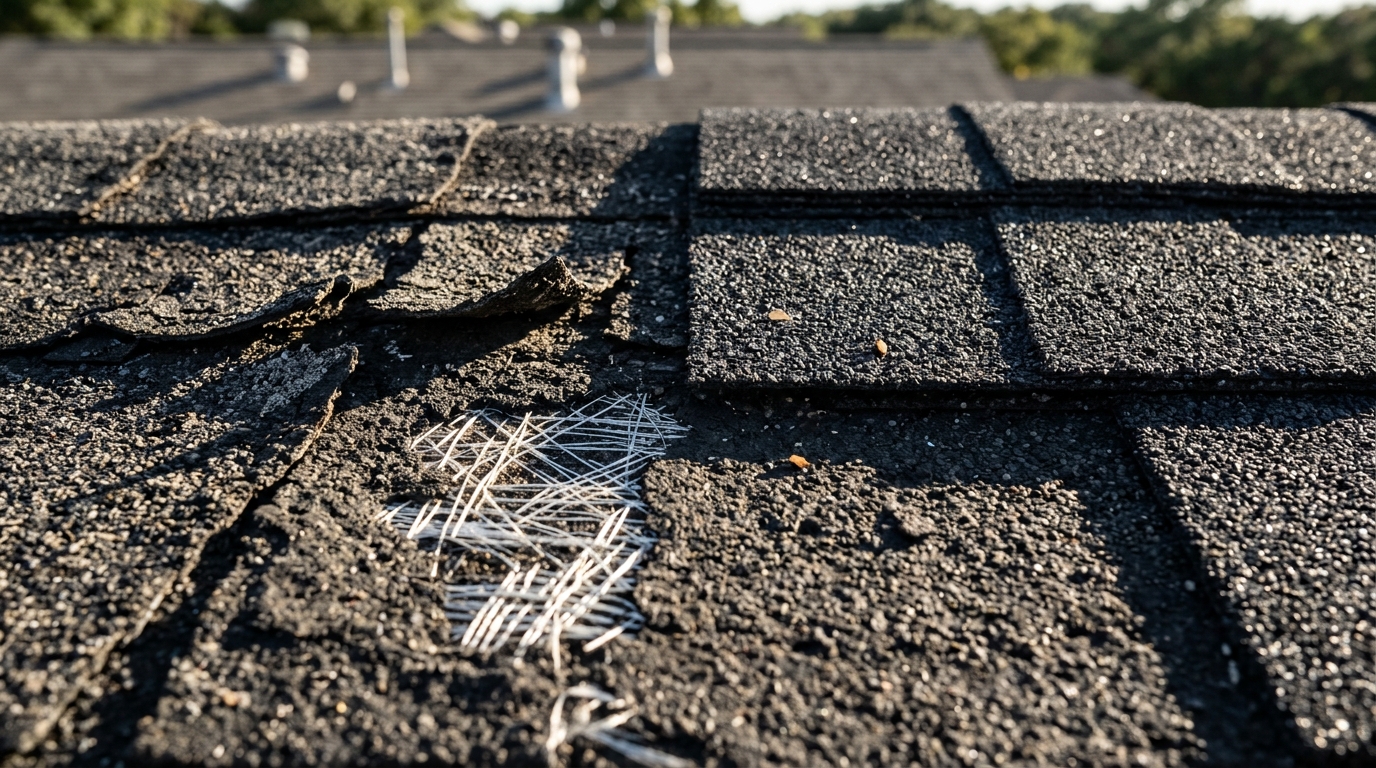
Hail damage is the primary cause of roof replacement across North and Central Texas. When hailstones strike asphalt shingles, they fracture the fiberglass reinforcement mat and dislodge the protective ceramic granules, exposing the underlying black asphalt. Over time, sunlight bakes this exposed asphalt, making it brittle and allowing water to penetrate. Hail bruises appear as round, soft, dark indentations where granules are missing.
Equally destructive is missing kickout flashing. When roof eaves terminate against a vertical wall, water running down the roof edge must be directed outward into the gutter. Without a kickout diverter, water flows directly down the wall behind the siding, rotting the wood wall studs, exterior sheathing, and interior drywall in a hidden pattern that often goes unnoticed until thousands of dollars in structural damage has occurred.
Early Warning Signs & Red Flags
Mineral granules washing out of downspouts in heavy quantities, accumulating on splash blocks
Curling, cupping, or brittle shingles that crack easily when touched
Circular dark bruised spots on shingles following a hailstorm
Water stains or dark brown discoloration on ceiling drywall near exterior walls
Lifted or missing shingles along wind-exposed eaves, ridges, and hips
Missing Kickout Flashing at Roof-Wall IntersectionsIMMEDIATE ACTION
Water draining behind siding rather than into the gutter, causing hidden framing and sheathing rot.
Severe Hail Impact Fractures & Granule LossIMMEDIATE ACTION
Dislodged granules exposing asphalt mat to rapid UV degradation and leaks.
Missing or Damaged Metal Drip EdgeMONITOR
Decking edges exposed to moisture capillary action, causing soft, rotted fascia boards.
Exposed Fasteners on Ridge Caps or Pipe BootsROUTINE
Unsealed nail heads on roof penetrations rusting and creating active water leak paths.
TEXAS HAIL FORENSICS • § 1.3
Hail Impact Mat Bruising & Granule Displacement on Asphalt Shingles
Hailstones ≥1.25 inches crush protective ceramic granules into the underlying asphalt mat; UV sunlight then bakes the exposed bitumen until brittle fractures leak into the decking.
How Texas Weather & Soil Affect It
The Texas climate subjects roof coverings to intense thermal shock, severe hail storms, and hurricane-force coastal winds.
Roof surface temperatures on Texas summer afternoons routinely surpass 150°F to 160°F. This intense heat bakes volatile oils out of asphalt shingles, making them brittle and accelerating granule loss. Sudden afternoon thunderstorms then cause thermal shock—dropping surface temperatures by 50°F in minutes—inducing rapid thermal contraction that strains fasteners and adhesive sealant strips.
Along the Texas Gulf Coast (Designated Windstorm Areas), building codes enforce the Texas Department of Insurance (TDI) Windstorm Inspection Program (WPI-8 certificates). Shingles in coastal zones require six nails per shingle rather than four, reinforced starter courses, and high-wind rated ridge cap shingles capable of withstanding 130 to 150 mph wind gusts.
Texas Climate & Soil Stresses
Intense ultraviolet radiation degrading shingle asphalt binders and adhesives
Spring supercell storms producing golf-ball to baseball-sized hail across North and Central Texas
High coastal wind zones requiring TDI Windstorm certification (WPI-8) along the Gulf Coast
Sudden thermal shocks causing expansion and contraction of metal flashings and fasteners
Texas Field Pro Tips
Choose Class 4 impact-resistant shingles when reroofing; many Texas insurance carriers offer 15% to 25% premium discounts.
In coastal counties, verify that your roofing contractor obtains a TDI Windstorm certificate (WPI-8) upon roof completion.
Inspect plumbing vent pipe rubber flashings ('pipe boots') every 5 years, as Texas sun rots rubber seals long before shingles fail.
How to Maintain & Protect It
Regular ground-level visual checks and timely sealant maintenance prevent minor roof wear from turning into costly interior leaks.
Never walk on asphalt shingles during hot Texas summer afternoons; soft, heated shingles are easily damaged by foot traffic, which tears the fiberglass mat and scuffs away granules. Use binoculars from ground level or hire an experienced inspector with drone photography to evaluate roof condition safely.
Inspect plumbing pipe boots and flashing seals every few years. The neoprene rubber collars on standard plumbing vent flashings typically dry out, crack, and split within 6 to 8 years in the Texas sun. Replacing worn rubber collars with silicone slip-on covers prevents water from dripping down vent pipes into attic insulation.
Seasonal Walkthrough Checklist
Spring: Conduct a visual inspection following early spring thunderstorms to check for lifted or wind-damaged shingles.
Summer: Inspect plumbing vent boot collars for sun cracking and dry rot.
Fall: Clear accumulated leaves, pine needles, and tree debris from roof valleys and gutter troughs.
Winter: Check attic ceilings beneath valleys and chimneys for any faint water staining following cold rains.
HOMEOWNER DECISION MATRIX
DIY Weekend Maintenance vs. Call a Qualified Pro
SAFE 15-MINUTE DIY CARE
Visually inspect shingles and roof valleys from ground level with binoculars after storms.
Keep overhanging tree branches trimmed back at least 6 feet from roof shingles.
Clear leaf and twig dams from roof valleys and gutter inlets.
WHEN TO CALL A QUALIFIED PRO
Professional roof replacement or storm damage assessment following severe hail events.
Repair or installation of metal step flashing and kickout diverter flashings.
Replacing worn plumbing vent pipe boots and resealing chimney counter-flashings.
CLINICAL DIFFERENTIAL FIELD TRIAGE & CONNECTED SYSTEMS§ 1.3 Diagnostic Rubric
Harmless Cosmetic Baseline
Minor ceramic granule settling inside gutters during the first year of a new asphalt roof and uniform sun-fading across south slopes are normal.
Active Failure Signal
Circular dark hail bruises exposing fiberglass mat, lifted wind-creased tabs, or split neoprene plumbing vent boots allow storm water straight onto roof decking.
60-Second Homeowner Check
Stand across the street with binoculars to scan plumbing vent boots for splits, and inspect downspout splash blocks for heavy piles of shed shingle granules.
BEFORE YOU SIGN A BID • TEXAS CONTRACTOR VETTING & SCAM DEFENSE
Roof Replacement & Texas Hail Claims
§ 1.3 Playbook
Texas Credential to VerifyManufacturer Master Installer credential, verifiable general liability certificate, and WPI-8 windstorm engineer alignment in coastal counties.
Municipal Permit & Inspection RuleMunicipal reroof permit required in most Texas cities; WPI-8 certificate mandatory in TWIA coastal zones.
3 Questions You Must Ask Before Hiring
“Does your written scope replace ALL metal valley flashings, drip edges, and lead/neoprene pipe boots down to bare decking—or reuse old flashing?”
“Will you install synthetic underlayment plus peel-and-stick ice-and-water shield in all valleys, chimneys, and skylights?”
“Can you provide a local Texas street office address, active General Liability policy verifiable directly with the insurer, and final lien waivers?”
3 High-Pressure Red Flags & Scams
Door-to-door out-of-state “storm chasers” offering to waive or rebate your insurance deductible—which is a Class B misdemeanor in Texas under HB 2102.
Overlaying a second layer of shingles on top of hail-damaged shingles instead of a complete tear-off to inspect OSB decking.
Demanding 50%+ cash upfront before a single pallet of shingles is delivered to your driveway.
HOMEOWNER ACTION TAKEAWAYRISK LEVEL: HIGH
Roof Covering Stewardship Summary
Your roof is your home's first line of defense against Texas heat, hail, and storms. Regular inspection of vulnerable flashings and choosing impact-resistant materials will maximize roof life and protect your home interior.
Recommended Action Steps
Check that kickout flashings are present wherever roof edges terminate against siding walls.
Inspect rubber plumbing pipe boots every 3 to 5 years for sun dry rot and cracking.
Trim tree branches back at least 6 feet to prevent physical abrasion against shingle granules.
Immediate Priorities
Address any active roof leaks or ceiling stains immediately to prevent structural wood rot and mold.
Have your roof inspected by a trusted professional after any confirmed hailstorm in your neighborhood.
Install kickout flashing if water is currently running down siding walls at roof transitions.
Ongoing Annual Maintenance
Conduct ground-level binocular inspections twice a year and after major storm events.
Keep roof valleys, gutters, and downspouts clean and clear of accumulated debris.
Budget for roof replacement every 15 to 20 years in typical Texas sun and storm environments.
Typical Repair / Replacement Budget:$350 – $16,000($350–$850 for pipe boot replacement and flashing repairs; $8,000–$16,000+ for complete architectural shingle reroofing.)
Expected Assembly Lifespan:15–22 years for architectural shingles in Texas (vs 25–30 in cooler northern states)
ICC DIGITAL CODES2021 / 2024 IRC
2021/2024 IRC R905.2.8.5 / R903.2.1—Drip Edge and Kickout Flashing Requirements
STATUTORY MODEL CODE TEXT
A drip edge shall be provided at eaves and gables of shingle roofs. Flashing shall be installed at wall and roof intersections, at gutters, wherever there is a change in roof slope or direction and around roof openings. A kickout flashing shall be installed to divert water away from exterior wall coverings.
Exception: Where existing roof structures preclude standard drip edge profiles, approved alternative metal edge flashings providing complete deck coverage shall be accepted.
IN PLAIN ENGLISH
Metal drip edge along the eaves protects decking from capillary water wicking, while angled kickout flashing prevents torrential roof runoff from penetrating behind exterior siding.
HOMEOWNER PRO TIP:Look for Class 4 impact-resistant composition shingles to qualify for Texas homeowner insurance premium discounts of up to 25%.
1.4
Roof Structures and Attics: Framing, Ventilation & Texas R-38 Insulation
Deep blown fiberglass insulation bed maintaining uniform R-38 thermal resistance
Radiant barrier foil roof decking reflecting up to 97% of radiant solar heat
Intact engineered roof truss with factory-pressed galvanized steel gusset plates
COMMON DEFECT (HAZARD / AT-RISK)
Blown insulation spilling into soffit cavity, completely blocking attic intake air
Cut or notched truss chord compromising engineered structural roof capacity
Superheated attic air reaching 150°F+, degrading shingles and overworking AC
Bathroom exhaust fan dumping humid steam directly into attic insulation
Side-by-side comparison of balanced attic ventilation with continuous soffit baffles, radiant barrier, and R-38 insulation versus blocked airflow, cut trusses, and trapped condensation.
TEXAS FIELD TRIAGE: 3-STAGE SEVERITY SCALEField Inspection Progression Rubric
STAGE 1NORMAL TEXAS AGING (COSMETIC)
Condition:Faint surface dust streaking on rafters; minor settlement of blown insulation (retaining ≥ R-30).
Action:Inspect in fall; maintain clear airflow over baffles.Annual Log
Action:Install plastic rafter baffles to restore 1-inch eave clearance within 30–60 days.30–60 Days
STAGE 3ACT IMMEDIATELY (URGENT)
Condition:Cut or altered engineered roof truss webs, cracked/sagging ridge beam, or rotted roof decking.
Action:Engage structural engineer immediately for PE-stamped truss sistering repair.Immediate
How It Works in Your Home
Your attic framing and roof structure form the architectural skeleton supporting roof loads, while the attic ventilation and insulation system controls extreme heat transfer into your living space.
In modern Texas homes, roof structures are built using engineered wood roof trusses or conventional stick-built rafter and ridge framing. Engineered trusses consist of top chords, bottom chords (which support ceiling drywall), and diagonal web members joined by toothed galvanized steel gusset plates. Every truss member is calculated by structural engineers to carry dead loads (shingles and framing) and live loads (wind pressure and foot traffic) across wide, open floor plans without interior load-bearing walls.
Equally vital is the attic thermal and ventilation envelope. Attic ventilation operates on the natural stack effect: cool outdoor air enters through continuous perforated vents in exterior soffits, warms as it contacts hot roof decking, and rises naturally to exhaust through continuous ridge vents or louvered static roof vents. To keep this airflow path unobstructed, rigid plastic or cardboard baffles are installed between rafters at the eaves, preventing blown-in insulation from burying the soffit openings. Modern Texas building energy codes require a minimum of R-38 insulation depth (approximately 12 to 14 inches of blown fiberglass or cellulose) across attic floors, paired with radiant barrier foil sheathing beneath roof decking to reflect up to 97% of radiant solar heat.
Engineered Roof Trusses:Factory-fabricated triangular framing units connected by steel gusset plates, engineered to span long distances without interior wall support.
Continuous Ridge Vent:An exhaust vent installed along the highest peak of the roof to let rising hot attic air escape continuously.
Soffit Intake Baffles:Rigid plastic channels that maintain a 2-inch clear air channel above insulation for fresh air intake.
Radiant Barrier Sheathing:Foil-laminated OSB roof decking that reflects radiant solar heat back outward, lowering attic temperatures by up to 30°F.
Blown-in R-38 Insulation:A 12-to-14-inch deep thermal blanket separating scorching attic air from climate-controlled interior living spaces.
What Can Go Wrong & What to Look For
Altered truss chords, blocked ventilation baffles, compressed insulation, and missing thermal barriers drive up summer utility bills and degrade roof decking.
A critical structural defect occurs when homeowners, plumbers, or HVAC technicians cut, notch, or remove truss web members to squeeze large ductwork, attic ladders, or storage platforms into the attic. Because every component of an engineered truss is under precise tension or compression, cutting even a single diagonal web member compromises the entire roof assembly, leading to roof sagging, cracked ceiling drywall, and potential roof failure under storm winds.
On the thermal side, unventilated attics act as giant superheated ovens. When insulation contractors inadvertently blow fiberglass over soffit vents without installing rigid baffles, airflow stops completely. Attic temperatures can soar past 140°F to 150°F on summer afternoons. This intense heat bakes shingles from below, drastically shortening their lifespan, and overworks air conditioning equipment and ductwork running through the attic space.
Early Warning Signs & Red Flags
Noticeable sagging, bowing, or dips in the exterior roofline when viewed from across the street
Cut, notched, or spliced wood truss chords or diagonal webs
Loose or pulling galvanized steel truss connector plates (gusset plates)
Attic insulation thickness measuring less than 10 inches across the floor joists
Dark mildew or condensation staining on the underside of roof sheathing around roof penetrations
Cut or Altered Engineered Roof TrussesIMMEDIATE ACTION
Truss web or chord members severed for storage or equipment, compromising structural integrity.
Blocked Soffit Vents with InsulationIMMEDIATE ACTION
Blown insulation blocking eave vents, stopping airflow and superheating the attic.
Inadequate Attic Insulation Depth (< R-30)MONITOR
Thin or compressed insulation allowing massive summer heat transfer into bedrooms.
Disconnected or Incomplete Ridge VentingMONITOR
Ridge vent cutouts missing or blocked by roof paper, preventing hot air exhaust.
Galvanized steel hurricane ties anchor rafters directly to wall top plates, preventing high-velocity Gulf Coast and straight-line thunderstorm winds from peeling the roof assembly upward.
How Texas Weather & Soil Affect It
In Texas, attics are the most extreme thermal environment in the entire home, frequently reaching 140°F to 160°F during long summer heatwaves.
Because most Texas homes place HVAC air handlers and flexible distribution ductwork in the unconditioned attic rather than basements, attic temperature directly dictates air conditioning efficiency. A poorly ventilated attic at 150°F radiates intense heat into R-6 or R-8 ductwork, warming conditioned air before it ever reaches living room supply registers.
Furthermore, in humid coastal environments, poor attic ventilation traps indoor moisture evaporating through ceiling penetrations. When warm, humid attic air contacts cooler surfaces, condensation forms on metal roof fasteners and air ducts, fostering mold growth and rotting roof sheathing from the inside out.
Texas Climate & Soil Stresses
100°F+ outdoor ambient temperatures producing 150°F+ unconditioned attic air spaces
High coastal humidity causing condensation when moist air encounters cooled duct surfaces
High wind gusts creating negative pressure zones that test soffit vent fasteners
Hail and wind events that can loosen exterior attic ridge vent caps
Texas Field Pro Tips
Verify that your attic floor has at least 12 to 14 inches of blown insulation (R-38 depth in Texas Climate Zones 2 and 3).
Never install an attic radiant barrier foil directly over insulation on the attic floor—dust accumulation negates its reflectivity within a year; radiant barriers must be attached to the underside of roof rafters.
Ensure your attic access hatch is insulated and weatherstripped to prevent superheated attic air from drafting into hallways.
How to Maintain & Protect It
Attic maintenance focuses on preserving structural wood framing, keeping airflow paths unobstructed, and maintaining thermal insulation depth.
Inspect your attic twice a year. Check that blown-in insulation remains evenly distributed without bare spots caused by wind washing near soffit vents or foot traffic from service technicians. If you notice thin areas around the access stairs or mechanical equipment, add fiberglass batts or blown insulation to restore uniform R-38 depth.
Verify that all bathroom exhaust fans terminate completely outside the home through dedicated roof or wall caps with backdraft dampers. Bathroom exhaust fans that discharge directly into attic insulation pump gallons of hot moisture into the attic every week, leading to wood rot, wet insulation, and dangerous mold blooms.
Seasonal Walkthrough Checklist
Spring: Inspect soffit intake baffles to confirm they remain clear of blown insulation and pest nests.
Summer: Check attic temperature during peak afternoon heat to ensure ridge vents are exhausting hot air.
Fall: Verify that bathroom exhaust fan duct joints are securely taped and venting completely to the exterior.
Winter: Check underside of roof decking for any moisture condensation or dark water staining around chimneys.
HOMEOWNER DECISION MATRIX
DIY Weekend Maintenance vs. Call a Qualified Pro
SAFE 15-MINUTE DIY CARE
Install weatherstripping and rigid foam insulation boards on the back of your attic access door.
Check insulation depth with a ruler to verify uniform 12-to-14-inch coverage across the attic floor.
Ensure cardboard boxes and stored items are not crushing floor insulation batts.
WHEN TO CALL A QUALIFIED PRO
Structural engineer assessment and engineered sistering repairs for cut or damaged roof trusses.
Professional blown-in fiberglass or cellulose insulation top-off to reach current R-38 standards.
Installation of continuous ridge vents, baffles, or powered solar attic exhaust ventilators.
CLINICAL DIFFERENTIAL FIELD TRIAGE & CONNECTED SYSTEMS§ 1.4 Diagnostic Rubric
Harmless Cosmetic Baseline
Seasonal creaking of wood rafters during rapid winter cold fronts and light surface lumber checking along roof purlins do not weaken structural capacity.
Texas Credential to VerifyTBPE Licensed Professional Engineer (P.E.) before altering any roof framing; BPI-Certified Building Envelope & Insulation Specialist.
Municipal Permit & Inspection RuleMunicipal structural framing permit required before cutting, sistering, or modifying rafters, collar ties, purlins, or engineered roof trusses.
3 Questions You Must Ask Before Hiring
“Will you install rigid soffit-vent baffles at every eave bay BEFORE blowing R-38 fiberglass or cellulose so soffit intake airflow stays 100% open?”
“Are you air-sealing recessed can lights, plumbing top-plate holes, and attic hatches with fire-rated foam before adding new insulation depth?”
“Does your ventilation design rely on ONE continuous exhaust path (ridge vent OR solar fan)—never mixing competing exhaust types that short-circuit eave airflow?”
3 High-Pressure Red Flags & Scams
High-pressure attic sales reps pitching $8,000 foil “NASA space blankets” laid directly atop dusty insulation while claiming 50% utility bill drops.
Installing powered attic exhaust fans alongside existing ridge vents—pulling conditioned indoor air up through ceiling light fixtures and backdrafting gas flues.
Cutting engineered wood truss webs without a stamped Texas P.E. repair detail just to squeeze an oversized storage deck or air handler into the attic.
HOMEOWNER ACTION TAKEAWAYRISK LEVEL: HIGH
Roof Structure & Attic Stewardship Summary
Your roof structure supports the entire upper house, while proper attic insulation and continuous soffit-to-ridge ventilation keep summer cooling bills under control and protect roofing materials from heat degradation.
Recommended Action Steps
Never permit anyone to cut, notch, or remove any wood member of an engineered roof truss.
Ensure attic insulation maintains a uniform depth of at least 12 to 14 inches (R-38 rating).
Verify that soffit intake vents are equipped with rigid baffles to prevent insulation blockage.
Immediate Priorities
Repair any severed or damaged roof truss members with engineer-specified gussets.
Reroute any bathroom exhaust fans that currently blow humid steam directly into the attic.
Clear any insulation covering soffit vents along the exterior eaves.
Ongoing Annual Maintenance
Conduct a semi-annual attic walkthrough checking for leaks, animal intrusion, or insulation displacement.
Check that the attic pull-down stairway or access hatch seals tightly when closed.
Inspect the underside of roof sheathing after severe storms for water tracking along rafters.
Typical Repair / Replacement Budget:$250 – $3,500($250–$600 for attic stair insulation covers and baffle clearing; $1,200–$3,500 for professional R-38 re-insulation and ventilation upgrades.)
Expected Assembly Lifespan:50+ years for roof framing; 20–30 years for insulation (unless water damaged)
ICC DIGITAL CODES2021 / 2024 IRC
2021/2024 IRC R802.10.4 / R806.1—Truss Alterations and Attic Ventilation Requirements
STATUTORY MODEL CODE TEXT
Truss members shall not be cut, notched, drilled, spliced or otherwise altered in any way without the approval of a registered design professional. Enclosed attics and enclosed rafter spaces shall have cross ventilation for each separate space by ventilating openings protected against the entrance of rain and snow. The total net free ventilating area shall not be less than 1/150 of the area of the space ventilated.
Exception: The minimum net free ventilation area shall be 1/300 of the vented space where a Class I or II vapor retarder is installed on the warm-in-winter side of the ceiling or where between 40 and 50 percent of the required ventilating area is provided in the upper portion of the attic space.
IN PLAIN ENGLISH
Roof trusses cannot be cut or notched for pipes or storage, and attics must have balanced lower-soffit and upper-ridge ventilation totaling at least 1 square foot of airflow for every 150 square feet of attic floor space.
HOMEOWNER PRO TIP:Pair continuous perforated soffits with a ridge vent and radiant barrier roof sheathing to lower attic summer temperatures by up to 30°F.
1.5
Walls: Framing, Brick Weep Holes, Lintels & Stucco Systems
Open Weep Hole:Unobstructed vertical cavity opening allowing drainage of condensation behind brick.
2
Sound Bed Mortar Joint:Intact mortar without stair-step shear fractures or moisture delamination.
3
Clean Foundation Reveal:Concrete foundation band kept free of mulch or soil buildup.
AUTHENTIC FIELD INSPECTION • BRICK WEEP HOLESOpen, unobstructed brick weep holes spaced every 33 inches along the foundation ledge, allowing trapped cavity condensation to drain freely to the exterior.
3D ARCHITECTURAL CUTAWAY • FIGURE 1.5
FIGURE 1.5: BRICK VENEER FLASHING & CLEAR WEEP HOLES VS. BLOCKED WEEPS & MISSING TIES
BEST PRACTICE (CODE-COMPLIANT)
Open, unobstructed weep holes spaced maximum 33 inches apart along foundation ledge
Clear 1-inch drainage air cavity between brick veneer and weather-resistant barrier
Corrugated galvanized steel wall ties securing brick to wood framing every 16 to 24 inches
Weather-resistant housewrap overlapping foundation flashing to guide water outward
COMMON DEFECT (HAZARD / AT-RISK)
Weep holes plugged with mortar, caulk, or buried under garden mulch
Trapped moisture pooling on foundation ledge, rotting bottom sill plate and drywall
Missing or corroded wall ties allowing brick veneer to pull away and bow outward
Side-by-side comparison of properly drained brick veneer with 1-inch air space and open weep holes versus blocked weeps, missing wall ties, and rotting structural framing.
TEXAS FIELD TRIAGE: 3-STAGE SEVERITY SCALEField Inspection Progression Rubric
STAGE 1NORMAL TEXAS AGING (COSMETIC)
Condition:Hairline cosmetic drywall tape cracks (<1/16") at door headers; minor exterior brick efflorescence.
Action:Touch up with spackle and paint during annual refresh.Annual Log
STAGE 2WATCH & MAINTAIN (30–90 DAYS)
Condition:Exterior brick stair-step mortar crack (1/16" to 1/8"); dry caulk around windows; clogged weep holes.
Action:Clear weep holes and recaulk window perimeters with polyurethane within 30–60 days.30–60 Days
STAGE 3ACT IMMEDIATELY (URGENT)
Condition:Displaced masonry crack (>1/4"), leaning brick veneer pulling from studs, or bulging rotted stucco.
Action:Call masonry contractor and structural engineer immediately for wall tie repair.Immediate
How It Works in Your Home
Your home's wall assemblies perform a dual role: interior wood stud framing carries vertical gravity and lateral wind loads, while exterior cladding shields the structural framing from wind-driven moisture.
In Texas, the overwhelming majority of homes utilize wood light-frame construction. Exterior walls are framed using 2×4 or 2×6 Southern Yellow Pine or Douglas Fir studs spaced 16 inches on center, fastened to horizontal bottom plates (sill plates) bolted to the concrete foundation and capped with double top plates that support roof trusses. Exterior structural sheathing (oriented strand board or plywood) is nailed to the studs to form shear walls that resist hurricane and tornado wind forces.
Over this structural wooden skeleton sits the exterior cladding. Over 80% of Texas homes feature brick veneer, fiber-cement siding, or traditional three-coat stucco. It is essential for homeowners to understand that brick veneer is not a structural, load-bearing wall—it is a decorative, weather-resistant curtain wall. Brick is porous and absorbs water during rainstorms. Behind the brick lies a mandatory 1-inch clear air space and a weather-resistant barrier (housewrap). Water that penetrates the brick runs down the back of the masonry onto metal base flashing and exits harmlessly through open vertical weep holes spaced every 33 inches along the bottom brick course.
In historic Texas neighborhoods—including late 19th- and early 20th-century Victorian, Craftsman, and folk houses in Galveston, San Antonio, the Houston Heights, and Waxahachie—homes were frequently constructed using balloon framing rather than modern platform framing. In balloon framing, vertical wall studs extend in continuous, uninterrupted runs from the foundation sill plate all the way to the second-story roof plate, with intermediate floor joists resting on an interior ribbon board notched into the studs. The critical building-science hazard of historic balloon framing is the absence of horizontal firestops within the continuous vertical stud cavities. Without solid wood fireblocks or mineral wool firestops at floor transitions, an open stud cavity acts as a high-velocity convective chimney flue during a fire, drawing flames and combustion gases from the crawlspace or first floor directly into the upper floor and attic within minutes.
Structural Wood Studs:Vertical 2×4 or 2×6 lumber spaced 16 inches on center carrying floor and roof loads down to the foundation.
Brick Veneer & Weep Holes:Porous exterior masonry backed by a 1-inch air gap and weep openings that let trapped cavity water drain outward.
Weather-Resistant Barrier (WRB):Vapor-permeable housewrap (such as Tyvek) that stops liquid water while allowing indoor moisture vapor to escape.
Steel Lintels:L-shaped heavy steel angle irons supporting brickwork across door and window openings, coated against rust.
Wall Ties:Corrugated galvanized metal straps nailed to wood studs and embedded in brick mortar joints to anchor the brick wall.
The most frequent defect observed in Texas brick homes is blocked weep holes. Homeowners, painters, and landscapers routinely caulk weep holes shut, pack them with steel wool, or bury them under flowerbed mulch. When weep holes are plugged, water that naturally penetrates the brick cannot escape. It pools on the foundation ledge, wicks upward into interior drywall, rots the treated sill plate, and provides subterranean termites a hidden moisture pathway directly into the house framing.
Above exterior windows and doors, look at the steel lintels supporting the brick courses. If the steel angle iron is not kept properly painted, moisture oxidizes the metal. Rust causes steel to expand up to ten times its original thickness—a destructive force known as 'rust jacking.' This expansion lifts the masonry above the window, producing horizontal and diagonal stepped cracks through the brick mortar at the upper window corners.
Early Warning Signs & Red Flags
Weep holes along the bottom row of brick filled with caulk, mortar droppings, or buried in garden soil
Diagonal or stepped cracks radiating outward from the upper corners of window and door openings
Rust flaking and expansion bulging on steel window lintels above exterior openings
Spalling, cracking, or bulging stucco finish, particularly beneath window sills and roof junctions
Soft, spongy, or rotting wood window trim, baseboards, or exterior fascia boards
Plugged or Buried Brick Weep HolesIMMEDIATE ACTION
Trapped moisture unable to escape wall cavities, rotting framing and attracting termites.
Rusted Steel Lintels with Masonry CrackingMONITOR
Expanding rust lifting brickwork above windows and doors, requiring steel prep and repointing.
Stucco Cracks Exceeding 1/8 Inch Without KickoutsIMMEDIATE ACTION
Unsealed stucco cracks allowing rainwater directly into wood wall sheathing.
Missing or Corroded Brick Wall TiesIMMEDIATE ACTION
Omitted sill-pan flashing or sealed-shut bottom weep screeds trap wind-driven Texas rain behind rigid stucco coats, quietly rotting OSB sheathing while the painted exterior still looks intact.
How Texas Weather & Soil Affect It
Wind-driven rains, high humidity, and intense summer sun test exterior wall seals across the state.
During Gulf Coast tropical storms, wind pressures push rainwater directly through microscopic brick pores and mortar joints. If the weather-resistant housewrap behind the brick is torn, unsealed, or missing proper flashing tapes around window flanges, water enters the wood wall cavity, saturating fiberglass batt insulation and fostering hidden toxic mold colonies inside wall cavities.
In Central and North Texas, high thermal swings cause differential thermal expansion between exterior brick veneer and interior wood framing. Brick walls expand in the blazing sun while interior studs remain at 72°F in air conditioning. Without flexible polyurethane expansion joints placed every 25 feet along long brick runs, thermal stress creates vertical mortar cracks near building corners.
Texas Climate & Soil Stresses
Wind-driven tropical storm rains forcing moisture through exterior cladding materials
Intense solar baking causing significant thermal expansion differentials between brick and wood
Persistent high humidity slowing exterior wall drying times in Coastal Texas
Expansive clay soil movement causing stress cracks in rigid exterior masonry and stucco
Texas Field Pro Tips
Never allow lawn sprinkler spray heads to continuously soak exterior brick or stucco walls.
Install retrofitted stainless steel weep hole covers (mesh inserts) to keep wasps and pests out while preserving drainage.
Keep steel window lintels scraped, primed with rust-inhibiting primer, and painted with exterior acrylic enamel.
How to Maintain & Protect It
Wall maintenance requires keeping drainage paths open, sealing perimeter gaps, and maintaining protective coatings on metal components.
Walk your home exterior annually to inspect every weep hole along the foundation perimeter. Ensure weep holes remain completely clear of dirt, mulch, spiderwebs, and leaves. If you see painters or contractors attempting to caulk weep holes shut, stop them immediately.
Inspect the caulking around exterior window frames, door trim, and siding expansion joints every 2 to 3 years. Texas heat dries out standard silicone and latex caulks, causing them to shrink and pull away. Use high-performance elastomeric polyurethane sealants that flex during thermal movements without cracking.
Seasonal Walkthrough Checklist
Spring: Check weep holes along flowerbeds and clear away any accumulated mulch or garden soil.
Summer: Inspect steel window lintels for surface rust; scrape, prime, and repaint as necessary.
Fall: Examine caulk joints around all exterior window and door perimeters; recaulk failed joints.
Winter: Check interior drywall along exterior walls for any signs of cold drafts, moisture staining, or peeling paint.
HOMEOWNER DECISION MATRIX
DIY Weekend Maintenance vs. Call a Qualified Pro
SAFE 15-MINUTE DIY CARE
Clear dirt and debris from blocked brick weep holes using a plastic pry tool or stiff wire.
Scrape and repaint surface rust on steel window lintels with exterior metal paint.
Apply elastomeric polyurethane sealant to small exterior gaps around window frames.
WHEN TO CALL A QUALIFIED PRO
Tuckpointing and mortar repointing for wide stepped cracks in exterior brick veneer.
Replacement or structural support for severely rusted, bowed, or deflected steel lintels.
Stucco remediation and moisture testing if soft wall sheathing or water intrusion is suspected.
CLINICAL DIFFERENTIAL FIELD TRIAGE & CONNECTED SYSTEMS§ 1.5 Diagnostic Rubric
Harmless Cosmetic Baseline
Pinhead drywall nail pops and hairline vertical tape seams over wide headers commonly appear as framing lumber acclimates across humid summers and dry winters.
Check the bottom brick row every 33 inches to confirm weep holes are open (never caulked shut), and press interior baseboards below windows for softness.
Municipal Permit & Inspection RulePermit required when replacing structural steel lintels or removing >25% of exterior cladding.
3 Questions You Must Ask Before Hiring
“How will you preserve an unobstructed drainage plane and keep every bottom-course brick weep hole or stucco weep screed completely open?”
“Are you sealing mortar cracks with breathable elastomeric mortar sealant rather than smearing rigid mismatched Portland cement over the brick face?”
“For stucco repairs, does the bid include continuous pan flashing with end-dams beneath window sills and two-layer weather-resistive barrier integration?”
3 High-Pressure Red Flags & Scams
Caulking shut brick weep holes or painting elastomeric waterproof coatings over stucco weep screeds—trapping bulk water inside your stud walls.
Cosmetically tuckpointing stair-step brick fractures without first diagnosing whether active foundation settlement is still occurring.
Replacing rusted steel window lintels without installing through-wall flexible flashing membrane above the new steel angle.
HOMEOWNER ACTION TAKEAWAYRISK LEVEL: MEDIUM
Wall Assembly Stewardship Summary
Your exterior walls are designed as drainage systems: brick lets water through, and weep holes let it back out. Keeping weep holes open and maintaining paint on steel lintels protects the structural wood framing inside.
Recommended Action Steps
Never seal, caulk, or bury the weep holes located along the bottom course of your brick veneer.
Keep steel window and door lintels painted to prevent rust expansion and brick cracking.
Inspect exterior caulking around windows and doors every two to three years for shrinkage or gaps.
Immediate Priorities
Unclog any brick weep holes currently blocked by caulk, paint, or landscaping mulch.
Seal wide stucco cracks or siding gaps that allow wind-driven rain behind the cladding.
Repair flaking rust and expanding metal on any window lintels showing structural brick separation.
Ongoing Annual Maintenance
Walk the exterior perimeter semi-annually to inspect mortar joints and lintels.
Adjust sprinkler heads so they never spray directly against brick or siding walls.
Reapply high-quality elastomeric sealant around exterior door and window trim as needed.
Typical Repair / Replacement Budget:$150 – $4,000($150–$350 for lintel painting and DIY recaulking; $800–$4,000 for professional masonry repointing or lintel replacement.)
Expected Assembly Lifespan:50–100+ years for brick veneer; 20–30 years for fiber-cement siding; 5–8 years for exterior caulk seals
ICC DIGITAL CODES2021 / 2024 IRC
2021/2024 IRC R703.8.4 / R703.8.6—Masonry Veneer Weep Holes and Lintel Support
STATUTORY MODEL CODE TEXT
Weep holes shall be provided in the outside wythe of masonry walls at a maximum spacing of 33 inches on center. Weep holes shall not be less than 3/16 inch in diameter. Weep holes shall be located immediately above the foundation wall or flashing. Masonry veneer shall be supported on steel lintels sized to support the imposed load without exceeding deflection limits of L/600.
Exception: Approved weep vents and mortar collection mesh devices shall be permitted in weep hole locations to prevent pest entry while maintaining drainage capacity.
IN PLAIN ENGLISH
Exterior brick walls must have open weep holes spaced no more than 33 inches apart to let trapped water drain out, and windows must have steel lintels strong enough to support overhead brickwork without sagging.
HOMEOWNER PRO TIP:Never caulk, seal, or bury brick weep holes under mulch or raised garden beds.
1.6
Ceilings and Floors: Joist Spans, Engineered I-Joists & Floor Deflection
CHECK FREQUENCYAnnual (Check for bounce or tile grout cracking)
RISK IF IGNOREDMODERATE
Structural Joist Sag & Tile Floor Cracking ($4,000–$12,000)
1
2
3
WHAT YOU'RE LOOKING ATFIELD INSPECTION ANATOMY
1
Engineered I-Joist Web:OSB vertical web engineered for high stiffness without bowing or twisting.
2
Glued Subfloor Sheathing:Stiff tongue-and-groove decking fastened and glued to eliminate floor squeaks.
3
Full-Depth Solid Blocking:Structural bridging at joist ends preventing joist rolling under live load.
FIELD DIAGNOSTIC • FLOOR DEFLECTION & LEVELINGLaser level altimeter setup measuring subfloor elevation flatness across a wide living area to distinguish normal structural deflection from active foundation heave.
3D ARCHITECTURAL CUTAWAY • FIGURE 1.6
FIGURE 1.6: CODE-COMPLIANT JOIST BORING & L/360 LEVELNESS VS. EXCESSIVE NOTCHING & SAG
BEST PRACTICE (CODE-COMPLIANT)
Holes bored strictly in center zone of joist, maintaining 2-inch edge clearance
Hole diameter limited to maximum one-third of total structural joist depth
Subfloor glued and screwed to joist flanges for quiet, squeak-free floor plane
Floor deflection complies with rigid L/360 maximum deflection standard
COMMON DEFECT (HAZARD / AT-RISK)
Severed bottom flange on engineered I-joist destroying structural tensile strength
Excessive notching in center third of span causing floor bounce and sagging
Water leak from overhead bathroom producing yellow drywall ceiling ring
Subfloor delamination and popping nails telegraphing through finished flooring
Side-by-side comparison of code-compliant joist boring rules and L/360 deflection limits versus excessive notching, severed flanges, and sagging subflooring.
TEXAS FIELD TRIAGE: 3-STAGE SEVERITY SCALEField Inspection Progression Rubric
STAGE 1NORMAL TEXAS AGING (COSMETIC)
Condition:Minor floor squeak in high-traffic hallway; superficial ceiling sheetrock nail pops.
Action:Note in journal; reset loose drywall screws as desired.Annual Log
STAGE 2WATCH & MAINTAIN (30–90 DAYS)
Condition:Noticeable floor deflection/bounce (>1/2" over 10 ft); cracked grout along bathroom tile seams.
Action:Inspect subfloor/crawlspace; install joist shims or secure subfloor panels within 60 days.60 Days
Action:Brace sagging ceiling; shut off water if active leak; dispatch framing pro immediately.Immediate
How It Works in Your Home
Your ceilings and floors form the horizontal structural diaphragms of your home, transferring live foot traffic and dead furniture loads to vertical walls while providing fire separation and acoustic buffering.
In two-story homes and elevated pier-and-beam construction, floor systems consist of horizontal joists spanning between foundation beams or load-bearing walls. Modern Texas builders predominantly utilize engineered wood I-joists (consisting of laminated veneer lumber flanges with an oriented strand board web) or open-web wood floor trusses. These engineered components provide longer spans, lighter weight, and perfectly straight lines compared to traditional dimensional lumber. Over the joists sits a subfloor of 3/4-inch tongue-and-groove OSB or plywood, glued and screwed to joist flanges to eliminate squeaks and create a rigid structural plane.
Ceilings are typically finished with 1/2-inch gypsum drywall boards screwed directly to the underside of ceiling joists or roof truss bottom chords. Beyond creating smooth, finished surfaces, gypsum drywall acts as a mandatory passive fire barrier, containing household room fires for up to 30 minutes before flames can ignite overhead structural floor and roof framing.
Engineered I-Joists:High-strength wood joists with LVL top/bottom flanges and OSB center webs, engineered for long, bounce-free floor spans.
Tongue-and-Groove Subflooring:Interlocking 3/4-inch structural wood panels glued and screwed to joists to form a continuous, squeak-free walking deck.
Gypsum Drywall Ceilings:Fire-rated ceiling panels that provide acoustic dampening, clean interior aesthetics, and passive fire resistance.
Bridging & Blocking:Cross-braces installed between joists at mid-span to prevent joists from twisting and distribute concentrated foot loads.
What Can Go Wrong & What to Look For
Improper joist notching, subfloor water saturation, over-spanned lumber, and plumbing leaks cause springy floors, cracked drywall, and structural sagging.
A common framing defect occurs when trade contractors (plumbers, electricians, HVAC installers) aggressively cut, notch, or drill through floor joists to run drain pipes and ductwork. Building codes strictly regulate joist boring: holes must never be drilled in the outer 2 inches of the top or bottom edge, and notches are completely prohibited in the center third of a joist span where bending tension is highest. When a plumber cuts through the bottom flange of an I-joist for a toilet drain, the structural beam loses up to 80% of its load-carrying capacity, resulting in sagging floors and cracked ceiling drywall below.
On upper floor ceilings, brown or yellowish water rings frequently signal active plumbing leaks from second-floor bathtubs, leaking shower pans, or dripping air conditioning condensate pans located directly above. Stained ceiling drywall that feels soft or spongy to the touch must be addressed immediately before the gypsum board collapses under the weight of accumulated water.
Early Warning Signs & Red Flags
Noticeable floor bounce, vibration, or springiness when walking across large open rooms
Circular yellow, brown, or dark water stains on ceiling drywall beneath second-floor bathrooms
Sagging, bowed, or unlevel ceiling drywall joints along framing lines
Creaking, groaning, or popping sounds from subflooring during normal foot travel
Visible cuts, large holes, or severed flanges on floor joists in basements, crawlspaces, or utility rooms
Improperly Bored or Notched Floor JoistsIMMEDIATE ACTION
Large holes cut through structural joist flanges for plumbing drains, severely weakening floor load capacity.
Active Water Staining & Sagging Ceiling DrywallIMMEDIATE ACTION
Water leaking from overhead plumbing fixtures or AC pans, threatening ceiling collapse.
Subfloor Swelling and DelaminationMONITOR
Moisture-damaged OSB subfloor edges swelling and telegraphing through laminate or carpet flooring.
Loose Subflooring and Chronic Floor SqueaksROUTINE
Subfloor nails pulling loose from joists due to lack of adhesive during construction.
Over-notched joists under renovated bathrooms or compressed shims on pier-and-beam girders manifest upstairs as bouncy tile grout lines, squeaking subfloors, and out-of-square door latches.
How Texas Weather & Soil Affect It
Foundation soil movement and high indoor humidity directly impact ceiling and floor performance in Texas homes.
When expansive clay subsoils heave or settle under a corner of the home, the movement travels upward through wall framing into ceiling and floor diaphragms. Stiff floor joists resist bending, but ceiling drywall—which is rigid and brittle—cannot flex. This stress causes drywall seams to pop, tape joints to buckle, and interior door headers to shift.
Additionally, Texas summer humidity poses challenges for subflooring. If elevated crawlspaces lack adequate ground vapor retarders or ventilation, moist ground air rises continuously into the underside of subflooring. Wood floorboards absorb this moisture and expand, causing hardwood planks to 'cup' (edges rising higher than the center) or laminate flooring to buckle.
Texas Climate & Soil Stresses
Foundation differential settlement transferring twisting stress into ceiling and floor framing
High crawlspace humidity causing subfloor expansion, cupping, and wood rot
Sudden seasonal humidity changes causing wood floorboards to expand and shrink cyclically
Heavy ceiling insulation loads on drywall in homes with R-38 or R-49 blown attic insulation
Texas Field Pro Tips
Maintain indoor relative humidity between 40% and 55% year-round to prevent hardwood floor cupping and drywall joint cracking.
If you discover a water stain on your ceiling, never paint over it until the active source is located and repaired.
In crawlspace homes, ensure a continuous 6-mil polyethylene vapor barrier covers 100% of the ground below floor joists.
How to Maintain & Protect It
Protecting floors and ceilings requires prompt water leak intervention, controlling indoor humidity, and avoiding structural overload.
Promptly investigate any new ceiling water stains or musty odors. A small water stain today can lead to a collapsed drywall ceiling tomorrow if an air conditioning primary drain overflows or a bathtub overflow gasket fails. After repairing the leak source, inspect the damp ceiling drywall; if the gypsum core remains solid and dry, treat the stain with a stain-blocking primer before repainting.
To eliminate annoying floor squeaks in carpeted or hardwood areas, use specialized breakaway subfloor screws designed to fasten loose subflooring tightly back down to joists without damaging existing carpet fibers.
Seasonal Walkthrough Checklist
Spring: Inspect second-floor bathroom shower and tub caulk joints to prevent water seepage into ceilings below.
Summer: Check attic HVAC drain pans and float switches to ensure condensate cannot overflow onto ceilings.
Fall: Walk through the home observing floor levelness and checking for newly developed floor squeaks or bounces.
Winter: Check ceiling corners for hairline cosmetic drywall separation caused by winter framing contraction.
HOMEOWNER DECISION MATRIX
DIY Weekend Maintenance vs. Call a Qualified Pro
SAFE 15-MINUTE DIY CARE
Recaulk bathtub surrounds, shower doors, and toilet bases to stop water from reaching subfloors.
Use a stud finder and breakaway screws to silence squeaky subflooring beneath carpeting.
Apply stain-blocking primer and ceiling touch-up paint over dried, historic water stains.
WHEN TO CALL A QUALIFIED PRO
Structural framing contractor to sister reinforced joists or install steel flitch plates on cut joists.
Drywall contractor to replace water-softened or sagging ceiling panels and re-tape joints.
Hardwood flooring specialist for moisture testing, sanding, and refinishing cupped floor planks.
CLINICAL DIFFERENTIAL FIELD TRIAGE & CONNECTED SYSTEMS§ 1.6 Diagnostic Rubric
Harmless Cosmetic Baseline
Occasional seasonal wood-floor squeaks where subfloor nails rub joists and slight thermal gaps between hardwood planks in winter are purely cosmetic.
Active Failure Signal
Spongy subfloors around toilets, sequential cracked floor tiles running across rooms, or sagging ceiling drywall joints point to moisture rot or framing deflection.
60-Second Homeowner Check
Roll a marble on upstairs bathroom tile and rock gently while straddling the toilet—any wobble or soft bounce signals wax-ring seepage into the subfloor.
Texas Credential to VerifyTBPE Licensed Structural Engineer (P.E.) for load-bearing wall removals or girder engineering; insured structural framing contractor.
Municipal Permit & Inspection RuleMandatory municipal structural remodeling permit and framing inspection before concealing sistered joists, LVL beams, or load-bearing headers.
3 Questions You Must Ask Before Hiring
“Before removing this interior wall, do we have a stamped Texas P.E. calculation sizing the LVL flush beam AND verifying point-load footing capacity below?”
“In my pier-and-beam crawlspace, will you shim girders using steel plates or hardwood wedges rather than stacking unmortared concrete blocks?”
“Will you verify crawlspace wood moisture content is below 16% and repair plumbing leaks before closing up new subfloor sheathing?”
3 High-Pressure Red Flags & Scams
Open-concept remodelers declaring an interior wall “non-load-bearing” by glancing from the living room without climbing into the attic to trace purlin struts.
Notching the bottom tension flange of engineered wood I-joists or solid 2x10 floor joists to route 3-inch bathroom toilet drains.
Laying new luxury vinyl plank or porcelain tile straight over bouncy, moisture-rotted OSB subfloors without screwing down and replacing soft decking.
HOMEOWNER ACTION TAKEAWAYRISK LEVEL: MEDIUM
Ceiling & Floor System Stewardship Summary
Ceilings provide fire protection while floors carry household loads. Keeping joists structurally uncut, eliminating plumbing leaks promptly, and maintaining balanced indoor humidity preserves flat, squeak-free floors and intact ceilings.
Recommended Action Steps
Never permit trade contractors to notch or cut the flanges of engineered floor joists.
Investigate and repair the source of any ceiling water stain immediately before mold develops.
Maintain indoor relative humidity below 55% to prevent hardwood floor cupping and buckling.
Immediate Priorities
Address any sagging or water-soaked ceiling drywall immediately to prevent falling gypsum hazards.
Reinforce any structural floor joists found to be excessively cut or notched for plumbing pipes.
Repair leaking shower pans or toilet wax rings that are actively saturating subflooring.
Ongoing Annual Maintenance
Inspect shower and tub caulk joints every six months to keep water out of ceiling framing.
Monitor floor levelness during seasonal foundation moisture changes.
Ensure second-floor washing machine supply hoses are braided stainless steel with auto-shutoff valves.
Typical Repair / Replacement Budget:$150 – $3,500($150–$400 for DIY drywall patch and leak tracing; $1,200–$3,500 for structural joist sistering or subfloor repair.)
Expected Assembly Lifespan:50+ years for structural joists and subflooring; 20–30 years for ceiling drywall (unless moisture damaged)
ICC DIGITAL CODES2021 / 2024 IRC
2021/2024 IRC R502.8 / R502.1.2—Cutting, Notching and Deflection Limits for Floor Joists
STATUTORY MODEL CODE TEXT
Structural floor joists and rafters shall not exceed maximum deflection limits of L/360 under full design live loads. Notches in wood joists shall not exceed one-sixth of the joist depth and are prohibited in the middle third of the span. Holes bored in joists shall not be within 2 inches of the top or bottom edge, and the diameter of any such hole shall not exceed one-third the depth of the joist.
Exception: Engineered wood I-joists and structural composite lumber shall only be bored, cut, or notched in strict accordance with the manufacturer's approved design tables.
IN PLAIN ENGLISH
Holes drilled in floor joists cannot be in the outer 2 inches of the edge or exceed one-third of the joist depth, and floor framing must remain rigid without excessive springiness under heavy furniture.
HOMEOWNER PRO TIP:Springy or bouncy upper floors often indicate over-spanned joists or improper subfloor glue-and-screw fastening.
1.7
Doors: Weatherstripping, Garage Fire Doors & Safety Hardware
Garage Fire Infiltration & Conditioned Air Loss ($2,500–$8,000)
1
2
3
WHAT YOU'RE LOOKING ATFIELD INSPECTION ANATOMY
1
Self-Closing Spring Hinge:Fire-safety hardware required to automatically swing door shut and latch.
2
Solid-Core / Metal Fire Slab:20-minute fire-rated door core preventing garage fumes/fire from entering home.
3
Intact Perimeter Weatherstrip:Compression seal blocking carbon monoxide, insects, and draft infiltration.
LIFE SAFETY • FIRE-RATED DOOR ASSEMBLYSolid-core 20-minute fire-rated self-closing door between the attached garage and home interior, featuring intact intumescent perimeter seals and spring-loaded hinges.
3D ARCHITECTURAL CUTAWAY • FIGURE 1.7
FIGURE 1.7: 20-MINUTE FIRE-RATED GARAGE DOOR ASSEMBLY VS. HOLLOW DOOR & MISSING CLOSER
BEST PRACTICE (CODE-COMPLIANT)
Solid-core 20-minute fire-rated door assembly between attached garage and home
Adjustable spring-loaded self-closing hinges automatically swing door shut and latch
Airtight weatherstripping and threshold sweep block carbon monoxide fume migration
1/2-inch gypsum drywall fire separation on garage wall and ceiling surfaces
COMMON DEFECT (HAZARD / AT-RISK)
Hollow-core interior wood door providing zero fire resistance against garage flashover
Missing self-closing device allowing door to remain open, admitting lethal exhaust fumes
Large gap beneath door threshold allowing gasoline vapors and insects into living areas
Door slab sticking in frame due to loose hinge screws and foundation racking
Side-by-side comparison of a code-compliant 20-minute fire-rated self-closing garage door assembly versus hollow-core interior door with no closer exposing home to fire and carbon monoxide.
TEXAS FIELD TRIAGE: 3-STAGE SEVERITY SCALEField Inspection Progression Rubric
STAGE 1NORMAL TEXAS AGING (COSMETIC)
Condition:Interior door latch clicking against strike plate slightly in humid summer; weatherstrip scuffs.
Action:Lubricate hinges with silicone spray; adjust strike plate.Annual Log
STAGE 2WATCH & MAINTAIN (30–90 DAYS)
Condition:Exterior door sticking in frame from humidity; daylight visible beneath door sweep; loose threshold.
Action:Replace door sweep and adjust bottom sill threshold screws within 30–60 days.30–60 Days
STAGE 3ACT IMMEDIATELY (URGENT)
Condition:Garage fire door failing to self-close and latch shut (fire breach); shattered tempered glass panel.
Action:Adjust or replace spring hinges immediately (24 hrs) to restore fire barrier.24 Hrs
How It Works in Your Home
Your exterior and interior doors provide daily security, thermal weather sealing, emergency egress paths, and vital life-safety fire separation between attached garages and living areas.
In modern residential architecture, exterior entry doors combine insulated fiberglass or steel skins with polyurethane foam cores, hung in jambs sealed with continuous magnetic or rubber weatherstripping and adjustable threshold sweeps. These assemblies block conditioned indoor air from leaking out while sealing out wind-driven rain. Multi-point locking mechanisms on heavy front doors engage steel bolts at the top, center, and bottom of the frame, providing exceptional resistance against forced entry and hurricane wind pressures.
The single most critical life-safety door in any residence is the door connecting the attached garage to the home interior. Attached garages store motor vehicles, lawnmowers, gasoline, paints, and flammable solvents. Building codes require this separation door to be a solid wood door not less than 1-3/8 inches thick, a solid or honeycomb-core steel door not less than 1-3/8 inches thick, or a certified 20-minute fire-rated door assembly. Furthermore, this door must be equipped with an automatic self-closing spring hinge or hydraulic closer and a tight perimeter seal to stop smoke, carbon monoxide fumes, and vehicle fire flashover from entering family living areas.
20-Minute Fire Door:Solid-core steel or heavy wood door between garage and house designed to resist flame breakthrough for at least 20 minutes.
Self-Closing Spring Hinges:Adjustable internal tension springs in door hinges that automatically swing the garage door fully shut and latch it securely.
Adjustable Threshold Sweep:Neoprene or silicone bottom door gasket that seals tightly against the sill to block draft air, insects, and rainwater.
Deadbolt Latches:Heavy-duty steel deadbolts with at least a 1-inch throw into reinforced strike plates anchored into wall framing studs.
What Can Go Wrong & What to Look For
Disabled garage door spring closers, torn weatherstripping, sticking door slabs, and unlatched exterior doors compromise home security, fire safety, and energy efficiency.
A critical safety violation found during Texas home inspections is a disabled or missing self-closer on the garage service door. Homeowners frequently loosen the spring hinge tension pins or prop the door open with a brick, eliminating the automatic fire seal. If a car battery ignites or gasoline fumes combust in the garage, toxic smoke and flames rush directly into the home hallway within seconds.
On exterior doors, torn or flattened weatherstripping allows significant conditioned air loss. On a 100°F summer afternoon, a 1/8-inch gap under an exterior door leaks as much air as a 3-inch hole knocked through your wall. Additionally, doors that bind, stick, or fail to latch securely indicate either loose hinge screws or foundation movement shifting the door rough opening out of square.
Early Warning Signs & Red Flags
Garage service door failing to swing shut and latch automatically when released from a 45-degree angle
Daylight visible around the perimeter or under the threshold sweep of closed exterior doors
Interior or exterior doors rubbing, binding against the top jamb, or requiring forceful shoulder shoving to close
Exterior door threshold rotted, soft, or leaking water into interior flooring during heavy rains
Keyed deadbolts installed on interior bedroom doors, creating dangerous egress traps during night fires
Disabled or Missing Garage Self-Closing Spring HingeIMMEDIATE ACTION
Door fails to close automatically, leaving living areas vulnerable to garage carbon monoxide and fire.
Torn or Missing Exterior Door WeatherstrippingROUTINE
Gaps allowing conditioned air to escape, pests to enter, and driving rain to leak onto flooring.
Door Rubbing or Binding Due to SettlementMONITOR
Shifting foundation racking door frames out of square, preventing proper closing and latching.
Exterior Door Jamb Wick-Rot & Missing Sill-Pan Flashing
Unsealed lower exterior door jambs wick splashback rainwater upward like a straw; keeping sweep seals pliable and caulking threshold corners blocks both bulk water and conditioned air loss.
How Texas Weather & Soil Affect It
Severe Texas summer heat cycles and shifting expansive soils test door jamb tolerances and seal durability.
Texas heat causes exterior door materials to expand significantly. Dark-colored fiberglass or steel entry doors exposed to direct afternoon western sunlight can reach surface temperatures exceeding 160°F, causing door slabs to bow slightly and bind against top jamb corners. When the sun sets and the door cools, it snaps back into shape, causing cyclic stress on weatherstripping.
Furthermore, foundation movement on expansive smectite clay soils frequently reveals itself first through sticking doors. When a corner of the foundation settles by even 1/2 inch, the rectangular door rough opening wracks into a parallelogram, causing the door slab to stick at the top strike-side corner.
Texas Climate & Soil Stresses
100°F+ afternoon sun causing thermal bowing of dark-colored exterior steel and fiberglass door slabs
Seasonal clay soil movement racking door frames out of plumb and square
Wind-driven tropical storms driving rainwater under threshold sweeps
UV degradation breaking down vinyl and rubber weatherstripping gaskets
Texas Field Pro Tips
Test your garage self-closer twice a year by releasing the door from a 45-degree angle; it should swing closed and click shut smoothly.
Choose light or medium-toned exterior door colors for west-facing entries to reduce solar heat absorption and slab warping.
Replace worn door sweeps with durable aluminum-cased neoprene sweeps that adjust upward and downward with screws.
How to Maintain & Protect It
Routine hardware adjustments, silicone lubrication, and seasonal weatherstripping checks keep doors secure, energy-efficient, and code-compliant.
If an exterior door sticks, first check the top hinge screws before planing down the wood slab. Over time, heavy door weight pulls the top hinge loose from the wood jamb. Replacing the short 3/4-inch factory hinge screws with 3-inch hardened wood screws that bite directly into the 2×4 wall framing stud often pulls the door back into square and completely cures the sticking issue.
Lubricate door locksets, deadbolts, and spring hinges twice a year with dry PTFE or graphite spray lubricant rather than sticky oils like WD-40, which attract dust and gum up precision brass lock pins. Check the vinyl sweep under the door bottom and replace it if cracked or flattened.
Seasonal Walkthrough Checklist
Spring: Test the tension on garage service door spring hinges; tighten internal springs with a hex wrench if sluggish.
Summer: Inspect exterior door weatherstripping for tears, hardening, or gaps allowing air conditioning loss.
Fall: Apply dry silicone spray lubricant to all door latch bolts, deadbolts, and sliding patio door rollers.
Winter: Check exterior door thresholds for drafts; adjust threshold riser screws upward to establish a tight bottom seal.
HOMEOWNER DECISION MATRIX
DIY Weekend Maintenance vs. Call a Qualified Pro
SAFE 15-MINUTE DIY CARE
Adjust spring hinge tension on garage fire doors using an Allen wrench and tension pin.
Replace peeling or compressed adhesive weatherstripping around exterior door perimeters.
Drive 3-inch structural wood screws through the top hinge into the wall stud to fix sticking doors.
WHEN TO CALL A QUALIFIED PRO
Replacing a rotted exterior door jamb, brickmold, and threshold assembly.
Installing multi-point locksets or impact-resistant hurricane-rated exterior door units.
Squaring up heavily racked door openings caused by significant foundation settlement.
CLINICAL DIFFERENTIAL FIELD TRIAGE & CONNECTED SYSTEMS§ 1.7 Diagnostic Rubric
Harmless Cosmetic Baseline
Minor seasonal rubbing on a single exterior wood door during peak Gulf humidity—when nearby drywall is uncracked—reflects normal wood moisture expansion.
Active Failure Signal
Daylight shining past weatherstripping, soft rotted lower door jambs, or a garage-to-house fire door missing self-closing hinges compromise moisture and life safety.
60-Second Homeowner Check
Close a dollar bill in the exterior door latch—if it slides out effortlessly, replace the compression seal; then release your garage entry door to confirm self-closing.
BEFORE YOU SIGN A BID • TEXAS CONTRACTOR VETTING & SCAM DEFENSE
Exterior Entry Doors, Sill-Pan Flashing & Garage Fire Doors
§ 1.7 Playbook
Texas Credential to VerifyInsured Fenestration / Millwork Specialist; TDI Windstorm (WPI-8) product evaluation compliance in designated Texas Gulf Coast counties.
Municipal Permit & Inspection RuleMunicipal building permit required when widening rough structural headers or replacing coastal windstorm-rated exterior door assemblies.
3 Questions You Must Ask Before Hiring
“Will you set the new exterior door threshold inside a sloped, one-piece waterproof sill pan with end-dams before applying perimeter backer rod and sealant?”
“For the house-to-garage separation door, is the slab UL fire-rated (or 1-3/8-inch solid core) with intact perimeter smoke seals and working self-closing hinges?”
“Are you driving 3-inch structural security screws through the deadbolt strike plate and heavy hinge leaves straight into the jack and king studs?”
3 High-Pressure Red Flags & Scams
Setting a $3,500 mahogany entry unit directly onto bare concrete with zero sill-pan flashing—allowing wind-driven Texas rain to rot the subfloor behind the trim.
Shaving 3/4 inch off the bottom of a hollow interior bedroom door and hanging it in the garage fire-wall opening.
Shimming heavy double French doors with cardboard scraps and short 1-inch trim brads that sag out of latch alignment within a single humid summer.
HOMEOWNER ACTION TAKEAWAYRISK LEVEL: MEDIUM
Door Assembly Stewardship Summary
Doors provide physical security, weather defense, and life-safety separation. Ensuring that your garage door self-closes tightly and keeping exterior weatherstripping sealed protects your family and lowers energy bills.
Recommended Action Steps
Verify that the door between your garage and house closes and latches completely on its own.
Replace damaged weatherstripping whenever daylight is visible around closed exterior doors.
Tighten loose hinge screws with 3-inch wood screws to cure sticking doors before planing wood.
Immediate Priorities
Adjust or replace the self-closing spring hinge on the garage door if it fails to latch shut.
Remove any double-cylinder deadbolts on bedroom doors that require a key to exit from the inside.
Replace torn bottom door sweeps that let rainwater blow onto interior wood or carpet floors.
Ongoing Annual Maintenance
Lubricate door hinges and lock mechanisms with dry silicone or graphite lubricant semi-annually.
Check that weatherstripping remains soft and flexible without permanent compression flat spots.
Inspect exterior wood door frames and brickmold for paint peeling or early signs of water rot.
Typical Repair / Replacement Budget:$50 – $2,200($50–$150 for DIY weatherstripping, door sweep, and spring hinge replacement; $800–$2,200 for prehung exterior entry door replacement.)
Expected Assembly Lifespan:30+ years for steel/fiberglass doors; 5–8 years for weatherstripping and door sweeps
ICC DIGITAL CODES2021 / 2024 IRC
2021/2024 IRC R302.5.1—Opening Protection from Attached Garages
STATUTORY MODEL CODE TEXT
Openings from a private garage directly into a room used for sleeping purposes shall not be permitted. Other openings between the garage and residence shall be equipped with solid wood doors not less than 1-3/8 inches in thickness, solid or honeycomb-core steel doors not less than 1-3/8 inches thick, or 20-minute fire-rated doors, equipped with a self-closing or automatic-closing device.
Exception: Openings between a garage and residential dwelling unit shall not require fire-rated protection if a compliant 1/2-inch gypsum board separation wall and ceiling assembly isolates the garage entirely.
IN PLAIN ENGLISH
The door between your house and attached garage must be solid-core wood or steel, cannot lead into a bedroom, and must have a self-closing spring hinge that automatically pulls the door fully shut to block fires and carbon monoxide.
HOMEOWNER PRO TIP:Periodically test your garage pass-through door by letting go of it at a 45-degree angle to verify the spring hinge latches it securely.
DEFECT OBSERVATION • THERMAL SEAL FAILUREMoisture condensation and hazy mineral fogging trapped between double-pane Low-E glass layers caused by desiccant saturation and failed perimeter perimeter seal.
Permanent acid-etched tempered safety monogram in hazardous impact locations
Emergency bedroom egress opening meeting 5.7 sq ft clear area and maximum 44" sill
Clear double-pane Low-E insulated glass unit with intact argon seal and desiccant
Exterior sill weep slots open and draining rainwater cleanly outward
COMMON DEFECT (HAZARD / AT-RISK)
Milky mineral fogging and condensation permanently trapped between failed glass panes
Standard annealed plate glass next to entry door posing catastrophic laceration hazard
Window painted shut or blocked by security bars without internal quick-release latch
Broken sash balance spring causing heavy upper window to fall shut violently
Side-by-side comparison of code-compliant tempered safety glass and unobstructed 5.7 sq ft bedroom egress window versus failed thermal seal fogging and blocked egress paths.
TEXAS FIELD TRIAGE: 3-STAGE SEVERITY SCALEField Inspection Progression Rubric
STAGE 1NORMAL TEXAS AGING (COSMETIC)
Condition:Light surface dust or hard water spots on exterior glass; minor window screen mesh tear.
Action:Vacuum window tracks and lubricate vinyl jamb sliders.Annual Log
STAGE 2WATCH & MAINTAIN (30–90 DAYS)
Condition:Failed insulated glass unit (IGU) thermal seal causing permanent fogging/haze between double panes.
Action:Contact window glazier to order replacement dual-pane IGU sash within 60–90 days.60–90 Days
STAGE 3ACT IMMEDIATELY (URGENT)
Condition:Bedroom emergency egress window jammed shut; cracked jagged glass; water pouring through head.
Action:Service emergency egress window latch immediately for fire escape safety.24 Hrs
How It Works in Your Home
Your windows connect your living space to the outdoors, providing natural illumination, passive ventilation, emergency fire escape routes, and solar heat gain control.
In modern Texas construction, insulated glass units (IGUs) are the standard. An IGU consists of two panes of glass separated by an aluminum or composite spacer containing moisture-absorbing desiccant pellets, hermetically sealed along the perimeter with polyisobutylene and silicone seals. The sealed gap is filled with dry air or non-toxic argon gas. To combat blistering Texas heat, windows are coated with microscopic, invisible layers of metallic silver known as Low-Emissivity (Low-E) coatings. Low-E glass reflects infrared solar heat rays back outward while transmitting visible sunlight, lowering solar heat gain coefficients (SHGC) to 0.25 or less as mandated by Texas energy codes.
From a life-safety standpoint, windows fulfill two non-negotiable requirements: impact safety and emergency escape. Windows in high-risk zones—such as within 24 inches of a door, within 60 inches of a bathtub or shower floor, or large low windows within 18 inches of the floor—must feature heat-strengthened tempered safety glass. When broken, tempered glass fractures into thousands of tiny, blunt, pebble-sized cubes rather than jagged, razor-sharp shards. Furthermore, every sleeping room must contain at least one operable emergency egress window with a minimum net clear opening of 5.7 square feet (5.0 sq ft on ground floors) to allow occupant escape and firefighter entry.
Insulated Glass Unit (IGU):Double-pane glass sealed with desiccated spacer and argon gas fill for thermal resistance.
Low-E Coating:Microscopic metallic film on glass that blocks radiant solar heat gain while letting visible light pass through.
Safety Tempered Glass:Heat-treated glass with a permanent etched monogram bug in the corner, required in hazardous impact zones.
Emergency Egress Opening:Operable window opening providing at least 5.7 sq ft of clear area with a minimum 24-inch height and 20-inch width.
What Can Go Wrong & What to Look For
Failed thermal seals, missing safety tempered glass, broken sash balance springs, and locked egress paths compromise comfort, safety, and energy efficiency.
The most frequent window defect reported during Texas home inspections is thermal seal failure on double-pane insulated windows. Over years of thermal cycling in extreme Texas summer heat, the perimeter seal expands and contracts until a microscopic breach develops. Atmospheric air and humidity enter the gap between the glass panes. At first, the desiccant pellets inside the spacer absorb the moisture; however, once the desiccant saturates, water droplets condense between the panes. As sunlight bakes the trapped moisture, it leaves behind a permanent, milky, cloudy mineral film that cannot be wiped clean from the inside or outside.
A severe life-safety defect is the omission of safety tempered glass in hazardous locations. If standard annealed plate glass is installed next to a front entry door or over a master bathtub, an accidental slip or trip can cause someone to fall into the glass, resulting in catastrophic, life-threatening lacerations. Inspectors also check that bedroom egress windows open smoothly without sticking and that sill heights do not exceed 44 inches above the floor.
Early Warning Signs & Red Flags
Milky, hazy, or foggy appearance between double panes of glass that cannot be cleaned off
Water droplets or condensation permanently trapped inside the sealed window cavity
Window sashes that will not stay open on their own, slamming shut when released (failed balance springs)
Missing etched acid monogram ('TEMPERED') in the corner of glass panes located next to doors or tubs
Security bars, storm shutters, or solar screens permanently screwed over bedroom egress windows without emergency release latches
Failed IGU Thermal Perimeter SealROUTINE
Condensation and mineral fogging trapped between glass panes, degrading thermal performance and view.
Missing Tempered Glass in Hazardous Impact ZonesIMMEDIATE ACTION
Standard annealed glass near doors or tubs creating severe laceration hazards if shattered.
Inoperable or Restricted Bedroom Emergency EgressIMMEDIATE ACTION
Window painted shut, blocked by furniture, or failing to meet 5.7 sq ft clear emergency opening.
Broken Sash Balance SpringsROUTINE
Window falls shut under gravity, posing guillotine finger-crush hazards for children.
GLAZING & WIND PROTECTION • § 1.8
Impact-Resistant Glazing, Low-E Coatings & Tempered Safety Zones
Double-pane Low-E argon windows block intense Texas infrared solar gain, while tempered safety glass beside tubs, stairs, and doors shatters into dull cubes instead of jagged shards.
How Texas Weather & Soil Affect It
Blistering solar radiation, thermal glass stress, and coastal windstorm pressures push window assemblies to their design limits.
Texas solar heat creates intense thermal stress across window assemblies. The outer pane of an insulated window can reach 140°F in direct sunlight while the inner pane remains at 72°F in air conditioning. This sharp temperature differential exerts continuous outward pumping pressure on perimeter spacer seals, eventually breaking down the polyisobutylene adhesive and causing seal failure within 8 to 15 years.
In Texas coastal counties, windows must comply with strict windborne debris standards under the TDI Windstorm Inspection Program. Homes within designated catastrophe areas require impact-rated laminated glass capable of withstanding a 2×4 lumber missile fired at 50 feet per second, or must feature permanently mounted, code-approved hurricane shutter tracks.
Texas Climate & Soil Stresses
High solar radiation baking perimeter spacer sealants and accelerating thermal seal failures
Severe temperature differentials between exterior and interior glass panes inducing thermal stress
Expansive clay soil settlement racking window rough openings and causing vinyl sashes to bind
Texas Field Pro Tips
Look for the tiny acid-etched monogram in the corner of window glass near doors, stairs, and tubs to confirm it is safety tempered.
When replacing windows in Texas, verify the Solar Heat Gain Coefficient (SHGC) is 0.25 or lower to maximize summer air conditioning savings.
If a double-pane window fogs up, you don't always need a whole new window unit—many glass companies replace just the glass sash (IGU) for a fraction of the cost.
Clean vinyl window tracks annually using a vacuum brush and wipe them clean with a damp microfiber cloth. Apply dry silicone spray lubricant along the jamb tracks and balance channels—never use heavy grease or petroleum oils, which attract dirt and cause vinyl sashes to bind. Check weep holes at the bottom of exterior window frame sills; these tiny slots let wind-driven rain drain outside rather than overflowing into interior drywall.
Inspect the exterior perimeter caulk joint between window frames and brick or siding every 2 to 3 years. Seal any hairline cracks with high-performance polyurethane sealant to stop rainwater from leaking into wall framing studs.
Seasonal Walkthrough Checklist
Spring: Open every bedroom egress window completely to verify smooth operation and clear balance channels.
Summer: Inspect double-pane glass during morning sunlight to identify newly failed thermal seals.
Fall: Clear dirt and insect debris from exterior window frame sill weep slots.
Winter: Check weatherstripping along sliding sash meeting rails for drafts or air leaks.
HOMEOWNER DECISION MATRIX
DIY Weekend Maintenance vs. Call a Qualified Pro
SAFE 15-MINUTE DIY CARE
Clean dirt from window track weep slots to ensure storm water drains outward properly.
Apply dry silicone spray lubricant to vinyl window sash tracks and balance springs.
Apply exterior polyurethane caulk around window frame perimeters to stop air and water leaks.
WHEN TO CALL A QUALIFIED PRO
Replacing failed insulated glass units (IGUs) inside existing vinyl or aluminum window frames.
Replacing non-tempered glass with code-compliant safety tempered units in hazardous zones.
Complete window replacement with high-performance Low-E vinyl or composite units.
CLINICAL DIFFERENTIAL FIELD TRIAGE & CONNECTED SYSTEMS§ 1.8 Diagnostic Rubric
Harmless Cosmetic Baseline
Morning dew on the OUTSIDE surface of Low-E double-pane windows proves the insulated glass unit is blocking indoor heat transfer effectively.
Active Failure Signal
Milky fogging trapped BETWEEN double glass panes, painted-shut bedroom egress sashes, or non-tempered glass beside tubs and doors require corrective action.
60-Second Homeowner Check
Unlock and lift every bedroom window once a season to verify smooth emergency fire escape, and check bottom exterior frame weep slots for dirt clogs.
Texas Credential to VerifyAAMA InstallationMasters Certified Fenestration Contractor; TDI WPI-8 Windstorm Inspector alignment on the coast; EPA RRP Certified for pre-1978 homes.
“What is the exact NFRC Solar Heat Gain Coefficient (SHGC <= 0.25 recommended for Texas) and U-factor printed on the factory glass certification label?”
“Are you performing a full-frame flanged installation integrated into the weather-resistive barrier and sill pan—or just caulking a pocket insert over rotted wood?”
“Did you verify every bedroom replacement window still preserves the 5.7 sq ft (5.0 ground floor) clear emergency egress opening and tempered glass near tubs/stairs?”
3 High-Pressure Red Flags & Scams
Three-hour in-home “buy tonight only for 40% off” vinyl window pitches quoting $38,000 for pocket inserts worth a third of that price.
Caulking completely across the bottom exterior window flange or plugging frame weep slots—trapping rainwater inside the wall framing.
Installing non-tempered annealed glass within 24 inches of a door arc or over a bathtub where a slip becomes a life-threatening laceration hazard.
HOMEOWNER ACTION TAKEAWAYRISK LEVEL: MEDIUM
Window System Stewardship Summary
Windows provide daily energy efficiency and life-safety escape routes. Verifying tempered glass in hazardous zones, ensuring bedroom egress windows open easily, and maintaining sill weep holes protects both family safety and home comfort.
Recommended Action Steps
Verify that every bedroom has at least one window that opens easily for emergency escape.
Confirm that glass within 24 inches of doors or over bathtubs bears a 'TEMPERED' safety monogram.
Keep exterior window sill weep slots clean and clear so rain drains outward.
Immediate Priorities
Ensure no bedroom egress windows are painted shut, nailed closed, or blocked by heavy furniture.
Replace any non-tempered glass located in hazardous impact zones with safety tempered glass.
Replace broken sash balance cords or spiral springs that cause heavy windows to slam shut.
Ongoing Annual Maintenance
Clean window tracks and lubricate with dry silicone spray twice a year.
Inspect exterior perimeter caulk joints around all window frames every two to three years.
Monitor double-pane windows for milky mineral fogging indicating thermal seal failure.
Typical Repair / Replacement Budget:$150 – $1,200($150–$350 to replace a single failed IGU glass pane; $500–$1,200 per window for complete high-performance replacement.)
Expected Assembly Lifespan:15–25 years for vinyl window frames; 10–18 years for double-pane IGU perimeter thermal seals
Glazing in hazardous locations, including glazing in doors, glazing within 24 inches of an open door edge, glazing within 60 inches of a tub or shower basin, and large low windows within 18 inches of the floor, shall be safety tempered. Every sleeping room shall have at least one operable emergency escape and rescue opening with a net clear opening of not less than 5.7 square feet, a minimum clear height of 24 inches, and a minimum clear width of 20 inches, with a maximum sill height of 44 inches above the floor.
Exception: Grade-floor emergency escape openings shall have a minimum net clear opening of not less than 5.0 square feet.
IN PLAIN ENGLISH
Windows near bathtubs, stair landings, or low to the floor must be tempered safety glass so they crumble into tiny blunt pellets if struck, and bedroom windows must open wide enough for emergency firefighter access.
HOMEOWNER PRO TIP:Foggy or cloudy double-pane windows indicate a broken thermal seal; while not a structural emergency, replacing the insulated glass unit restores clear views and thermal efficiency.
1.9
Stairways: Geometry, Handrail Graspability & The 4-Inch Baluster Rule
CODE COMPLIANCE • 4-INCH BALUSTER SPHERE RULEMeasuring spindle spacing on a contemporary oak and wrought-iron staircase to verify compliance with the IRC 4-inch sphere child safety rule.
3D ARCHITECTURAL CUTAWAY • FIGURE 1.9
FIGURE 1.9: CONTINUOUS GRASPABLE HANDRAIL & 4-INCH BALUSTER SPACING VS. LOOSE POST & WIDE GAPS
BEST PRACTICE (CODE-COMPLIANT)
Continuous graspable handrail mounted between 34 and 38 inches above tread nosing
Railing baluster spindles spaced strictly under 4 inches apart for child fall safety
Solid newel post securely bolted into floor joist structural framing below
Consistent step risers (max 7-3/4") with under 3/8" variation per flight
Loose, wobbling newel post with pulled lag screws risking catastrophic railing failure
Flat, non-graspable wide top board that fingers cannot encircle during an accidental slip
Uneven bottom riser height tripping occupants through subconscious muscle memory
Side-by-side comparison of code-compliant graspable handrail, 4-inch baluster sphere rule, and anchored newel post versus loose post, wide gaps, and non-graspable flat rail.
TEXAS FIELD TRIAGE: 3-STAGE SEVERITY SCALEField Inspection Progression Rubric
STAGE 1NORMAL TEXAS AGING (COSMETIC)
Condition:Superficial paint scuffing on stair risers; minor cosmetic tread squeak under foot.
Action:Inspect hardware during annual safety walkthrough.Annual Log
Action:Tighten handrail bracket lag screws into wall studs and re-anchor balusters within 30 days.30 Days
STAGE 3ACT IMMEDIATELY (URGENT)
Condition:Missing handrail on 4+ risers; guardrail baluster gap >4 inches allowing toddler fall; loose newel post.
Action:Barricade stairs or rebuild railing anchorage immediately to prevent fall injuries.Immediate
How It Works in Your Home
Your stairways and elevated railings are precision-engineered life-safety assemblies designed to prevent catastrophic falls and protect young children from fatal entrapment.
Stairway architecture is governed by strict mathematical ergonomics. Under building standards, stair risers (the vertical step height) cannot exceed 7-3/4 inches, and stair treads (the horizontal walking surface) must be at least 10 inches deep. Crucially, the variation between the tallest riser and shortest riser (or deepest tread and shallowest tread) within any flight cannot exceed 3/8 inch. Human muscle memory navigates stairs subconsciously; a variation of just 1/2 inch in step height trips unsuspecting occupants, frequently causing severe fall injuries.
Equally vital are handrails and guardrails. Handrails must be installed between 34 and 38 inches above the stair tread nosing, continuous for the full flight of stairs, and terminate with rounded ends or returns into the wall to prevent snagging clothes. The handrail must feature a graspable cross-section—either a circular profile between 1-1/4 and 2 inches in diameter, or a shaped profile with finger recess grooves that allow a firm, natural grip during an accidental slip. For any elevated walking surface or open staircase edge higher than 30 inches above the floor, guardrails must be installed with vertical balusters spaced so that a rigid 4-inch sphere cannot pass through any opening.
Consistent Riser & Tread Geometry:Uniform steps with maximum 7-3/4" height, minimum 10" depth, and less than 3/8" variation per flight.
Continuous Graspable Handrail:Ergonomically shaped handrail between 34" and 38" height that allows a complete, secure hand grip.
Guardrail Balusters (4-Inch Rule):Vertical railing spindles spaced less than 4 inches apart to prevent children from slipping through or becoming trapped.
Newel Posts & Rail Returns:Solid structural posts anchored into floor framing, with handrail ends returning to the wall to eliminate snag hazards.
What Can Go Wrong & What to Look For
Loose newel posts, wide baluster gaps, non-graspable handrails, and uneven step risers create severe fall and entrapment hazards.
The most critical life-safety defect found on residential staircases is guardrail baluster spacing exceeding 4 inches. In custom homes or remodeled properties, horizontal cable railings, ornamental wrought iron, or craftsman wood spindles are frequently installed with 5-to-6-inch gaps. Toddlers can easily slip their bodies through a 5-inch gap, resulting in fatal falls or head entrapment. Horizontal railings also create a 'ladder effect' that young children can easily climb.
Another widespread issue is wide, decorative flat handrails (such as a 2×6 board or wide flat timber) that cannot be grasped. If a person slips on a stair tread, they cannot wrap their fingers around a wide flat board, making it impossible to arrest their fall. Inspectors also verify that newel posts at the top of staircases are bolted solidly into floor framing and do not wobble under adult body weight.
Early Warning Signs & Red Flags
Stairway handrail wobbling or pulling loose from wall brackets under moderate hand pressure
Spacing between railing balusters wider than 4 inches (easily tested with a 4-inch sphere or softball)
Noticeable variation in height between the bottom step and the rest of the staircase risers
Handrail ending abruptly with sharp cut edges rather than returning smoothly into the wall
Open gaps between stair risers exceeding 4 inches on modern floating open-riser stairs
Irregular bottom or top step height tripping occupants through muscle memory disruption.
STAIR FRAMING ANATOMY • § 1.9
Hidden Stair Stringer Hangers & Guardrail Post Blocking
Safe stairways begin behind the drywall: engineered stringer hangers, consistent riser heights within 3/8 inch, and structural blocking securing guardrail newel posts against lateral lean.
How Texas Weather & Soil Affect It
Foundation shifts and outdoor humidity affect both interior staircase alignment and exterior deck stairs.
When expansive clay soils heave or settle under two-story Texas homes, the floor framing shifts, transferring stress into the staircase stringers. This structural racking causes stair treads to pull away from walls, squeak loudly, or slope slightly from side to side. In severe foundation movement, bottom risers can become noticeably uneven relative to the moving slab floor.
Exterior stairways on decks, covered patios, and coastal stilt homes face harsh sun and rain. Pressure-treated wood stair stringers can split, twist, and rot at the bottom where they contact concrete or soil. Exterior handrail fasteners corrode rapidly in coastal salt air unless hot-dip galvanized or 316-grade stainless steel hardware is used.
Texas Climate & Soil Stresses
Foundation movement racking interior staircase stringers out of square and level
High coastal humidity causing exterior wood stair stringers to warp and split
Corrosive salt air degrading exterior stair bracket fasteners and railing bolts
Intense sun drying out interior hardwood treads, causing shrinkage squeaks
Texas Field Pro Tips
Use a simple 4-inch rigid sphere (or a standard softball) to verify that your stair railing spindles are safe for young children.
If an interior newel post feels loose, check underneath: tightening a single lag bolt from the ceiling or access panel below usually eliminates the wobble.
Ensure exterior deck stairs have solid treated footings elevated at least 1 inch above soil grade on metal post bases.
Test your stairway handrail and guardrails twice a year by applying firm outward and downward pressure. There should be zero play, creaking, or movement in the newel posts or wall brackets. If wall brackets feel loose, replace short drywall screws with 3-inch structural lag screws driven directly into wall studs.
For homes with wooden stair treads, inspect tread nosings for wear or slippery finishes. If your household includes toddlers or elderly family members, adding clear non-slip adhesive grip treads or carpet runners dramatically reduces the risk of accidental slips.
Seasonal Walkthrough Checklist
Spring: Check exterior deck stairs for loose tread screws, rusted brackets, or wood decay.
Summer: Test all railing balusters to ensure none have cracked, worked loose, or rotated.
Fall: Check handrail wall bracket screws and tighten any loose hardware with heavy-duty fasteners.
Winter: Inspect interior stair treads for squeaks; lubricate rubbing joints with powdered graphite.
HOMEOWNER DECISION MATRIX
DIY Weekend Maintenance vs. Call a Qualified Pro
SAFE 15-MINUTE DIY CARE
Tighten loose handrail mounting bracket screws into wall studs.
Install safety netting or supplemental wood balusters if existing railing gaps exceed 4 inches.
Apply non-slip grip tape or tread treads to exterior wooden steps.
WHEN TO CALL A QUALIFIED PRO
Rebuilding or reinforcing a wobbly, unanchored newel post and guardrail system.
Texas Credential to VerifyInsured Architectural Stair & Finish Carpenter; TBPE Structural Engineer (P.E.) when altering stairwell floor openings or cantilever balconies.
Municipal Permit & Inspection RuleMunicipal building permit required when re-framing stair stringers, changing riser/tread geometry, or modifying elevated loft guardrails.
3 Questions You Must Ask Before Hiring
“Will every finished riser height from bottom floor to upper landing stay uniform within the strict 3/8-inch maximum code variation?”
“How are newel posts mechanically bolted through structural floor framing so the guardrail resists a 200-pound lateral lean load without wobbling?”
“Does the wall handrail profile meet graspable cross-section rules (1.25 to 2 inches) with 1.5-inch wall knuckle clearance and closed end returns?”
3 High-Pressure Red Flags & Scams
Installing trendy horizontal cable loft railings without high-tension intermediate posts—allowing toddlers to spread cables wider than a 4-inch sphere or climb them like a ladder.
Replacing thick carpet with thin hardwood on stairs while forgetting to adjust the bottom and top riser—creating an instant 3/4-inch trip hazard.
Toe-nailing balcony newel posts onto surface subflooring with finish brads instead of structural blocking and lag hardware.
HOMEOWNER ACTION TAKEAWAYRISK LEVEL: HIGH
Stairway Life-Safety Stewardship Summary
Stairs and guardrails are critical life-safety systems. Maintaining uniform step heights, solid newel posts, graspable handrails, and tight 4-inch baluster spacing prevents traumatic household fall injuries.
Recommended Action Steps
Verify that stair railing baluster openings are strictly under 4 inches to prevent child entrapment.
Ensure handrails are solidly anchored into wall framing studs and feel completely rigid.
Confirm that stair handrails have an ergonomic graspable shape that fingers can encircle.
Immediate Priorities
Anchor any loose or wobbly newel posts at the top of staircases immediately.
Remediate baluster gaps wider than 4 inches using safety mesh or additional spindles.
Install continuous graspable handrails on any staircase with 4 or more risers currently lacking them.
Ongoing Annual Maintenance
Perform a semi-annual shake test on all interior and exterior stair railings.
Inspect exterior stair stringers and metal connector brackets for rust or wood rot.
Keep stair treads well-lit with functioning 3-way wall switches at both the top and bottom.
Typical Repair / Replacement Budget:$50 – $2,500($50–$200 for DIY handrail bracket tightening and non-slip treads; $800–$2,500 for professional railing rebuild or newel post anchoring.)
Expected Assembly Lifespan:50+ years for interior hardwood stairs; 15–20 years for exterior treated wood stairs
ICC DIGITAL CODES2021 / 2024 IRC
2021/2024 IRC R311.7.8 / R312.1.3—Handrail Graspability and Guard Opening Limitations
STATUTORY MODEL CODE TEXT
Handrails shall be provided on at least one side of each continuous run of treads or flight with four or more risers. Handrail height shall be not less than 34 inches and not more than 38 inches. Handrails shall be continuous for the full length of the flight. Type I handrails with a circular cross section shall have an outside diameter of not less than 1-1/4 inches and not greater than 2 inches. Required guards shall not have openings from the walking surface to the required guard height that allow passage of a sphere 4 inches in diameter.
Exception: The triangular opening formed by the riser, tread and bottom rail of a guard at the open side of a stairway shall not allow passage of a sphere 6 inches in diameter.
IN PLAIN ENGLISH
Stairs with 4 or more steps require a solid, easy-to-grip handrail between 34 and 38 inches high, and safety railings cannot have gaps larger than 4 inches to prevent young children from falling through or getting trapped.
HOMEOWNER PRO TIP:Test your railing spindles with a standard 4-inch softball; if the ball passes through the gap anywhere, child-safety remediation is required.
1.10
Fireplaces and Chimneys: Damper Clamps, Spark Arrestors & The 3-2-10 Rule
CHECK FREQUENCYAnnual Chimney Sweep & Inspection (Prior to Winter)
RISK IF IGNOREDCRITICAL
Attic Chimney Fire & Carbon Monoxide Infiltration
1
2
3
WHAT YOU'RE LOOKING ATFIELD INSPECTION ANATOMY
1
Roof Cricket / Saddle:Elevated peak behind chimney that splits and diverts rainwater around chimney sides.
2
Metal Counterflashing:Step flashing embedded into chimney masonry joints to prevent attic water leaks.
3
Spark Arrestor Cap:Stainless wire-mesh flue cap preventing ember ejection and animal nesting.
ROOF ARCHITECTURE • CHIMNEY CRICKET & FLASHINGSteep metal chimney cricket (saddle) installed behind a 36-inch masonry chimney on a composition shingle roof, diverting heavy rainwater around the chase.
Compliant 3-2-10 chimney height (3 ft above roof, 2 ft higher than roof within 10 ft)
Engineered metal chimney cricket (saddle) diverting water around 36-inch chimney chase
Permanent damper clamp installed locking damper partially open for vented gas logs
Stainless steel spark arrestor cap with 1/2-inch mesh blocking sparks and wildlife
COMMON DEFECT (HAZARD / AT-RISK)
Missing damper clamp on gas logs allowing damper to close, trapping carbon monoxide
Missing chimney cricket causing water to dam against uphill brick face and rot roof
Insufficient chimney height causing smoke and exhaust downdrafts into living room
Heavy flammable creosote buildup inside flue posing chimney structure fire hazard
Side-by-side comparison of 3-2-10 chimney clearance, cricket saddle, spark arrestor, and gas log damper clamp versus insufficient height, missing cricket, and creosote fire risk.
TEXAS FIELD TRIAGE: 3-STAGE SEVERITY SCALEField Inspection Progression Rubric
STAGE 1NORMAL TEXAS AGING (COSMETIC)
Condition:Light soot coating on firebox refractory brick; minor surface rust on spark arrestor screen.
Action:Brush loose soot; inspect screen during fall walkthrough.Annual Log
STAGE 2WATCH & MAINTAIN (30–90 DAYS)
Condition:Missing damper clamp on gas-log fireplace (blocking 2" vent); hairline crack in chimney crown wash.
Action:Install bolt-on damper clamp and seal chimney crown with elastomeric coat within 30–60 days.30–60 Days
STAGE 3ACT IMMEDIATELY (URGENT)
Condition:Cracked terra-cotta flue tile liner; active gas smell; chimney cricket leak causing attic rot.
Action:Isolate gas line; hire CSIA chimney sweep for Level 2 camera flue inspection immediately.Immediate
How It Works in Your Home
Your fireplace and chimney system creates an ambiance of warmth while safely containing high-temperature combustion fires and venting toxic flue gases, smoke, and carbon monoxide outdoors.
In Texas homes, fireplaces typically fall into two categories: traditional masonry site-built fireplaces (constructed of firebrick fireboxes connected to clay tile flue liners inside a brick chimney) or factory-built manufactured metal fireboxes (zero-clearance units connected to double-wall or triple-wall stainless steel chimney pipes inside a framed wood or stucco chase). Combustion air draws oxygen from the room or an exterior intake vent, fuel burns at temperatures reaching 1,000°F to 1,500°F in the firebox, and exhaust gases rise naturally by thermal buoyancy up through the flue throat, past the damper, and out the chimney top.
To ensure safe drafting and prevent roof fires, chimneys must comply with the universal '3-2-10 Rule.' The chimney top must extend at least 3 feet above the highest point where it penetrates the roofline, and at least 2 feet higher than any portion of the roof or building located within a 10-foot horizontal radius. At the rooftop, chimneys wider than 30 inches that interrupt roof runoff require an engineered sheet metal ridge called a chimney cricket (or saddle) installed behind the uphill side to split and divert torrential rainwater around the chimney flanks. At the top, spark arrestor wire mesh caps prevent flying embers from escaping onto dry roof shingles while blocking raccoons, squirrels, and chimney swifts from nesting inside the flue.
Firebrick Firebox:High-density refractory bricks and refractory mortar designed to withstand 2,000°F direct flame exposure without cracking.
Flue Damper & Damper Clamp:Movable metal flap at the chimney throat; vented gas log sets require a permanent clamp locking the damper partially open.
Chimney Cricket (Saddle):Elevated metal peak built behind wide chimneys to shed rainwater around the chase and prevent ponding leaks.
Spark Arrestor Cap:Stainless steel or galvanized hood with wire mesh (1/2" to 5/8" openings) that catches sparks and keeps rain and animals out.
Non-Combustible Hearth Extension:Brick, stone, or tile floor extending at least 16 to 20 inches in front of the firebox opening to catch popping embers.
What Can Go Wrong & What to Look For
Missing damper clamps on gas logs, cracked clay flue liners, rusted chimney chase covers, and missing crickets create severe carbon monoxide and water leak hazards.
A critical life-safety defect found in Texas homes equipped with vented decorative gas logs is a missing damper clamp. When homeowners convert a wood-burning fireplace to gas logs, building codes require installing a permanent metal C-clamp on the damper blade that physically prevents it from closing completely. If the gas logs are ignited with the damper accidentally shut—or if the gas pilot light slowly leaks odorless carbon monoxide while the family sleeps—the deadly fumes cannot escape up the chimney and spill directly into the living room.
On the roof, look behind the chimney. If a chimney is wider than 30 inches and lacks a sheet metal cricket saddle, leaves and water dam up against the uphill masonry face. Over time, standing water rusts step flashing, rots roof decking, and leaks down into attic ceiling drywall. On wood-framed manufactured fireplace chases, flat galvanized metal chase covers frequently rust through in low spots, allowing rainwater to pour directly onto the metal firebox below.
Early Warning Signs & Red Flags
Vented gas log set installed with a damper that closes completely (missing required damper C-clamp)
Water stains on ceiling drywall or running down the brick face inside the living room during heavy rains
Visible cracks or gaps in firebox refractory mortar joints wider than 1/8 inch
Heavy black shiny tar-like creosote buildup coating the smoke chamber and flue interior
Rusted, ponding, or leaking metal chimney chase cover on rooftop manufactured fireplace chases
Missing Damper Clamp on Vented Gas Log FireplaceIMMEDIATE ACTION
Damper can be closed while gas burns, venting deadly carbon monoxide into living areas.
Missing Chimney Cricket on Wide Chimneys (> 30 Inches)IMMEDIATE ACTION
Rainwater ponding behind chimney, causing major roof rot and interior ceiling leaks.
Cracked Firebox Brick or Missing MortarIMMEDIATE ACTION
Intense heat escaping through wall joints to ignite adjacent wood framing studs.
Missing or Damaged Rooftop Spark Arrestor CapMONITOR
Sparks escaping onto roof shingles, and rain/animals entering the open chimney flue.
MASONRY & CHIMNEY CASE • § 1.10
Masonry Crown Cracks, Counter-Flashing & Water Repellent Care
Exposed chimney crowns and uncricked wide chases take the brunt of Texas hail and UV sun; breathable siloxane water repellents and metal counter-flashing stop attic ceiling leaks.
How Texas Weather & Soil Affect It
High humidity, torrential storms, and lightning strikes test chimney structures across Texas.
In Texas, heavy masonry chimneys represent massive concentrated vertical loads resting on the perimeter of the foundation. If expansive clay soils shrink during summer drought, the foundation edge under the chimney can settle, causing the tall brick chimney stack to tilt, pull away from the roofline, and crack flashing joints.
Furthermore, because Texas winters are mild, many homeowners only burn a few fires each season. Infrequent burning can lead to careless maintenance: creosote accumulates from slow, smoldering fires, and during long humid summer months, the sulfur in creosote combines with air moisture to form corrosive sulfuric acid that attacks metal dampers and mortar joints from the inside.
Texas Climate & Soil Stresses
Foundation soil movement causing heavy exterior masonry chimneys to lean or pull away from eaves
Torrential tropical rainstorms driving water into un-cricketed chimney roof junctions
High humidity reacting with flue soot to accelerate corrosion on metal dampers and flue liners
Severe convective thunderstorms and lightning strikes frequently hitting prominent chimney peaks
Texas Field Pro Tips
Install a $15 permanent metal damper clamp immediately if your fireplace features vented decorative gas logs.
Have a CSIA-certified chimney sweep inspect and clean your flue every 36 burns or at least once every two years.
Inspect the flat metal chase pan on rooftop chimney chases; ensure it crowns upward so water drains off rather than ponding.
How to Maintain & Protect It
Fireplace safety requires verifying gas shutoff valves, ensuring flue cleanliness, and sealing rooftop flashings.
Always confirm that the dedicated manual gas shutoff valve (either a key valve in the floor or a quarter-turn ball valve in the firebox) operates smoothly and shuts off gas flow completely. When burning natural wood, burn only seasoned hardwoods (such as oak or pecan) dried for at least six months; never burn green unseasoned pine, Christmas trees, painted wood, or construction scraps, which generate explosive sparks and coat flues in flammable creosote.
Inspect rooftop chimney counter-flashing every two years. Masonry chimney counter-flashing is cut into horizontal mortar joints and sealed with non-hardening polyurethane caulk. When caulk shrinks in the Texas sun, water tracks behind the metal and rots roof decking.
Seasonal Walkthrough Checklist
Spring: Check firebox interior for loose refractory mortar joints or spalling bricks after winter heating.
Summer: Inspect rooftop chimney cricket and flashing seals for gaps, rust, or accumulated leaf debris.
Fall: Verify damper clamp is locked open on gas fireplaces; inspect chimney spark arrestor screen.
Winter: Test carbon monoxide and smoke alarms in the living area prior to lighting your first seasonal fire.
HOMEOWNER DECISION MATRIX
DIY Weekend Maintenance vs. Call a Qualified Pro
SAFE 15-MINUTE DIY CARE
Install a bolt-on damper clamp to permanently keep the damper blade open 2 inches on gas log units.
Clear ash and soot from the firebox using a metal shovel and steel ash bucket.
Check that the gas log burner orifices and pilot light are clean and free of dust and spiderwebs.
WHEN TO CALL A QUALIFIED PRO
CSIA-certified chimney sweep inspection, Level 2 camera flue scan, and creosote removal.
Tuckpointing cracked refractory firebrick joints with high-temperature refractory mortar.
Installing custom sheet metal chimney crickets and counter-flashing on steep roofs.
CLINICAL DIFFERENTIAL FIELD TRIAGE & CONNECTED SYSTEMS§ 1.10 Diagnostic Rubric
Harmless Cosmetic Baseline
Light gray ash dust and faint surface soot tinting on refractory firebox bricks are expected byproducts of occasional seasoned-hardwood winter fires.
Active Failure Signal
Thick glossy tar creosote (>1/8 inch), cracked firebox panels, rusted missing chimney caps, or vented gas logs lacking a permanent damper clamp pose fire/CO hazards.
60-Second Homeowner Check
Shine a flashlight up past the throat damper to confirm a C-clamp holds it open if gas logs exist, and inspect attic roof decking around the flue for water stains.
BEFORE YOU SIGN A BID • TEXAS CONTRACTOR VETTING & SCAM DEFENSE
Chimney Sweeping, Masonry Crown Repair & Gas Log Conversions
§ 1.10 Playbook
Texas Credential to VerifyCSIA Certified Chimney Sweep / NFI Certified Hearth Specialist; TSBPE Responsible Master Plumber (RMP) for all gas log valves and piping.
Municipal Permit & Inspection RuleMunicipal plumbing/mechanical permit required for gas log conversions, zero-clearance firebox replacements, or structural chimney rebuilds.
3 Questions You Must Ask Before Hiring
“Will you perform an NFPA 211 Level 2 internal video camera scan of the entire flue liner and show me live footage before recommending costly relining?”
“Are you pouring a reinforced concrete chimney crown with an overhanging drip edge and expansion gap—not smearing thin mortar wash that cracks by July?”
“When converting a wood fireplace to vented gas logs, will you install the mandatory permanent damper clamp so carbon monoxide can never be shut indoors?”
3 High-Pressure Red Flags & Scams
Telemarketing “$39 chimney sweep specials” where uncertified crews walk in with pre-broken clay tile shards and demand $5,500 on the spot for liner coatings.
Spraying thick acrylic paint over brick chimneys instead of breathable siloxane water repellent—trapping vapor until brick faces spall off.
Installing unvented gas logs inside a drafty wood firebox without verifying room oxygen-depletion sizing or sealing a defective flue.
HOMEOWNER ACTION TAKEAWAYRISK LEVEL: HIGH
Fireplace & Chimney Stewardship Summary
Fireplaces add warmth and character, but they require strict safety compliance. Verifying damper clamps on gas logs, maintaining rooftop crickets, and keeping flues free of creosote ensures safe, leak-free operation.
Recommended Action Steps
Install a permanent damper clamp if you have vented gas logs to prevent carbon monoxide poisoning.
Ensure your chimney extends at least 3 feet above the roof and 2 feet higher than anything within 10 feet.
Verify that a sheet metal chimney cricket is installed behind any chimney wider than 30 inches.
Immediate Priorities
Install a damper clamp immediately if a vented gas log set is present without one.
Repair cracked refractory firebrick or mortar joints before burning any wood fires.
Have chimneys with heavy creosote buildup professionally swept to prevent chimney structure fires.
Ongoing Annual Maintenance
Schedule professional chimney cleaning and Level 2 camera inspection every two years.
Inspect rooftop chimney counter-flashing and metal chase caps semi-annually.
Maintain functioning carbon monoxide detectors in the same room as any fuel-burning fireplace.
Typical Repair / Replacement Budget:$15 – $2,800($15–$30 for a DIY damper clamp; $180–$350 for chimney sweeping; $800–$2,800 for cricket installation or firebox repointing.)
Expected Assembly Lifespan:50+ years for masonry chimneys; 20–30 years for metal factory-built fireplaces; 10–15 years for chase covers
ICC DIGITAL CODES2021 / 2024 IRC
2021/2024 IRC R1003.9 / G2433.1—Chimney Termination Clearances and Gas Log Damper Clamps
STATUTORY MODEL CODE TEXT
Masonry chimneys shall extend at least 2 feet higher than any portion of a building within 10 feet, but shall not be less than 3 feet above the highest point where the chimney passes through the roof. Fireplaces equipped with vented decorative gas logs shall have a permanent damper clamp installed to prevent complete closure of the flue damper, or the damper shall be removed.
Exception: Factory-built chimney assemblies listed and tested in accordance with UL 103 shall be installed in strict accordance with the manufacturer's listing instructions.
IN PLAIN ENGLISH
Chimneys must extend at least 3 feet above the roofline and 2 feet higher than any roof peak within 10 feet to ensure proper smoke drafting, and gas-log fireplaces must have their damper permanently locked open to prevent carbon monoxide accumulation.
HOMEOWNER PRO TIP:Never light a wood fire if you suspect cracked firebrick; heat can escape through joints and ignite hidden wooden wall studs.
1.11
Porches, Balconies, Decks, and Carports: Ledger Bolting & Post Footings
Catastrophic Deck Collapse Under Occupant Load ($10k–$30k)
1
2
3
WHAT YOU'RE LOOKING ATFIELD INSPECTION ANATOMY
1
Z-Flashing Over Ledger:Galvanized metal cap preventing rainwater from running behind ledger board into wall framing.
2
Staggered Through-Bolts:1/2-inch structural bolts securing deck ledger directly to house rim joist.
3
Hot-Dip Galvanized Joist Hanger:Metal connector with approved drive nails supporting deck floor joist load.
STRUCTURAL CONNECTION • DECK LEDGER FASTENINGHot-dip galvanized structural ledger screws staggered in code pattern with z-flashing cap, securely anchoring the elevated outdoor deck to the house rim joist.
1/2-inch hot-dip galvanized structural ledger screws staggered in code pattern
Continuous corrosion-resistant metal Z-flashing protecting house rim joist
Elevated concrete pier with galvanized metal standoff bracket keeping post dry
Proper metal joist hangers secured with 10d full-shank galvanized nails
COMMON DEFECT (HAZARD / AT-RISK)
Ledger fastened with smooth nails pulling out under tension, risking collapse
Missing ledger flashing allowing water behind siding, rotting structural band joist
Wooden support post buried directly in dirt, suffering severe base rot and termites
Ledger bolted directly through brick veneer, which cannot bear structural deck loads
Side-by-side comparison of code-compliant bolted deck ledger with Z-flashing and elevated post base versus nailed ledger, missing flashing, and rotted wood post in soil.
TEXAS FIELD TRIAGE: 3-STAGE SEVERITY SCALEField Inspection Progression Rubric
STAGE 1NORMAL TEXAS AGING (COSMETIC)
Condition:Cosmetic surface graying or checking on pressure-treated deck boards; surface rust on nails.
Action:Clean and apply penetrating UV-protective sealer biannually.Annual Log
Action:Retrofit structural through-bolts and lateral tension ties into rim joist within 30–60 days.30–60 Days
STAGE 3ACT IMMEDIATELY (URGENT)
Condition:Deck ledger pulling away from house rim board (>1/2" gap); rotted 6×6 posts rotting off footings.
Action:Barricade deck immediately; engage framing contractor for structural reconstruction.Immediate
How It Works in Your Home
Your exterior porches, balconies, decks, and carports extend your living space outdoors while bearing heavy live crowd loads and enduring constant exposure to Texas weather.
In residential construction, elevated decks and balconies carry significant structural risk. An elevated deck must support a minimum design live load of 40 to 60 pounds per square foot (the equivalent of a dense crowd of people celebrating). The most critical structural connection is the ledger board—the horizontal pressure-treated lumber beam that anchors the deck directly to the home's exterior band joist.
Under modern International Residential Code (IRC R507) standards, ledger boards must be fastened with 1/2-inch hot-dip galvanized or stainless steel structural lag screws in a calculated, staggered zigzag pattern directly through exterior sheathing into the house rim joist. Decks can never be fastened with smooth nails (which pull out under tension) and must never be attached directly to brick or stone veneer. Furthermore, a continuous corrosion-resistant metal Z-flashing must cap the top of the ledger board, tucked behind the housewrap above to prevent rainwater from rotting the house rim joist.
Vertical deck posts must rest on poured concrete footings extending below frost and expansive soil lines, anchored with raised metal standoff brackets that keep wood post bottoms 1 inch above concrete to prevent water wicking and rot.
Bolted Ledger Board:Pressure-treated 2×8 or 2×10 lumber fastened to the house rim joist with staggered 1/2-inch galvanized structural screws.
Continuous Ledger Z-Flashing:Corrosion-resistant metal flashing overlapping the ledger top, preventing water from penetrating the house rim joist.
Elevated Post Footings:Concrete piers with galvanized metal standoff brackets elevating wooden posts 1 inch above wet ground.
Lateral Tension Ties:Steel hardware brackets holding the deck frame securely against the house to prevent sudden pull-away collapse.
Joist Hangers & Hanger Nails:Heavy-gauge metal brackets securing floor joists to beams, fastened with 10d or 16d full-shank galvanized nails.
What Can Go Wrong & What to Look For
Nailed ledgers, missing flashing, rotting wood posts, and corroded joist hangers cause sudden, catastrophic deck collapses under crowd weight.
The leading cause of catastrophic deck collapse nationwide is ledger board detachment. In older homes or unpermitted DIY projects, builders frequently fastened ledger boards with common smooth nails instead of structural bolts. Over years of seasonal rain, water seeps behind the un-flashed ledger, rotting the house rim joist. When a group of people gathers on the deck, the rusted nails pull out under tension, causing the deck to suddenly shear off the house and collapse without warning.
Another widespread defect is supporting wooden deck posts directly on bare soil or embedding them directly into concrete. Untreated or poorly treated wood in direct contact with damp earth rots at the base within 5 to 8 years and provides a hidden superhighway for subterranean termites to enter the house.
Early Warning Signs & Red Flags
Ledger board fastened only with nails instead of heavy 1/2-inch galvanized bolts or structural timber screws
Visible gap opening between the deck ledger board and the house exterior wall
Missing metal Z-flashing over the top of the ledger board, allowing water behind siding
Wooden deck posts buried in dirt or sitting in standing water puddles
Rusted, flaking joist hangers or roof nails used in place of heavy structural joist hanger nails
Ledger Board Fastened with Smooth NailsIMMEDIATE ACTION
Nails pulling out under tension, risking sudden catastrophic deck detachment and collapse.
Missing Ledger Board Z-FlashingIMMEDIATE ACTION
Rainwater rotting the house band joist, structural wall framing, and subflooring.
Deck Ledger Bolted to Brick VeneerIMMEDIATE ACTION
Brick veneer cannot bear lateral or vertical deck loads and can shear off the wall.
Wooden Posts in Direct Contact with SoilIMMEDIATE ACTION
Severe base rot and subterranean termite tunneling undermining vertical load columns.
ELEVATED DECK & PILING • § 1.11
Structural Pilings, Hot-Dipped Galvanized Hardware & Decay Zones
Elevated decks, balconies, and coastal pilings require hot-dipped galvanized or 316 stainless through-bolts—ordinary interior screws corrode rapidly in humid Texas air and ACQ-treated lumber.
How Texas Weather & Soil Affect It
High solar radiation, fungal wood decay, and hurricane winds make outdoor wood structures vulnerable across Texas.
Texas heat bakes outdoor deck lumber, causing pressure-treated southern pine to cup, crack, and warp. In coastal and humid East Texas environments, fungal rot (brown rot and white rot) thrives in shaded, unventilated spaces beneath low-profile ground-level decks.
In coastal windstorm zones, covered patios, carports, and elevated balconies must feature heavy uplift resistance. Hurricane-force winds generate powerful upward aerodynamic suction on patio roofs. Structural posts and beam connections must feature engineered hurricane tie-down straps (such as Simpson Strong-Tie brackets) rated to resist hundreds of pounds of wind uplift.
Texas Climate & Soil Stresses
Intense ultraviolet radiation breaking down wood lignin and degrading surface deck sealants
High coastal humidity and fungal spore activity accelerating wood rot in unventilated under-deck spaces
Hurricane wind uplift forces attempting to lift patio covers and carport roofs off their footings
Expansive clay soil movement causing freestanding deck footings to tilt or settle unevenly
Texas Field Pro Tips
Never attach an elevated deck ledger board to exterior brick veneer—the brick will shear off under load; freestanding self-supporting footings are required.
Use 316-grade marine stainless steel fasteners within 10 miles of the Gulf Coast to stop salt air corrosion.
Apply an oil-based penetrating water-repellent wood preservative every 2 to 3 years to prevent decking from splintering.
Inspect the underside of your deck annually using a bright flashlight. Check every joist hanger: confirm that all nail holes are filled with proper full-shank galvanized hanger nails, not short roofing nails or drywall screws. Check the ledger bolts to verify washers are present and that bolts are snug against the wood.
Clean deck boards and gaps each spring. Remove accumulated leaves and dirt trapped between deck boards; packed debris traps moisture against joist tops, accelerating wood decay. Reapply an exterior UV-resistant penetrating stain every two to three years.
Seasonal Walkthrough Checklist
Spring: Pressure-wash deck boards on low pressure and apply penetrating water-repellent sealer.
Summer: Test handrails and guardrails for firm rigidity; check for split or rotting post bases.
Fall: Clear leaves and twigs from between deck boards to allow ventilation and drainage.
Winter: Inspect metal joist hangers and ledger bolts for rust flaking or loose nuts.
HOMEOWNER DECISION MATRIX
DIY Weekend Maintenance vs. Call a Qualified Pro
SAFE 15-MINUTE DIY CARE
Tighten loose carriage bolts on deck railing posts and stair stringers.
Clean between deck board gaps and apply penetrating water-repellent stain.
Clear soil and mulch away from elevated post bases to maintain 1-inch clearance.
WHEN TO CALL A QUALIFIED PRO
Retrofitting through-bolts and lateral tension tie hardware on existing nailed ledgers.
Replacing rotted support posts and installing poured concrete piers with standoff brackets.
Complete deck rebuilding or structural engineering calculations for elevated second-story balconies.
CLINICAL DIFFERENTIAL FIELD TRIAGE & CONNECTED SYSTEMS§ 1.11 Diagnostic Rubric
Harmless Cosmetic Baseline
Shallow lengthwise sun-checking cracks along pressure-treated deck boards and gray UV weathering do not compromise structural beam or post strength.
Active Failure Signal
Deck ledgers bolted onto brick veneer, corroded non-galvanized joist hangers, soft post bases buried in wet dirt, or loose balcony railings risk sudden collapse.
60-Second Homeowner Check
Crawl or look beneath your deck where it meets the house: confirm heavy steel bolts + metal Z-flashing—never nails alone or bolts anchored into face brick.
Texas Credential to VerifyTBPE Licensed Professional Engineer (P.E.) for second-story decks, roof-tied patio covers, and coastal pilings; TDI WPI-8 inspector in Gulf counties.
Municipal Permit & Inspection RuleMunicipal building permit, open-hole pier footing inspection prior to pouring concrete, and final structural framing sign-off.
3 Questions You Must Ask Before Hiring
“How will the deck ledger be through-bolted or structural-screwed with continuous Z-flashing—never lag-bolted onto non-structural brick veneer?”
“Are all joist hangers, post bases, and structural fasteners hot-dipped galvanized (G185) or 316 stainless steel rated for ACQ pressure-treated lumber?”
“How deep below Texas clay frost/shrink-swell depth will concrete pier footings extend, and will wood posts sit on elevated metal standoffs above wet concrete?”
3 High-Pressure Red Flags & Scams
Bolting a heavy backyard patio cover or second-story balcony ledger directly onto 4-inch face brick veneer—the #1 cause of sudden residential deck collapses.
Burying untreated or residential-grade 4x4 wood posts directly into wet soil or concrete without drainage gravel or elevated galvanized post bases.
Using cheap interior electro-galvanized drywall or deck screws inside structural joist hangers—which shear silently under party loads.
HOMEOWNER ACTION TAKEAWAYRISK LEVEL: CRITICAL
Deck & Porch Stewardship Summary
Decks and balconies bear heavy live crowd loads outdoors. Ensuring bolted ledger attachments, proper metal flashing, concrete footings, and intact joist hangers prevents sudden catastrophic structural collapse.
Recommended Action Steps
Verify that your deck ledger board is fastened with heavy galvanized bolts or structural screws, never nails.
Ensure metal Z-flashing caps the top of the ledger to prevent water from rotting the house rim joist.
Confirm that wood posts rest on concrete footings elevated above soil grade.
Immediate Priorities
Cease using any elevated deck where the ledger board is pulling away from the house wall.
Retrofit structural timber screws or through-bolts if an existing ledger is held only with nails.
Replace any wooden posts that are rotted or buried directly in soil.
Ongoing Annual Maintenance
Conduct a semi-annual under-deck structural inspection of joist hangers and fasteners.
Reapply UV-inhibiting water repellent stain to wood deck surfaces every two to three years.
Inspect covered porch posts and carport hurricane straps after severe windstorms.
Typical Repair / Replacement Budget:$150 – $6,000($150–$400 for DIY ledger bolt retrofits and staining; $1,500–$6,000 for post replacement, footing repairs, or ledger re-flashing.)
Expected Assembly Lifespan:15–25 years for treated pine decks; 25–35+ years for composite decking; 5–8 years for fasteners in coastal zones
ICC DIGITAL CODES2021 / 2024 IRC
2021/2024 IRC R507.9.1 / R507.8—Vertical and Lateral Deck Ledger Connections
STATUTORY MODEL CODE TEXT
Deck ledger boards shall be connected to the exterior wall rim joist with 1/2-inch lag screws or structural timber screws in a staggered pattern. Deck ledgers shall not be supported on stone or brick veneer. Lateral tension ties and hot-dip galvanized or stainless steel hardware shall be provided. Where supported by concrete footings, wood posts shall be elevated at least 1 inch above concrete surfaces.
Exception: Free-standing decks that are completely self-supporting on independent concrete footings without connection to an exterior house ledger shall not require ledger attachment.
IN PLAIN ENGLISH
Elevated outdoor decks must be bolted directly into the house wood framing with staggered galvanized screws—never attached to brick veneer or nailed with smooth nails that can pull out under crowd weight.
HOMEOWNER PRO TIP:Never use drywall screws or smooth nails to fasten joist hangers; only use manufacturer-approved full-shank galvanized structural nails.
Rotted expansion joint allowing water to erode soil under garage foundation beam
Settled concrete sidewalk slab creating trip hazard exceeding 1/2 inch at doorway
Side-by-side comparison of continuous 6-mil polyethylene crawlspace vapor retarder with sealed seams versus bare dirt, high humidity, and rotting floor joists.
TEXAS FIELD TRIAGE: 3-STAGE SEVERITY SCALEField Inspection Progression Rubric
STAGE 1NORMAL TEXAS AGING (COSMETIC)
Condition:Hairline crack in concrete sidewalk or patio slab (<1/8" offset); minor paver moss.
Action:Seal crack with self-leveling polyurethane caulk.Annual Log
STAGE 2WATCH & MAINTAIN (30–90 DAYS)
Condition:Sidewalk or patio slab settling with >1/2" trip hazard lip; retaining wall weep holes clogged.
Action:Schedule polyurethane foam concrete lifting or clear retaining wall weep pipes within 60–90 days.60–90 Days
STAGE 3ACT IMMEDIATELY (URGENT)
Condition:Retaining wall bowing outward (>2 inches from vertical) threatening collapse against foundation.
Action:Engage structural engineer and retaining wall specialist immediately for tiebacks.Immediate
How It Works in Your Home
This section encompasses specialty structural components that complete the home's protective perimeter: exterior concrete flatwork, crawlspace ground vapor barriers, building additions, retaining walls, and residential storm shelters.
Exterior concrete flatwork—including driveways, front entry walkways, and backyard patios—is poured separately from the structural house foundation. To accommodate thermal expansion and soil movement, flatwork is divided by control joints (to control where hairline cracking occurs) and isolated from the home foundation by flexible expansion joint material. When expansion joints are maintained, the driveway can rise and fall on expansive clay without exerting lateral crushing pressure against the foundation slab.
In crawlspace homes, the ground vapor retarder is one of the most critical moisture defenses. Soil constantly releases moisture vapor into the air through evaporation. A continuous, puncture-resistant 6-mil to 10-mil polyethylene Class I vapor retarder laid over 100% of the exposed crawlspace dirt, with seams overlapped by 6 to 12 inches and taped securely, stops ground evaporation. This keeps crawlspace relative humidity low, protecting subfloor framing and preventing fungal mold blooms.
Residential safe rooms and in-ground storm shelters engineered to FEMA P-320 standards provide life-safety shelter from EF-4 and EF-5 tornadoes, anchoring directly to reinforced concrete slabs with heavy-duty missile-impact-tested steel door assemblies.
Driveway Expansion Joints:Flexible polyurethane or asphaltic strips separating driveways from garage slabs to absorb thermal and soil movement.
Crawlspace Vapor Retarder:Heavy 6-mil to 10-mil continuous polyethylene membrane covering 100% of exposed crawlspace soil.
Retaining Walls:Engineered stone, concrete, or timber walls supporting soil grade changes, equipped with gravel backfill and drainage weeps.
FEMA Storm Shelters:Reinforced steel or concrete safe rooms engineered to withstand 250 mph tornado winds and debris impact.
When wooden or fiber expansion joints between driveways and garage slabs rot away, a 1-to-2-inch open gap forms. During rainstorms, water pours directly into this joint, washing out the subgrade soil beneath the garage slab and saturating the foundation beam. Furthermore, unsealed joints fill with debris; when summer heat expands the concrete driveway, it pushes with hydraulic force against the house slab, cracking the garage foundation.
In crawlspaces, missing or torn polyethylene vapor barriers allow millions of moisture vapor molecules to rise into floor framing daily. Subfloor moisture meters often read over 18% to 20% wood moisture content in these homes—the exact threshold where wood decay fungi ignite, resulting in rotted floor joists and moldy subflooring.
Early Warning Signs & Red Flags
Open gaps or rotted fiber strips between the concrete driveway and the garage slab
Concrete sidewalk or driveway panels that have settled or heaved, creating trip hazards exceeding 1/2 inch
Bare dirt floor inside a crawlspace with missing, torn, or incomplete plastic vapor barrier sheeting
Uneven concrete settlement creating pedestrian tripping hazards and drainage ponding.
Bowing Retaining Wall Without Drainage WeepsMONITOR
Hydrostatic soil pressure pushing retaining walls toward failure due to missing drain pipes.
EXTERIOR FLATWORK • § 1.12
Driveway & Patio Expansion Joints Preventing Water Funneling
Decayed wood expansion joints between driveways, patios, and the house slab allow rainwater to pour beneath flatwork, saturating clay subgrades and lifting adjacent walkways into trip hazards.
How Texas Weather & Soil Affect It
Expansive clay movement and heavy thermal loads cause concrete flatwork to heave, crack, and shift significantly.
Exterior concrete sidewalks and driveways rarely feature the deep grade beams or heavy post-tension cables of the main house slab. Consequently, flatwork moves far more dramatically on expansive clay soils. During summer droughts, sidewalks drop several inches, while spring rains heave them upward. If flatwork is poured touching the house foundation without an expansion joint, this movement shears off foundation corners.
Furthermore, tornado activity across North Texas and the Panhandle makes residential storm shelters an invaluable structural asset. In-ground garage shelters must maintain watertight seals to prevent groundwater flooding during torrential thunderstorms.
Texas Climate & Soil Stresses
Expansive clay soil movement causing significant heave and settlement of concrete flatwork
Extreme summer thermal expansion of large concrete driveways pushing against house foundations
High crawlspace ground water evaporation in humid coastal and river valley regions
Severe tornado activity across North Texas requiring FEMA-compliant safe room construction
Texas Field Pro Tips
Clean out rotted expansion joints and fill them with closed-cell backer rod and self-leveling polyurethane sealant (such as Sikaflex).
If concrete sidewalk slabs have settled unevenly, consider polyurethane foam injection ('poly-jacking') rather than expensive slab replacement.
Ensure crawlspace ground plastic overlaps by at least 12 inches and extends 6 inches up foundation perimeter walls.
Inspect the joint where your driveway meets your garage floor. If the original wood divider has rotted or shrunk, scrape out all dirt, push a foam backer rod into the crevice, and cap it flush with self-leveling polyurethane concrete sealant. This flexible rubber seal expands and contracts while keeping 100% of rainwater out of your foundation subsoil.
Inspect your crawlspace annually. Verify that the plastic ground cover remains fully spread across all bare dirt and that no plumbing drain lines are leaking onto the plastic.
Seasonal Walkthrough Checklist
Spring: Inspect retaining wall weep holes to confirm they are clear of mud and draining freely.
Summer: Check expansion joints around driveway and pool deck for separation or failed caulk.
Fall: Walk driveways and walkways to mark any settled concrete slabs that create pedestrian trip hazards.
Winter: Check crawlspace vapor barrier for standing water, puncture tears, or rodent displacement.
HOMEOWNER DECISION MATRIX
DIY Weekend Maintenance vs. Call a Qualified Pro
SAFE 15-MINUTE DIY CARE
Seal driveway expansion joints using foam backer rod and self-leveling polyurethane sealant.
Lay down 6-mil polyethylene plastic sheeting across bare dirt in accessible crawlspaces.
Clear dirt and debris from retaining wall drainage weep pipes.
WHEN TO CALL A QUALIFIED PRO
Polyurethane foam concrete lifting ('poly-jacking') to level sunken sidewalk or driveway slabs.
Engineered retaining wall rebuild or tie-back anchor installation for leaning walls.
FEMA-compliant safe room or in-ground tornado storm shelter installation.
CLINICAL DIFFERENTIAL FIELD TRIAGE & CONNECTED SYSTEMS§ 1.12 Diagnostic Rubric
Harmless Cosmetic Baseline
Controlled hairline cracks strictly inside saw-cut driveway grooves with zero vertical lip offset indicate concrete control joints working as engineered.
Walk the joint where your driveway and patio meet the house foundation—if old wood filler has rotted out, seal it with foam backer rod and polyurethane sealant.
Texas Credential to VerifyTBPE Structural Engineer (P.E.) for retaining walls >4 ft tall; NSSA / ICC-500 & FEMA P-320 verified producer for residential storm shelters.
Municipal Permit & Inspection RuleMunicipal right-of-way driveway approach permit, retaining wall engineering permit (>4 ft), and city emergency-responder storm shelter registration.
3 Questions You Must Ask Before Hiring
“Does your driveway pour include compacted base, #3/#4 steel rebar on chairs (not wire mesh trampled into mud), and flexible polyurethane slab expansion joints?”
“For retaining walls over 36 inches, how are you relieving hydrostatic clay pressure behind the wall with washed gravel, perforated drain pipe, and weep outlets?”
“Does this garage or backyard tornado safe room carry third-party Texas Tech National Wind Institute impact testing and ICC-500 / FEMA P-320 certification?”
3 High-Pressure Red Flags & Scams
“Leftover highway asphalt/concrete” driveway crews knocking on rural Texas doors and laying 1.5 inches of crumbling millings over bare grass.
Polyurethane foam “mud-jacking” lifting sunken patio slabs while accidentally filling under-slab plumbing drain breaks or tilting water toward your house.
Building railroad-tie or unreinforced cinder-block retaining walls with zero weep drains—which lean and collapse after the first heavy spring rainstorm.
HOMEOWNER ACTION TAKEAWAYRISK LEVEL: MEDIUM
Specialty Structural Systems Stewardship Summary
Concrete flatwork, crawlspace vapor barriers, and retaining walls protect your primary foundation from water erosion, subsoil heave, and lateral pressure. Maintaining sealed expansion joints and covered crawlspace dirt preserves long-term stability.
Recommended Action Steps
Seal the expansion joint between your driveway and garage slab with flexible polyurethane caulk.
Verify that a continuous 6-mil polyethylene plastic vapor retarder covers 100% of crawlspace soil.
Ensure exterior retaining walls have clear weep holes to relieve hydrostatic water pressure.
Immediate Priorities
Seal open joints where driveway concrete meets the house slab to stop water erosion.
Install a complete ground vapor barrier in any crawlspace with exposed damp dirt.
Address any severe trip hazards on walkways leading to main entry doorways.
Ongoing Annual Maintenance
Inspect driveway and patio expansion joints annually for sealant shrinkage or separation.
Check crawlspace interiors annually for plumbing leaks or moisture accumulation on plastic.
Verify retaining wall weep pipes discharge water freely following heavy rainstorms.
Typical Repair / Replacement Budget:$100 – $3,500($100–$250 for DIY expansion joint sealing and crawlspace poly; $800–$3,500 for professional poly-jacking or retaining wall repairs.)
Expected Assembly Lifespan:30+ years for concrete flatwork; 20+ years for crawlspace vapor retarders; 5–8 years for joint sealants
ICC DIGITAL CODES2021 / 2024 IRC
2021/2024 IRC R408.2 / R301.2.1—Crawlspace Vapor Retarders and Wind/Storm Protection
STATUTORY MODEL CODE TEXT
The ground surface within unvented and vented crawlspaces shall be covered with an approved Class I vapor retarder not less than 6 mils in thickness. Joints of the vapor retarder shall lap not less than 6 inches and be sealed. Concrete flatwork and building additions shall be structurally isolated with expansion joints to prevent lateral stresses on the primary foundation.
Exception: Where exceptional site drainage and ventilation conditions exist, approved alternative ground coverings providing equivalent vapor permeance shall be permitted.
IN PLAIN ENGLISH
Unvented and vented crawlspaces must have heavy 6-mil plastic sheeting covering 100% of the exposed soil to stop ground moisture from rotting floor joists, and concrete flatwork must have expansion joints to keep from cracking the main house foundation.
HOMEOWNER PRO TIP:Seal the expansion joint between your driveway and garage slab with self-leveling polyurethane caulk to keep rainwater from eroding perimeter foundation subsoil.
Chapter 2 • II
Electrical Systems
Service Panels, Branch Circuits, Outlets, AFCI/GFCI & Surge Protection
Chapter 2 explores your home's electrical nerve center: utility service drops, main breaker panels, subpanel grounding and neutral isolation, branch circuit wiring, AFCI/GFCI shock and fire prevention, and modern high-draw circuits.
SCAN FOR LIVE DIGITAL TOOLS & UPDATES
Chapter 2 Digital Companion
Electrical Systems & Distribution
Instant mobile access to electrical panel safety checklists, AFCI/GFCI testing walkthroughs, and aluminum branch circuit guidelines.
Catastrophic Electrical Arc Flash & Home Fire Hazard
1
2
3
WHAT YOU'RE LOOKING ATFIELD INSPECTION ANATOMY
1
Main Service Disconnect:200-amp master breaker that shuts down all electrical power to entire house.
2
Interior Copper Busbars:Energized vertical metal bars distributing current to individual branch circuit breakers.
3
Equipment Grounding Bar:Solid copper bus where bare safety grounding wires bond to panel enclosure.
FIELD DIAGNOSTIC • 200A SERVICE PANEL BUSBARSIdentifying hazardous legacy breaker panels: busbar corrosion, unbonded neutrals, and obsolete breakers that fail to trip under direct overcurrent conditions.
3D ARCHITECTURAL CUTAWAY • FIGURE 2.1
FIGURE 2.1: SUBPANEL NEUTRAL & GROUND ISOLATION VS. BOOTLEGGED GROUND & DOUBLE-TAPPED MAIN
BEST PRACTICE (CODE-COMPLIANT)
4-wire feeder cable containing two hots, isolated neutral, and equipment ground
Floating neutral busbar mounted on insulated plastic standoffs with main bonding screw removed
Dedicated equipment grounding busbar bolted directly to metal enclosure chassis
Strictly one neutral return conductor per terminal screw slot on neutral busbar
COMMON DEFECT (HAZARD / AT-RISK)
Main bonding screw installed in subpanel creating live neutral current on steel enclosure
Neutrals and equipment grounds terminated indiscriminately on a shared busbar
Double-tapped main breaker lug forcing multiple conductors under a single set screw
Side-by-side comparison of a code-compliant 4-wire subpanel with floating neutral bus and separate chassis ground versus prohibited bonding screws and double-tapped lugs.
TEXAS FIELD TRIAGE: 3-STAGE SEVERITY SCALEField Inspection Progression Rubric
STAGE 1NORMAL TEXAS AGING (COSMETIC)
Condition:Faint surface oxidation on exterior NEMA 3R enclosure; handwritten directory labels faded.
Your electric service entrance and main breaker panel function as the central brain and gateway for all electrical energy entering your residence.
In Texas residential construction, electricity arrives from the municipal utility provider either overhead (via a service drop swinging from a pole to a rigid steel mast pipe penetrating the roofline) or underground (via a subterranean service lateral entering the bottom of the electric meter enclosure). From the electric meter, heavy service conductors feed the main service disconnect equipment. Standard contemporary Texas homes feature 200-ampere main electrical services, while larger estates or all-electric homes with dual heat pumps and EV chargers utilize 300-amp to 400-amp multi-panel systems.
Inside the main service panel, the master circuit breaker allows homeowners to shut down all electrical power to the house with a single throw. Below the main breaker, two 120-volt energized copper or aluminum busbars run vertically down the cabinet. Individual branch circuit breakers snap onto these busbars, distributing 120-volt power (from a single busbar) to general lights and outlets, or 240-volt power (spanning across both busbars simultaneously) to heavy appliances like air conditioners, electric ranges, and water heaters.
The grounding electrode system anchors the electrical infrastructure safely to the earth. Homes must connect to two 5/8-inch copper-clad steel ground rods driven at least 8 feet deep into the soil and spaced at least 6 feet apart, or to an engineered concrete-encased electrode ('Ufer ground') consisting of 20 feet of reinforcing rebar embedded in the concrete foundation footing. Metal domestic water piping and gas piping are bonded directly to this grounding system to equalize voltage and prevent lightning surges from energizing household pipes.
Main Service Disconnect:The master circuit breaker (typically 150A to 200A) that disconnects all incoming utility power to the home in an emergency.
Grounding Electrode System:Dual 8-foot driven copper ground rods or a foundation Ufer rebar ground that safely dissipates lightning and static charges into the earth.
Neutral & Ground Busbars:Terminal strips where white neutral return wires and bare copper safety ground wires terminate.
Subpanel Isolation:Downstream electrical panels where neutral busbars float isolated from the metal chassis to prevent live shock hazards on panel covers.
What Can Go Wrong & What to Look For
Hazardous legacy panels, bonded neutrals in subpanels, double-tapped lugs, and corroded aluminum connections pose severe fire and shock risks.
One of the most dangerous defects observed in Texas homes is the presence of obsolete, hazardous electrical panels—specifically Federal Pacific Electric (FPE) Stab-Lok panels and Zinsco / GTE Sylvania panels installed from the 1950s through the 1980s. Forensic testing confirms that FPE Stab-Lok breakers fail to trip under direct electrical short circuits and sustained overloads up to 60% of the time. When a breaker fails to trip, wire insulation inside wall framing melts, glows red-hot, and ignites framing lumber. In Zinsco panels, aluminum busbar clips corrode and weld themselves permanently to breakers, preventing the system from shutting off power even when manually switched. Major Texas insurance carriers routinely decline coverage or require mandatory panel replacement prior to issuing property insurance policies.
Another critical safety defect is improper neutral-to-ground bonding in downstream subpanels. In the main service disconnect panel, neutral and ground wires connect together at the main bonding jumper. However, in every subpanel (such as in an attached garage or detached workshop), the neutral busbar must remain completely isolated ('floating') on plastic standoffs from the steel cabinet. If someone installs a bonding screw in a subpanel, active neutral return current travels continuously through the metal panel enclosure, creating a lethal shock hazard for anyone touching the panel cover.
Early Warning Signs & Red Flags
Brand name on panel door reads 'Federal Pacific Electric', 'FPE Stab-Lok', 'Zinsco', or 'GTE Sylvania'
Acrid burning plastic smell, humming noises, or scorching around circuit breakers
Breakers that feel unusually hot to the touch or frequently trip under normal household appliance use
Two wires crammed under a single circuit breaker screw terminal ('double-tapped breaker')
Missing metal knockout filler plates leaving open 1-inch holes into live 240V interior panel wiring
Hazardous Legacy Panel (FPE Stab-Lok or Zinsco)IMMEDIATE ACTION
High breaker failure-to-trip rate under overcurrent conditions, creating extreme fire hazard.
Improper Neutral Bonding in SubpanelIMMEDIATE ACTION
Bonding screw installed in subpanel, energizing metal enclosure with active return current.
Double-Tapped Neutral LugMONITOR
Two neutral wires sharing a single terminal screw slot, causing thermal arcing and loose neutral spikes.
Missing Knockout Filler SealsROUTINE
Open cabinet holes allowing sparks to exit and children or pests to contact live busbars.
Obsolete Federal Pacific Stab-Lok and Zinsco panels exhibit documented failure-to-trip rates under overcurrent loads—warranting proactive replacement by a TDLR-licensed electrical contractor.
How Texas Weather & Soil Affect It
Severe lightning storms, extreme heatwaves, and Gulf Coast salt air test electrical service equipment across Texas.
Texas leads the nation in annual cloud-to-ground lightning strikes. A lightning strike hitting nearby utility power lines sends high-voltage electrical surges rushing into homes, destroying sensitive electronics, smart appliances, and variable-speed air conditioning inverter boards. Robust grounding electrodes with dual 8-foot rods and whole-home surge protective devices (SPDs) are essential defenses.
Along the Texas Gulf Coast, salt spray and high humidity accelerate corrosion on outdoor meter enclosures and service panels. Copper conductors oxidize, developing green patina, and aluminum lugs corrode into white powdery aluminum oxide. Because aluminum oxide is an electrical insulator, corroded terminations develop high electrical resistance, generating extreme heat that melts wire insulation and sparks panel fires.
Texas Climate & Soil Stresses
Nation-leading frequency of cloud-to-ground lightning strikes and utility grid voltage spikes
100°F+ ambient heat in unconditioned garages increasing thermal operating stress on breakers
Coastal salt air corrosion oxidizing aluminum and copper busbar connections
Tropical storm wind gusts swinging overhead service drops and straining roof mast attachments
Texas Field Pro Tips
Check your electrical panel brand label during your option period; if it is FPE or Zinsco, budget $2,000–$3,500 for replacement.
Install a Type 2 Whole-House Surge Protective Device (SPD) at your main panel to protect smart appliances from lightning strikes.
Maintain a 30-inch wide by 36-inch deep clear workspace in front of all electrical panels—never block panels with storage shelving or water heaters.
How to Maintain & Protect It
Panel stewardship focuses on maintaining clear workspaces, verifying label accuracy, and scheduling periodic thermal inspections.
Keep the dedicated workspace in front of your electrical panel completely unobstructed. The National Electrical Code requires a working clearance measuring at least 30 inches wide, 36 inches deep, and 6 feet 6 inches high in front of all panels. Never build wooden storage cabinets, hang shelves, or stack boxes directly in front of the panel door. In an emergency, first responders and family members must be able to reach the main disconnect switch instantly.
Update circuit breaker directory labels whenever remodeling or adding appliances. A clearly labeled panel eliminates dangerous guessing games when shutting down power for a plumbing leak or electrical repair. Once every two to three years, hire a licensed electrician to inspect the panel with an infrared thermal imaging camera to identify loose lugs before they spark.
Seasonal Walkthrough Checklist
Spring: Check the outdoor electrical service mast on your roof; verify flashing is intact and drip loops hang freely.
Summer: Ensure the 36-inch clear workspace in front of the garage service panel is completely unobstructed.
Fall: Verify all circuit directory labels are legible and accurately describe the rooms and appliances served.
Winter: Inspect exterior meter enclosure and disconnect box for wasp nests or corrosion.
HOMEOWNER DECISION MATRIX
DIY Weekend Maintenance vs. Call a Qualified Pro
SAFE 15-MINUTE DIY CARE
Install plastic snap-in knockout seals over any open holes in the panel enclosure.
Keep the 30"x36" workspace in front of the panel clean and unobstructed.
Label all circuit breakers accurately with room and appliance names.
WHEN TO CALL A QUALIFIED PRO
Complete electrical panel replacement and service amperage upgrades (e.g. 100A to 200A).
Separating bonded neutrals and grounds in subpanels to eliminate enclosure current.
Infrared thermal imaging scanning and torque-testing all lug set screws.
CLINICAL DIFFERENTIAL FIELD TRIAGE & CONNECTED SYSTEMS§ 2.1 Diagnostic Rubric
Harmless Cosmetic Baseline
A faint 60-Hz transformer hum from smart meters or doorbells and cool, cleanly labeled circuit breakers in a dry load center reflect healthy service power.
Active Failure Signal
Warm or buzzing breakers, flickering lights when the AC starts, scorched busbars, loose meter cans, or legacy Federal Pacific / Zinsco panels pose active fire risk.
60-Second Homeowner Check
Open the outer panel door (never remove the dead-front cover), verify every breaker switch is clearly labeled, and scan your exterior copper ground rod clamp.
BEFORE YOU SIGN A BID • TEXAS CONTRACTOR VETTING & SCAM DEFENSE
Main Electrical Panel & Service Upgrades
§ 2.1 Playbook
Texas Credential to VerifyTDLR Licensed Electrical Contractor (TECL) & Master Electrician — verify license number at tdlr.texas.gov.
Municipal Permit & Inspection RuleMandatory city electrical permit, utility meter-pull coordination, and municipal inspector green-tag sign-off.
3 Questions You Must Ask Before Hiring
“What is your active TDLR TECL contractor number, and will you pull the municipal electrical permit and utility disconnect tag in your company name?”
“Does this panel replacement include a 2023 NEC-compliant exterior emergency disconnect, whole-house Type 1/2 surge protector, and updated grounding electrodes?”
“Will every circuit breaker match the panel manufacturer’s UL-listed compatibility chart (zero mismatched ‘alien’ breakers) with torqued lug verification?”
3 High-Pressure Red Flags & Scams
Unlicensed handymen offering to swap a Federal Pacific or Zinsco breaker box “over the weekend without bothering the city or utility company.”
Double-tapping neutral wires or cramming non-listed tandem breakers into panels not rated for circuit tandemizing.
Quoting a complete whole-home rewire when only main-lug torqueing, pigtailing, or targeted AFCI/GFCI breaker upgrades are needed.
HOMEOWNER ACTION TAKEAWAYRISK LEVEL: CRITICAL
Electrical Service Panel Stewardship Summary
Your service panel is your home's central power hub. Replacing hazardous legacy panels, ensuring proper subpanel neutral isolation, and maintaining unobstructed emergency access keeps your family safe from electrical shocks and panel fires.
Recommended Action Steps
Verify your panel brand is not Federal Pacific Electric (FPE) or Zinsco.
Maintain a 30-inch wide by 36-inch deep clear working space in front of all electrical panels.
Confirm that neutral return wires and safety ground wires are kept separate in all subpanels.
Immediate Priorities
Replace FPE Stab-Lok or Zinsco panels immediately to prevent catastrophic electrical fires.
Remove the main bonding screw in any subpanel where neutrals and grounds share an un-isolated busbar.
Install missing knockout filler plates to prevent sparks from exiting or accidental contact with live 240V busbars.
Ongoing Annual Maintenance
Inspect electrical panel condition and verify breaker directory labels annually.
Check exterior service entrance mast flashing and overhead utility drip loops for storm damage.
Have a licensed electrician perform an infrared thermal scan of panel lugs every three years.
Typical Repair / Replacement Budget:$25 – $3,500($25–$50 for DIY knockout seals and directory labeling; $1,800–$3,500 for professional 200A main service panel replacement.)
Expected Assembly Lifespan:30–40 years for modern panels; replace obsolete FPE/Zinsco panels immediately regardless of age
ICC DIGITAL CODES2023 NEC
2023 NEC 250.24(A)(5) / 250.32(B)—Grounded Conductor (Neutral) Separation in Subpanels
STATUTORY MODEL CODE TEXT
A grounded conductor shall not be connected to normally non-current-carrying metal parts of equipment or to equipment grounding conductors on the load side of the service disconnecting means. Subpanel neutral busbars shall remain completely isolated from the enclosure chassis.
Exception: Existing range and dryer branch circuits installed prior to modern code adoption shall be permitted to remain where equipment grounding conductors were not required, provided the frame is grounded to the neutral conductor.
IN PLAIN ENGLISH
Neutral return wires and bare copper safety ground wires must only connect together at your main service panel; keeping them separate in all subpanels prevents metal panel covers from carrying dangerous shock currents.
HOMEOWNER PRO TIP:If your home still has a Federal Pacific Electric (FPE) Stab-Lok or Zinsco panel, budget for immediate replacement—these obsolete breakers frequently fail to trip during overloads, creating serious fire hazards.
Flat exterior outlet cover leaking rainwater into receptacle while cord is plugged in
Side-by-side comparison of modern AFCI/GFCI tamper-resistant receptacle protection versus reversed polarity, ungrounded 3-prong outlets, and wet location shock hazards.
TEXAS FIELD TRIAGE: 3-STAGE SEVERITY SCALEField Inspection Progression Rubric
Action:Shut off breaker immediately; dispatch electrician for arc-fault remediation or AlumiConn.Immediate
How It Works in Your Home
Branch circuits distribute electrical energy from the panel to individual rooms, lighting fixtures, and wall receptacles through insulated copper conductors protected by specialized safety devices.
In modern residential wiring, non-metallic sheathed cable (commonly known as Romex) carries power through wall and ceiling framing. A typical 120-volt 15-ampere general lighting circuit uses 14 AWG copper wire protected by a 15-amp breaker, while kitchen small-appliance, bathroom, and outdoor circuits require heavier 12 AWG copper wire protected by 20-amp breakers. Cables run through holes drilled in the center of framing studs, protected by steel nail plates wherever conductors pass closer than 1-1/4 inches from the stud edge.
To protect occupants from shocks, electrocution, and electrical fires, modern building codes mandate two advanced protective technologies: Ground-Fault Circuit-Interrupters (GFCI) and Arc-Fault Circuit-Interrupters (AFCI). GFCI devices monitor the balance of electrical current flowing between the hot and neutral conductors; if an imbalance as small as 4 to 6 milliamperes is detected (indicating electricity is flowing through a human body into water or ground), the GFCI cuts power within 25 milliseconds. AFCI circuit breakers utilize advanced microprocessors to detect hazardous electrical arcing—the tiny, sparking, high-temperature jumps that occur when wires are punctured by picture-hanging nails, pinched by furniture, or chewed by rodents—shutting down the circuit before wall framing can ignite.
Furthermore, all 15A and 20A 125V receptacles must be Tamper-Resistant (marked with an embossed 'TR' on the faceplate). Spring-loaded internal plastic shutters block foreign objects (keys, paper clips, hairpins) from being inserted by curious young children, opening only when two prongs of an electrical plug enter simultaneously.
GFCI Protection:Sensors that trip within 25 milliseconds when 4–6 mA current leak is detected near sinks, bathrooms, outdoors, and garages.
AFCI Breakers:Microprocessor-controlled breakers in the panel that detect sparking electrical arcs in bedroom and living room wiring.
Tamper-Resistant (TR) Receptacles:Internal safety shutters blocking children from inserting conductive metal items into outlet slots.
Steel Nail Protection Plates:Hardened steel plates nailed over studs to stop drywall screws from puncturing electrical cables.
What Can Go Wrong & What to Look For
Missing GFCI/AFCI protection, reversed wiring polarity, open equipment grounds, and overloaded multi-outlet power strips create shock and fire hazards.
A common electrical defect found during home inspections is missing GFCI protection in moisture-prone zones. Older homes frequently lack GFCI protection on kitchen countertop receptacles, bathroom outlets, wet bars, garage workbenches, and exterior patio plugs. If an appliance (like a hairdryer or toaster) drops into a sink filled with water, standard breakers will not trip, resulting in fatal electrocution.
Another widespread defect is reversed wiring polarity or open equipment grounding conductors. When DIYers or unqualified handymen install three-prong grounded outlets into older two-wire wiring systems without connecting an actual grounding wire (known as an 'open ground'), surge protectors and electronic appliances cannot safely dump voltage spikes. In worse cases, hot and neutral wires are swapped ('reversed polarity'), energizing the threaded metal socket of table lamps even when switched off, posing shock hazards when changing lightbulbs.
Homes built between 1965 and 1973 may contain solid-strand aluminum 15A/20A branch wiring, which creeps and oxidizes at brass screws unless remediated with listed COPALUM or AlumiConn connectors.
How Texas Weather & Soil Affect It
Summer air conditioning electrical draws, outdoor humidity, and intense sun test branch circuit longevity.
During scorching Texas summer afternoons, homes operate at peak electrical draw. Refrigerators, dual air conditioning compressors, pool pumps, and kitchen appliances run concurrently. If general lighting branch circuits are over-subscribed, continuous electrical draw heats wire conductors inside insulated walls, accelerating the breakdown of thermoplastic insulation and causing nuisance breaker tripping.
Exterior receptacles face intense weather exposure. Building codes require outdoor receptacles to feature 'extra-duty while-in-use' weatherproof bubble covers. Standard flat metal flip-lids only seal when nothing is plugged in; when a sprinkler controller or outdoor string light is plugged in, rainwater runs directly into the energized outlet, causing ground fault shorts.
Texas Climate & Soil Stresses
High summer electrical loads pushing branch circuits to maximum continuous operating capacity
Severe outdoor humidity and rain driving moisture into exterior patio receptacles
Lightning strikes inducing high voltage surges across unshielded branch circuits
Texas Field Pro Tips
Test all GFCI outlets once a month by pressing the 'TEST' button; if power doesn't cut out, replace the unit immediately.
Verify outdoor receptacles have clear, durable 'extra-duty' while-in-use covers that seal even when cords are plugged in.
Never use extension cords as permanent wiring for outdoor landscape lighting, garage refrigerators, or garage door openers.
How to Maintain & Protect It
Routine outlet testing, avoiding circuit overload, and installing tamper-resistant devices keeps household power safe.
Use a simple $10 three-prong circuit tester (available at any home center) to check every outlet in your home once a year. The three indicator lights immediately identify correct wiring, open grounds, or reversed polarity. Press the integrated GFCI test button on the tester to confirm that kitchen, bathroom, garage, and outdoor GFCI outlets trip instantly.
Avoid overloading wall outlets with octopus multi-plug adapters and high-wattage space heaters. Electric resistance space heaters draw 1,500 watts (12.5 amps) on a 15-amp circuit; running a space heater on the same circuit as a computer or television will overheat the wall wiring.
Seasonal Walkthrough Checklist
Spring: Test all exterior and garage GFCI receptacles; ensure weatherproof covers close tightly.
Summer: Check that high-draw kitchen small-appliance circuits are not running simultaneously on the same breaker.
Fall: Walk through bedrooms testing tamper-resistant shutter operation on low outlets.
Winter: Avoid running high-wattage space heaters on extension cords or shared lighting circuits.
HOMEOWNER DECISION MATRIX
DIY Weekend Maintenance vs. Call a Qualified Pro
SAFE 15-MINUTE DIY CARE
Test and reset GFCI and AFCI breakers and receptacles monthly using integrated test buttons.
Replace broken, cracked, or loose plastic outlet and light switch faceplates.
Use a three-prong receptacle analyzer to check outlets for proper grounding and polarity.
WHEN TO CALL A QUALIFIED PRO
Installing dedicated 20-amp branch circuits for microwaves, refrigerators, or workshops.
Rewiring vintage knob-and-tube or ungrounded two-wire circuits with modern grounded Romex.
Upgrading standard circuit breakers to modern Dual-Function AFCI/GFCI breakers in the panel.
CLINICAL DIFFERENTIAL FIELD TRIAGE & CONNECTED SYSTEMS§ 2.2 Diagnostic Rubric
Harmless Cosmetic Baseline
A tiny brief blue spark inside an outlet slot when plugging in a running vacuum or laptop brick is normal initial load draw—not an arc fault.
Active Failure Signal
Warm or brown-discolored outlet faceplates, tingling metal appliances, loose plugs falling out of worn slots, or GFCI buttons failing to trip demand licensed service.
60-Second Homeowner Check
Press TEST then RESET on every kitchen, bath, garage, and patio GFCI outlet monthly—power must snap completely off on TEST and restore crisply on RESET.
Texas Credential to VerifyTDLR Licensed Electrical Contractor (TECL) & Master/Journeyman Electrician — verify active license at tdlr.texas.gov before work begins.
Municipal Permit & Inspection RuleMunicipal electrical permit required when adding new branch circuits, rewiring rooms, or performing whole-home aluminum pigtailing.
3 Questions You Must Ask Before Hiring
“For my 1965–1973 solid aluminum branch wiring, are you using CPSC-recognized COPALUM crimp or torqued AlumiConn lug connectors—never ordinary purple twist-on wire nuts?”
“Will you wire all new tamper-resistant receptacles using secure side-screw clamps rather than unreliable 14-gauge push-in ‘backstab’ holes?”
“When an AFCI breaker nuisance-trips, will you trace shared neutrals or ground-to-neutral bootlegs with diagnostic meters instead of swapping back to a standard breaker?”
3 High-Pressure Red Flags & Scams
Installing a GFCI outlet with a fake “bootleg ground” jumper wire between neutral and ground slots to fool a cheap three-light home inspector plug tester.
Removing a life-saving AFCI or GFCI breaker because a faulty appliance or nicked attic staple keeps tripping it—hiding the real fire/shock fault.
Twisting solid aluminum and copper wires together under standard wire nuts with antioxidant paste—a documented overheating fire hazard.
HOMEOWNER ACTION TAKEAWAYRISK LEVEL: HIGH
Branch Circuit & Device Stewardship Summary
Branch circuits carry power into your daily living spaces. Ensuring GFCI protection near all water sources, AFCI protection in bedrooms, and tamper-resistant shutters for children prevents electrocutions and electrical fires.
Recommended Action Steps
Ensure all receptacles in kitchens, bathrooms, garages, and outdoors have functioning GFCI protection.
Replace ungrounded two-wire outlets or ensure they are protected by upstream GFCI devices.
Verify outdoor outlets are protected by 'extra-duty' while-in-use weatherproof bubble covers.
Immediate Priorities
Install GFCI receptacles at any kitchen countertop, bathroom, or outdoor outlet currently lacking them.
Correct any reversed polarity or open neutral wiring conditions found during inspection.
Replace cracked or scorch-marked wall outlets and light switches immediately.
Ongoing Annual Maintenance
Test all GFCI and AFCI test buttons monthly to verify internal safety sensors remain responsive.
Check that exterior while-in-use covers remain unbroken and sealed against rain.
Avoid daisy-chaining multi-outlet surge protector power strips together.
Typical Repair / Replacement Budget:$20 – $1,200($20–$40 for DIY GFCI receptacle and while-in-use cover replacement; $400–$1,200 for professional circuit rewiring or AFCI breaker retrofits.)
Expected Assembly Lifespan:15–25 years for GFCI/AFCI devices; 40+ years for copper Romex wiring
ICC DIGITAL CODES2023 NEC
2023 NEC 210.8(A) / 210.12(A)—GFCI and AFCI Protection for Branch Circuits
STATUTORY MODEL CODE TEXT
Ground-fault circuit-interrupter (GFCI) protection for personnel shall be provided for all 125-volt through 250-volt receptacles in bathrooms, garages, outdoors, crawlspaces, basements, and kitchens. Arc-fault circuit-interrupter (AFCI) protection shall be provided for all 120-volt branch circuits supplying outlets or devices in dwelling unit bedrooms, family rooms, dining rooms, living rooms, and laundry areas.
Exception: Receptacles dedicated solely for factory-installed internal fire alarm or carbon monoxide monitoring equipment shall be permitted to omit AFCI protection where installed in metal conduit.
IN PLAIN ENGLISH
GFCI devices instantly cut power when water contact threatens fatal electrocution, while AFCI breakers sense microscopic arcing sparks inside walls before electrical fires ignite.
HOMEOWNER PRO TIP:Press the 'TEST' button on your bathroom, kitchen, and exterior GFCI receptacles once every month to verify their internal safety trips remain responsive.
2.3
Safety Alarms & Power Defense: Smoke Alarms, CO Detectors, Whole-House Surge & Generators
CHECK FREQUENCYMonthly (Check SPD LED indicator lights)
RISK IF IGNOREDHIGH
Fried Appliances from Lightning & Grid Surge ($5,000–$15,000)
1
2
3
WHAT YOU'RE LOOKING ATFIELD INSPECTION ANATOMY
1
Dedicated 50-Amp Double-Pole Breaker:Heavy-duty 240-volt double-pole branch breaker designed for continuous vehicle charging load.
2
Type 2 Whole-House Surge Protector:Panel-mounted SPD device with LED status lights defending electronics from grid spikes.
3
Heavy-Gauge Conductor Feeder Conduit:6 AWG copper conduit feeding clean continuous power to charging station.
LIFE SAFETY & RESILIENCE • WHOLE-HOUSE SURGE & ALARMSDedicated 50-amp 240V Level 2 EV charging circuit with rigid conduit feed, paired with whole-home Type 2 surge protective device (SPD) at the main service panel.
3D ARCHITECTURAL CUTAWAY • FIGURE 2.3
FIGURE 2.3: WHOLE-HOME SURGE PROTECTION & SMOKE/CO ALARMS VS. COMMON DEFICIENCIES
BEST PRACTICE (CODE-COMPLIANT)
Type 2 Whole-Home Surge Protective Device (SPD) shunting voltage spikes to ground
Interconnected hardwired smoke and CO alarms with battery backup inside all bedrooms
Missing whole-house surge protection leaving $10,000 in smart appliances vulnerable
Side-by-side comparison of panel-mounted Type 2 surge protective device, interconnected smoke/CO alarms, and generator interlock versus expired alarms, missing CO detectors, and grid backfeeding.
TEXAS FIELD TRIAGE: 3-STAGE SEVERITY SCALEField Inspection Progression Rubric
Action:Replace battery with fresh lithium cell; vacuum sensor.Annual Log
STAGE 2WATCH & MAINTAIN (30–90 DAYS)
Condition:Expired smoke/CO detector (>10 yrs old per back date); generator inlet missing interlock plate.
Action:Install new 10-year sealed smoke/CO alarms and install UL panel interlock within 30 days.30 Days
STAGE 3ACT IMMEDIATELY (URGENT)
Condition:Total lack of working smoke alarms in bedrooms; backfed generator plug energizing utility grid.
Action:Install operational detectors immediately; never use generator suicide cords.Immediate
How It Works in Your Home
This section encompasses advanced residential electrical systems that safeguard life and property: interconnected smoke and carbon monoxide detection networks, whole-home surge protective devices (SPDs), dedicated 240V Level 2 electric vehicle (EV) charging stations, and standby emergency generator transfer equipment.
In modern residential safety engineering, smoke alarms are hardwired to 120V household power with battery backup and interconnected via an extra communication conductor. When a single smoke alarm detects combustion particles in a remote utility room, all alarms throughout the house sound simultaneously at a piercing 85 decibels, providing precious minutes for sleeping occupants to escape. Carbon monoxide (CO) alarms must be installed outside each separate sleeping area in homes with fuel-burning appliances (gas furnaces, water heaters, fireplaces) or attached garages.
Under current National Electrical Code standards (NEC 242.66), all new and updated homes require a Type 1 or Type 2 Surge Protective Device (SPD) installed at the main electrical panel. An SPD uses high-capacity metal oxide varistors (MOVs) to clamp down lightning surges and utility switching spikes in nanoseconds, safely shunting excess voltage into the grounding electrode before it can fry expensive smart appliances, computer systems, or HVAC variable-speed motors.
For homes equipped with standby generators, code strictly mandates an automatic or manual mechanical transfer switch with an interlock device. The transfer switch physically isolates the home from the municipal electric grid before generator power can flow, preventing dangerous 'backfeeding' that could electrocute utility line workers restoring power down the street.
Interconnected Smoke/CO Alarms:Hardwired alarm network with 9V battery backup that sounds throughout the house if any single unit triggers.
Type 2 Surge Protective Device (SPD):Panel-mounted surge suppressor that diverts lightning spikes and grid surges into the ground rods in nanoseconds.
Dedicated 50A EV Charging Circuit:Heavy 6 AWG copper conductor feeding a 240V NEMA 14-50 receptacle or hardwired wall connector for electric vehicles.
Generator Transfer Interlock:Mechanical safety interlock preventing simultaneous utility and generator connection, stopping hazardous grid backfeeding.
What Can Go Wrong & What to Look For
Expired smoke alarms, missing CO detectors, unpermitted EV chargers overloading panels, and illegal generator suicide cords threaten family lives.
The most critical safety issue in older homes is expired smoke alarms. Smoke alarms have a strict 10-year maximum operational lifespan from their factory manufacture date. Over a decade, sensor chambers accumulate dust, and radioactive ionization or photoelectric sensors degrade. In a fire, an expired alarm may fail to sound entirely. Similarly, missing carbon monoxide alarms in homes with gas water heaters or attached garages leave families unprotected against the silent, invisible, odorless poison.
During widespread Texas power outages (such as after hurricanes or winter freezes), dangerous portable generator setups proliferate. Homeowners frequently use illegal dual-male plug cords ('suicide cords') to plug generators directly into dryer outlets without an interlock switch. This backfeeds 240V electricity onto neighborhood utility lines, creating lethal shock hazards for line workers and threatening to ignite the generator or house wiring when grid power abruptly restores.
Early Warning Signs & Red Flags
Smoke alarm manufacture date stamped on the back is older than 10 years
Smoke alarm chirping intermittently every 30 to 60 seconds (low battery or expired sensor indicator)
Zero carbon monoxide alarms present in a home with natural gas appliances or an attached garage
Portable generator connected to a household outlet without a mechanical interlock breaker slider
Electrical service panel operating at over 80% continuous capacity with new 50A EV charger additions
While smoke alarms warn you after combustion starts, AFCI breakers and Type 1/2 surge protective devices stop parallel/series wiring arcs and Texas grid lightning spikes before a fire ignites.
How Texas Weather & Soil Affect It
Severe Texas grid instability, winter polar freezes, and tropical storm blackouts highlight the importance of backup power and surge defense.
Texas experiences frequent, high-profile power disruptions—from hurricane grid failures along the Gulf Coast to grid demand crises during 105°F summer heatwaves and winter polar vortex freezes. When power returns after an outage, sudden electrical grid surges frequently exceed 1,000 volts, destroying electronics without whole-home SPD protection.
Portable and standby generators have become standard fixtures across the state. However, fuel-powered generators must be operated outdoors at least 20 feet away from open windows, doors, and air conditioner fresh air intakes. Exhaust gases contain concentrated carbon monoxide that can seep into bedrooms within minutes.
Texas Climate & Soil Stresses
Frequent cloud-to-ground lightning strikes inducing extreme electrical voltage surges
Prolonged grid blackouts during hurricane recovery and severe winter freeze events
High carbon monoxide poisoning risks from improperly positioned portable emergency generators
High ambient temperatures in garages accelerating battery breakdown in emergency alarm units
Texas Field Pro Tips
Always check the manufacture date on the back of every smoke alarm when moving into a home; replace any unit over 10 years old.
Position portable emergency generators at least 20 feet away from exterior windows and point the exhaust pipe away from the home.
If installing a Level 2 EV charger, have a licensed electrician perform an NEC load calculation to confirm your panel has sufficient amperage capacity.
Test all smoke and carbon monoxide alarms once a month by pressing and holding the 'TEST' button until the piercing siren sounds. Replace 9V backup batteries in all alarms twice a year—an easy habit to tie to daylight saving time changes. If an alarm unit chirps intermittently, replace the battery immediately; if chirping continues, the entire alarm unit has reached end-of-life and must be replaced.
Exercise standby and portable emergency generators under moderate load for 20 to 30 minutes every two to three months. Fresh fuel should be treated with fuel stabilizer, or ran dry from the carburetor, to prevent gummy varnish from clogging generator fuel jets during emergency deployments.
Seasonal Walkthrough Checklist
Spring: Test all smoke alarms and install fresh 9V backup batteries during daylight saving time change.
Summer: Check whole-house surge protector status LEDs on the main electrical panel (green indicates active protection).
Fall: Test carbon monoxide detectors before starting up winter heating equipment and gas fireplaces.
Winter: Exercise emergency generator, verify fuel stabilizer freshness, and inspect mechanical transfer switch.
HOMEOWNER DECISION MATRIX
DIY Weekend Maintenance vs. Call a Qualified Pro
SAFE 15-MINUTE DIY CARE
Replace 9V backup batteries in all smoke and carbon monoxide detectors twice yearly.
Vacuum dust and cobwebs out of smoke alarm sensing chambers using a soft vacuum brush.
Check the green status indicator LED on your panel-mounted surge protective device.
WHEN TO CALL A QUALIFIED PRO
Installing hardwired, interconnected smoke and carbon monoxide alarm systems.
Installing an approved manual generator transfer switch and mechanical interlock kit.
Installing a dedicated 50-amp 240V circuit and wall connector for electric vehicle charging.
CLINICAL DIFFERENTIAL FIELD TRIAGE & CONNECTED SYSTEMS§ 2.3 Diagnostic Rubric
Harmless Cosmetic Baseline
A single brief chirp every 60 seconds simply signals a low backup battery—not smoke—provided the alarm unit manufacture date is under 10 years old.
Active Failure Signal
Smoke alarms older than 10 years, missing alarms inside bedrooms, silent non-interconnected units, or dark status LEDs on your panel surge protector leave you exposed.
60-Second Homeowner Check
Twist one bedroom smoke alarm off its bracket to check the stamped manufacture date (<10 years), then hold TEST to confirm hallway/upstairs alarms sound together.
Texas Credential to VerifyTDLR Licensed Electrical Contractor (TECL) for 120V interconnected alarms and Type 1/2 surge devices; Texas DPS/TDI ACR license for monitored security.
Municipal Permit & Inspection RuleMunicipal electrical permit required when extending new 120V interconnected alarm circuits; city police/fire alarm permit where centrally monitored.
3 Questions You Must Ask Before Hiring
“Will every new 120V smoke alarm interconnect simultaneously across all bedrooms and hallways, with sealed 10-year lithium battery backup?”
“What is the UL 1449 Voltage Protection Rating (VPR) and kA surge capacity of the Type 2 panel surge arrestor, and will lead wires be kept short and straight?”
“Are you installing dedicated UL 2034 carbon monoxide sensors outside every sleeping zone in addition to dual-sensor photoelectric smoke alarms?”
3 High-Pressure Red Flags & Scams
Door-to-door “free home security panel” solicitors locking homeowners into non-cancellable 60-month monitoring contracts at $75/month with auto-renewal traps.
Leaving discolored 15-year-old smoke alarms on bedroom ceilings simply because pressing the test button still chirps the piezo horn (the sensor chamber is dead after 10 years).
Mounting a whole-house surge protector at the bottom of a panel with 36 inches of coiled wire—ruining clamping response speed during Texas lightning strikes.
HOMEOWNER ACTION TAKEAWAYRISK LEVEL: CRITICAL
Safety Alarms & Power Defense Stewardship Summary
Safety alarms protect your family while sleeping, whole-home surge suppressors safeguard your electronics, and code-compliant generator transfer switches ensure safe emergency power. Regular testing and replacing 10-year-old detectors saves lives.
Recommended Action Steps
Replace every smoke alarm that is more than 10 years old from its manufacture date.
Install carbon monoxide detectors outside every sleeping area in homes with gas or attached garages.
Never connect a generator to household wiring without a code-approved mechanical interlock switch.
Replace expired, chirping, or yellowed smoke alarm units throughout the residence.
Remove any illegal generator suicide cords and install an approved interlock kit.
Ongoing Annual Maintenance
Test all smoke and CO alarms monthly using the integrated test buttons.
Replace 9V backup batteries twice a year at daylight saving time transitions.
Inspect whole-house surge protector LED indicators semi-annually.
Typical Repair / Replacement Budget:$30 – $2,200($30–$80 for DIY smoke/CO alarm replacements; $450–$900 for whole-home surge protector installation; $800–$2,200 for generator interlock or EV charger circuit.)
Expected Assembly Lifespan:10 years maximum for smoke alarms; 7–10 years for CO alarms; 5–10 years for surge protectors
ICC DIGITAL CODES2023 NEC / IRC
2021/2024 IRC R314 / R315 & NEC 242.66—Smoke, Carbon Monoxide Alarms and Surge Protective Devices
STATUTORY MODEL CODE TEXT
Smoke alarms shall be installed in each sleeping room, outside each separate sleeping area in the immediate vicinity of bedrooms, and on each additional story of the dwelling. All dwelling units shall be provided with a surge protective device (SPD) connected to the service panel.
Exception: Surge protection shall not be required where an existing panelboard replacement is executed without increasing service capacity or modifying branch distribution wiring.
IN PLAIN ENGLISH
Hardwired, interconnected smoke alarms alert the whole house if smoke appears anywhere, and whole-home surge protectors safeguard valuable smart appliances against Texas lightning and grid spikes.
HOMEOWNER PRO TIP:Replace smoke alarm units every 10 years from their manufacture date, and install fresh 9V backup batteries at every daylight saving time change.
Chapter 3 • III
HVAC Systems
Heating Equipment, Cooling Equipment, Duct Systems & Texas Climate Control
Chapter 3 covers your home's environmental comfort engine: gas forced-air furnaces, electric heat pumps, high-efficiency SEER2 split condensers, attic evaporator coils, condensate drain pans, and R-8 distribution ductwork.
SCAN FOR LIVE DIGITAL TOOLS & UPDATES
Chapter 3 Digital Companion
HVAC & Cooling Systems
Instant mobile access to Texas extreme heat AC servicing guides, condensate drain flush video, and SEER2 replacement calculators.
3D mechanical cross-section detailing refrigerant heat transfer between the outdoor condensing unit and horizontal attic evaporator coil, dual condensate protection, sealed mastic plenums, and balanced room return air.
Sealed Gas Burner Chamber:Gas manifold where burners ignite, transferring heat across metal exchanger walls.
3
Emergency Sediment Trap (Drip Leg):Nipple and cap assembly capturing debris and scale before gas reaches control valve.
AUTHENTIC FIELD INSPECTION • ATTIC GAS FURNACETesting an attic gas furnace burner assembly, flue vent drafting, and heat exchanger integrity for dangerous carbon monoxide bypass into supply airstreams.
3D ARCHITECTURAL CUTAWAY • FIGURE 3.1
FIGURE 3.1: 80% GAS FURNACE WITH PROPER FLUE PITCH & SEDIMENT TRAP VS. CRACKED HEAT EXCHANGER & SCORCHED BURNERS
BEST PRACTICE (CODE-COMPLIANT)
Continuous upward flue slope (minimum 1/4" rise per linear foot) prevents backdrafting
Gas supply piping equipped with accessible manual shutoff and vertical sediment trap tee
Sealed, crack-free steel heat exchanger chamber isolates toxic flue exhaust from air stream
Pure blue flame jets indicate complete gas combustion with zero carbon monoxide generation
COMMON DEFECT (HAZARD / AT-RISK)
Negative flue pitch and loose joint backdrafts odorless carbon monoxide into attic space
Missing gas sediment trap allows metal pipe scale and moisture to foul gas burner valve
Cracked heat exchanger allows positive blower pressure to blow CO into bedrooms
Flame rollout scorches furnace wiring and indicates dangerous burner back-pressure
Side-by-side technical comparison of an attic gas furnace with continuous upward flue rise, Type B clearance, gas sediment trap, and pure blue flames versus negative flue pitch, cracked heat exchanger, and flame rollout hazards.
TEXAS FIELD TRIAGE: 3-STAGE SEVERITY SCALEField Inspection Progression Rubric
STAGE 1NORMAL TEXAS AGING (COSMETIC)
Condition:Light surface dust on furnace burner assembly; slight blower motor hum during normal cycle.
Action:Schedule professional HVAC furnace tune-up within 30 days to clean burner orifices.30 Days
STAGE 3ACT IMMEDIATELY (URGENT)
Condition:Cracked heat exchanger spilling carbon monoxide; gas smell near shutoff; heavy soot on cabinet.
Action:Shut off furnace gas valve immediately; call emergency HVAC (24 hrs); check CO alarm.Immediate
How It Works in Your Home
Heating systems in Texas homes must deliver reliable winter warmth while strictly isolating toxic combustion exhaust gases from the breathable indoor living air stream.
In the Texas climate, residential heating systems typically take one of two engineering configurations: Gas Forced-Air Furnaces or Electric Air-Source Heat Pumps. Natural gas or propane furnaces utilize atmospheric burner jets that ignite inside a sealed, hollow steel chamber known as the heat exchanger. A high-capacity blower motor pulls cool return air from the home across the exterior surface of the red-hot heat exchanger, warming the air before delivering it through supply ducts into living areas. Meanwhile, the hazardous combustion exhaust gases—including carbon monoxide, water vapor, and sulfur dioxide—are vented upward through a dedicated metal flue pipe through the roof to the outdoor atmosphere. The indoor air you breathe and the combustion exhaust gases inside the heat exchanger must remain 100% physically separated by solid, crack-free metal walls.
In an all-electric heat pump installation, the outdoor air conditioning compressor operates in reverse via an electromagnetic 4-way reversing valve. Instead of rejecting heat outside, the system extracts latent heat from cold winter air and pumps it indoors. When outdoor temperatures plummet toward freezing during sudden Texas 'Blue Norther' polar plunges, the heat pump's thermal efficiency declines. At this balance point, auxiliary electric resistance heat strips—high-voltage nichrome wire elements housed inside the air handler that glow red like giant toaster elements—automatically energize to provide supplementary heating.
Because over 80% of Texas residential furnaces are housed in unconditioned attics rather than basements, building codes enforce strict technician safety standards: the attic access scuttle must measure at least 22x30 inches, with a continuous 24-inch solid wood walkway leading to the unit, a 30x30 inch level working platform in front of the burner service panel, and a switched light fixture and 120V convenience outlet.
Heat Exchanger:Sealed steel chamber that transfers furnace flame heat to indoor air while keeping combustion exhaust gases isolated.
Type B Double-Wall Flue:Insulated metal exhaust pipe maintaining 1-inch clearance to attic wood framing and continuous upward draft pitch.
Combustion Air Ducts:Upper and lower fresh air openings providing oxygen to furnace burners in confined attic or closet spaces.
Auxiliary Heat Strips:High-voltage electric resistance coils inside air handlers that activate when outdoor temperatures drop below freezing.
What Can Go Wrong & What to Look For
Cracked heat exchangers, negative flue pitch backdrafting, flame rollout, and starved combustion air create severe carbon monoxide poisoning and fire hazards.
The single most hazardous defect in a gas heating system is a cracked heat exchanger. As steel heat exchangers endure thousands of thermal heating and cooling cycles, thermal metal fatigue causes hairline stress fractures along welded seams. When the supply blower fan engages, the powerful air current blows through the crack directly into the combustion chamber. This air pressure causes flame rollout—forcing burner flames to roll outward past the front of the furnace cabinet, scorching electrical wiring and pumping deadly carbon monoxide directly into living room supply registers.
Another widespread defect in Texas attics is a sagging or negatively pitched flue vent pipe. Category I gas furnaces rely entirely on natural thermal gravity draft to carry hot exhaust gases upward. If a horizontal section of flue pipe sags or slopes downward, heavy cooled combustion gases spill back out of the draft hood into the attic space, flooding the home with toxic carbon monoxide.
Early Warning Signs & Red Flags
Yellow, flickering, or wavering burner flames (healthy combustion flames should burn crisp, steady blue)
Soot streaks, black carbon deposits, or burned wiring around the front of the furnace burner compartment
Carbon monoxide alarm sounding in the hallway when the central heating system cycles on
Rusted, disconnected, or downward-sloping metal flue vent pipes in the attic space
Gas supply pipe connected directly to the furnace without an accessible manual shutoff valve or sediment trap
Because Texas furnaces sit dormant inside damp, hot attics for eight months a year, annual fall burner and heat-exchanger checks prevent rust-perforated cells from mixing flue gas into supply air.
How Texas Weather & Soil Affect It
Mild winters followed by sudden freezing polar plunges test heating equipment reliability and emergency resistance strips.
Because Texas winters are typically mild, residential furnaces sit completely dormant for 8 to 9 months of the year. During long humid summers, dust and spiderwebs accumulate on burner ports and pilot assemblies. When the first sudden winter cold front hits in December, furnaces cycle on under heavy load. That distinctive burning smell on the first cold night is accumulated dust baking off the heat exchanger—which is normal—but rusted burners or delayed ignition explosions require immediate professional service.
During severe winter freezes (such as Winter Storm Uri), grid voltage drops or prolonged freezing temperatures force heat pumps to run auxiliary electric heat strips continuously. This dramatically spikes electric utility bills and strains older electrical panel connections.
Texas Climate & Soil Stresses
Long dormant periods allowing dust, spiderwebs, and insect nests to foul burner orifices
Sudden 40°F temperature drops within hours during Texas 'Blue Norther' cold fronts
Auxiliary electric heat strips driving severe electrical demand spikes during freeze events
High attic humidity reacting with residual combustion soot to rust metal flue pipes
Texas Field Pro Tips
Schedule an annual professional furnace tune-up in October or November before the first cold snap arrives.
Install UL-listed carbon monoxide alarms in the hallway outside every sleeping area and on every story of the home.
Verify your attic furnace has a sediment trap (a 3-inch capped downward nipple) installed on the gas supply line before the gas valve.
How to Maintain & Protect It
Annual burner cleaning, filter changes, and maintaining clear working platforms ensures heating safety and efficiency.
Replace central return air filters every 30 to 60 days during the heating and cooling seasons. Clogged filters restrict airflow across the heat exchanger, causing the furnace to overheat and trigger internal high-limit safety cutoffs. Repeated high-limit cycling accelerates metal fatigue and leads to premature heat exchanger cracking.
Keep the attic walkway and 30x30 inch platform in front of the furnace completely clear of stored boxes, luggage, and holiday decorations. Technicians need unobstructed access to perform thorough annual burner inspections and carbon monoxide testing.
Seasonal Walkthrough Checklist
Spring: Inspect furnace flue pipe connections in the attic before summer heat sets in.
Summer: Ensure no holiday storage or boxes are stacked within 30 inches of the furnace cabinet.
Fall: Have a licensed HVAC technician clean burners, check gas pressure, and test heat exchanger integrity.
Winter: Test all carbon monoxide detectors monthly throughout the active winter heating season.
HOMEOWNER DECISION MATRIX
DIY Weekend Maintenance vs. Call a Qualified Pro
SAFE 15-MINUTE DIY CARE
Replace return air filters every 30 to 60 days with properly sized pleated filters.
Keep the 30"x30" working platform in front of the attic furnace completely clear of storage.
Test all carbon monoxide detectors in the home monthly using the test button.
WHEN TO CALL A QUALIFIED PRO
Annual combustion analysis, burner tuning, and heat exchanger camera inspection.
Repairing disconnected, rusted, or improperly pitched Type B flue vent pipes.
Complete furnace replacement or auxiliary heat strip replacement in electric air handlers.
CLINICAL DIFFERENTIAL FIELD TRIAGE & CONNECTED SYSTEMS§ 3.1 Diagnostic Rubric
Harmless Cosmetic Baseline
A 10-minute dusty odor on the first November furnace startup simply burns settled summer household dust off warm heat-exchanger surfaces.
Active Failure Signal
Wavering orange-tipped burner flames, soot streaks outside the burner compartment, booming delayed ignition, or disconnected attic flue vents risk CO poisoning.
60-Second Homeowner Check
Turn the thermostat to HEAT in October before the first cold front: listen for smooth ignition within seconds and peek through the sight glass for steady blue flames.
BEFORE YOU SIGN A BID • TEXAS CONTRACTOR VETTING & SCAM DEFENSE
Gas Furnace & Heating System Service
§ 3.1 Playbook
Texas Credential to VerifyTDLR Licensed Air Conditioning & Refrigeration Contractor (TACLA) — verify active license at tdlr.texas.gov.
Municipal Permit & Inspection RuleMechanical permit required for furnace change-outs or gas flue vent modifications.
3 Questions You Must Ask Before Hiring
“If you claim my furnace heat exchanger is cracked, will you show me the live borescope camera feed AND the digital combustion-analyzer CO ppm reading?”
“Does your installation include a properly sloped Type B double-wall flue vent with 1-inch clearance to all attic framing and insulation?”
“Will you verify gas manifold static and firing pressures with a digital manometer and install a code-compliant sediment trap at the gas valve?”
3 High-Pressure Red Flags & Scams
The classic “$49 fall tune-up” scare tactic: claiming a cracked heat exchanger to push an emergency $9,000 furnace sale while refusing to show camera or CO proof.
Connecting a new furnace onto a rusted, undersized single-wall flue pipe or omitting the attic service platform and light.
Bypassing a tripping rollout or high-limit safety switch instead of correcting restricted return-air static pressure.
HOMEOWNER ACTION TAKEAWAYRISK LEVEL: CRITICAL
Heating Equipment Stewardship Summary
Your heating system keeps you warm during severe winter freezes, but fuel-burning furnaces require zero tolerance for combustion defects. Ensuring intact heat exchangers, proper flue venting, and working carbon monoxide detectors protects your family from lethal hazards.
Recommended Action Steps
Schedule a professional furnace inspection and tune-up every autumn before winter cold fronts.
Install carbon monoxide detectors outside all sleeping rooms and test them monthly.
Keep the 30-inch clear working platform in front of your attic furnace free of boxes and clutter.
Immediate Priorities
Shut off any gas furnace exhibiting yellow flickering flames, soot rollout, or burning odors.
Repair cracked heat exchangers immediately—never operate a furnace with a breached combustion chamber.
Ensure the flue vent pipe slopes upward continuously toward the roof with at least 1-inch clearance to wood.
Ongoing Annual Maintenance
Replace return air filters every 30 to 60 days to prevent heat exchanger overheating.
Verify the attic light fixture and convenience outlet beside the furnace operate properly.
Inspect the gas supply line manual shutoff valve to ensure it turns smoothly by hand.
Typical Repair / Replacement Budget:$80 – $4,500($80–$150 for professional annual furnace tune-up; $1,800–$4,500 for complete 80% or 96% high-efficiency gas furnace replacement.)
Expected Assembly Lifespan:15–20 years for gas furnaces; 12–15 years for electric heat pumps in Texas
ICC DIGITAL CODES2021 / 2024 IRC
2021/2024 IRC G2427.6 / G2407—Gas Vent Clearances and Combustion Air Requirements
STATUTORY MODEL CODE TEXT
Type B gas vents shall terminate not less than 5 feet in vertical height above the highest connected equipment draft hood. Type B vents shall maintain a minimum 1-inch clearance to combustible building materials. Adequate combustion, ventilation, and dilution air shall be provided for fuel-burning appliances.
Exception: Direct-vent appliances that are engineered and listed to draw 100 percent of combustion air directly from the outdoor atmosphere via sealed concentric intake pipes shall not require room combustion air openings.
IN PLAIN ENGLISH
Gas furnace flue pipes must maintain at least 1-inch clearance from wooden framing, slope continuously upward toward the roof, and draw adequate fresh oxygen for complete, soot-free combustion.
HOMEOWNER PRO TIP:Never store cardboard boxes, flammable holiday decorations, or paint cans within 30 inches of your attic furnace burner compartment.
Outdoor Electrical Disconnect Box:Weatherproof pull-out switch enabling safe technician shutdown at unit.
HIGH EFFICIENCY • SEER2 HEAT PUMP CONDENSERHigh-efficiency variable-capacity outdoor heat pump condenser on an anti-vibration composite pad, delivering verified 16–21°F Delta-T indoor cooling performance.
3D ARCHITECTURAL CUTAWAY • FIGURE 3.2
FIGURE 3.2: 16-SEER CONDENSER & FLOAT SWITCH VS. CRUSHED FINS & DRAIN PAN OVERFLOW
BEST PRACTICE (CODE-COMPLIANT)
Primary PVC condensate drain line equipped with cleanout tee and accessible P-trap
Galvanized auxiliary drain pan with electronic float switch that cuts power on water rise
Outdoor condenser installed level on anti-vibration composite pad with 24" clear perimeter
Suction line insulated full length with UV-resistant elastomeric foam (Armaflex)
COMMON DEFECT (HAZARD / AT-RISK)
Primary drain line plugged with algae slime, overflowing water into ceiling insulation
Missing auxiliary pan float switch allowing compressor to run during water overflow
Crushed or bent aluminum condenser fins severely restricting outdoor heat rejection
Torn or missing suction line insulation sweating profusely onto attic floor framing
Side-by-side comparison of a code-compliant high-efficiency split AC system with auxiliary drain pan, float switch, and clear condenser versus crushed coil fins and overflowing attic drain pans.
TEXAS FIELD TRIAGE: 3-STAGE SEVERITY SCALEField Inspection Progression Rubric
STAGE 1NORMAL TEXAS AGING (COSMETIC)
Condition:Condenser coil fins showing minor grass clippings; Delta-T split measuring optimal 16°F to 20°F.
Action:Rinse exterior fins with garden hose; change filter.Annual Log
STAGE 2WATCH & MAINTAIN (30–90 DAYS)
Condition:Delta-T split dropping to 11°F–13°F; secondary condensate line dripping over exterior window.
Action:Flush primary condensate line with 1 cup white vinegar; call HVAC tech within 30 days.30 Days
STAGE 3ACT IMMEDIATELY (URGENT)
Condition:Evaporator coil frozen solid into block of ice; compressor knocking screech; drain pan overflowing.
In Texas, your air conditioning system is not a luxury—it is an essential life-support system designed to cool living spaces, extract gallons of humidity, and maintain indoor comfort through six months of intense summer heat.
Residential air conditioning operates on the closed-loop refrigeration cycle using a split system: the outdoor condensing unit (housing the compressor, condenser coil, and exhaust fan) connected via insulated copper refrigerant lines to the indoor evaporator coil (housed inside an attic or closet air handler). Gaseous refrigerant (such as R-410A) is compressed into a high-pressure, hot gas by the compressor, cooled and liquefied by the outdoor fan, and pumped through the small copper liquid line indoors. Inside the indoor evaporator coil, a thermal expansion valve (TXV) suddenly drops refrigerant pressure, causing it to evaporate and drop in temperature to roughly 40°F. As warm, humid indoor air blows across the freezing aluminum coil fins, heat is absorbed into the refrigerant and moisture condenses out of the air onto the cold metal fins, dripping into a collection pan.
To measure performance, inspectors evaluate the Temperature Differential (Delta-T)—the difference between the return air entering the filter and the cooled supply air exiting supply registers. A properly charged, healthy cooling system operating in typical Texas summer humidity produces a temperature split of 16°F to 21°F. Furthermore, modern equipment installed after January 1, 2023, must comply with Department of Energy SEER2 standards (minimum 14.3 SEER2 for southern climate regions), utilizing variable-speed inverter compressors that modulate cooling capacity smoothly rather than cycling abruptly on and off.
Because indoor evaporator coils are installed over ceilings in attics, building codes mandate robust dual-drain protection: a primary PVC drain line with a P-trap routing condensate to an indirect plumbing waste drain, plus an auxiliary metal drain pan beneath the entire unit equipped with an emergency electronic water-level float switch that automatically kills thermostat power if water rises 1/4 inch in the pan.
Outdoor Condenser Unit:Compressor and fan assembly resting on an elevated composite pad that rejects absorbed indoor heat into outside air.
Indoor Evaporator Coil:A-frame or slab coil inside the attic air handler where refrigerant boils, absorbing heat and wringing humidity from air.
Auxiliary Condensate Drain Pan:Galvanized metal catch pan underneath the entire air handler to catch emergency leaks before ceiling damage occurs.
Electronic Float Switch (UL 508):Safety sensor in the drain pan or secondary coil outlet that immediately shuts off the AC compressor if water backs up.
Insulated Suction Line:Larger copper pipe wrapped in black elastomeric foam (Armaflex) that carries cool gas back to the outdoor compressor without sweating.
What Can Go Wrong & What to Look For
Clogged condensate lines, missing safety float switches, bent condenser fins, and low refrigerant charge cause frozen coils, failed compressors, and collapsed drywall ceilings.
The leading cause of indoor water damage in Texas homes during summer is condensate drain overflow. A typical 4-ton central AC system produces 10 to 20 gallons of water per day condensing out of humid air. If the primary PVC drain line clogs with algae slime or rust flakes, water fills the internal drain pan. If the emergency auxiliary drain pan is rusted through, lacks a float switch, or has an un-trapped secondary line, water overflows directly onto attic insulation and drywall ceilings, causing thousands of dollars in water damage and ceiling collapse.
Another frequent issue is low refrigerant charge caused by microscopic leaks at copper coil solder joints or service Schrader valves. When refrigerant leaks, the system loses cooling capacity; Delta-T drops below 14°F, the compressor runs continuously without satisfying the thermostat, and the indoor coil freezes into a solid block of ice. When the ice eventually thaws, gallons of melting water overwhelm the drain pan.
Early Warning Signs & Red Flags
Water actively dripping from the secondary condensate drain pipe located above an exterior window or back patio door
Air conditioner running continuously for hours without lowering indoor room temperature to the thermostat setpoint
Ice formation or heavy white frost coating the copper suction line or indoor coil cabinet
Water pooling in the auxiliary metal drain pan beneath the attic air handler unit
Supply air registers blowing lukewarm or humid air rather than cool, dehumidified air
Clogged Primary Condensate Line & Overflowing PanIMMEDIATE ACTION
SEER2 Condenser Sizing, Coil Fin Care & Refrigerant Subcooling
Modern Southern-region SEER2 condensers rely on clean outdoor fins, intact suction-line foam insulation, and exact AHRI coil matching to survive 3,000+ annual cooling hours.
How Texas Weather & Soil Affect It
Six continuous months of 95°F to 105°F heat, high humidity, and coastal salt spray push air conditioning equipment harder in Texas than anywhere else in North America.
In Texas, air conditioning systems log an average of 2,500 to 3,000 run hours per year (compared to just 800 hours in northern states). This continuous duty cycle accelerates compressor wear, fan motor bearing failure, and run capacitor degradation. In coastal areas (such as Galveston, Corpus Christi, and coastal Houston), airborne salt aerosols corrode aluminum condenser fins into brittle white powder within 5 to 7 years, severely degrading heat transfer.
Furthermore, unlevel outdoor condenser pads represent a common observation. When expansive clay soils dry out in summer droughts, the soil shrinks and drops beneath the pre-cast concrete or plastic condenser pad. If the condenser tilts by more than 10 degrees, compressor motor oil cannot circulate properly through the internal sump, leading to premature compressor seizure.
Texas Climate & Soil Stresses
Extreme annual operating run hours (up to 3,000 hours per year) accelerating component fatigue
Gulf Coast salt fog corroding aluminum condenser coil fins and electrical contactors
Intense direct afternoon sun beating down on unshaded outdoor condensing units
Texas Field Pro Tips
Pour one cup of white distilled vinegar down your primary AC condensate drain access T-pipe every spring to keep lines free of algae.
Maintain at least 24 inches of clear space around your outdoor condenser; trim back bushes and never store trash cans against the coil fins.
Ensure the outdoor electrical service disconnect switch box is within sight of the condenser and maintains a weatherproof cover.
How to Maintain & Protect It
Regular filter changes, condensate line flushes, and keeping outdoor coils clean ensures icy cold air and prevents expensive ceiling water disasters.
The single most important homeowner maintenance task is replacing return air filters every 30 to 60 days. A dirty, dust-choked filter restricts airflow across the evaporator coil, causing coil temperatures to drop below 32°F and freeze into a solid block of ice. When changing filters, verify the airflow arrow on the filter frame points toward the unit.
Gently rinse the outdoor condenser coil with a garden hose once a year each spring. Turn off the electrical disconnect switch first, then spray water downward through the aluminum coil fins from the outside to flush away dirt, grass clippings, and dryer lint. Never use high-pressure power washers, which instantly bend and crush the delicate aluminum fins.
Seasonal Walkthrough Checklist
Spring: Pour vinegar down condensate drain line; gently rinse outdoor condenser coil with a garden hose.
Summer: Check auxiliary drain pan in attic monthly for standing water; verify secondary float switch operates.
Fall: Inspect black foam insulation on outdoor copper suction line; replace any sun-rotted sections.
Winter: Keep fallen leaves and weeds cleared away from the base of the outdoor condenser pad.
HOMEOWNER DECISION MATRIX
DIY Weekend Maintenance vs. Call a Qualified Pro
SAFE 15-MINUTE DIY CARE
Flush the primary condensate drain line with white vinegar or clean water every spring.
Rinse outdoor condenser coils with a gentle garden hose to remove lawn debris.
Replace worn or missing foam insulation (Armaflex) on the outdoor copper suction pipe.
Replacing worn dual-run capacitors, contactors, or fan motors before mid-summer breakdown.
CLINICAL DIFFERENTIAL FIELD TRIAGE & CONNECTED SYSTEMS§ 3.2 Diagnostic Rubric
Harmless Cosmetic Baseline
Steady clear water dripping from the PVC primary condensate drain (typically into a bathroom sink tailpiece) on muggy Texas days proves healthy dehumidification.
Active Failure Signal
Water dripping from an exterior eave secondary overflow pipe, ice on copper refrigerant lines, or supply air <14°F cooler than return air signals AC trouble.
60-Second Homeowner Check
Measure air temperature at a return grille vs. closest supply register (14°F–22°F drop is healthy), and check that your outdoor copper suction foam sleeve is intact.
BEFORE YOU SIGN A BID • TEXAS CONTRACTOR VETTING & SCAM DEFENSE
Central Air Conditioning & Heat Pump Replacement
§ 3.2 Playbook
Texas Credential to VerifyTDLR Licensed Air Conditioning & Refrigeration Contractor (TACLA) + EPA Section 608 Refrigerant Certification.
Municipal Permit & Inspection RuleMunicipal mechanical permit + AHRI matched-system certificate (coil, condenser, and furnace/air handler).
3 Questions You Must Ask Before Hiring
“Did you perform an ACCA Manual J heat-load calculation for my home’s insulation and windows—or are you just guessing tonnage by square footage?”
“Can you provide the official AHRI matched-rating certificate proving the new indoor evaporator coil and outdoor condenser achieve the advertised SEER2 efficiency?”
“Will you pull a deep micron vacuum (<500 microns) with a nitrogen purge during brazing, and wire BOTH an inline and auxiliary pan float switch?”
3 High-Pressure Red Flags & Scams
Oversizing a Texas AC unit (“bigger cools faster”)—which short-cycles the compressor, fails to dehumidify Gulf/summer air, and breeds clammy indoor mold.
“Topping off” R-410A or R-454B refrigerant every spring without locating and brazing the underlying evaporator or Schrader-core leak.
Slapping a new outdoor condenser onto an old, mismatched indoor attic coil without replacing the filter-drier or flushing contaminated line-sets.
HOMEOWNER ACTION TAKEAWAYRISK LEVEL: HIGH
Cooling Equipment Stewardship Summary
Your air conditioner is your home's most vital summer defense. Maintaining clean filters, keeping outdoor coils clear of debris, and verifying functioning condensate float switches will prevent expensive compressor replacements and attic water leaks.
Recommended Action Steps
Verify your attic air handler has a secondary drain pan with an automatic float shutoff switch.
Replace return air filters every 30 to 60 days to prevent coil freezing and compressor strain.
Keep at least 24 inches of clear space around the outdoor condenser unit for proper heat rejection.
Immediate Priorities
Clear clogged condensate lines immediately if water is dripping from the secondary pipe over your patio.
Install an electronic float switch if your attic unit lacks automatic water-overflow protection.
Have a technician evaluate any cooling system producing a Delta-T split of less than 15°F.
Ongoing Annual Maintenance
Flush primary condensate drain line with distilled vinegar every spring.
Rinse exterior condenser fins gently with a garden hose annually to maintain airflow.
Inspect outdoor copper line insulation and replace cracked, sun-rotted foam sleeves.
Typical Repair / Replacement Budget:$75 – $7,500($75–$150 for professional annual AC tune-up and drain line clearing; $4,500–$7,500+ for complete split-system heat pump or AC replacement.)
Expected Assembly Lifespan:10–14 years in Texas coastal zones; 12–16 years in North/Central Texas
ICC DIGITAL CODES2021 / 2024 IRC
2021/2024 IRC M1411.3.1—Auxiliary and Secondary Drain Systems for Evaporator Coils
STATUTORY MODEL CODE TEXT
Where damage to any building components could occur as a result of overflow from the equipment primary condensate removal system, an auxiliary drain pan with a separate drain pipe or a water-level detection device conforming to UL 508 shall be installed to shut down equipment before overflow occurs.
Exception: An auxiliary drain pan shall not be required where an approved automatic water-level shutoff device is installed on both the primary drain pan and the auxiliary drain outlet.
IN PLAIN ENGLISH
Attic cooling coils produce gallons of condensation daily; an auxiliary catch pan equipped with an automatic float switch shuts the AC off instantly if the primary drain line clogs, saving your ceiling drywall from water collapse.
HOMEOWNER PRO TIP:Pour a cup of white distilled vinegar down your primary AC condensate drain line every spring to dissolve algae slime and prevent drain pan overflow shutdowns.
1.5-Inch Hanging Support Strap:Wide webbing supporting flex duct run without pinching or restricting airflow.
AIR DISTRIBUTION • R-8 FLEX DUCT & MASTIC SEALINGProperly supported R-8 foil-jacketed flexible ductwork suspended with 1.5-inch nylon straps in a Texas attic, connected to an airtight mastic-sealed distribution plenum.
R-8 flexible duct with intact outer vapor barrier foil jacket in 140°F attic
Sheet metal distribution plenum sealed airtight with UL 181 fiber-reinforced mastic
Wide 1-1/2 inch polypropylene hanging straps supporting duct every 4 feet
Gentle, wide-radius bends maintaining balanced static airflow pressure to registers
COMMON DEFECT (HAZARD / AT-RISK)
Sharp kink in flex duct draped over sharp roof rafter, reducing airflow by 70%
Torn outer foil vapor jacket allowing humid air to condense and soak insulation
Disconnected duct connection blowing expensive conditioned air into empty attic
Old dried-up duct tape peeling off metal plenum, leaking cold air at joints
Side-by-side comparison of properly supported R-8 flexible ductwork sealed with UL 181 mastic versus kinked runs, torn vapor barriers, and air leakage in hot attics.
TEXAS FIELD TRIAGE: 3-STAGE SEVERITY SCALEField Inspection Progression Rubric
STAGE 1NORMAL TEXAS AGING (COSMETIC)
Condition:Minor dust accumulation on return air grille louvers; faint whistling at highest fan speed.
Action:Wipe down registers and vacuum return grille.Annual Log
STAGE 2WATCH & MAINTAIN (30–90 DAYS)
Condition:Flexible duct insulation jacket torn exposing wire core in attic; mastic peeling at plenum collar.
Action:Seal leaky seams with UL 181 mastic paste and fiberglass mesh tape within 30–60 days.30–60 Days
STAGE 3ACT IMMEDIATELY (URGENT)
Condition:Disconnected 10-inch main supply trunk dumping cold air into attic; duct sweating flooding ceiling.
Action:Reconnect and strap duct collar immediately; insulate to R-8 to stop condensation rot.Immediate
How It Works in Your Home
Your duct system functions as the circulatory respiratory network of your home, routing conditioned supply air into every room and pulling stale indoor air back to central filters.
In modern Texas construction, HVAC duct systems consist of sheet metal distribution plenums attached to the air handler, feeding flexible insulated duct runs (flex ducts) that branch out to individual ceiling supply boots. Because these air ducts run through unconditioned attics that reach 140°F to 150°F during summer heatwaves, building codes require all supply ducts to be heavily insulated to a minimum of R-8 thermal resistance. R-8 flex duct consists of an inner plastic helix wire core, wrapped in 2 inches of fiberglass batt insulation, and encased in a vapor-barrier metalized polyester foil jacket.
Airtight sealing is paramount. In older homes, duct tape was commonly used on duct joints; over time, intense attic heat dries out standard rubber adhesive, causing tape to peel and dumping up to 30% of conditioned air directly into the attic. Modern building energy codes strictly mandate that all sheet metal plenum joints, collar takeoffs, and flexible duct connections be sealed with fiber-reinforced, water-based UL 181 mastic sealant applied at least as thick as a nickel. Flexible ducts must be suspended from roof rafters using 1-1/2-inch wide polypropylene webbing straps spaced no more than 4 feet apart, with maximum 1/2-inch sag per foot, to prevent kinks that choke off airflow.
R-8 Flexible Air Ducts:Insulated spiral-wire ducts wrapped in 2 inches of fiberglass with an airtight outer foil jacket to stop heat gain.
UL 181 Mastic Sealant:Fiberglass mesh tape embedded in flexible water-based mastic that creates permanent, lifetime airtight duct seals.
Sheet Metal Plenums:Galvanized supply and return distribution boxes attached to the air handler that balance static airflow pressure.
Wide Webbing Straps:1-1/2-inch wide hanging straps supporting flexible ducts every 4 feet without pinching the inner airflow core.
What Can Go Wrong & What to Look For
Torn outer foil jackets, kinked flex ducts, disconnected return plenums, and unsealed supply boots waste energy and pull attic dust into living spaces.
The most costly duct defect in Texas attics is a disconnected or leaking return air plenum. If a return duct separates from the air handler in an unconditioned attic, the powerful blower fan draws 140°F dusty attic air, fiberglass particles, and rodent dander directly into the cooling system, blowing it into bedrooms while doubling monthly electric bills.
Another widespread defect is poor physical support of flexible ductwork. When contractors drape flex ducts over sharp roof truss lumber or hang them with narrow wire, the inner core is crushed, creating sharp 90-degree kinks. A single pinched flex duct can reduce airflow to an upstairs master bedroom by up to 70%, creating chronic 'hot rooms' that never cool down despite continuous air conditioning operation.
Early Warning Signs & Red Flags
Noticeable temperature differences between rooms (one bedroom consistently 5°F to 8°F hotter than the rest of the house)
Dust and insulation particles constantly blowing out of ceiling supply registers
Air ducts in the attic sagging deeply, resting directly on attic floor insulation, or pinched around roof trusses
Torn or deteriorated silver foil jackets exposing yellow fiberglass insulation in the attic
Hissing or blowing air sounds audible inside the attic when the cooling system is running
Disconnected Return Air Duct in AtticIMMEDIATE ACTION
System drawing 140°F contaminated attic air directly into household living areas.
Sharp Kinks and Pinched Flexible DuctsROUTINE
Severely restricted airflow causing hot bedrooms and imbalanced static pressure.
Torn Foil Vapor Barrier JacketMONITOR
Moisture condensing on inner duct core, soaking insulation and fostering mold growth.
Unsealed Sheet Metal Plenum JointsMONITOR
Dumping costly cooled air into unconditioned attic spaces through open metal seams.
ATTIC DUCT DEFECT • § 3.3
Attic Plenum & Boot “Sweating” When 55°F Air Meets 130°F Humidity
A single torn vapor jacket or unsealed metal supply boot exposes 55°F chilled sheet metal to humid attic air—condensing gallons of water that stain ceilings and feed hidden mold.
How Texas Weather & Soil Affect It
Extreme attic summer heat and humidity punish unsealed, poorly insulated ductwork across Texas.
When conditioned air leaves the evaporator coil at 55°F and travels through an attic reaching 150°F, thermal transfer is relentless. If ducts are insulated only to older R-4 or R-6 standards—or if insulation has compressed—air temperature can rise by 5°F to 8°F before reaching bedrooms. This heat gain forces the AC compressor to run longer cycles, driving up monthly electric bills.
In humid coastal environments, torn outer foil jackets create immediate condensation disasters. When humid 90°F attic air contacts the cold 55°F inner duct core through a tear in the foil jacket, water vapor condenses rapidly, soaking the fiberglass insulation. Water-logged insulation loses 100% of its insulating value, sags heavily, and drips through ceiling drywall.
Texas Climate & Soil Stresses
150°F attic temperatures creating extreme thermal heat transfer into cooling ductwork
High coastal humidity causing exterior condensation on torn or uninsulated duct jackets
Rodents and squirrels chewing through soft outer foil jackets to nest in fiberglass
Vibration and high air velocity loosening old duct tape joints over time
Texas Field Pro Tips
Never use standard gray cloth 'duct tape' to seal ducts in a Texas attic; use only UL 181-listed mastic paste and fiberglass mesh tape.
If one bedroom is always hot, check the attic for a kinked or crushed flexible duct leading to that room's ceiling boot.
Ensure supply duct boots where metal registers meet ceiling drywall are sealed with mastic to stop attic air leakage.
How to Maintain & Protect It
Routine visual inspections in the attic, sealing register boots, and maintaining wide-radius hanging loops preserves airflow balance.
Inspect attic ductwork twice a year. Walk the catwalk and look for any flexible ducts that have fallen onto insulation, sagging more than 1/2 inch per foot, or resting across sharp truss lumber. Support sagging ducts with wide 1-1/2-inch hanging straps, ensuring curves are gentle and wide to maintain maximum airflow.
Inspect the perimeter of your ceiling supply registers. Remove the metal register grille and check the joint where the metal duct boot meets the drywall cutout. If a gap exists, conditioned air leaks into the ceiling cavity, while suction draws dusty attic air down into the room. Seal this perimeter gap using approved acrylic latex caulk or mastic.
Seasonal Walkthrough Checklist
Spring: Inspect attic duct runs for tears in the outer foil jacket or rodent chewing damage.
Summer: Check for condensation sweating on ductwork during peak humid afternoon cooling cycles.
Fall: Verify that all flexible duct hanging straps remain securely anchored to roof rafters.
Winter: Seal ceiling register boot cutouts with mastic to stop cold winter attic drafts.
HOMEOWNER DECISION MATRIX
DIY Weekend Maintenance vs. Call a Qualified Pro
SAFE 15-MINUTE DIY CARE
Seal ceiling supply register boots to drywall cutouts using paintable acrylic latex caulk.
Re-hang sagging flexible ducts using 1-1/2-inch wide polypropylene webbing straps.
Repair minor tears in outer foil jackets using UL 181A-P listed foil tape.
WHEN TO CALL A QUALIFIED PRO
Complete attic duct replacement with high-efficiency R-8 flexible ductwork.
Professional aeroseal duct sealing to eliminate internal duct leakage below 3%.
Airflow balancing and manual damper adjustments using digital airflow hoods.
CLINICAL DIFFERENTIAL FIELD TRIAGE & CONNECTED SYSTEMS§ 3.3 Diagnostic Rubric
Harmless Cosmetic Baseline
Gentle, quiet airflow across rooms with balanced open interior pathways and a slight dust outline on return grilles between 30-day filter swaps is normal.
Active Failure Signal
Dark star-shaped dust streaks radiating across ceiling drywall around vents, sweating rusty boots, or crushed R-4 attic flex ducts reveal costly air leakage.
60-Second Homeowner Check
Hold a tissue near closed bedroom door undercuts while the AC runs to verify return air escapes freely, and check ceiling vents for dark condensation dust rings.
Texas Credential to VerifyTDLR Licensed Air Conditioning & Refrigeration Contractor (TACLA) — Texas law requires a TACLA license to replace or modify HVAC ductwork.
Municipal Permit & Inspection RuleMunicipal mechanical permit + IECC duct-leakage pressure test (<4%–8% leakage) required on complete duct system replacements in most Texas cities.
3 Questions You Must Ask Before Hiring
“Are all new attic trunks and branches insulated to full R-8 vapor-barrier rating, pulled taut over wide saddle hangers with zero sagged kinks?”
“Will every sheet-metal plenum joint and ceiling register boot be sealed with thick UL 181 fiber-reinforced mastic paste—never cloth ‘duct tape’ that dries out at 135°F?”
“Did you perform an ACCA Manual D room-by-room CFM calculation and add jumper ducts or return pathways for closed master bedrooms?”
3 High-Pressure Red Flags & Scams
Coupon-mailer “$79 Whole-House Air Duct Cleaning” crews using rotary brushes that rip open soft fiberglass flex-duct liners and upsell $1,800 “mold fogging.”
Replacing a compressor and coil while leaving 25-year-old R-4 deteriorating attic ducts leaking 30% of your cooled air into a 140°F attic.
Strapping flex ducts tightly with narrow plastic zip ties directly to rafters—crushing the inner airway core by 40% and starving distant bedrooms.
HOMEOWNER ACTION TAKEAWAYRISK LEVEL: MEDIUM
Duct System Stewardship Summary
Your ductwork delivers the comfort you pay for. Ensuring heavy R-8 insulation, airtight UL 181 mastic sealing, and kink-free wide-radius strapping delivers icy cold air to every room and lowers summer utility bills.
Recommended Action Steps
Verify all attic ducts are insulated to at least R-8 and sealed with permanent mastic paste.
Ensure flexible ducts are suspended on wide 1.5-inch straps without sharp kinks or pinches.
Seal gaps between ceiling drywall and metal supply register boots to stop attic dust leakage.
Immediate Priorities
Re-attach and seal any disconnected return or supply duct found in the attic space immediately.
Straighten any kinked or crushed flexible ducts that are choking off airflow to hot rooms.
Tape and seal any tears in the outer foil vapor barrier jacket to stop insulation condensation.
Ongoing Annual Maintenance
Inspect attic ductwork semi-annually for sagging runs, animal damage, or loose tape.
Vacuum dust from ceiling register grilles during seasonal cleaning.
Consider professional duct leakage testing if summer electric bills are unusually high.
Typical Repair / Replacement Budget:$50 – $3,500($50–$150 for DIY mastic sealing and duct strapping; $1,800–$3,500 for complete professional R-8 duct system replacement.)
Expected Assembly Lifespan:15–20 years for flexible ductwork in Texas attics; 30+ years for rigid sheet metal plenums
Supply and return air ducts and plenums shall be insulated to not less than R-8 when located in attics. All duct joints, seams, and connections shall be securely fastened and sealed with approved UL 181A-M or 181B-M mastic or tape. Unlisted duct tape is prohibited.
Exception: Ducts or portions thereof located entirely within the building thermal envelope shall not be required to maintain R-8 insulation.
IN PLAIN ENGLISH
Air ducts in sweltering Texas attics must be heavily insulated to R-8 and sealed airtight with fiber-reinforced mastic to deliver icy cold air into bedrooms without wasting energy.
HOMEOWNER PRO TIP:Avoid sharp 90-degree bends or crushed flexible ducts in the attic; proper wide-radius strapping restores balanced airflow to hot rooms.
High Indoor Humidity (>60%), Dust Mites & Mold ($5k–$15k)
1
2
3
WHAT YOU'RE LOOKING ATFIELD INSPECTION ANATOMY
1
Dedicated Dehumidifier Cabinet:High-capacity compressor unit removing 70–100 pints of water daily from humid Texas air.
2
Motorized Fresh Air Damper:Automated intake bringing filtered outside air into HVAC system to maintain indoor air quality.
3
Trapped PVC Condensate Drain:Dedicated drain line routing removed humidity directly outside without overflow.
HUMIDITY CONTROL • DEDICATED WHOLE-HOME DEHUMIDIFIERSuspended whole-house dehumidifier system in an attic mechanical space, maintaining 45–50% indoor relative humidity during humid Texas Gulf Coast summer nights.
3D ARCHITECTURAL CUTAWAY • FIGURE 3.4
FIGURE 3.4: SMART THERMOSTAT & MEDIA FILTER VS. COLLAPSED DIRTY FILTER & BAD LOCATION
BEST PRACTICE (CODE-COMPLIANT)
Smart thermostat installed on interior hallway wall away from direct sun and drafts
4-inch deep pleated MERV 11 media air filter with high dust-holding capacity
Dedicated whole-house dehumidifier keeping indoor humidity between 45% and 50%
Motorized fresh air intake bringing controlled filtered outdoor air into return stream
COMMON DEFECT (HAZARD / AT-RISK)
Thermostat installed in direct sunlight from window, causing AC to overcool house
Thin 1-inch fiberglass filter collapsed and clogged with dust, starving blower motor
High indoor humidity (> 65%) creating cold, clammy rooms and indoor mold risk
Continuous fan mode ('ON') evaporating coil condensate back into living areas
Side-by-side comparison of a properly located smart thermostat, deep MERV 11 media filter, and whole-house dehumidifier versus dirty collapsed filter and sunny thermostat location.
TEXAS FIELD TRIAGE: 3-STAGE SEVERITY SCALEField Inspection Progression Rubric
STAGE 1NORMAL TEXAS AGING (COSMETIC)
Condition:Indoor relative humidity reading 48% to 54% in summer; light dust on dehumidifier pre-filter.
Action:Wash or replace reusable filter screen every 90 days.Annual Log
STAGE 2WATCH & MAINTAIN (30–90 DAYS)
Condition:Indoor humidity consistently >60% in summer; bathroom fan pulling weak airflow (<30 CFM).
Action:Clean exhaust fan blower wheel and verify exterior damper flap opens within 30 days.30 Days
STAGE 3ACT IMMEDIATELY (URGENT)
Condition:Whole-house dehumidifier overflow pan backing up into ceiling; mold growing on supply registers.
Action:Shut down dehumidifier; clear drain line; dispatch HVAC ventilation technician.Immediate
How It Works in Your Home
This section encompasses advanced residential climate engineering: dedicated whole-house dehumidification systems, whole-home mechanical fresh air ventilation (HRVs/ERVs), smart programmable Wi-Fi thermostats, and high-efficiency media air filtration.
In tight, modern energy-efficient Texas homes, mechanical ventilation is essential for indoor air quality. As homes are built tighter to conserve energy, indoor air becomes trapped. Building codes mandate whole-house mechanical ventilation systems (such as motorized motorized fresh air intake dampers, Energy Recovery Ventilators [ERVs], or Heat Recovery Ventilators [HRVs]) that automatically introduce controlled, filtered outdoor air into the return plenum while exhausting stale indoor air.
In humid coastal and central Texas regions, central air conditioning alone often cannot control relative humidity during mild, rainy spring and autumn days when cooling demand is low. High-end Texas homes feature dedicated whole-house dehumidifiers (such as Santa Fe or Ultra-Aire systems) suspended in the attic or utility room. These units pull return air, remove up to 100 pints of water per day, and deliver dry air into the supply plenum, maintaining indoor relative humidity between 45% and 50% year-round without overcooling the home.
Smart Wi-Fi thermostats (such as Nest, Ecobee, or Honeywell Home) optimize comfort and energy savings by using occupancy sensors, geofencing, and algorithmic learning to adjust setpoints automatically, reducing cooling runtime while maintaining indoor comfort.
Whole-House Dehumidifier:Dedicated suspended refrigeration unit removing 70–120 pints of water daily to keep indoor relative humidity below 50%.
Fresh Air Damper / ERV:Motorized intake bringing measured, filtered outdoor air into the return stream for indoor air freshness.
Smart Wi-Fi Thermostat:Digital climate control adjusting cooling curves, staging heat strips, and monitoring system runtime remotely.
MERV 11–13 Media Filter:High-capacity 4-inch pleated air filter capturing pollen, mold spores, and fine dust without restricting airflow.
What Can Go Wrong & What to Look For
Oversized AC systems causing high indoor humidity, thermostat placement near hot windows, collapsed media filters, and uncalibrated humidistats degrade indoor air quality.
A common issue in Texas homes is system oversizing. When an air conditioner is too large for the square footage, it cools the home too quickly (short-cycling in 8 to 10 minutes) and shuts off before it can extract humidity. The result is a cold, clammy indoor environment with relative humidity exceeding 65%—the exact condition that fosters dust mite proliferation and indoor mold growth on drywall and furniture.
Thermostat placement also creates chronic comfort problems. If a thermostat is installed in direct sunlight from a window, in the direct draft of a supply register, or on a wall shared with a hot attic knee-wall, it misreads the actual living room temperature, causing the cooling system to overcool the rest of the house.
Early Warning Signs & Red Flags
Indoor relative humidity reading above 60% on a digital hygrometer during summer months
Cold, clammy sensation indoors where air feels damp even at 72°F
Thermostat installed in direct sunlight, near exterior doors, or directly under an AC supply register
Thick 4-inch media filter bowing, collapsing, or coated in dense black dust
Air conditioner short-cycling on and off in rapid 5-to-10 minute bursts
High Indoor Relative Humidity (> 60%)MONITOR
Air conditioner short-cycling or lacking dedicated dehumidification, risking indoor mold growth.
Improper Thermostat LocationROUTINE
Thermostat influenced by drafts or sunlight, misreading temperature and causing uneven comfort.
Collapsed or Severely Restricted Media FilterIMMEDIATE ACTION
Airflow starved across cooling coils, risking frozen coils and blower motor failure.
Motorized Fresh Air Damper Stuck ClosedROUTINE
Airtight home receiving zero outdoor ventilation, elevating indoor CO2 and VOC levels.
LATENT HUMIDITY CONTROL • § 3.4
Why Oversized AC Units Create Clammy 68% RH Texas Interiors
In Houston and Gulf Coast homes, an oversized AC blasts rooms to 72°F in five minutes and shuts off before the coil gets cold enough to wring out moisture—requiring dedicated dehumidification.
How Texas Weather & Soil Affect It
Humid Gulf Coast air masses, spring pollen deluges, and extreme heat make indoor air quality and psychrometrics paramount across Texas.
The Texas Gulf Coast experiences ambient outdoor relative humidity exceeding 85% for most of the year. During mild spring and autumn nights (when outdoor temperatures drop to 75°F but humidity remains 90%), traditional air conditioners never turn on because no cooling is called for. Without dedicated whole-house dehumidification, indoor humidity climbs steadily above 65%, creating an environment ripe for mold spores.
Furthermore, heavy cedar pollen seasons in Central Texas and pine pollen in East Texas challenge standard 1-inch fiberglass filters. Upgrading to high-efficiency 4-inch pleated MERV 11 to 13 media air filters captures microscopic allergens while maintaining low static pressure drops across blower motors.
Texas Climate & Soil Stresses
Persistent high ambient outdoor humidity along the Gulf Coast and East Texas
Spring cedar fever and pine pollen storms challenging residential air filtration
Long shoulder seasons with high humidity but low sensible cooling requirements
Tight modern home construction requiring mechanical fresh air ventilation
Texas Field Pro Tips
Keep your digital thermostat fan setting on 'AUTO' rather than 'ON' during humid summer months; running the fan continuously blows water evaporating off indoor coils right back into your rooms.
Keep indoor relative humidity between 45% and 52% to eliminate dust mites and prevent mold growth.
Upgrade to a 4-inch deep media air filter cabinet (MERV 11); it holds six times more dust than 1-inch filters and only needs replacement every 6 to 12 months.
How to Maintain & Protect It
Routine filter replacement, hygrometer monitoring, and thermostat sensor calibration ensures healthy indoor air quality.
Place a small $15 digital hygrometer on a living room shelf. If indoor relative humidity consistently reads above 55% during summer, evaluate your air conditioner's cycle runtime. If the system runs short cycles (under 12 minutes), contact an HVAC professional to adjust blower speeds or consider adding a dedicated whole-home dehumidifier.
Replace 4-inch whole-house media filters every 6 to 9 months, or 1-inch pleated filters every 30 to 60 days. Check the filter cabinet door to ensure it latches tightly with a foam gasket, preventing unconditioned, dusty attic air from being sucked directly into the blower.
Seasonal Walkthrough Checklist
Spring: Check indoor relative humidity with a hygrometer; verify whole-home dehumidifier turns on.
Summer: Set thermostat fan to 'AUTO'; inspect media filter for dust saturation.
Fall: Clean motorized fresh air intake hood on the exterior wall; clear away insect screens.
Winter: Check smart thermostat programming and verify backup electric heat strip staging is active.
HOMEOWNER DECISION MATRIX
DIY Weekend Maintenance vs. Call a Qualified Pro
SAFE 15-MINUTE DIY CARE
Monitor living room relative humidity with a digital hygrometer to ensure it stays under 55%.
Replace 4-inch media air filters or 1-inch return air filters on schedule.
Keep the thermostat set to 'AUTO' fan mode during the summer cooling season.
WHEN TO CALL A QUALIFIED PRO
Installing a dedicated 70–100 pint whole-house dehumidifier system integrated into attic ductwork.
Relocating an improperly positioned thermostat away from sunny windows or supply drafts.
Installing and commissioning an Energy Recovery Ventilator (ERV) or fresh air intake damper.
CLINICAL DIFFERENTIAL FIELD TRIAGE & CONNECTED SYSTEMS§ 3.4 Diagnostic Rubric
Harmless Cosmetic Baseline
Indoor relative humidity holding steadily between 42% and 54% throughout Texas summer afternoons keeps wood floors stable and inhibits dust mites and mold.
Active Failure Signal
Clammy air >60% RH even at 71°F, musty closet odors, or thermostats mounted in afternoon sunbeams point to AC short-cycling or uncontrolled humid infiltration.
60-Second Homeowner Check
Place a $12 digital hygrometer in your central hallway—verify the AC fan switch stays set to AUTO (never ON, which blows wet coil moisture back into rooms!).
Texas Credential to VerifyTDLR Licensed Air Conditioning & Refrigeration Contractor (TACLA); TDLR TECL Electrician when adding dedicated 120V attic appliance outlets.
Municipal Permit & Inspection RuleMunicipal mechanical and electrical permits required for dedicated ventilating dehumidifiers, ERVs, and motorized multi-zone damper retrofits.
3 Questions You Must Ask Before Hiring
“In our humid Texas climate, is this fresh-air intake routed through a dedicated ventilating dehumidifier or ERV rather than dumping raw 80% RH outdoor air straight into my return plenum?”
“If adding motorized zone dampers to a single-speed AC, how are you managing static bypass pressure without freezing my indoor evaporator coil?”
“Does the attic whole-home dehumidifier include a dedicated secondary drain pan, float shutoff switch, and accessible MERV 11 media filter?”
3 High-Pressure Red Flags & Scams
Wiring a cheap Motorized Fresh-Air Damper straight into a Houston/Coastal return plenum with no humidity interlock—spiking indoor relative humidity above 68% overnight.
Slapping two motorized zone dampers onto an oversized single-stage compressor—skyrocketing static pressure and burning out blower motors.
Selling $1,500 UV light bulbs inside dusty return plenums as a cure-all for high indoor humidity instead of correcting airflow and latent moisture removal.
HOMEOWNER ACTION TAKEAWAYRISK LEVEL: MEDIUM
Indoor Airflow & Ventilation Stewardship Summary
True home comfort is about humidity control and clean air, not just temperature. Keeping indoor humidity below 55%, setting thermostat fans to 'AUTO', and using high-efficiency media filtration keeps your indoor environment healthy, fresh, and mold-free.
Recommended Action Steps
Keep your thermostat fan set to 'AUTO' rather than 'ON' to prevent humidity re-evaporation.
Monitor indoor relative humidity with a digital hygrometer, keeping levels between 45% and 52%.
Upgrade to 4-inch deep MERV 11 media air filters to capture pollen while preserving airflow.
Immediate Priorities
Investigate any home maintaining indoor relative humidity above 60% during summer cooling.
Relocate thermostats installed in direct sunlight or directly in line with supply air registers.
Replace collapsed, dust-choked air filters that are starving the blower motor of air.
Ongoing Annual Maintenance
Replace 4-inch whole-house media filters every 6 to 9 months.
Inspect the exterior fresh air intake hood screen annually for insect or leaf blockage.
Check smart thermostat firmware updates and sensor batteries annually.
Typical Repair / Replacement Budget:$30 – $3,200($30–$80 for 4-inch media filters and hygrometer; $1,800–$3,200 for professional whole-house dehumidifier installation.)
Expected Assembly Lifespan:10–15 years for dehumidifiers and ERVs; 10+ years for digital smart thermostats
ICC DIGITAL CODES2021 / 2024 IRC
2021/2024 IRC M1505.4—Whole-House Mechanical Ventilation System Requirements
STATUTORY MODEL CODE TEXT
Dwelling units meeting air tightness standards shall be provided with whole-house mechanical ventilation. The system shall operate continuously or intermittently with automatic controls, delivering outdoor air to living spaces while exhausting stale indoor air.
Exception: Naturally ventilated dwelling units where calculated infiltration rates exceed 5 ACH50 shall not require continuous mechanical ventilation systems.
IN PLAIN ENGLISH
Modern airtight homes require controlled fresh outdoor air intake and dedicated dehumidification to keep indoor relative humidity below 55%, preventing mold growth during muggy Texas Gulf Coast nights.
HOMEOWNER PRO TIP:Set your smart thermostat to 'AUTO' fan rather than 'ON' during humid summer months so moisture on indoor cooling coils doesn't blow back into your living rooms.
Chapter 4 • IV
Plumbing Systems
Water Supply, Distribution Piping, Static Pressure & PRVs, DWV Systems, Water Heating, Hydro-Massage Equipment, Fuel Gas & Outdoor Fixtures
Chapter 4 covers the complete residential plumbing and fuel gas distribution infrastructure: municipal water supply, static pressure regulation, supply piping materials (PEX, copper, CPVC, polybutylene), sanitary DWV drainage and venting, water heaters and TPR valves, whirlpool hydro-massage tubs, gas piping and sediment traps, and exterior hose bibbs under Texas freeze conditions.
SCAN FOR LIVE DIGITAL TOOLS & UPDATES
Chapter 4 Digital Companion
Plumbing & Gas Systems
Instant mobile access to polar vortex freeze defense procedures, PRV pressure testing protocols, and water heater flush logs.
CHECK FREQUENCYMonthly Water Meter Dial Leak Check • Annual PRV Test
RISK IF IGNOREDCRITICAL
Pinhole Slab Leaks & Catastrophic Water Flooding ($10k–$35k)
1
2
3
WHAT YOU'RE LOOKING ATFIELD INSPECTION ANATOMY
1
Master PEX Supply Manifold:Central distribution hub with individual color-coded shutoff valves for each fixture.
2
Water Pressure Gauge (55 PSI):Diagnostic gauge verifying municipal incoming pressure remains safely under 80 PSI.
3
Lead-Free Quarter-Turn Ball Valve:Reliable full-port emergency isolation valve for water main.
PLUMBING DISTRIBUTION • PEX MANIFOLD & PRVComparison of plumbing supply materials: flexible PEX-A expansion tubing, rigid type-L copper, and brittle legacy CPVC pipes vulnerable to Texas freeze damage.
3D ARCHITECTURAL CUTAWAY • FIGURE 4.1
FIGURE 4.A: PEX MANIFOLD DISTRIBUTION & PRV VS. CORRODED GALVANIZED NIPPLES & FAILING POLYBUTYLENE
DONE RIGHT (CODE-COMPLIANT)
Brass Pressure-Reducing Valve (PRV) calibrated between 40 and 80 PSI ceiling
Homerun PEX distribution manifold with individual fixture isolation shutoffs
Zero concealed fittings or pipe joints buried beneath concrete foundation slabs
Dielectric brass isolation fittings separating dissimilar copper and steel connections
COMMON DEFECT (SAFETY HAZARD)
Unregulated municipal pressure spiking to 95+ PSI causing fixture valve failure
Direct connection of copper to galvanized steel creating severe galvanic rust choke
Defective gray polybutylene piping with brittle plastic acetal crimp fittings
Missing main customer water shutoff valve inside conditioned living spaces
Comparative technical illustration of code-compliant PEX homerun manifold distribution with brass PRV set to 55 PSI versus common supply defects including excessive municipal pressure (95 PSI), galvanic pipe corrosion, and brittle gray polybutylene tubing.
TEXAS FIELD TRIAGE: 3-STAGE SEVERITY SCALEField Inspection Progression Rubric
STAGE 1NORMAL TEXAS AGING (COSMETIC)
Condition:Aerator screen on bath faucet restricted by mineral scale; slight handle stiffness on mixer.
Action:Unscrew aerator and soak in vinegar for 30 min.Annual Log
STAGE 2WATCH & MAINTAIN (30–90 DAYS)
Condition:Water pressure regulator (PRV) delivering 82–90 PSI (code max 80); slow drip at shutoff packing nut.
Action:Tighten packing nut 1/4 turn; adjust PRV screw within 30 days to restore 55–65 PSI.30 Days
STAGE 3ACT IMMEDIATELY (URGENT)
Condition:Water pressure >100 PSI risking pipe bursts; pinhole leak spraying in wall; meter spinning continuously.
Action:Isolate main water shutoff valve immediately; call licensed emergency plumber.Immediate
How It Works in Your Home
Pressurized water supply delivers clean, potable drinking water under continuous pressure to every faucet, shower, toilet, and appliance throughout your home.
Water enters your property from a municipal main beneath the street or from a private water well. The city water meter box sits near the curb, housing the utility meter and a city shutoff valve. From there, a private water service line—typically constructed of Cross-linked Polyethylene (PEX), high-density polyethylene (HDPE), or Type K/L copper—runs underground into your home.
Inside your home, a dedicated customer master shutoff valve is located in the garage, utility closet, or exterior wall. Once past the main valve, water splits into two main paths: cold water routes directly to cold taps and toilets, while a dedicated line feeds your water heater, which in turn feeds hot water distribution lines across the home.
Modern Texas homes use either a 'branch-and-tee' piping layout or a central 'homerun' PEX manifold system. A central PEX manifold functions like an electrical breaker panel for water, routing dedicated continuous flexible lines from a central utility closet to each individual fixture with zero hidden pipe joints buried beneath your concrete foundation slab.
Curb Meter & City Shutoff:The utility water meter at the street containing the city curb stop valve.
Customer Master Shutoff Valve:The primary ball valve in the garage or utility closet that shuts off all water to the home during emergencies.
Pressure-Reducing Valve (PRV):A brass regulating valve that steps down high municipal street pressure to a safe household range (40 to 80 PSI).
PEX Homerun Manifold:A central distribution hub with individual shutoff valves for every hot and cold plumbing line in the home.
What Can Go Wrong & What to Look For
Excessive pressure, aging pipe materials, and hidden leaks under foundation slabs represent the greatest plumbing risks for Texas homeowners.
Static water pressure in excess of 80 PSI is the number one cause of premature plumbing failure in Texas suburban homes. When municipal water pressure spikes into the 90–120 PSI range, it exerts continuous mechanical stress on internal seals, causing toilet fill valves to hiss and leak, bursting washing machine hoses, and eroding copper pipe walls from within.
Aging piping materials carry distinct failure modes. Chlorinated Polyvinyl Chloride (CPVC) becomes exceedingly brittle after 15 to 25 years of exposure to hot water and municipal chlorine disinfectants; even minor bumps during cabinet use can snap fittings cleanly off. Legacy polybutylene (Quest) piping installed between 1978 and 1995 suffers microscopic chemical degradation from municipal oxidants, causing fittings to fracture without warning.
Under-slab plumbing leaks occur when copper water lines buried in or beneath concrete slabs rub against aggregate as they expand and contract with hot water flow, eventually wearing pinholes through the pipe walls.
Early Warning Signs & Red Flags
Hissing or running sounds from toilets when no one is using the bathroom
Unexplained spikes on your monthly water bill
Warm spots on concrete slab floors or vinyl/tile flooring
Low water flow when multiple fixtures run simultaneously
Water meter leak indicator dial spinning when all faucets are turned off
Excessive Static Water Pressure (>80 PSI)IMMEDIATE ACTION
Water pressure exceeding the 80 PSI maximum limit due to a missing or failed pressure-reducing valve, threatening pipes and appliances.
Brittle CPVC or Polybutylene PipingMONITOR
Aging plastic supply piping with high historical failure rates and spontaneous fitting ruptures.
Under-Slab Hot Water LeakIMMEDIATE ACTION
Ruptured supply line beneath the foundation causing soil moisture imbalance and wasted energy.
Loose Toilet Bowl MountingIMMEDIATE ACTION
Toilet rocking against the floor, breaking the wax seal and allowing wastewater into the subfloor.
Knowing your home’s supply pipe material is essential: flexible PEX resists brief attic freezes, while 15-year-old chlorinated CPVC turns brittle like eggshell if bumped in a hot attic.
How Texas Weather & Soil Affect It
Severe winter freezes and expansive clay soils place exceptional stress on residential plumbing lines across Texas.
During severe Texas Arctic freezes, uninsulated water lines located in attics, garage walls, and exterior brick walls freeze rapidly. Water expands by approximately 9% as it freezes, exerting immense hydraulic pressure that splits rigid copper pipes and CPVC fittings. Flexible PEX-A tubing has superior freeze elasticity, expanding to accommodate ice formation and returning to shape without rupturing, though brass fittings remain vulnerable.
Expansive smectite clay soils ('black gumbo') common across Houston, Dallas-Fort Worth, and Austin expand when wet and contract during summer droughts. As soil around the perimeter of the home moves, underground water service lines passing through the grade beam experience shearing and bending forces that can crack rigid service pipes at the foundation penetration point.
Texas Climate & Soil Stresses
Sudden Arctic freezes dropping temperatures into the teens for 48+ consecutive hours
Heavy clay shrinkage during July and August drought pulling on underground service lines
Municipal water pressure surges during seasonal maintenance and summer hydrant flushes
Texas Field Pro Tips
Before winter freeze alerts, disconnect all outdoor garden hoses and install insulated foam covers over all exterior spigots.
Locate your main water shutoff valve and test turning it off once a year so every family member knows how to shut off water during a freeze burst.
How to Maintain & Protect It
A few simple annual maintenance habits safeguard your home against catastrophic water damage.
Test your static water pressure annually using an inexpensive $10 pressure gauge screwed onto an outdoor hose bibb. If the needle reads above 75–80 PSI, have a licensed plumber test or replace your pressure-reducing valve (PRV).
Replace all rubber washing machine supply hoses every 3 to 5 years with braided stainless steel burst-resistant hoses. Inspect under-sink shutoff valves ('angle stops') twice a year for green verdigris corrosion or mineral crusting, and replace old multi-turn valves with quarter-turn ball valves.
Seasonal Walkthrough Checklist
Spring: Test static water pressure at exterior hose spigot (confirm 40–80 PSI)
Summer: Inspect under-sink supply lines and cabinet floors for hidden moisture
Fall: Disconnect all garden hoses and install insulated freeze caps on hose bibbs
Winter: In freezing weather, open cabinet doors under sinks on exterior walls to let room heat circulate
HOMEOWNER DECISION MATRIX
DIY Weekend Maintenance vs. Call a Qualified Pro
SAFE 15-MINUTE DIY CARE
Testing static water pressure with a screw-on gauge
Replacing washing machine rubber hoses with braided stainless steel lines
Installing foam freeze caps on exterior hose faucets
Tightening loose toilet tank bolts or replacing worn flappers
WHEN TO CALL A QUALIFIED PRO
Installing or adjusting a municipal pressure-reducing valve (PRV)
Locating and repairing under-slab plumbing leaks
Repiping older homes with whole-house PEX distribution
Replacing broken main water service shutoff valves
CLINICAL DIFFERENTIAL FIELD TRIAGE & CONNECTED SYSTEMS§ 4.1 Diagnostic Rubric
Harmless Cosmetic Baseline
Clear, steady faucet flow at 45 to 70 PSI with silent pipe shutoff and dry quarter-turn angle stops beneath every sink indicates sound supply plumbing.
Active Failure Signal
Banging pipes when washers shut off, rusty low-pressure water from 1960s galvanized lines, static pressure >80 PSI, or spinning meter dials with all taps off.
60-Second Homeowner Check
Turn off every faucet, ice maker, and toilet in the house, then watch the tiny red triangle leak-indicator dial on your street water meter for 60 seconds.
Texas Credential to VerifyTSBPE Responsible Master Plumber (RMP) carrying mandatory state-verified liability insurance — verify license at tsbpe.texas.gov.
Municipal Permit & Inspection RuleMandatory municipal plumbing permit, live water/air pressure gauge hold test, and city inspector sign-off BEFORE closing drywall access cuts.
3 Questions You Must Ask Before Hiring
“Are you repiping with expansion PEX-A (ASTM F1960 rings) or Type L copper, and how will attic lines be tucked BENEATH insulation on the warm ceiling side against Texas freezes?”
“Will you test static street water pressure at the hose bibb and install a brass Pressure-Reducing Valve (PRV) set to 55–65 PSI if city pressure exceeds 80 PSI?”
“Does your written turnkey bid explicitly include licensed drywall patching, texture matching, and quarter-turn brass ball shutoff valves at every fixture?”
3 High-Pressure Red Flags & Scams
Strapping uninsulated PEX water pipes high across exposed attic rafters near ventilated soffits—guaranteeing burst pipes during the next 18°F Texas Arctic front.
Splicing short PEX repairs directly onto crumbling 1960s galvanized steel or brittle 20-year-old CPVC without disclosing systemic pipe-wall failure.
Leaving homeowners with 25 open holes in ceilings and cabinets because “drywall restoration was excluded in fine print.”
HOMEOWNER ACTION TAKEAWAYRISK LEVEL: HIGH
Water Supply Pressure & Pipe Defense Stewardship
Keep static water pressure strictly between 40 and 80 PSI to prevent pipe bursts, know your master shutoff location, and eliminate fragile legacy piping before leaks occur.
Recommended Action Steps
Test static water pressure at an exterior hose bibb to ensure it does not exceed 80 PSI.
Locate and tag the master water shutoff valve in the garage or utility room.
Confirm every outdoor hose faucet is equipped with an anti-siphon vacuum breaker.
Immediate Priorities
Test static water pressure at an exterior hose bibb to ensure it does not exceed 80 PSI.
Locate and tag the master water shutoff valve in the garage or utility room.
Confirm every outdoor hose faucet is equipped with an anti-siphon vacuum breaker.
Ongoing Annual Maintenance
Replace washing machine rubber hoses with stainless steel braided lines every 5 years.
Inspect under-sink angle stop shutoff valves twice annually for leaks or corrosion.
Disconnect all outdoor hoses before winter freezes and install insulated spigot covers.
Typical Repair / Replacement Budget:$150 – $450($150–$350 for PRV replacement; $3,500–$8,500 for whole-home PEX repipe of aging CPVC or polybutylene.)
2021/2024 IRC P2903.3.1—Maximum Static Water Pressure
STATUTORY MODEL CODE TEXT
Where water main pressure exceeds 80 psi (552 kPa), an approved pressure-reducing valve conforming to ASSE 1003 or CSA B356 with an approved strainer shall be installed on the domestic water service line near the entrance of the water service to the building.
Exception: Service lines connected to private water systems with approved variable-frequency drive (VFD) pressure regulation.
IN PLAIN ENGLISH
Incoming water pressure must not exceed 80 PSI; when municipal street pressure is higher, a pressure-reducing valve (PRV) is mandatory to protect household pipes and fixtures.
HOMEOWNER PRO TIP:Test your home's water pressure annually with an inexpensive $10 screw-on pressure gauge attached to an outdoor hose bibb. If the needle reads above 80 PSI, adjust or replace your PRV immediately.
4.2
Drains, Wastes, and Vents (DWV): Cast Iron vs PVC, Cleanouts, Trap Primers & Hydrostatic Drain Integrity
Backward sloped drain arm causing standing wastewater and chronic blockages
Technical comparison of a code-compliant Schedule 40 PVC vented P-trap assembly with 2-4 inch liquid seal and continuous 1/4 inch per foot fall versus prohibited S-trap and corrugated accordion pipe siphoning sewer gas into the home.
TEXAS FIELD TRIAGE: 3-STAGE SEVERITY SCALEField Inspection Progression Rubric
STAGE 1NORMAL TEXAS AGING (COSMETIC)
Condition:Bathroom sink draining slightly slow due to hair in pop-up stopper; minor soap scum.
Action:Clear hair with plastic drain claw; avoid harsh chemicals.Annual Log
STAGE 2WATCH & MAINTAIN (30–90 DAYS)
Condition:Gurgling sounds in tub drain when toilet flushes; sewer cleanout cap in yard cracked or stripped.
Action:Replace cleanout cap with threaded plug and snake drain line within 30 days.30 Days
STAGE 3ACT IMMEDIATELY (URGENT)
Condition:Raw sewage backing up into tubs/showers during laundry; collapsed sewer pipe under slab.
Action:Cease all home water use immediately; call plumber for camera sewer scope and repair.Immediate
How It Works in Your Home
Your Drain, Waste, and Vent (DWV) system carries used wastewater away from your home by gravity while venting sewer gases safely above your roofline.
Unlike the pressurized supply system, your drainage system operates strictly by gravity. Every drain pipe is sloped downward—typically 1/4 inch per foot—allowing water and solids to glide through smooth horizontal branch lines into the vertical 3-inch or 4-inch main soil stack and out to the city sewer main or private septic tank.
Every plumbing fixture relies on a curved water-filled 'P-trap' beneath the drain. The P-trap holds a standing water seal 2 to 4 inches deep that creates a permanent liquid barrier, preventing explosive methane, toxic hydrogen sulfide, and sewer odors from entering your living spaces.
The vent system is the unsung hero of home drainage. Vent pipes connect to drain lines behind walls and travel upward through the roof into open air. When a toilet flushes or a tub drains, it displaces air; the roof vent supplies fresh air behind the moving slug of water, equalizing air pressure so the water seal inside the P-trap is not sucked out by vacuum siphonage.
P-Trap:The U-shaped curved pipe under sinks and tubs that holds standing water to block hazardous sewer gas.
Roof Vent Stack:Vertical pipes extending through your roof to let air in and vent sewer gas out.
Main Sewer Cleanout:Exterior threaded PVC access caps near the foundation that allow plumbers to clear drain blockages.
Building Sewer Lateral:The underground pipe carrying wastewater from the home foundation to the city main or septic tank.
What Can Go Wrong & What to Look For
Aging cast iron pipes, improper traps, and tree root intrusions under foundation slabs are the leading drainage hazards in Texas homes.
Homes built before the mid-1980s frequently feature cast iron drain piping beneath the foundation slab. Over 40 to 60 years, sewer hydrogen sulfide gas combines with moisture to form sulfuric acid, which chemically dissolves the bottom channel of cast iron pipes. Eventually, the pipe floor dissolves entirely, allowing wastewater to discharge directly into the soil beneath the foundation, washing away support soil and attracting root masses.
Unvented 'S-traps' and flexible corrugated drain tailpieces are common improper DIY repairs. S-traps lack a vent pipe connection; when water rushes down the drain, momentum siphons the water completely out of the trap, leaving an open air path for sewer gas. Flexible accordion drain pipes catch hair, grease, and soap scum in their ridges, causing persistent clogs and bacterial odors.
Missing or damaged sewer cleanout caps allow rainwater, mulch, and rodents into the sewer line while allowing foul sewer odor to waft around your patio or flower beds.
Early Warning Signs & Red Flags
Gurgling sounds from sinks or tubs when a nearby toilet is flushed
Persistent sewer gas odors in bathrooms, laundry rooms, or the kitchen
Slow drainage affecting multiple fixtures simultaneously on the ground floor
Water backing up into shower pans when toilets are flushed or washing machines drain
Lush, spongy green grass patches over the sewer lateral during summer drought
Under-Slab Cast Iron Channel CorrosionIMMEDIATE ACTION
Bottom channel of cast iron drain pipe eroded away under the foundation slab, causing soil voiding.
Unvented S-Trap or Prohibited Flexible TailpieceROUTINE
Improper drain configuration that siphons trap water dry or collects decomposing waste in accordion ridges.
Broken or Missing Sewer Cleanout CapROUTINE
Open sewer pipe at exterior grade allowing storm runoff, debris, and vermin into the sewer lateral.
Tree Root Intrusion in Sewer LateralIMMEDIATE ACTION
Aggressive tree roots penetrating clay or cast iron pipe joints, causing recurrent sewage backups.
An HD fiber-optic sewer camera scope reveals bottom-out channel rot, offset joints, and live-oak root balls inside buried drain lines long before sewage backs up into ground-floor showers.
How Texas Weather & Soil Affect It
Heaving clay soils and summer droughts cause serious movement in under-slab sewer lines.
Texas smectite clay soils expand and contract dramatically between wet springs and blistering summer droughts. Because the house slab and surrounding exterior yard soil move at different rates, the sewer lateral pipe where it exits through the concrete grade beam experiences severe shear stress, frequently snapping PVC or clay pipes at the foundation perimeter.
During prolonged summer droughts, thirsty roots from live oaks, elms, and crepe myrtles seek out the moisture and nutrients inside underground drain lines. Roots exploit microscopic joint fissures, expanding inside the pipe into dense root balls that cause catastrophic sewage backups into ground-floor bathtubs.
Texas Climate & Soil Stresses
Extreme soil swelling and contraction causing pipe shearing at foundation perimeter grade beams
Severe summer drought driving tree roots deep into sewer pipe joints
Torrential subtropical downpours overloading municipal storm and combined sewer systems
Texas Field Pro Tips
If you are buying a Texas home built before 1985, always order a professional HD sewer camera scope to inspect the under-slab cast iron pipes.
Keep large trees planted at least 15 to 20 feet away from your main sewer lateral line to prevent root intrusion.
How to Maintain & Protect It
Smart disposal habits and routine cleanout inspections keep your drainage lines flowing smoothly.
Never pour cooking grease, bacon fat, coffee grounds, or 'flushable' wipes down your drains. Grease solidifies inside cool under-slab pipes, catching wipes and paper to form rock-hard blockages.
Pour two gallons of hot water and a cup of baking soda followed by vinegar down rarely used bathroom sinks and guest tubs every month to clear soap film and ensure P-traps remain filled with water.
Seasonal Walkthrough Checklist
Spring: Check exterior sewer cleanout caps to ensure they are sealed and undamaged by lawnmowers
Summer: Run water in unused guest bathrooms and laundry sinks to prevent trap evaporation
Fall: Inspect roof plumbing vent stacks to confirm they are not blocked by fallen leaves or bird nests
Winter: Pour water into floor drains and mechanical room traps to maintain liquid seals against sewer gas
HOMEOWNER DECISION MATRIX
DIY Weekend Maintenance vs. Call a Qualified Pro
SAFE 15-MINUTE DIY CARE
Pouring water into unused drains to replenish evaporated P-traps
Replacing cracked threaded cleanout caps on exterior PVC risers
Clearing hair from pop-up sink stoppers and shower drain strainers
Replacing accordion tailpieces with smooth rigid PVC pipe
WHEN TO CALL A QUALIFIED PRO
Conducting an HD video sewer scope inspection of under-slab drain pipes
Hydro-jetting grease and tree roots from main sewer lateral lines
Tunneling beneath concrete slabs to replace collapsed cast iron drain lines
Installing cleanouts or trenchless CIPP epoxy pipe lining
CLINICAL DIFFERENTIAL FIELD TRIAGE & CONNECTED SYSTEMS§ 4.2 Diagnostic Rubric
Harmless Cosmetic Baseline
Swift, quiet vortex drainage at sinks and tubs with zero gurgling in adjacent toilets confirms unobstructed DWV slope and open atmospheric roof vents.
Active Failure Signal
Gurgling toilets when a shower drains, sewer-gas odors from dry floor traps, or wet foundation soil near cleanouts signal root intrusion or cast-iron channel rot.
60-Second Homeowner Check
Fill an upstairs bathroom sink to the brim, pull the stopper while flushing the adjacent toilet, and listen for slow backing up or bubbling trap gurgles.
BEFORE YOU SIGN A BID • TEXAS CONTRACTOR VETTING & SCAM DEFENSE
Under-Slab Cast-Iron Drain & Sewer Line Repair
§ 4.2 Playbook
Texas Credential to VerifyTexas State Board of Plumbing Examiners (TSBPE) Responsible Master Plumber (RMP) — verify at tsbpe.texas.gov.
Municipal Permit & Inspection RuleMandatory city plumbing permit, trench/tunnel safety compliance, and municipal green-tag pressure inspection.
3 Questions You Must Ask Before Hiring
“Will you provide the unedited, full-length HD sewer camera video with on-screen foot-counter from the house cleanout all the way to the city tap?”
“Are we tunneling beneath the perimeter beam rather than jackhammering through my post-tension slab cables—and how will tunnels be compacted and backfilled?”
“Does your bid specify Schedule 40 solid-core PVC pipe with sweep fittings and post-repair hydrostatic/air testing witnessed by the city inspector?”
3 High-Pressure Red Flags & Scams
Showing a homeowner a blurry, pre-recorded video clip of someone else’s collapsed cast-iron pipe without proving the camera entry at your property’s cleanout.
Backfilling under-slab plumbing tunnels with loose dirt instead of engineered compacted fill or flowable fill—causing guaranteed slab settlement 12 months later.
Jackhammering blind trenches inside a post-tension concrete floor without ground-penetrating radar (GPR) cable location.
HOMEOWNER ACTION TAKEAWAYRISK LEVEL: MEDIUM
Drain, Waste & Vent System Integrity Playbook
Preserve trap seals to block toxic sewer gas, avoid putting grease or wipes into drains, and commission an HD sewer camera scope on any home built before 1985.
Recommended Action Steps
Verify all sink traps are proper vented P-traps, not unvented S-traps or corrugated hoses.
Locate the two-way sewer cleanout in the front yard and ensure caps are intact.
Schedule an HD sewer camera scope if the home was built before the mid-1980s.
Immediate Priorities
Verify all sink traps are proper vented P-traps, not unvented S-traps or corrugated hoses.
Locate the two-way sewer cleanout in the front yard and ensure caps are intact.
Schedule an HD sewer camera scope if the home was built before the mid-1980s.
Ongoing Annual Maintenance
Run water monthly in all unused fixtures and floor drains to prevent trap dry-out.
Never flush wipes, feminine hygiene products, or paper towels into the sewer system.
Clear lint and hair from shower drain strainers regularly.
Typical Repair / Replacement Budget:$250 – $750($250 for HD sewer camera scope; $450–$750 for hydro-jetting root clearing; $5,000–$15,000+ for under-slab cast iron pipe tunneling and replacement.)
2021/2024 IRC P3101.1 / P3201.6—Trap Seal and Prohibited Traps
STATUTORY MODEL CODE TEXT
Each fixture trap shall have a liquid seal of not less than 2 inches (51 mm) and not more than 4 inches (102 mm). Traps that depend on moving parts to maintain the seal, crown-vented traps, and S-traps are strictly prohibited.
Exception: Fixture traps with deeper seals approved for interceptors or specialized environmental conditions.
IN PLAIN ENGLISH
Every drain must be protected by a water-filled P-trap between 2 and 4 inches deep to block sewer gas; unvented S-traps that can siphon dry are strictly prohibited.
HOMEOWNER PRO TIP:If a guest bathroom or floor drain smells like sewer gas, the water seal in the trap has evaporated. Pour two cups of water and a tablespoon of cooking oil into the drain to restore and preserve the seal.
4.3
Water Heating Equipment: Tank & Tankless Systems, TPR Valves, Discharge Piping, Expansion Tanks & Pan Drains
Non-heat-rated DWV PVC discharge pipe that softens and whips loose at 140°F
Missing thermal expansion tank on closed plumbing system triggering pressure spikes
Water heater tank installed directly over finished wood framing without a drain pan
Technical schematic contrasting a code-compliant water heater installation featuring blue thermal expansion tank, 3/4-inch rigid metal TPR gravity drain, and watertight drain pan versus critical deficiencies including plugged relief valve, melting PVC pipe, and leaking panless tank base.
TEXAS FIELD TRIAGE: 3-STAGE SEVERITY SCALEField Inspection Progression Rubric
STAGE 1NORMAL TEXAS AGING (COSMETIC)
Condition:Light popping or sizzling sounds from bottom of tank as burners fire (normal mineral scale).
Action:Perform annual 5-gallon tank sediment flush via hose.Annual Log
Action:Manually test TPR valve; descale tankless unit with vinegar pump kit within 30–60 days.30–60 Days
STAGE 3ACT IMMEDIATELY (URGENT)
Condition:Active water pooling beneath water heater base seam; TPR pipe capped off; flame rollout scorch.
Action:Shut off cold water valve and power/gas supply immediately; dispatch licensed plumber.Immediate
How It Works in Your Home
Your water heater produces and manages domestic hot water using storage tanks or on-demand heat exchangers with critical pressure relief safeguards.
Most Texas homes utilize either a conventional storage tank water heater (40 to 50 gallons, fueled by natural gas or electricity) or a modern on-demand tankless water heater. In a storage tank unit, cold water enters through an internal dip tube to the bottom of the steel tank, where gas burners or electric heating elements heat the water to your thermostat setpoint (typically 120°F). Hot water rises naturally and discharges through the top hot water outlet into your home's hot supply lines.
Tankless water heaters heat water instantly on demand. When you open a hot water tap, an internal flow sensor detects movement and fires high-output gas burners or electric elements, heating water as it passes through a compact copper heat exchanger without storing standby water.
Because water expands by about 2% to 3% when heated (thermal expansion), every water heater must have an emergency safety device: the Temperature and Pressure Relief (TPR) valve. Located on the top or upper side of the tank, the TPR valve automatically snaps open if water temperature reaches 210°F or internal tank pressure exceeds 150 PSI, preventing a catastrophic boiler explosion.
TPR Safety Relief Valve:The spring-loaded emergency relief valve rated at 210°F and 150 PSI that prevents tank explosions.
TPR Discharge Pipe:A full-diameter rigid copper or CPVC pipe sloped downward to discharge relief water safely within 6 inches of the ground or pan.
Thermal Expansion Tank:A pre-pressurized diaphragm tank installed on the cold supply line that absorbs expanding water volume on closed plumbing systems.
Drain Pan & Pan Drain Line:A corrosion-resistant pan beneath the heater with a 3/4-inch drain pipe routed outside to protect ceilings and floors from leaks.
What Can Go Wrong & What to Look For
Mineral scale accumulation, unpermitted TPR discharge piping, and missing expansion tanks are frequent hazards.
The Temperature and Pressure Relief (TPR) valve is the primary life-safety mechanism on a water heater. A severely hazardous defect is an improper, uphill, or capped discharge pipe. If someone uses standard thin PVC pipe (which melts under boiling water), routes the pipe uphill, or threads a cap onto the end to stop a drip, the tank becomes an unvented pressure vessel capable of rocketing through the roof like a missile if thermostat controls fail.
Missing thermal expansion tanks on closed plumbing systems cause rapid pressure spikes. When a home has a pressure-reducing valve (PRV) or backflow preventer, heated water cannot push backward into the city main. As water expands during heating cycles, pressure spikes up to 120–150 PSI, causing faucets to drip, toilet valves to fail, and the water heater tank to fatigue and burst prematurely.
Water heaters installed in attics or upper-floor utility closets pose immense water damage risks. A missing or blocked drain pan allows hundreds of gallons of water to pour through drywall ceilings when the tank eventually rusts through.
Early Warning Signs & Red Flags
Water dripping steadily from the TPR relief discharge pipe outside or into the drain pan
Popping, rumbling, or boiling noises from inside the water heater tank during heating cycles
Rusty or discolored hot water coming from bathroom faucets
Moisture or standing water in the drain pan beneath the water heater
Running out of hot water much faster than normal
Improper TPR Valve Discharge PipeIMMEDIATE ACTION
Discharge pipe made of unrated PVC, trapped uphill, reduced in diameter, or capped at the end.
Missing Thermal Expansion Tank on Closed SystemROUTINE
Closed plumbing system lacking an expansion tank, subjecting pipes and tank to repeated 150 PSI stress spikes.
Missing or Un-Drained Emergency Pan in AtticIMMEDIATE ACTION
Attic water heater lacking a drain pan routed to the exterior, creating catastrophic ceiling collapse risks upon tank failure.
Heavy Mineral Sediment BuildupMONITOR
Thick calcium carbonate layer on the tank bottom insulating water from the burner and causing metal overheating.
PRESSURE RELIEF SAFETY • § 4.3
T&P Relief Valve Hazards: Never Cap, Plug, or Uphill-Trap Discharge Lines
Your water heater’s T&P valve is its last defense against runaway thermostat over-pressurization; discharge pipes must maintain full 3/4-inch diameter and slope continuously downward to daylight.
How Texas Weather & Soil Affect It
Hard Texas water and attic heat significantly accelerate water heater degradation.
Groundwater across Central and North Texas (including the Edwards and Trinity aquifers) contains exceptionally high levels of dissolved calcium and magnesium carbonates ('hard water'). When heated above 120°F, these minerals precipitate out of solution, coating heating elements and settling to the bottom of the tank as thick mineral sediment. In gas heaters, this sediment insulates water from the burner flame, causing the steel tank bottom to overheat, pop noisily, and rust out in 7 to 10 years instead of 12 to 15.
In many Texas homes, water heaters are installed in unconditioned attics to save interior floor space. Attic ambient temperatures routinely reach 130°F–140°F in summer, accelerating metal oxidation and expansion tank bladder degradation. In winter freezes, uninsulated attic water pipes freeze and burst, flooding ceilings below.
Texas Climate & Soil Stresses
Extremely hard mineral-rich municipal water accelerating internal tank scaling
Winter cold snaps freezing exposed attic water lines and pan drains
Texas Field Pro Tips
Flush your water heater tank annually to drain out accumulated calcium sediment before it hardens into rock.
Set your water heater thermostat to 120°F. This provides plenty of hot water, cuts energy costs, and reduces scalding risks.
How to Maintain & Protect It
Annual sediment flushing and anode rod inspection can double your water heater's service life.
Connect a garden hose to the tank drain valve at the bottom of the heater once a year. Open the valve and flush 5 to 10 gallons of water into a bucket until the water runs completely clear of white calcium flakes and rust granules.
Inspect the sacrificial magnesium or aluminum anode rod every 3 to 4 years. The anode rod corrodes intentionally to protect the steel tank from rusting. When the rod is depleted, the tank walls begin to rust immediately. Replacing a $40 anode rod can extend tank life by a decade.
Seasonal Walkthrough Checklist
Spring: Test the TPR valve test lever to verify water discharges freely and reseats tightly
Summer: Check expansion tank air pressure with a tire gauge (should match home water pressure, ~55–60 PSI)
Fall: Flush sediment from the tank bottom using the drain valve and garden hose
Winter: Insulate hot and cold water pipes within 3 feet of the heater in attics and garages
HOMEOWNER DECISION MATRIX
DIY Weekend Maintenance vs. Call a Qualified Pro
SAFE 15-MINUTE DIY CARE
Flushing sediment from the tank bottom with a garden hose
Testing the TPR valve spring lever by lifting it gently
Insulating exposed water lines with foam pipe sleeves
Adjusting the thermostat dial to 120°F
WHEN TO CALL A QUALIFIED PRO
Replacing a leaking or corroded TPR safety relief valve
Installing a thermal expansion tank and calibrating air pressure
Replacing depleted sacrificial anode rods
Installing a new gas or electric water heater and flue venting
CLINICAL DIFFERENTIAL FIELD TRIAGE & CONNECTED SYSTEMS§ 4.3 Diagnostic Rubric
Harmless Cosmetic Baseline
Occasional faint popping sounds inside an older gas tank heater simply come from harmless steam bubbles escaping limestone mineral scale on the tank floor.
Active Failure Signal
Rusty water pooling in the drain pan, scorched draft-hood soot, capped or uphill T&P safety relief pipes, or corroded dielectric nipples warn of imminent failure.
60-Second Homeowner Check
Visually inspect the metal pan beneath your water heater for rust trails, and confirm the side/top T&P copper pipe runs downhill unthreaded with zero cap or plug.
BEFORE YOU SIGN A BID • TEXAS CONTRACTOR VETTING & SCAM DEFENSE
Tank & Tankless Water Heater Installation
§ 4.3 Playbook
Texas Credential to VerifyTSBPE Licensed Master or Journeyman Plumber working under a registered Responsible Master Plumber (RMP).
Municipal Permit & Inspection RuleTexas law requires a municipal plumbing permit and third-party/city inspection on ALL water heater replacements.
3 Questions You Must Ask Before Hiring
“Does your quote include a thermal expansion tank (where a closed PRV/check valve exists), a metal drain pan routed outdoors, and a full-port brass shutoff?”
“For a gas tankless upgrade, did you calculate total BTU gas-pipe sizing from the meter AND include stainless Category III venting plus isolation flush valves?”
“Is the Temperature & Pressure (T&P) relief discharge line piped in approved copper/CPVC continuously downward to an exterior termination 6 inches above grade?”
3 High-Pressure Red Flags & Scams
Big-box subcontractor rush jobs that skip the city plumbing permit, omit the sediment trap, or reuse corroded flexible gas connectors.
Connecting a 199,000-BTU tankless unit onto an undersized 1/2-inch gas branch—starving your furnace and range whenever hot water runs.
Capping or plugging a dripping T&P safety relief valve instead of diagnosing thermal expansion or excessive street water pressure.
HOMEOWNER ACTION TAKEAWAYRISK LEVEL: HIGH
Water Heating Safety & Tankless Longevity Protocol
Never cap a leaking TPR valve, flush mineral sediment annually, and verify expansion tanks are installed on closed plumbing systems.
Recommended Action Steps
Inspect the TPR relief valve discharge pipe to confirm it slopes downhill and terminates within 6 inches of the ground or pan.
Verify a thermal expansion tank is installed if your home has a pressure-reducing valve.
Check that an emergency drain pan with an exterior drain line is installed beneath attic units.
Immediate Priorities
Inspect the TPR relief valve discharge pipe to confirm it slopes downhill and terminates within 6 inches of the ground or pan.
Verify a thermal expansion tank is installed if your home has a pressure-reducing valve.
Check that an emergency drain pan with an exterior drain line is installed beneath attic units.
Ongoing Annual Maintenance
Flush sediment from the bottom of the tank annually.
Test the TPR valve lever once a year to ensure it operates freely.
Inspect the sacrificial anode rod every 3 to 4 years.
Typical Repair / Replacement Budget:$150 – $350($150–$350 for expansion tank or TPR valve replacement; $1,400–$2,800 for tank replacement; $2,800–$4,500 for tankless conversion.)
Expected Assembly Lifespan:Tank Water Heaters: 8–12 years; Tankless Water Heaters: 15–20 years; Expansion Tanks: 5–8 years
ICC DIGITAL CODES2021 / 2024 IRC
2021/2024 IRC P2804.6.1—Discharge Pipe for Temperature and Pressure Relief Valves
STATUTORY MODEL CODE TEXT
The discharge pipe serving a pressure-relief valve, temperature-relief valve or combination thereof shall not be directly connected to the drainage system; shall drain by gravity to an approved location; shall not have valves or tee fittings; shall not be smaller than the diameter of the valve outlet; and shall not be threaded at its terminal.
Exception: Discharge to an approved indirect waste receptor located inside the building.
IN PLAIN ENGLISH
The temperature-pressure relief (TPR) discharge pipe must run downward by gravity, terminate within 6 inches of the ground or outside, and never have threads that could allow someone to cap it off.
HOMEOWNER PRO TIP:Never cap or plug a leaking TPR valve line. A leaking TPR valve indicates dangerous thermal expansion, failed pressure regulation, or an overheating tank. Call a licensed plumber immediately.
CHECK FREQUENCYMonthly GFCI Test • Quarterly Anti-Bacterial Jet Flush
RISK IF IGNOREDCRITICAL
Electric Shock in Bathwater & Hidden Motor Subfloor Leaks
1
2
3
WHAT YOU'RE LOOKING ATFIELD INSPECTION ANATOMY
1
Removable Motor Access Panel:Code-mandated service door (min 12×12 inches) allowing inspection of circulating pump.
2
Dedicated Circulating Water Pump:Electric motor driving high-pressure jets, mounted on anti-vibration rubber feet.
3
Dedicated GFCI Disconnect:Protective life-safety interrupter terminating power if motor experiences current leakage.
FIELD INSPECTION • JETTED TUB MOTOR ACCESS & GFCIInspecting a master bathroom jetted tub pump motor through a removable tiled access panel, verifying equipotential bonding wire and dedicated GFCI receptacle.
3D ARCHITECTURAL CUTAWAY • FIGURE 4.4
FIGURE 4.D: JETTED TUB DEDICATED GFCI & PUMP ACCESS WITH BONDING VS. INACCESSIBLE MOTOR & MISSING BOND WIRE
DONE RIGHT (CODE-COMPLIANT)
Unobstructed removable access panel (minimum 12"x12") for pump inspection
Dedicated branch circuit protected by an accessible, testable GFCI device
Solid #8 AWG bare copper equipotential bonding conductor on motor frame
Tub skirt completely tiled in with zero service access to pump or electrical wiring
Missing or inaccessible GFCI test device preventing routine safety testing
Missing #8 AWG copper bonding wire allowing lethal voltage potential in tub water
Active water leak at pump shaft seal rotting subfloor lumber beneath tub base
Side-by-side technical drawing illustrating a code-compliant whirlpool tub with 12×12 inch service hatch, dedicated 20A GFCI protection, and solid #8 AWG motor bonding wire versus a completely tiled-in motor with ungrounded splice and zero access.
TEXAS FIELD TRIAGE: 3-STAGE SEVERITY SCALEField Inspection Progression Rubric
STAGE 1NORMAL TEXAS AGING (COSMETIC)
Condition:Jet nozzles showing minor mineral buildup ring; suction cover screen holding minor hair lint.
Action:Fill tub with warm water and 2 cups vinegar; run jets 15 min.Annual Log
STAGE 2WATCH & MAINTAIN (30–90 DAYS)
Condition:Whirlpool tub GFCI breaker tripping intermittently; motor access panel caulked completely shut.
Action:Cut access panel free to ensure motor access and test GFCI breaker within 30 days.30 Days
STAGE 3ACT IMMEDIATELY (URGENT)
Condition:Pump motor running dry with zero water flow; water leaking through shaft seal into subfloor; unbonded.
Action:Turn off dedicated tub breaker immediately; prohibit use until motor is repaired.Immediate
How It Works in Your Home
Hydro-massage whirlpool tubs combine water circulation pumps, air induction venturis, and specialized electrical safety controls.
A jetted hydro-massage bathtub operates by drawing water from the filled tub through a low-mounted intake suction fitting into an electric circulation pump (typically 3/4 to 1.5 horsepower). The pump forces pressurized water through a network of flexible PVC tubing concealed beneath the tub rim, discharging water through adjustable hydro-jets positioned along the back and sides of the tub basin.
Air is introduced into the water stream through a venturi air control knob on the tub deck. As high-velocity water rushes past the air port, it draws room air in, creating the invigorating aerated massage jet stream.
Because high-voltage electricity (120V) powers a motor operating directly alongside water where people are immersed, life safety depends on two mandatory electrical protections: a dedicated Ground-Fault Circuit Interrupter (GFCI) and a solid bare copper equipotential bonding wire (minimum 8 AWG) clamped to the pump motor frame.
Circulation Pump Motor:The electric motor that pulls water from the tub suction fitting and propels it through the jet nozzles.
Removable Service Access Panel:A minimum 12-by-12 inch removable opening in the tub skirt or adjacent wall allowing inspection and maintenance of the pump.
GFCI Protection:A ground-fault circuit interrupter receptacle or breaker that instantly cuts power if current leaks toward water.
Equipotential Bonding Wire:A solid 8 AWG bare copper wire connecting the pump casing to bathroom metal pipes to eliminate voltage differences.
What Can Go Wrong & What to Look For
Inaccessible pump motors, missing GFCI shock protection, and moldy internal circulation lines are the most common whirlpool defects.
The most frequent building code deficiency is a completely sealed, non-removable tub skirt that blocks access to the pump motor. Builders or tile contractors frequently tile over the required 12×12 inch access opening. When the pump motor fails, leaks, or trips its GFCI, homeowners are forced to smash through custom ceramic or marble tile to access the motor.
Missing or inoperative GFCI protection poses severe electrocution hazards. If electrical insulation inside the pump motor breaks down or water leaks into the motor windings, 120-volt current can electrify the tub bathwater unless a functional GFCI trips within milliseconds.
Stagnant water trapped in flexible circulation lines promotes bacterial and mold biofilm growth. When tubs sit unused for months, the residual water inside the pipes turns slimy; when the jets are finally turned on, black flakes of bacteria and mold shoot into the bathwater.
Early Warning Signs & Red Flags
The whirlpool pump will not turn on when the pneumatic air button is pressed
GFCI breaker or reset button trips immediately when the pump motor starts
Black or gray biofilm flakes discharge from jet nozzles when water circulates
Humming or grinding sounds from the pump motor without water circulation
Moisture or water staining on ceilings beneath second-floor jetted tubs
Missing or Tiled-Over Motor Access PanelROUTINE
Tub pump motor completely walled in without the required 12×12 inch service opening.
Missing or Inoperable GFCI ProtectionIMMEDIATE ACTION
Whirlpool pump connected to a standard ungrounded or non-GFCI protected circuit, presenting shock hazard.
Missing Equipotential Bonding WireROUTINE
Lack of 8 AWG solid copper bonding wire between the motor casing and ground, risking voltage differentials.
Service Access Panels & GFCI Test Verification on Whirlpool Tubs
Without a removable tub skirt access panel, a $15 leaking pump union or inaccessible GFCI receptacle turns a ten-minute service call into custom tile demolition.
How Texas Weather & Soil Affect It
Subfloor foundation movement can stress rigid tub surrounds and concealed piping connections.
Expansive clay soil movement under Texas slab foundations can cause subtle shifting of bathroom subfloors and partition framing. Because large garden and whirlpool tubs carry immense weight when full (up to 800–1,000 pounds with water and occupants), minor foundation settlement can crack perimeter caulk joints, stress flexible PVC pipe connections at the pump, and cause slow concealed leaks into the subfloor.
High Texas indoor humidity during summer months can promote mold growth within the warm, dark, enclosed cavity beneath the tub skirt if the access panel or piping connections leak.
Texas Climate & Soil Stresses
Foundation movement stressing tub framing and drain connections
High summer indoor humidity fostering mold growth in enclosed tub cavities
Texas Field Pro Tips
Never run a whirlpool tub dry. Always ensure the water level is at least 2 inches above the highest jet nozzle before pressing the start button to prevent burning out the mechanical water seal.
How to Maintain & Protect It
Routine line purging and GFCI testing ensure sanitary, safe hydro-massage operation.
Sanitize and purge the internal jet lines every 2 to 3 months. Fill the tub with warm water 2 inches above the jets, add 2 cups of white vinegar or a specialized jetted tub cleaner, and run the jets for 15 minutes. Drain the tub, refill with cold water, and run for 10 minutes to rinse out all lines.
Test the GFCI reset button twice a year. Locate the dedicated GFCI outlet (usually inside the access panel, in a nearby closet, or on the main breaker panel) and press TEST to confirm the pump shuts off instantly, then press RESET.
Seasonal Walkthrough Checklist
Spring: Test the dedicated GFCI circuit breaker or receptacle for proper trip response
Summer: Purge and sanitize circulation lines with jetted tub cleaner or vinegar solution
Fall: Remove the access panel to inspect the pump motor area for leaks or rodent nesting
Winter: Inspect perimeter caulk around the tub rim to prevent water penetration into the motor cavity
HOMEOWNER DECISION MATRIX
DIY Weekend Maintenance vs. Call a Qualified Pro
SAFE 15-MINUTE DIY CARE
Sanitizing internal jet piping with vinegar or commercial tub cleaner
Testing the dedicated GFCI reset button
Cleaning removable jet nozzles of mineral scale
Recaulking the tub rim against tile surrounds
WHEN TO CALL A QUALIFIED PRO
Cutting a professional 12×12 inch access panel in tiled skirts
Replacing a seized or leaking electric circulation pump motor
Installing dedicated GFCI breaker protection and equipotential bonding
Repairing leaks in concealed flexible PVC jet piping
CLINICAL DIFFERENTIAL FIELD TRIAGE & CONNECTED SYSTEMS§ 4.4 Diagnostic Rubric
Harmless Cosmetic Baseline
Smooth jet circulation with zero vibration leaks beneath the access hatch and instant power cutoff when pressing the dedicated GFCI TEST button is ideal.
Active Failure Signal
Dark biofilm flakes shooting out of jets, humming seized pumps, tiled-shut skirts with no service access panel, or missing GFCI protection create shock/leak hazards.
60-Second Homeowner Check
Locate your jetted tub’s dedicated GFCI breaker or wall reset BEFORE filling the tub, press TEST/RESET, and open the closet/skirt panel to check pump unions dry.
BEFORE YOU SIGN A BID • TEXAS CONTRACTOR VETTING & SCAM DEFENSE
Whirlpool / Hydro-Massage Tub Service, Access Panels & GFCI
§ 4.4 Playbook
Texas Credential to VerifyTSBPE Licensed Plumber (RMP) for supply/drain assemblies AND TDLR Licensed Electrical Contractor (TECL) for dedicated GFCI circuits and motor bonding.
Municipal Permit & Inspection RuleMunicipal plumbing and electrical permits required when installing, replacing, or wiring jetted hydro-massage tubs and inline bath heaters.
3 Questions You Must Ask Before Hiring
“Will you preserve or frame a removable, louvered 12x18-inch service access panel in an adjacent closet or tub skirt so the pump and unions never get tiled shut?”
“Are both the circulation pump AND any inline water heater on separate, dedicated 120V GFCI breakers whose TEST buttons are readily reachable in the bathroom or panel?”
“Did you connect the #8 AWG solid copper equipotential bonding lug on the pump motor housing where metal piping or adjacent conductive surfaces exist?”
3 High-Pressure Red Flags & Scams
Bathroom tile remodelers cementing solid porcelain tile across the entire whirlpool skirt—turning a $20 O-ring drip or tripped hidden GFCI into a $2,500 demolition.
Plugging both a 12-amp jet pump and a 12-amp inline bath heater into a single 15-amp bathroom outlet via a hardware-store splitter cord.
Leaving stagnant jet manifolds untested during leak repairs instead of running a 20-minute full-fill agitation test to verify suction/return seals.
HOMEOWNER ACTION TAKEAWAYRISK LEVEL: HIGH
Hydro-Massage Tub Electrical & Sanitation Defense
Ensure your whirlpool pump has an accessible 12×12 inch panel, verify GFCI shock protection, and purge lines regularly to prevent bacterial biofilm.
Recommended Action Steps
Confirm the whirlpool tub pump has an openable service access panel.
Locate and test the dedicated GFCI reset button for the tub motor.
Verify water level covers jets completely before activating the pump.
Immediate Priorities
Confirm the whirlpool tub pump has an openable service access panel.
Locate and test the dedicated GFCI reset button for the tub motor.
Verify water level covers jets completely before activating the pump.
Ongoing Annual Maintenance
Purge and sanitize jet lines quarterly to eliminate black bacterial slime.
Inspect the pump compartment annually for signs of leaks or motor corrosion.
Maintain waterproof caulk around the tub deck rim.
Typical Repair / Replacement Budget:$150 – $450($150–$250 to install a magnetic tile access panel; $350–$650 to replace a burned-out whirlpool pump motor.)
2021/2024 IRC P2720.1 / 2023 NEC 680.71—Access to Whirlpool Pump and GFCI Protection
STATUTORY MODEL CODE TEXT
Circulation equipment and pump motors for hydromassage bathtubs shall be accessible for inspection, service and repair. The access opening shall be not less than 12 inches by 12 inches (305 mm by 305 mm). All electrical equipment associated with the bathtub shall be protected by a ground-fault circuit interrupter.
Exception: Where pump location provides direct access without removable panels.
IN PLAIN ENGLISH
Jetted whirlpool tubs must have at least a 12×12 inch service access opening and must be powered by a dedicated GFCI-protected circuit to eliminate electrical shock hazards.
HOMEOWNER PRO TIP:Test your whirlpool tub's GFCI breaker or reset button every six months. Never run the jets without filling the water level at least 2 inches above the highest jet nozzle to avoid burning out the pump motor.
4.5
Gas Distribution Systems and Gas Appliances: Black Iron, CSST Bonding, Sediment Traps & Appliance Shutoff Valves
CHECK FREQUENCYAnnual Visual Check of CSST Bonding & Gas Meter Riser
RISK IF IGNOREDCRITICAL
Lightning Gas Line Puncture, Gas Leak & Explosion Hazard
1
2
3
WHAT YOU'RE LOOKING ATFIELD INSPECTION ANATOMY
1
Yellow-Jacketed CSST Flexible Tubing:Semi-rigid yellow-jacketed stainless tubing routed through framing to gas appliances.
2
6 AWG Direct Electrical Bonding Clamp:Heavy copper ground wire clamped to brass nut diverting lightning energy away from pipe wall.
3
Sediment Trap & Appliance Shutoff Valve:Vertical nipple and capped tee collecting pipe scale and oil before appliance valve.
GAS SAFETY • CSST DIRECT ELECTRICAL BONDINGYellow jacketed Corrugated Stainless Steel Tubing (CSST) gas supply line with mandatory 6 AWG copper bonding clamp preventing electrical arc puncture from lightning strikes.
3D ARCHITECTURAL CUTAWAY • FIGURE 4.5
FIGURE 4.E: APPLIANCE SEDIMENT TRAP & BONDED CSST TUBING VS. UNBONDED CSST & MISSING GAS SHUTOFF
DONE RIGHT (CODE-COMPLIANT)
Yellow CSST gas tubing bonded to electrical service ground with #6 AWG copper wire
Accessible manual quarter-turn gas ball valve within 6 ft in same room as unit
Vertical 3-inch sediment trap (drip leg) tee installed ahead of appliance inlet
Flexible stainless steel connector protected from physical rub or cabinet pinch
COMMON DEFECT (SAFETY HAZARD)
Unbonded yellow CSST in attic crawlspace vulnerable to lightning pinhole arcing
Missing sediment trap allowing pipe scale to jam appliance automatic gas valve open
Inaccessible gas shutoff valve buried behind finished drywall or inside floor cavity
Appliance flexible connector passing through appliance housing or wall partitions
Detailed illustration showing code-compliant yellow CSST bonded with #6 AWG copper clamp, accessible ball shutoff within 6 ft, and 3-inch vertical sediment trap tee versus unbonded attic CSST with lightning arc puncture hole and missing sediment drip leg.
TEXAS FIELD TRIAGE: 3-STAGE SEVERITY SCALEField Inspection Progression Rubric
STAGE 1NORMAL TEXAS AGING (COSMETIC)
Condition:Light surface paint chipping on exterior black-iron meter riser; dusty shutoff valve behind range.
Action:Paint exterior steel gas piping with rust-inhibiting enamel.Annual Log
Action:Hire licensed electrician/plumber to install 6 AWG CSST bonding jumper within 30 days.30 Days
STAGE 3ACT IMMEDIATELY (URGENT)
Condition:Active rotten-egg gas smell (mercaptan); bubbling soap test on joint; hissed appliance flex line.
Action:Evacuate home immediately; do not flip light switches; call gas utility from outdoors.Immediate
How It Works in Your Home
Your fuel gas distribution system safely delivers natural gas or propane to water heaters, furnaces, ranges, fireplaces, and outdoor appliances.
Natural gas flows from the utility main into your exterior gas meter at low pressure (typically 1/4 PSI or 7 inches water column). The gas meter assembly includes a utility shutoff valve, a pressure regulator, and the gas meter itself. From the meter, gas enters the home through rigid schedule-40 black steel pipe, corrugated stainless steel tubing (CSST), or underground polyethylene piping.
Inside the home, rigid black iron pipes or flexible yellow-jacketed CSST route gas to individual appliance locations. Each gas appliance must have a dedicated manual gas shutoff valve installed within 6 feet of the appliance in the same room, allowing quick shutoff for servicing or emergencies.
At water heaters, furnaces, and boilers, code mandates a 'sediment trap' (drip leg) directly upstream of the appliance control valve. The sediment trap consists of a tee fitting with a capped downward pipe nipple. As gas turns 90 degrees to enter the appliance, inertia forces heavy rust particles, pipe scale, and moisture droplets to fall downward into the capped nipple, preventing debris from clogging sensitive gas burner orifices.
Gas Meter & Master Valve:The exterior gas meter assembly featuring a quarter-turn rectangular valve lug to shut off all gas to the home.
Appliance Shutoff Valve:A brass ball valve located within 6 feet of each gas appliance for localized isolation.
Sediment Trap (Drip Leg):A vertical capped tee fitting on the gas line before water heaters and furnaces that captures rust scale.
CSST Bonding Clamp:A heavy brass grounding clamp and 6 AWG copper wire connecting yellow CSST gas pipes to electrical ground.
What Can Go Wrong & What to Look For
Unbonded CSST tubing, missing sediment traps, and aging appliance flex connectors create severe fire and explosion risks.
Corrugated Stainless Steel Tubing (CSST) is a flexible, thin-walled gas pipe encased in a yellow polyethylene jacket. When lightning strikes on or near a home with unbonded CSST, electrical energy travels through metal building components seeking ground. If the voltage jumps (arcs) between metal pipes or framing and the thin CSST wall, the electrical arc burns a pinhole through the stainless steel, instantly igniting a pressurized blowtorch gas fire inside wall cavities or attics.
Missing sediment traps on water heaters and furnaces allow pipe scale and debris to enter the automatic gas control valve. Debris can jam the valve open, causing continuous gas leakage, or block burner jets, causing incomplete combustion and deadly carbon monoxide production.
Reusing old flexible brass or corrugated gas appliance connectors when installing new appliances is exceedingly dangerous. Repeated bending causes microscopic stress cracks in the thin metal, leading to sudden gas leaks behind ranges or dryers.
Early Warning Signs & Red Flags
Sulfuric 'rotten egg' odor (mercaptan odorant added to natural gas)
Hissing sounds near gas meters, appliances, or piping joints
Yellow or erratic burner flames instead of crisp blue flames on gas stoves
Dead vegetation patches over buried gas lines in the yard
Soot or black scorching on burner access panels of water heaters or furnaces
Yellow CSST gas lines lacking a dedicated 6 AWG copper bonding wire to the electrical grounding electrode, risking lightning arc fires.
Missing Sediment Trap (Drip Leg)ROUTINE
Gas furnace or water heater lacking a downward sediment tee, allowing pipe scale to foul gas valves.
Inaccessible or Missing Appliance Shutoff ValveROUTINE
Appliance lacking a manual shutoff valve in the same room within 6 feet of the unit.
Active Gas Leak at Pipe Joints or ValvesIMMEDIATE ACTION
Combustible gas leakage detected with electronic gas sniffers or bubble solution at fittings.
LIGHTNING GAS SAFETY • § 4.5
Direct Equipotential Bonding on Yellow-Jacketed CSST Gas Lines
Unbonded yellow-jacketed flexible CSST gas tubing can suffer pinhole arc-perforations during nearby Texas lightning strikes unless bonded with a #6 AWG copper jumper to the grounding system.
How Texas Weather & Soil Affect It
Texas lightning frequency and shifting clay soils demand robust gas system protection.
Texas leads the nation in annual cloud-to-ground lightning strikes, with intense thunderstorm activity across North, Central, and East Texas. This high lightning frequency makes proper electrical bonding of Corrugated Stainless Steel Tubing (CSST) an urgent life-safety priority. Modern black-jacketed arc-resistant CSST (CounterStrike/FlashShield) provides superior resistance, but standard yellow CSST requires verified 6 AWG copper bonding.
Expansive clay soil movement can cause exterior gas meters and yard piping to shift. If an exterior gas meter settles or tilts as soil dries out during summer droughts, pipe threads where the line enters the brick wall can experience bending stress and develop leaks.
Texas Climate & Soil Stresses
Frequent severe lightning thunderstorms creating high electrical surge and pipe arcing risks
Soil settlement causing exterior gas meter manifolds to shift and strain wall penetrations
Texas Field Pro Tips
If you smell natural gas, evacuate the home immediately. Do not flip light switches, use phones, or ring doorbells, as a tiny electrical spark can ignite gas.
Keep a dedicated adjustable wrench near your exterior gas meter to shut off the gas valve during a hurricane or structural emergency.
How to Maintain & Protect It
Annual safety inspections and professional gas leak checks ensure complete peace of mind.
Have your gas furnace and water heater inspected annually by a licensed HVAC technician or plumber before each heating season. Technicians verify burner combustion, test for carbon monoxide, and confirm gas pressure.
Check that your yellow CSST gas piping has a heavy green or bare copper wire clamped to it that connects directly to your electrical panel or ground rod. If you do not see a bonding clamp, hire a licensed electrician to install one immediately.
Seasonal Walkthrough Checklist
Spring: Inspect exterior gas meter manifold to ensure it is plumb and not damaged by lawn equipment
Summer: Check that gas appliance shutoff valves are accessible and not blocked by storage boxes
Fall: Have heating equipment combustion and gas valves professionally serviced
Winter: Test carbon monoxide alarms in hallways outside all sleeping areas
HOMEOWNER DECISION MATRIX
DIY Weekend Maintenance vs. Call a Qualified Pro
SAFE 15-MINUTE DIY CARE
Checking that appliance gas shutoff valves are accessible
Applying bubble leak detection solution to suspected joint leaks
Testing carbon monoxide alarms monthly
Keeping an adjustable wrench near the exterior meter for emergency shutoff
WHEN TO CALL A QUALIFIED PRO
Installing 6 AWG copper bonding clamps on CSST gas systems
Repairing active gas leaks on black iron or CSST piping
Adding sediment traps to water heaters or furnaces
Replacing gas appliance flex connectors and testing gas pressure
CLINICAL DIFFERENTIAL FIELD TRIAGE & CONNECTED SYSTEMS§ 4.5 Diagnostic Rubric
Harmless Cosmetic Baseline
A faint whiff of mercaptan for 1 second during burner ignition is normal; otherwise, gas piping must remain 100% odor-free with painted exterior risers.
Active Failure Signal
Persistent rotten-egg sulfur odor, rusted uncoated underground gas risers, unbonded flexible CSST tubing in the attic, or missing appliance shutoff valves.
60-Second Homeowner Check
Never use flames to hunt gas leaks: brush soapy dishwater onto accessible meter/valve unions—growing bubbles reveal leaks; evacuate outdoors if strong odor exists.
Texas Credential to VerifyTSBPE Responsible Master Plumber (RMP) for natural gas; Railroad Commission of Texas (RRC) LP-Gas license for propane; TDLR TECL for CSST bonding.
Municipal Permit & Inspection RuleMandatory municipal plumbing gas permit, calibrated diaphragm pressure test, and city inspector sign-off required before utility gas meter release.
3 Questions You Must Ask Before Hiring
“If my attic contains flexible corrugated stainless steel tubing (CSST), will a licensed electrician install a #6 AWG copper bonding jumper from the brass manifold nut to the grounding electrode?”
“Will you isolate appliance valves and perform a calibrated low-pressure manometer/diaphragm pressure drop test across the entire house gas system?”
“Does every gas furnace, water heater, and dryer connection include a vertical 3-inch dirt/sediment trap downstream of an accessible quarter-turn shutoff valve?”
3 High-Pressure Red Flags & Scams
Clamping a ground wire directly onto the thin corrugated stainless steel jacket of CSST instead of the heavy brass manifold hex fitting—which actually increases lightning arc risk!
Using white plumbing Teflon water tape or unlisted thread dope on black-iron gas threads instead of fuel-gas-rated pipe joint compound.
Burying uncoated indoor black-iron gas pipe underground to feed a pool heater or firepit—where moist Texas soil corrodes pinholes within 3 years.
HOMEOWNER ACTION TAKEAWAYRISK LEVEL: CRITICAL
Gas Piping & Appliance Sediment Trap Safety Playbook
Bond yellow CSST gas lines with 6 AWG copper wire to prevent lightning fires, verify sediment traps on heating equipment, and know your gas meter shutoff location.
Recommended Action Steps
Verify yellow CSST gas piping is bonded to the electrical grounding electrode with 6 AWG copper wire.
Confirm all gas water heaters and furnaces feature a sediment trap (drip leg).
Locate the gas meter shutoff valve and ensure a wrench is readily accessible.
Immediate Priorities
Verify yellow CSST gas piping is bonded to the electrical grounding electrode with 6 AWG copper wire.
Confirm all gas water heaters and furnaces feature a sediment trap (drip leg).
Locate the gas meter shutoff valve and ensure a wrench is readily accessible.
Ongoing Annual Maintenance
Have gas heating equipment serviced annually before winter.
Test carbon monoxide detectors monthly on every floor.
Never reuse flexible stainless steel appliance gas connectors.
Typical Repair / Replacement Budget:$150 – $350($150–$350 to install a 6 AWG CSST bonding clamp; $120–$250 to install a missing sediment trap on a water heater or furnace.)
Expected Assembly Lifespan:Black Steel Pipe: 75+ years; CSST: 50+ years; Gas Valves: 25–30 years; Appliance Flex Connectors: 10–15 years
ICC DIGITAL CODES2021 / 2024 IRC
2021/2024 IRC G2411.1.1 / G2419.4—CSST Electrical Bonding and Sediment Traps
STATUTORY MODEL CODE TEXT
Corrugated stainless steel tubing (CSST) gas piping systems shall be bonded to the electrical service grounding system with not smaller than 6 AWG copper wire. Where an appliance is fueled by gas, a sediment trap shall be installed downstream of the appliance shutoff valve and as close to the inlet of the appliance as practical.
Exception: Illuminating appliances, gas ranges, clothes dryers, outdoor grills and gas fireplaces do not require sediment traps.
IN PLAIN ENGLISH
Yellow CSST flexible gas lines must be grounded with 6-gauge copper wire to prevent lightning strikes from blowing holes in the pipe, and water heaters/furnaces require sediment traps to catch pipe debris.
HOMEOWNER PRO TIP:If your attic or utility closet has yellow flexible gas lines, check that a heavy green or bare copper wire connects them to your main electrical panel. Without this bonding wire, a nearby lightning strike can puncture the pipe and start a fire.
CHECK FREQUENCYMonthly Salt Level Check • Annual Resin Cleaner Treatment
RISK IF IGNOREDMODERATE
Severe Hard Water Scale Clogging Water Heaters & Fixtures
1
2
3
WHAT YOU'RE LOOKING ATFIELD INSPECTION ANATOMY
1
Mineral Resin Tank & Control Head:Automated valve cycling sodium brine wash to remove hard Texas limestone calcium.
2
Salt Brine Storage Tank:Heavy-duty container storing pellet salt necessary for resin bed regeneration.
3
3-Valve Softener Bypass Loop:Plumbing manifold allowing homeowner to isolate softener for irrigation or servicing.
WATER TREATMENT • WHOLE-HOUSE SOFTENER & FILTRATIONIon-exchange water softener with digital metering head, salt brine tank, bypass valve manifold, and multi-stage sediment filtration in a Texas garage.
3D ARCHITECTURAL CUTAWAY • FIGURE 4.6
FIGURE 4.F: ANTI-SIPHON FROST-PROOF HOSE BIBB VS. BURST PIPE FROM ATTACHED WINTER HOSE & OPEN SIPHON
DONE RIGHT (CODE-COMPLIANT)
10"–12" frost-free barrel placing valve seat deep in heated interior wall cavity
Integrated atmospheric vacuum breaker preventing back-siphonage into drinking water
Garden hose detached in winter allowing internal barrel water to drain completely
Missing atmospheric vacuum breaker risking pesticide back-siphonage into drinking taps
Water softener brine line shoved directly into sewer pipe without physical air gap
Technical illustration contrasting a code-compliant frost-free sillcock with deep interior valve seat and vacuum breaker versus winter burst damage from an attached garden hose and chemical back-siphonage risk.
TEXAS FIELD TRIAGE: 3-STAGE SEVERITY SCALEField Inspection Progression Rubric
STAGE 1NORMAL TEXAS AGING (COSMETIC)
Condition:Water softener brine tank salt crusting above water; sediment filter cartridge turning light tan.
Action:Break up salt bridge gently; swap 10-inch filter cartridge.Annual Log
STAGE 2WATCH & MAINTAIN (30–90 DAYS)
Condition:Reverse osmosis drinking system delivering sluggish flow (<1 glass/min); brine tank water abnormally high.
Action:Replace RO pre-filters and sanitize brine tank float valve within 30–60 days.30–60 Days
STAGE 3ACT IMMEDIATELY (URGENT)
Condition:Water softener resin tank bead rupture discharging yellow resin beads into all faucets and toilets.
Action:Turn bypass valve on softener head immediately; flush cold lines to purge beads.Immediate
How It Works in Your Home
Exterior hose spigots and whole-house water treatment systems protect drinking water quality and defend against mineral scaling.
Exterior hose bibbs (sillcocks) provide water for lawn care, gardening, and vehicle washing. Modern Texas homes utilize frost-free sillcocks—long brass valves (8 to 14 inches deep) where the actual shutoff seat is located deep inside the conditioned, heated wall cavity rather than outside in the cold. When turned off, the remaining water drains out the front spout, leaving the exterior section dry.
To protect your home's potable drinking supply, exterior faucets must feature an anti-siphon vacuum breaker. When you attach a garden hose that sits submerged in a bucket of fertilizer or garden puddle, a sudden municipal pressure drop could siphon that dirty water backward into your kitchen tap. The vacuum breaker vents air to break the siphon the moment supply pressure drops.
Water softeners use an ion-exchange process to remove hard calcium and magnesium minerals from municipal water. Hard water passes through a resin tank where sodium ions replace mineral ions. Periodically, the system flushes the resin with saltwater from an adjacent brine tank, discharging mineral brine through a dedicated drain line. To prevent raw sewer water from contaminating your water softener, code requires a physical 'air gap' fitting where the softener drain line discharges into the plumbing system.
Frost-Free Sillcock:An elongated outdoor faucet with the shutoff valve seated deep inside the heated wall structure.
Anti-Siphon Vacuum Breaker:A backflow prevention valve screwed or integrated onto hose spigots to stop back-siphonage.
Ion-Exchange Water Softener:A dual-tank system that removes hard calcium minerals to prevent pipe scale and fixture spotting.
Drain Air Gap Fitting:A physical air separation device on the water softener drain line preventing sewer water back-siphonage.
What Can Go Wrong & What to Look For
Connected hoses during winter freezes, missing vacuum breakers, and un-gapped water softener drains are frequent plumbing problems.
Leaving a garden hose connected to a frost-free outdoor faucet during a freezing winter night is the leading cause of burst pipes in Texas. Even though the valve is 'frost-free', the attached hose traps water inside the brass barrel. As the trapped water freezes and expands, it splits the copper barrel inside the wall cavity. When you turn the spigot on in the spring, high-pressure water floods directly into your exterior wall framing, soaking insulation and drywall.
Missing anti-siphon vacuum breakers allow garden hose water to back-siphon into your home's drinking supply, introducing lawn chemicals and bacteria into drinking water.
Connecting a water softener drain hose directly into a sewer pipe without a physical air gap creates a cross-connection hazard. If the sewer line backs up, contaminated sewage can be sucked backward through the drain tube directly into the water softener resin tank, contaminating your drinking water.
Early Warning Signs & Red Flags
Water spraying or leaking from the handle of outdoor hose spigots when turned on
Water running inside wall cavities or soaking interior baseboards when an outdoor faucet is turned on
Water softener salt tank filled with water ('salt bridge' or failed brine valve)
Salt crusting or mineral build-up around water softener bypass valves
Missing vacuum breakers on threaded exterior faucets
Freeze-Split Frost-Free SillcockIMMEDIATE ACTION
Outdoor faucet split inside the wall cavity due to a connected garden hose during freezing temperatures.
Missing Anti-Siphon Vacuum BreakerROUTINE
Threaded outdoor hose faucet lacking a backflow prevention device, risking drinking water contamination.
Direct-Connected Water Softener DrainROUTINE
Water softener drain line connected directly into a waste pipe without a certified physical air gap.
Leaking Sump Pump or Backflow ValveMONITOR
Failed check valve on groundwater sump pumps allowing pumped water to flow backward into the pit.
Pairing frost-free exterior hose bibbs with a smart motorized main-line shutoff valve automatically stops catastrophic flooding if a pipe bursts while you are traveling.
How Texas Weather & Soil Affect It
Severe Texas freezes and high mineral water hardness make outdoor fixture protection and water softening essential.
Texas Arctic freeze events regularly catch homeowners unprepared. Because exterior brick veneer conducts sub-freezing temperatures deep into wall cavities, uninsulated outdoor plumbing spigots freeze in hours. In older homes where conventional short-shank sillcocks were installed instead of frost-free models, the valve body freezes immediately unless wrapped in heavy insulated foam covers.
Water hardness across Texas suburban regions frequently measures 15 to 25 grains per gallon (GPG), categorized as 'very hard' to 'extremely hard'. Without water softening, this intense mineral load coats water heater elements, clogs showerhead nozzles, and leaves white crust on bathroom fixtures.
Texas Climate & Soil Stresses
Sudden Arctic blue northers dropping temperatures from 70°F to 20°F in hours
High mineral water hardness scaling pipes, fixtures, and appliances
Texas Field Pro Tips
Always disconnect all garden hoses, splitters, and timers from outdoor faucets by November 15 each year.
Install rigid foam insulating faucet covers over all exterior spigots before every freeze.
How to Maintain & Protect It
Seasonal freeze prep and regular water softener salt checks protect outdoor plumbing and water quality.
Disconnect every outdoor garden hose before freezing weather. Check that vacuum breaker rubber washers are clean and not leaking when faucets are pressurized.
Check your water softener brine tank monthly. Keep salt pellets filled above the water level, and break up any hardened 'salt bridges' with a broom handle so salt can dissolve properly during regeneration.
Seasonal Walkthrough Checklist
Spring: Pressurize outdoor faucets and check interior wall baseboards for hidden freeze leaks
Summer: Check water softener salt level and verify regeneration metering settings
Fall: Disconnect all garden hoses, drain outdoor bibbs, and install insulated freeze covers
Winter: In extreme freezes, check that outdoor foam covers remain firmly strapped in place
HOMEOWNER DECISION MATRIX
DIY Weekend Maintenance vs. Call a Qualified Pro
SAFE 15-MINUTE DIY CARE
Disconnecting garden hoses before freezing weather
Installing insulated foam freeze caps on outdoor faucets
Adding water softener salt pellets to the brine tank
Replacing a freeze-burst frost-free sillcock inside a brick wall
Installing an ion-exchange water softener with proper air gap drainage
Installing whole-home sediment and carbon filtration systems
Replacing failed groundwater sump pumps and check valves
CLINICAL DIFFERENTIAL FIELD TRIAGE & CONNECTED SYSTEMS§ 4.6 Diagnostic Rubric
Harmless Cosmetic Baseline
A brief 2-second squirt from an exterior spigot anti-siphon vacuum breaker right after shutting off a garden hose simply relieves hose backpressure.
Active Failure Signal
Hose bibbs dripping inside brick walls when turned on in spring (split freeze stem), salty lawn burn from unbypassed softeners, or air-gapless filter drains.
60-Second Homeowner Check
Open an exterior hose bibb while holding your thumb firmly over the spout—listen and watch inside the adjacent interior wall for hidden freeze-burst hissing.
BEFORE YOU SIGN A BID • TEXAS CONTRACTOR VETTING & SCAM DEFENSE
Water Softeners, Whole-House Filtration, Spigots & Smart Shutoffs
§ 4.6 Playbook
Texas Credential to VerifyTSBPE Licensed Plumber (RMP) for main-line tie-ins AND TCEQ Licensed Water Treatment Specialist (WTI Class II/III) — verify at tceq.texas.gov.
Municipal Permit & Inspection RuleMunicipal plumbing permit required in most Texas cities when cutting into the main service line for softeners, backflow valves, or smart shutoffs.
3 Questions You Must Ask Before Hiring
“Did you test raw water hardness (grains per gallon), iron, and municipal chloramines with a calibrated titration kit—not a free-gift-card sales strip trick?”
“Will you install a 3-valve copper/PEX bypass manifold AND keep exterior lawn hose bibbs plumbed to unsoftened water so potassium/sodium brine never burns my St. Augustine grass?”
“Where does the softener regeneration backwash line discharge, and does it terminate through a code-compliant 1.5-inch physical air gap into a trapped standpipe?”
3 High-Pressure Red Flags & Scams
Door-to-door “free water test” pitchers adding chemical precipitants to tap water to create scary brown sludge in a beaker and push an $8,500 Proprietary Conditioner.
Shoving a softener or reverse-osmosis drain tube directly inside a sewer cleanout or P-trap with zero air gap—risking raw sewage siphonage into your drinking water.
Replacing exterior hose bibbs without anti-siphon vacuum breakers, allowing lawn-chemical hose sprayers to back-siphon into household faucets.
Disconnect garden hoses before freezes, install vacuum breakers on all exterior faucets, and maintain an air gap on water softener drain lines.
Recommended Action Steps
Disconnect all garden hoses and timers before freezing temperatures arrive.
Install vacuum breakers on any threaded outdoor faucets lacking anti-siphon protection.
Confirm water softener drain lines have a physical air gap before entering waste pipes.
Immediate Priorities
Disconnect all garden hoses and timers before freezing temperatures arrive.
Install vacuum breakers on any threaded outdoor faucets lacking anti-siphon protection.
Confirm water softener drain lines have a physical air gap before entering waste pipes.
Ongoing Annual Maintenance
Replace damaged foam hose bibb covers annually prior to winter.
Check water softener salt levels monthly and break up any salt bridging.
Test outdoor sillcocks in early spring to verify zero internal wall leaks.
Typical Repair / Replacement Budget:$45 – $450($45–$90 for vacuum breakers and air gap fittings; $250–$450 to replace a freeze-split frost-free sillcock inside a brick wall.)
Expected Assembly Lifespan:Frost-Free Sillcock: 15–20 years; Vacuum Breaker: 5–8 years; Water Softener: 10–15 years
ICC DIGITAL CODES2021 / 2024 IRC
2021/2024 IRC P2902.1 / P2902.4.3—Backflow Protection on Hose Bibbs and Softener Air Gaps
STATUTORY MODEL CODE TEXT
A device or method shall be installed to prevent the backflow of nonpotable water into the potable water supply. Hose bibbs shall be protected against backflow by an atmospheric vacuum breaker or hose connection backflow preventer conforming to ASSE 1011 or ASSE 1052. Water softeners and filtration systems shall discharge through a certified physical air gap.
Exception: Hose connections intended for dedicated water heater drainage.
IN PLAIN ENGLISH
Exterior hose spigots must have vacuum breaker valves to keep dirty garden hose water from siphoning into your drinking water, and water softener drain lines must have an air gap.
HOMEOWNER PRO TIP:Before the first freeze each winter, always disconnect garden hoses from outdoor faucets. Even a 'frost-free' sillcock will burst inside your brick wall if a connected hose prevents trapped water from draining.
Chapter 5 • V
Built-In Household Appliances
Dishwashers, Food Waste Disposers, Range Hoods, Cooking Ranges, Microwave Ovens, Exhaust Vents, Garage Door Openers & Dryer Ductwork
Chapter 5 covers the complete spectrum of built-in kitchen, laundry, and garage appliances: verifying proper electrical and water connections, preventing backflow through high drain loops, safe exterior exhaust ducting, anti-tip range protection, garage door auto-reversing safety, and dryer lint fire defense.
SCAN FOR LIVE DIGITAL TOOLS & UPDATES
Chapter 5 Digital Companion
Appliances & Mechanicals
Instant mobile access to appliance manufacturer recall verifications, anti-tip bracket checks, and dryer duct safety standards.
3D cutaway highlighting built-in residential appliance safety assemblies: under-sink dishwasher high-loop, rigid metal range and clothes-dryer exhaust ducts, range anti-tip brackets, and ≤6" garage photo-eye sensors.
CHECK FREQUENCYMonthly Filter Clean • Semi-Annual Door Seal Check
RISK IF IGNOREDHIGH
Sink Waste Siphoning into Dishes & Kitchen Floor Rot ($3k–$8k)
1
2
3
WHAT YOU'RE LOOKING ATFIELD INSPECTION ANATOMY
1
32-Inch Drain Hose High Loop:Hose fastened high against underside of countertop preventing sink back-siphonage.
2
Garbage Disposer Drain Port:Clean barb connection with internal knockout plug removed for full water flow.
3
Under-Cabinet Leak Pan / Mat:Protective waterproof tray catching minor valve drips before subfloor rots.
PLUMBING DETAIL • DISHWASHER HIGH LOOP DRAINUnder-sink inspection revealing a properly secured dishwasher flexible drain hose looped high against the underside of the countertop to prevent contaminated sink backflow.
3D ARCHITECTURAL CUTAWAY • FIGURE 5.1
FIGURE 5.A: DISHWASHER HIGH DRAIN LOOP & GFCI OUTLET VS. SINK S-DRAIN BACKFLOW & UNANCHORED CHASSIS
DONE RIGHT (CODE-COMPLIANT)
Drain hose secured in high loop under countertop higher than sink flood rim
Chassis securely anchored to countertop underside or cabinet stiles with brackets
Accessible dedicated GFCI receptacle located in adjacent sink base cabinet
Counterbalanced door springs descending smoothly without sudden dropping
COMMON DEFECT (SAFETY HAZARD)
Missing high drain loop allowing contaminated disposer slurry to back-siphon into tub
Unanchored chassis tipping forward when loaded dish racks are extended
Active water leakage around door gaskets or supply valve fittings beneath cabinet
Broken door balance cables allowing heavy door to drop violently to floor
Comparative technical illustration of code-compliant undercounter dishwasher installation featuring countertop high drain loop, cabinet anchoring brackets, and accessible GFCI versus common defects including flat drain hose siphoning sink wastewater and unanchored tipping chassis.
TEXAS FIELD TRIAGE: 3-STAGE SEVERITY SCALEField Inspection Progression Rubric
STAGE 1NORMAL TEXAS AGING (COSMETIC)
Condition:Filter basket at bottom of tub showing crumb buildup; minor hard water spots on glassware.
Action:Rinse filter under tap monthly; run cycle with cleaner tablet.Annual Log
STAGE 2WATCH & MAINTAIN (30–90 DAYS)
Condition:Drain hose under sink sagging without high-loop or air-gap (risking wastewater siphoning back in).
Action:Clamp drain hose high to underside of countertop within 30 days.30 Days
STAGE 3ACT IMMEDIATELY (URGENT)
Condition:Active water pooling under kitchen cabinets beneath dishwasher motor; door gasket dumping water.
Action:Shut off under-sink dishwasher supply stop and breaker immediately; call technician.Immediate
How It Works in Your Home
Your built-in dishwasher integrates electrical power, pressurized hot water supply, and automated sanitary drainage within custom kitchen cabinetry.
A residential built-in dishwasher connects to three distinct home utility systems: a dedicated 120-volt electrical circuit, a flexible 3/8-inch braided hot water supply line, and a flexible corrugated drain discharge hose connecting into the sink plumbing or garbage disposal.
During a typical wash cycle, hot water fills the tub base, where an internal heating element boosts temperature up to 140°F. The wash circulation pump forces hot soapy water through spinning upper and lower spray arms to blast away grease and food particles. At cycle completion, an internal drain pump discharges dirty wash water out through the flexible drain hose into your kitchen sink drain.
To prevent dirty sink wastewater and food waste from siphoning backward into the clean dishwasher basin, the drain hose must be routed in a high loop fastened to the underside of the countertop higher than the sink's flood-level rim, or connect through a deck-mounted physical air gap fitting.
Countertop High Drain Loop:The flexible drain hose elevated and anchored to the underside of the countertop to create an anti-siphon backflow barrier.
Cabinet Anti-Tip Brackets:Metal mounting brackets securing the top or sides of the dishwasher chassis to adjacent cabinetry.
Water Inlet Valve & Solenoid:The electromechanical valve controlling pressurized hot water entry into the tub.
Door Counterbalance Springs:Heavy-duty tension springs and cables preventing the heavy door from dropping suddenly to the floor.
What Can Go Wrong & What to Look For
Missing drain loops, unanchored tipping chassis, and slow door gasket leaks are the most common dishwasher defects.
The single most common installation defect in modern kitchens is a missing drain high loop. When an installer allows the drain hose to sag or lie flat on the cabinet floor, dirty water and greasy disposer slurry gravity-siphon directly backward into the dishwasher basin, coating clean dishes with bacteria and clogging the internal filter.
Unanchored chassis movement creates serious safety and structural hazards. When a dishwasher is loaded with heavy stoneware and both dishracks are pulled fully forward, the center of gravity shifts. Without top or side cabinet anchor screws, the entire 120-pound machine tips forward violently, which can crush small children or snap under-sink hot water copper supply lines.
Degraded perimeter door gaskets and faulty door latch switches allow hot water and steam to escape, silently rotting hardwood cabinet kickplates and subflooring beneath the kitchen island.
Early Warning Signs & Red Flags
Foul, standing dirty water pooling in the bottom of the dishwasher after a wash cycle
Dishes emerging with cloudy food film or foul sewer odors
Dishwasher tilting forward when the bottom dish rack is loaded with plates
Dampness or swollen cabinet wood along the toe-kick directly under the appliance
Dishwasher door dropping like a dead weight when unlatched
Missing Countertop Drain High LoopROUTINE
Flexible drain hose sagging across the cabinet floor without high-loop anti-siphon elevation.
Unanchored Dishwasher ChassisIMMEDIATE ACTION
Chassis lacking mounting screws into countertop or cabinet stiles, risking forward tipping.
Perimeter Door Gasket LeaksMONITOR
Worn or compressed rubber door seal weeping water during circulation cycles onto subflooring.
Broken Door Balance Cable / SpringROUTINE
Snapped counterbalance cable allowing the heavy door to drop violently to the floor.
Every six months, shine a flashlight beneath the kitchen sink while the dishwasher drains to confirm the hose remains clipped tightly beneath the countertop and braided supply fittings stay dry.
How Texas Weather & Soil Affect It
Hard Texas water scale and seasonal cabinet movement impact dishwasher performance.
Dissolved calcium and magnesium minerals in hard Texas water precipitate out during the 140°F wash and dry cycles. Over time, white mineral scale clogs microscopic spray arm nozzles, coats internal heating elements, and glazes glassware with cloudy silica etching that cannot be washed off.
Shifting indoor humidity between humid Texas summers and heated winter interiors causes kitchen island cabinets to expand and contract slightly, which can loosen cabinet mounting anchor screws and pinch under-sink flexible drain lines.
Texas Climate & Soil Stresses
Extreme municipal water hardness leaving calcium scale on spray arms and heating elements
Seasonal humidity swings causing cabinet expansion that loosens mounting screws
Texas Field Pro Tips
Run 1 cup of distilled white vinegar in an upright glass on the top rack once a month to dissolve hard water calcium scale.
Look under your kitchen sink today: verify the flexible ribbed drain hose curves upward to touch the underside of the countertop before dropping down to the disposer.
How to Maintain & Protect It
Routine filter cleaning and monthly descaling ensure sparkling dishes and leak-free operation.
Twist and remove the circular micro-mesh filter located at the bottom of the dishwasher tub once a month. Rinse it under warm running water with a soft nylon brush to clear trapped food debris, popcorn kernels, and grease.
Inspect the flexible perimeter rubber door gasket every six months. Wipe away accumulated soap scum and food residue with a damp cloth, checking for tears or brittle sections that allow steam leaks.
Seasonal Walkthrough Checklist
Spring: Check under-sink cabinet floor with a flashlight during a wash cycle for weeping drain hose leaks
Summer: Run a dishwasher cleaning tablet or vinegar cycle to dissolve hard water scale
Fall: Verify the chassis mounting screws are firmly tightened into the countertop underside
Winter: Inspect and clean the lower spray arm nozzles of mineral deposits using a toothpick
HOMEOWNER DECISION MATRIX
DIY Weekend Maintenance vs. Call a Qualified Pro
SAFE 15-MINUTE DIY CARE
Cleaning the bottom tub filter screen monthly
Fastening the drain hose into a high loop under the countertop with a plastic pipe clamp
Running vinegar or citric acid descaling cycles
Wiping down door gaskets and clearing spray arm holes
WHEN TO CALL A QUALIFIED PRO
Replacing burned-out internal heating elements or wash circulation pumps
Installing new under-counter mounting brackets into granite or quartz countertops
Replacing worn door balance spring mechanisms and tension cables
Replacing leaking water inlet solenoids and copper supply lines
CLINICAL DIFFERENTIAL FIELD TRIAGE & CONNECTED SYSTEMS§ 5.1 Diagnostic Rubric
Harmless Cosmetic Baseline
A thin pool of clean rinse water sitting below the removable bottom sump screen keeps internal rubber pump seals lubricated so they do not dry and crack.
Active Failure Signal
Dirty sink water backing into a stopped dishwasher, forward tipping when pulling loaded racks out, or moisture weeping beneath toe-kick trim onto wood floors.
60-Second Homeowner Check
Look inside your kitchen sink cabinet: trace the ribbed white/gray dishwasher drain hose and confirm it loops tightly up against the underside of the countertop.
BEFORE YOU SIGN A BID • TEXAS CONTRACTOR VETTING & SCAM DEFENSE
Built-In Dishwasher Installation, High-Loop Drain & Leak Pan
§ 5.1 Playbook
Texas Credential to VerifyTDLR Licensed Residential Appliance Installer (RAI / RAIC) or TSBPE Licensed Plumber — verify license at tdlr.texas.gov.
Municipal Permit & Inspection RuleElectrical/plumbing permit required when converting hardwired whips to an accessible adjacent-cabinet GFCI receptacle or relocating rough-ins.
3 Questions You Must Ask Before Hiring
“Will you fasten the corrugated drain hose at the absolute highest point beneath the countertop ( >=32 inches high loop) OR connect to a deck air gap so sink water never backs into the tub?”
“Did you knock out the plastic disposal drain plug on a brand-new garbage disposer before clamping the dishwasher discharge boot?”
“Are you installing a fresh braided stainless-steel 90-degree supply elbow, top/side granite mounting brackets, and an accessible adjacent-cabinet GFCI plug?”
3 High-Pressure Red Flags & Scams
Free delivery drop-off crews driving wood mounting screws straight upward through a thin 2cm quartz/granite countertop overhang and cracking the stone.
Forgetting to knock out a new disposer’s plastic inlet plug—causing the dishwasher to flood the kitchen floor on its very first rinse cycle.
Reusing a 12-year-old stiff rubber supply hose behind built-in cabinetry where slow drips buckle hardwood kitchen floors for months unseen.
HOMEOWNER ACTION TAKEAWAYRISK LEVEL: MEDIUM
Dishwasher High Loop & Backflow Prevention Stewardship
Secure the drain hose into a countertop high loop to prevent wastewater back-siphonage, ensure the chassis is anchored against tipping, and clean the tub filter monthly.
Recommended Action Steps
Check under the kitchen sink to verify the drain hose loops high against the countertop.
Gently pull on the top edge of the open dishwasher door to confirm the chassis is anchored.
Inspect the cabinet base for any evidence of past water leakage.
Immediate Priorities
Check under the kitchen sink to verify the drain hose loops high against the countertop.
Gently pull on the top edge of the open dishwasher door to confirm the chassis is anchored.
Inspect the cabinet base for any evidence of past water leakage.
Ongoing Annual Maintenance
Clean the cylindrical tub filter screen monthly under warm tap water.
Descale the interior with a cup of vinegar every 30 to 60 days.
Wipe the perimeter door rubber gasket clean of food debris.
Typical Repair / Replacement Budget:$50 – $250($50–$100 to strap a high loop and secure cabinet brackets; $180–$350 to replace a leaking inlet valve or door balance cables.)
Expected Assembly Lifespan:Built-In Dishwasher: 8–12 years; Door Gaskets: 5–8 years; Drain Hose: 10 years
ICC DIGITAL CODES2021 / 2024 IRC
2021/2024 IRC P2717.2—Dishwasher Waste Air Gap and High Loop Connection
STATUTORY MODEL CODE TEXT
The discharge line from a dishwasher shall be connected to a deck-mounted air gap or shall rise and be securely fastened to the underside of the counter, forming an approved high loop before connecting to the disposal inlet or waste tailpiece.
Exception: Where the dishwasher features an integrated internal air break certified by the manufacturer.
IN PLAIN ENGLISH
Dishwasher drain hoses must loop high against the underside of the countertop before connecting to the disposer to prevent dirty sink wastewater from siphoning into clean dishes.
HOMEOWNER PRO TIP:Look under your kitchen sink. If your dishwasher drain hose runs flat along the cabinet floor, fasten it to the highest point under the countertop with a sturdy strap to prevent backflow.
Raw Romex wire passing through sharp sheet metal knockout without protective clamp
Corroded internal grinding chamber leaking wastewater through bottom reset button
Motor humming without spinning due to calcified or jammed flywheel impellers
Loose mounting ring vibrating heavily and loosening under-sink drainage slip nuts
Comparative technical illustration of code-compliant food waste disposer with metallic cord clamp bushing, secure three-bolt mounting ring, and rubber splash guard versus hazardous installation with raw Romex chafing in sharp knockout hole and perforated leaking casing.
TEXAS FIELD TRIAGE: 3-STAGE SEVERITY SCALEField Inspection Progression Rubric
STAGE 1NORMAL TEXAS AGING (COSMETIC)
Condition:Minor food odor from grind chamber; sluggish drainage past rubber splash baffle.
Action:Grind 2 cups ice cubes with lemon peels and cold water.Annual Log
STAGE 2WATCH & MAINTAIN (30–90 DAYS)
Condition:Disposer motor hums without spinning (jammed flywheel); wiring entering casing without clamp.
Action:Use 1/4" hex Allen wrench in bottom socket to free jam; press red reset; install clamp.30 Days
STAGE 3ACT IMMEDIATELY (URGENT)
Condition:Heavy water leaking through motor casing bottom vents into cabinet; electrical tingle at sink flange.
Action:Unplug disposer under sink immediately; replace unit before using sink basin.Immediate
How It Works in Your Home
Your under-sink food waste disposer uses a high-speed centrifugal flywheel and shredder ring to pulverize soft organic food scraps into fine slurry.
A food waste disposer is suspended directly beneath the kitchen sink drain by a heavy-duty three-bolt mounting flange ring with an airtight rubber cushion gasket. Powered by an electric motor (typically 1/3 to 1 horsepower spinning at 1,725 RPM), the disposer uses centrifugal force to fling food scraps against a stationary perforated shredder ring rather than using spinning blades.
Blunt metal swivel impellers mounted on the rotating flywheel plate grind and shear food matter down to particles smaller than 1/8 inch, which wash through the shredder slots with cold water into the discharge elbow and P-trap.
The disposer operates in a harsh, wet, high-vibration environment directly beneath water fixtures. To prevent fire and electrical shock, electrical cables entering the metal junction box at the base must be protected by a certified metal strain-relief clamp that grips the cable securely and prevents wire insulation from rubbing against sharp metal knockout edges.
Sink Flange & Quick-Lock Ring:The three-bolt mounting assembly sealing the disposer to the sink drain opening.
Centrifugal Shredder Ring:The stationary serrated metal ring that shears food waste into micro-particles.
Strain-Relief Clamp:A metal clamp securing electrical wiring at the motor base to prevent insulation chafing.
Manual Jam Unsticking Socket:A 1/4-inch hex socket in the bottom center of the motor shaft used with an Allen wrench to manually free jams.
What Can Go Wrong & What to Look For
Missing wiring strain relief clamps, loose mounting collars, and internal housing corrosion are frequent safety defects.
A missing electrical clamp (strain relief connector) where the power cable enters the bottom of the disposer motor housing is a critical fire and shock hazard. Without this clamp, motor vibrations cause the sharp metal hole to saw through the plastic Romex wire insulation, causing electrical shorts, metal housing electrification, and sparks inside the cabinet.
Loose or improperly seated sink mounting rings allow the entire heavy disposer to wobble during operation. Over time, vibration breaks the plumber's putty seal beneath the sink flange, allowing sink water to pour continuously into the cabinet wood base.
When hard objects (bones, fruit pits, bottle caps) wedge between the impeller and the shredder ring, the motor stalls. If left energized, the motor overheats and trips the internal red overload circuit breaker on the bottom of the unit.
Early Warning Signs & Red Flags
Disposer hums loudly when the wall switch is turned on but the flywheel will not spin
Disposer unit does nothing at all when switched on (tripped overload button or dead power)
Water dripping from the bottom motor housing or electrical junction box
Excessive, violent shaking of the sink basin when the disposer operates
Persistent sour odors coming from the sink drain opening
Electrical cable passing through raw sheet-metal knockout without protective clamp, risking insulation chafing.
Corroded / Weeping Housing BaseIMMEDIATE ACTION
Internal motor shaft seal failed, weeping water through the bottom electrical junction chamber.
Loose Sink Mounting FlangeROUTINE
Wobbly mounting collar causing active water leaks around the sink drain opening.
Seized Impeller FlywheelROUTINE
Debris jammed between flywheel and shredder ring causing motor hum and thermal tripping.
CORD STRAIN RELIEF • § 5.2
Why Missing Metal Knock-Out Clamps Chafe Disposer Power Cords
High-RPM disposer vibration saws bare romex or appliance cords right against sharp steel housing knockouts whenever installers skip the $2 UL-listed cable strain-relief clamp.
How Texas Weather & Soil Affect It
Texas grease disposal habits and municipal drain lateral sensitivities require careful disposer management.
Texas cuisine often involves cooking with cooking oils, butter, and animal fats. When hot grease is poured into a disposer, cold water solidifies it inside long under-slab drain pipes. Expansive clay soils frequently cause minor dips or sags in under-slab pipes; grease accumulates in these sags, creating stubborn blockages that require professional hydro-jetting.
In homes on private septic systems (OSSF) widespread across suburban Texas acreage properties, heavy garbage disposer use overloads septic tanks with undigested solids, requiring much more frequent tank pumping.
Septic system microbial overload from excessive food scrap disposal
Texas Field Pro Tips
Always run cold water for 10 seconds before, during, and after running your disposer. Cold water keeps fats solid so impellers can chop them up before they coat downstream pipes.
Never grind fibrous materials (corn husks, celery, artichokes, onion skins) or starchy foods (potato peels, pasta, rice), which form thick paste that plugs P-traps.
How to Maintain & Protect It
Learn how to free jams with a simple Allen wrench and keep cutting chambers fresh.
If your disposer hums and stops spinning, turn the wall switch OFF immediately. Never stick your fingers into the grind chamber. Insert a standard 1/4-inch hex Allen wrench into the small center hole on the very bottom of the disposer motor. Rotate the wrench back and forth clockwise and counterclockwise to manually spin the flywheel and dislodge the jammed object.
Once the flywheel spins freely, use tongs to remove the foreign object from inside the sink. Press the small red overload reset button on the bottom of the motor, turn on cold water, and flip the switch.
Freshen grinding chambers by tossing in a handful of ice cubes and lemon or lime wedges, then running the unit with cold water for 30 seconds to scour residue off internal walls.
Seasonal Walkthrough Checklist
Spring: Check under the sink with a dry paper towel around the disposer mounting flange for leaks
Summer: Scour the grind chamber with ice cubes and citrus peels to eliminate fruit fly odors
Fall: Verify the electrical cable clamp is tight and no wires are pinched or exposed
Winter: Test the red overload reset button to ensure it operates smoothly
HOMEOWNER DECISION MATRIX
DIY Weekend Maintenance vs. Call a Qualified Pro
SAFE 15-MINUTE DIY CARE
Freeing flywheel jams using an Allen wrench in the bottom center socket
Resetting the red thermal overload button on the motor bottom
Replacing worn black rubber sink splash baffles
Freshening the grind chamber with ice and baking soda
WHEN TO CALL A QUALIFIED PRO
Installing a missing metal Romex strain-relief clamp on the junction box
Replacing a leaking or corroded disposer unit
Re-sealing a loose sink mounting flange with fresh plumber's putty
Clearing deep downstream drain line grease clogs
CLINICAL DIFFERENTIAL FIELD TRIAGE & CONNECTED SYSTEMS§ 5.2 Diagnostic Rubric
Harmless Cosmetic Baseline
Brief grinding rumble on soft food scraps followed by smooth, leak-free spinning under cold running water indicates healthy flywheel hammers and seals.
Active Failure Signal
Loud humming with a jammed turntable, water dripping from the bottom reset plate (rusted internal seal), or a loose power cord rubbing bare metal housing.
60-Second Homeowner Check
With the wall switch OFF, shine a light at the bottom of the disposer to verify a metal two-screw clamp secures the power cord and no rust drips stain the cabinet.
Texas Credential to VerifyTDLR Licensed Residential Appliance Installer (RAI / RAIC) or TSBPE Licensed Plumber.
Municipal Permit & Inspection RuleLike-for-like plug-in replacement needs no permit; adding new under-sink switched GFCI outlets or lowering in-wall drain tees requires trade permits.
3 Questions You Must Ask Before Hiring
“Will you install the UL-listed metal two-screw cable strain-relief clamp in the bottom motor housing knockout so motor vibration never chafes bare copper wires?”
“With my new deeper undermount farmhouse sink, is the wall drain stub-out low enough to preserve downhill gravity flow—without creating a flooded disposer chamber?”
“Are all three stainless sink-flange mounting bolts torqued evenly over plumbers putty/gasket and leak-tested under full stopper load?”
3 High-Pressure Red Flags & Scams
Stuffing raw NM-B Romex or an appliance cord straight through a razor-sharp steel housing hole with zero clamp bushing—energizing the metal sink with 120 volts.
Connecting a deep-basin sink to a high wall drain tee so standing foul water sits permanently inside the disposer grinding chamber and rusts the armature.
Charging $650 for a jammed disposer replacement when turning the bottom 1/4-inch Allen wrench socket and pressing the red thermal-overload button frees it in 20 seconds.
HOMEOWNER ACTION TAKEAWAYRISK LEVEL: LOW
Food Waste Disposer Electrical & Mechanical Care
Ensure electrical cables have a protective strain-relief clamp, free jams safely using a 1/4-inch hex wrench, and avoid pouring grease into the disposal.
Recommended Action Steps
Check beneath the sink to confirm the electrical wire enters the disposer through a metal clamp, not a raw metal hole.
Keep a 1/4-inch hex wrench taped to the cabinet wall near the disposer for clearing jams.
Verify the mounting flange is tightly sealed against the sink basin with zero leaks.
Immediate Priorities
Check beneath the sink to confirm the electrical wire enters the disposer through a metal clamp, not a raw metal hole.
Keep a 1/4-inch hex wrench taped to the cabinet wall near the disposer for clearing jams.
Verify the mounting flange is tightly sealed against the sink basin with zero leaks.
Ongoing Annual Maintenance
Always run cold water before, during, and after running the disposer.
Scour the chamber monthly with ice cubes and citrus wedges.
Never put grease, coffee grounds, bones, or potato peels into the disposal.
Typical Repair / Replacement Budget:$50 – $250($50–$100 to add a strain-relief clamp and clear a jam; $180–$350 for a professional new 3/4 HP disposer replacement.)
2023 NEC 422.16(B)(1)—Flexible Cord and Strain Relief for Waste Disposers
STATUTORY MODEL CODE TEXT
A food waste disposer shall be permitted to be cord-and-plug connected with a flexible cord terminating in a grounding-type attachment plug where the cord is 18 to 36 inches in length, the receptacle is located to avoid physical damage, and the cord enters the appliance through an approved strain-relief clamp.
Exception: Listed hardwired connections in flexible conduit terminating at an internal metal junction box.
IN PLAIN ENGLISH
Disposer power cords must be between 18 and 36 inches long, properly grounded, and fitted with a metal clamp where entering the motor base to prevent wire fraying and shock.
HOMEOWNER PRO TIP:Never reach into a disposer with your hands. If the motor hums but will not spin, press the red overload reset button on the bottom and use a 1/4-inch hex Allen wrench in the bottom center socket to free jams.
5.3
Range Exhaust Systems: Metal Ducting, Damper Flaps & Makeup Air
AIR QUALITY • RANGE HOOD METAL DUCT EXHAUSTStainless steel kitchen range hood with removable commercial baffle grease filters, illuminated halogen cooktop lights, and smooth rigid galvanized exterior exhaust duct.
3D ARCHITECTURAL CUTAWAY • FIGURE 5.3
FIGURE 5.C: SMOOTH METAL RANGE HOOD DUCT DISCHARGING OUTDOORS VS. CORRUGATED FOIL VENTING TO ATTIC
Adequate vertical clearance (≥ 24" to hood / ≥ 30" to combustible cabinets)
COMMON DEFECT (SAFETY HAZARD)
Combustible corrugated foil accordion duct trapping grease in hundreds of ridges
Exhaust duct discharging cooking grease and steam directly into attic insulation
Exhaust hood > 400 CFM lacking an approved interlocked motorized makeup air damper
Missing or heavily grease-saturated mesh filters presenting immediate flash-fire risks
Comparative technical illustration of code-compliant range hood installation with smooth rigid metal duct venting through roof with backdraft damper versus dangerous defect with combustible foil accordion duct discharging grease vapors into dry attic insulation.
TEXAS FIELD TRIAGE: 3-STAGE SEVERITY SCALEField Inspection Progression Rubric
STAGE 1NORMAL TEXAS AGING (COSMETIC)
Condition:Aluminum mesh grease filter screens discolored with yellow cooking oil film.
Action:Soak grease filters in warm degreasing soapy water monthly.Annual Log
STAGE 2WATCH & MAINTAIN (30–90 DAYS)
Condition:Exterior exhaust damper flap stuck open by lint/grease (letting humid air/pests into kitchen).
Action:Clean and free gravity damper flap; verify closure within 30 days.30 Days
STAGE 3ACT IMMEDIATELY (URGENT)
Condition:Range hood venting directly into attic framing or wall cavity (code breach & severe fire hazard).
Action:Cease use until rigid metal ducting is routed to exterior roof/wall cap.Immediate
How It Works in Your Home
Your range exhaust system removes cooking grease, moisture, heat, and combustion byproducts from your kitchen, venting them safely to the outdoors.
When you sear a steak, boil pasta, or cook with gas, cooking produces high volumes of aerosolized grease droplets, steam vapor, nitrogen dioxide, and carbon monoxide. A range exhaust hood uses an internal motorized blower fan to capture these airborne plumes and pull them through metallic grease filters.
In a true ducted exterior exhaust system, air passes through smooth, rigid galvanized steel or copper ducting directly through the roof or an exterior wall to the outdoors. A gravity-operated backdraft damper flap inside the duct prevents cold outdoor air and insects from blowing backward into your kitchen when the hood is off.
In ductless recirculating hoods, air is pulled through aluminum mesh filters and an activated charcoal pad to catch grease and odor before blowing the filtered air back into the kitchen ceiling. While this removes surface grease, it does not remove heat, humidity, or gas combustion pollutants.
High-performance commercial-style kitchen hoods moving over 400 cubic feet per minute (CFM) create powerful negative air pressure inside modern airtight homes. To prevent the hood from sucking deadly carbon monoxide down water heater and furnace chimneys (backdrafting), building codes require an automated fresh makeup air damper that opens automatically when the hood operates.
Metal Baffle / Mesh Filters:Removable aluminum or stainless steel filters capturing grease droplets from cooking fumes.
Smooth Rigid Metal Duct:Galvanized sheet metal ductwork routing exhaust fumes safely to the outdoors.
Backdraft Damper Flap:A one-way gravity flap preventing outdoor cold air and pests from entering the duct.
Makeup Air Damper:An automated fresh-air intake damper required for high-powered hoods exceeding 400 CFM.
What Can Go Wrong & What to Look For
Improper flexible foil ducting, missing dampers, and venting into attics are critical kitchen fire and moisture hazards.
Using thin corrugated flexible foil or plastic vinyl ducting for a kitchen range exhaust is a major fire hazard. Cooking grease condenses and accumulates inside the flexible corrugations. If a grease flare-up occurs on the cooktop, the flame can ignite the grease build-up inside the duct, burning through thin foil and spreading fire into upper cabinets and attic spaces within minutes.
Venting kitchen range hoods directly into attics or soffit overhangs is strictly prohibited by building codes. Dumping gallons of greasy steam into an attic causes heavy mold growth on roof rafters and creates severe fire hazards.
A stuck or missing backdraft damper allows winter drafts to chill the kitchen and gives outdoor wasps, roaches, and rodents direct access to your kitchen cabinets.
Early Warning Signs & Red Flags
Grease film accumulating on cabinet faces and ceiling paint across the kitchen
Cold air blowing out of the range hood vent into the kitchen on windy days
Persistent cooking smells remaining in the house hours after cooking
Excessive noise or severe vibration from the range hood blower fan
Water or grease dripping from range hood filters onto the cooktop
Flexible Foil Ducting on Range ExhaustIMMEDIATE ACTION
Use of corrugated foil or plastic ducting that traps combustible cooking grease.
Range Hood Discharging into AtticIMMEDIATE ACTION
Exhaust duct terminating in the attic instead of through a dedicated exterior roof or wall cap.
Missing or Stuck Backdraft DamperROUTINE
Damper flap missing or stuck open, allowing outdoor drafts and pests into kitchen.
True Exterior Ducted Capture vs. Recirculating Charcoal Hoods
Recirculating hoods merely filter grease and blow steam, heat, and gas combustion byproducts back at ceiling height; ducting outdoors via smooth metal pipe protects indoor air quality.
How Texas Weather & Soil Affect It
Proper exterior range venting is vital for removing summer humidity and protecting indoor air quality.
During hot Texas summers, boiling pots and gas burners generate immense sensible heat and humidity. A properly ducted exterior range hood expels this heat outdoors, drastically reducing the thermal load on your air conditioning system.
In tight, energy-efficient modern Texas homes with spray foam attics, indoor air exchange is minimal. Running gas cooktops without ducted exhaust rapidly drives indoor nitrogen dioxide and carbon monoxide levels past EPA health limits. Direct outdoor exhaust is essential for family respiratory health.
Texas Climate & Soil Stresses
Extreme summer heat making kitchen moisture and heat removal critical for AC efficiency
Airtight modern home construction amplifying gas cooking combustion byproduct buildup
Texas Field Pro Tips
Always turn on your range exhaust hood before turning on a gas burner, and let it run for 5 minutes after cooking finishes.
Open upper cabinet doors above the microwave or hood to verify the duct is smooth rigid metal, not flexible foil accordion pipe.
How to Maintain & Protect It
Regular filter degreasing and damper checks keep air moving cleanly and prevent grease fires.
Soak removable aluminum mesh or stainless steel baffle filters in hot water with grease-cutting dish soap and baking soda once a month, or run them through your dishwasher on a high-temperature cycle.
Inspect the exterior roof cap or wall vent hood once a year. Check that the damper flap swings freely when the hood turns on and closes tightly when it turns off.
Seasonal Walkthrough Checklist
Spring: Degrease metal mesh or baffle filters in hot soapy water or dishwasher
Summer: Replace activated charcoal pads on ductless recirculating range hoods
Fall: Inspect upper cabinet ductwork to verify seams are sealed airtight with foil tape
Winter: Check exterior vent hood to confirm the damper flap closes against cold drafts
HOMEOWNER DECISION MATRIX
DIY Weekend Maintenance vs. Call a Qualified Pro
SAFE 15-MINUTE DIY CARE
Washing metal grease filters in the dishwasher monthly
Replacing charcoal odor filters on recirculating hoods every 6 months
Wiping down hood interior surfaces and fan blades with degreaser
Installing a dedicated roof cap with sealed flashing and backdraft damper
Installing an automated makeup air system for hoods exceeding 400 CFM
Replacing worn blower fan motors or electronic speed control boards
CLINICAL DIFFERENTIAL FIELD TRIAGE & CONNECTED SYSTEMS§ 5.3 Diagnostic Rubric
Harmless Cosmetic Baseline
Strong upward steam capture on low/high fan speeds with removable metal baffle filters clicking cleanly into place reflects effective kitchen ventilation.
Active Failure Signal
Sticky grease dripping from upper cabinets, hoods exhausting into raw attic insulation, stuck exterior wall dampers, or gas water heaters backdrafting on high.
60-Second Homeowner Check
Turn your range hood to HIGH and hold a single square of facial tissue against the metal grease filter—healthy capture suction holds the tissue flat by itself.
BEFORE YOU SIGN A BID • TEXAS CONTRACTOR VETTING & SCAM DEFENSE
Exterior-Ducted Range Exhaust Hoods & Makeup-Air Systems
§ 5.3 Playbook
Texas Credential to VerifyTDLR Licensed HVAC Contractor (TACLA) for exterior sheet-metal duct runs, roof/wall dampers, and interlocked makeup-air dampers.
Municipal Permit & Inspection RuleMunicipal mechanical permit required when cutting new exterior roof/wall exhaust terminations or installing >400 CFM makeup-air dampers.
3 Questions You Must Ask Before Hiring
“Will this hood exhaust 100% outdoors via smooth galvanized steel pipe and a gravity backdraft roof/wall cap—rather than dumping grease into my attic or cabinets?”
“Because this commercial-style pro hood exceeds 400 CFM, does your scope include a code-required interlocked makeup-air damper so it will not backdraft my gas water heater or fireplace?”
“Is the bottom of the hood mounted within the manufacturer’s exact capture height (typically 24 to 30 inches above gas burners) using proper duct diameter?”
3 High-Pressure Red Flags & Scams
Remodelers mounting a sleek stainless chimney hood that blows straight into a closed upper cabinet box or raw attic insulation with no exterior roof cap.
Choking a 600-CFM blower down into a 4-inch flexible plastic dryer hose—creating jet-engine noise, trapped grease, and motor burnout.
Installing a 900-CFM pro-range exhaust in a tight spray-foamed Texas home with zero makeup air—sucking lethal carbon monoxide backward down furnace flues.
HOMEOWNER ACTION TAKEAWAYRISK LEVEL: MEDIUM
Range Exhaust Ventilation & Backdraft Damper Defense
Use only smooth rigid metal ducting venting completely outdoors, degrease filters monthly to prevent fires, and provide makeup air on high-powered hoods.
Recommended Action Steps
Verify the range hood exhaust duct is smooth rigid metal, not flexible foil or plastic.
Confirm the exhaust terminates completely outside, never into an attic or soffit.
Check that the backdraft damper flap prevents outdoor drafts from blowing into the kitchen.
Immediate Priorities
Verify the range hood exhaust duct is smooth rigid metal, not flexible foil or plastic.
Confirm the exhaust terminates completely outside, never into an attic or soffit.
Check that the backdraft damper flap prevents outdoor drafts from blowing into the kitchen.
Ongoing Annual Maintenance
Wash metal grease filters monthly in the dishwasher or hot soapy water.
Replace charcoal filters on recirculating hoods every 6 months.
Inspect the exterior wall/roof vent cap annually for bird nests or stuck flaps.
Typical Repair / Replacement Budget:$50 – $350($50–$150 to replace flexible foil with rigid metal ducting; $300–$650 to cut and flash a new dedicated exterior roof exhaust terminal.)
2021/2024 IRC M1503.2 / M1503.6—Range Hood Ducts and Makeup Air Systems
STATUTORY MODEL CODE TEXT
Range hoods shall discharge to the outdoors through a duct constructed of galvanized steel, stainless steel or copper. Ducts shall have smooth inner walls, be airtight, and be equipped with a backdraft damper. Exhaust hoods venting in excess of 400 cfm shall be provided with makeup air at a rate approximately equal to the exhaust air rate.
Exception: Listed recirculating ductless range hoods equipped with activated charcoal grease filtration.
IN PLAIN ENGLISH
Range hoods venting outdoors must use smooth metal ducting with a backdraft damper; high-powered hoods over 400 CFM require automated fresh makeup air so they don't suck carbon monoxide back down furnace flues.
HOMEOWNER PRO TIP:Clean your range hood grease filters monthly in hot soapy water or the dishwasher. Accumulated grease reduces airflow and presents a serious kitchen fire hazard.
5.4
Ranges, Cooktops, and Ovens: Anti-Tip Brackets, Gas Burners, Electric Elements & Thermostat Calibration
Range Tip-Over onto Children with Boiling Cookware & Scalding
1
2
3
WHAT YOU'RE LOOKING ATFIELD INSPECTION ANATOMY
1
Heavy-Gauge Anti-Tip Bracket:Steel floor-mounted bracket that catches rear range foot if weight is placed on open oven door.
2
Range Rear Leveling Leg:Threaded steel foot engaged fully inside the floor bracket slot.
3
Accessible Appliance Gas Shutoff:Dedicated ball valve behind or beside range allowing immediate fuel isolation.
SAFETY MANDATE • RANGE ANTI-TIP BRACKETFloor-mounted heavy gauge steel anti-tip safety bracket securely engaging the rear leveling leg of a free-standing range to prevent accidental tipping when oven doors open.
3D ARCHITECTURAL CUTAWAY • FIGURE 5.4
FIGURE 5.D: RANGE ANTI-TIP SAFETY BRACKET ANCHORED TO FLOOR VS. MISSING BRACKET & TIPPING CRUSH HAZARD
DONE RIGHT (CODE-COMPLIANT)
Heavy steel anti-tip bracket anchored into concrete slab or wall framing
Rear leveling leg fully engaged in bracket slot preventing forward tipping
Accessible manual gas shutoff valve located in same room within 6 feet
Oven thermostat temperature calibrated within 25°F of 350°F target
COMMON DEFECT (SAFETY HAZARD)
Missing anti-tip bracket allowing entire 200 lb range to tip onto children
Yellow or irregular gas burner flames producing carbon monoxide fumes
Oven temperature variance exceeding 25°F indicating sensor failure
Damaged door glass, broken bake elements, or inoperable surface burners
Comparative technical illustration of code-compliant free-standing range with floor-anchored steel anti-tip bracket securing rear leveling foot versus dangerous unanchored installation tipping forward under open door load.
TEXAS FIELD TRIAGE: 3-STAGE SEVERITY SCALEField Inspection Progression Rubric
STAGE 1NORMAL TEXAS AGING (COSMETIC)
Condition:Gas burner port partially clogged with food boil-over causing uneven flame ring; crumb buildup.
Action:Clean burner ports with wooden toothpick; clean drip pans.Annual Log
STAGE 2WATCH & MAINTAIN (30–90 DAYS)
Condition:Range lacking anti-tip safety bracket at rear base; bake element showing blistered hotspot.
Action:Install UL-listed anti-tip bracket within 30 days to protect children from oven tipping.30 Days
STAGE 3ACT IMMEDIATELY (URGENT)
Condition:Smell of unburned gas when controls are off; gas burner clicking without igniting; cracked glass top.
Action:Shut off appliance gas valve behind unit immediately; dispatch licensed technician.Immediate
How It Works in Your Home
Your kitchen range, cooktop, and oven provide precision thermal energy for cooking with specialized stability, combustion, and electrical safeguards.
Kitchen cooking appliances operate using either natural gas, propane, or 240-volt electric resistance/induction power. In a gas range, fuel gas passes through a manual shutoff valve and pressure regulator to precision burner valves. Electric spark igniters ignite gas at the burner caps, creating a clean blue flame ring with high heat transfer.
In electric ovens, heavy-duty 240-volt bake elements (at the bottom) and broil elements (at the top) cycle on and off under control of an electronic temperature sensor to maintain precise oven cavity temperatures between 170°F and 500°F.
Because free-standing ranges are tall, heavy appliances (150 to 250 pounds) with front-opening doors, opening the heavy oven door and placing a heavy Thanksgiving turkey on the door creates an immense forward-tipping lever. Every free-standing range must be anchored with an anti-tip safety bracket lag-bolted into the subfloor or wall framing that securely locks the rear leveling leg in place.
Anti-Tip Safety Bracket:Heavy stamped steel floor or wall bracket engaging the rear leveling leg to prevent forward tipping.
Appliance Gas Shutoff Valve:A dedicated brass ball valve located behind the range or in an adjacent cabinet for immediate shutoff.
Oven Temperature Sensor:An internal RTD probe monitoring and regulating oven baking temperature.
Electric Spark Igniters:Piezo-electric or pulse igniters providing instant spark ignition for gas cooktop burners.
What Can Go Wrong & What to Look For
Missing anti-tip brackets, yellow gas flames, and oven temperature calibration drifts are common hazards.
A missing anti-tip bracket is a severe child life-safety defect. When a child climbs on an open oven door to reach a cookie jar or a cook places a heavy roasting pan on the door, an unanchored range tips forward suddenly. The heavy stove falls on the child while scalding hot liquids and boiling pots crash down from the cooktop, frequently causing fatal crushing and burn injuries.
Yellow, lazy gas burner flames indicate incomplete combustion caused by dirty burner ports or incorrect air shutter adjustment. Incomplete combustion generates dangerous carbon monoxide gas and coats cookware with black carbon soot.
Oven temperature calibration often drifts over time by 25°F to 50°F, causing cakes to burn on the outside while staying raw in the center.
Early Warning Signs & Red Flags
Range rocks or tilts forward easily when downward hand pressure is applied to the rear top edge
Yellow, orange, or fluttering flames on gas cooktop burners instead of steady blue cones
Gas odor near the range when burners are turned off
Baked goods consistently burning or undercooking at recipe temperatures
Oven door glass cloudy, loose, or hot to the touch during baking
Missing Range Anti-Tip BracketIMMEDIATE ACTION
Free-standing range lacking floor or wall safety bracket, presenting severe tip-over hazard.
Incomplete Gas Combustion (Yellow Flames)IMMEDIATE ACTION
Burners producing yellow sooty flames and carbon monoxide due to clogged burner ports.
Oven Temperature Calibration Drift (>25°F)ROUTINE
Thermostat temperature varying significantly from digital setpoint.
Inoperable Surface Element or IgniterROUTINE
Electric burner element failing to glow red or spark igniter clicking without lighting gas.
COOKING LIFE SAFETY • § 5.4
The 30-Second Range Anti-Tip Test Before Holiday Cooking
Open the oven door and press firmly downward on the rear upper corner of a freestanding range—if the rear leveling leg lifts even slightly, install the steel floor anti-tip bracket immediately.
How Texas Weather & Soil Affect It
Minor slab floor settlement can cause cooktop unleveling and grease pooling.
Expansive clay foundation movement in Texas can cause kitchen floors to settle out-of-level by 1/4 to 1/2 inch across an 8-foot run. When a range is not properly leveled using its adjustable threaded legs, cooking oil and pancake batter pool on one side of frying pans, resulting in uneven cooking.
High summer humidity can accelerate surface rust on cast-iron burner grates and burner caps if water spills or boil-overs are not promptly wiped dry.
Texas Climate & Soil Stresses
Subfloor settlement causing ranges to tilt and cooking oil to pool unevenly
High coastal humidity promoting rust on cast-iron cooktop burner grates
Texas Field Pro Tips
Place a 12-inch torpedo level across the cooktop grates. Adjust the front threaded leveling legs until the bubble is perfectly centered both front-to-back and side-to-side.
Check your anti-tip bracket today: gently grip the top back edge of the range and pull forward. If it lifts more than 1/2 inch off the floor, the bracket is missing or not engaged.
How to Maintain & Protect It
Regular burner port cleaning and oven thermometer calibration ensure safe cooking.
Clean gas burner caps and ports every few months. Lift off the round burner caps and use an unfolded paperclip to clear food crumbs or grease from each tiny gas port hole. Never use toothpicks that can break off inside the brass ports.
Calibrate your oven temperature with an inexpensive standalone stainless steel oven thermometer placed in the center rack. Heat the oven to 350°F for 30 minutes; if the thermometer reads 375°F or 325°F, use your oven's calibration menu (consult your manual) to adjust the offset by up to ±35°F.
Seasonal Walkthrough Checklist
Spring: Check gas burner flame color (confirm sharp blue flame cones without yellow tips)
Summer: Level the range front-to-back and side-to-side using an adjustable wrench on leveling feet
Fall: Calibrate baking temperature using an independent oven thermometer before holiday baking
Winter: Verify the rear anti-tip bracket is securely engaged with the leveling leg
HOMEOWNER DECISION MATRIX
DIY Weekend Maintenance vs. Call a Qualified Pro
SAFE 15-MINUTE DIY CARE
Clearing clogged gas burner port holes with a paperclip
Adjusting threaded leveling legs to make the cooktop flat
Testing oven temperature calibration with an oven thermometer
Replacing worn oven door perimeter gaskets
WHEN TO CALL A QUALIFIED PRO
Installing and lag-bolting an anti-tip safety bracket into the floor or wall
Replacing defective spark ignition modules or gas safety valves
Replacing burned-out 240V bake or broil elements
Testing gas line pressure and fixing gas shutoff valve leaks
CLINICAL DIFFERENTIAL FIELD TRIAGE & CONNECTED SYSTEMS§ 5.4 Diagnostic Rubric
Harmless Cosmetic Baseline
Crisp blue gas burner cones (with occasional tiny orange flecks when ultrasonic humidifiers run nearby) and +/-15°F oven thermostat swings are normal.
Active Failure Signal
A freestanding range tipping forward when pressing the open oven door, clicking igniters failing to light gas, or lazy sooty flames demand immediate correction.
60-Second Homeowner Check
With the oven cold and empty, open the door and press firmly (~30 lbs) downward on its outer edge—confirm the rear floor anti-tip bracket locks the range flat.
BEFORE YOU SIGN A BID • TEXAS CONTRACTOR VETTING & SCAM DEFENSE
Freestanding & Pro Ranges, Wall Ovens & Anti-Tip Anchoring
§ 5.4 Playbook
Texas Credential to VerifyTSBPE Licensed Plumber (RMP) for gas shutoffs/flex lines; TDLR TECL Electrician for 240V 4-wire range circuits; TDLR RAIC for built-in anchoring.
Municipal Permit & Inspection RuleElectrical/plumbing permit required when upgrading 3-wire 240V receptacles to 4-wire NEMA 14-50 or modifying gas shutoff rough-ins.
3 Questions You Must Ask Before Hiring
“Will you bolt the steel anti-tip bracket securely into the concrete slab or wood subfloor AND physically slide/verify the rear range leg engagement before leaving?”
“Is the gas shutoff valve accessible right behind the range or inside the adjacent base cabinet—never buried behind drywall requiring oven removal in an emergency?”
“For my induction upgrade, did you verify actual copper/aluminum wire gauge and breaker ampacity (40A vs. 50A) plus a 4-wire isolated neutral/ground plug?”
3 High-Pressure Red Flags & Scams
Appliance delivery drivers tossing the steel anti-tip floor bracket into the kitchen trash can to save 10 minutes with a masonry hammer drill—creating a fatal child-tipping hazard.
Reusing kinked, grease-coated 20-year-old brass gas flex connectors that crack when sliding a heavy range back against the wall.
Swapping a 3-prong 240V outlet to a 4-prong NEMA 14-50 receptacle without separating the neutral-to-ground bonding strap inside the range terminal block.
HOMEOWNER ACTION TAKEAWAYRISK LEVEL: HIGH
Cooking Range Anti-Tip Bracket & Fire Safety Protocol
Verify your range has an anti-tip bracket to protect children, keep gas burner flames crisp blue, and calibrate oven temperature annually.
Recommended Action Steps
Test for the presence of an anti-tip safety bracket by gently pulling the top rear edge forward.
Verify gas burner flames burn crisp blue with zero yellow sooty tips.
Locate the manual gas shutoff valve behind the range or in an adjacent cabinet.
Immediate Priorities
Test for the presence of an anti-tip safety bracket by gently pulling the top rear edge forward.
Verify gas burner flames burn crisp blue with zero yellow sooty tips.
Locate the manual gas shutoff valve behind the range or in an adjacent cabinet.
Ongoing Annual Maintenance
Clear burner port holes with a paperclip whenever flames appear uneven.
Check baking temperature with an independent oven thermometer.
Wipe spills promptly to prevent rust on cast-iron grates.
Typical Repair / Replacement Budget:$50 – $250($50–$100 to supply and bolt an anti-tip bracket into the subfloor; $150–$300 to replace an oven bake element or gas igniter.)
Expected Assembly Lifespan:Gas / Electric Range: 13–15 years; Oven Elements: 8–12 years; Burner Igniters: 5–8 years
ICC DIGITAL CODES2021 / 2024 IRC
2021/2024 IRC G2447.4 / UL 858—Anti-Tip Device for Cooking Ranges
STATUTORY MODEL CODE TEXT
Free-standing and slide-in ranges shall be secured to the floor or rear wall structure with a listed anti-tip bracket. The bracket shall securely engage the range leveling leg to prevent accidental forward tipping under downward load applied to an open oven door.
Exception: Commercial-weight or built-in drop-in cooktops and wall ovens anchored into custom cabinetry.
IN PLAIN ENGLISH
Every free-standing stove must have an anti-tip bracket bolted to the floor or wall so the heavy appliance cannot tip forward and spill scalding pots onto children when the oven door is open.
HOMEOWNER PRO TIP:Test your stove's anti-tip bracket: with the range cool and empty, grip the rear edge and pull gently upward. If the rear lifts easily off the floor, an anti-tip bracket is missing or unengaged.
5.5
Microwave Ovens: Built-in Clearance, Interlock Switches & Door Latches
CHECK FREQUENCYMonthly Door Latch Check • Quarterly Grease Filter Clean
RISK IF IGNOREDMODERATE
Microwave Radiation Leakage & Overhead Cabinet Mount Failure
1
2
3
WHAT YOU'RE LOOKING ATFIELD INSPECTION ANATOMY
1
Upper Cabinet Bolt Fasteners:Through-cabinet anchor bolts supporting 60-pound weight of microwave unit.
2
Dual Safety Door Interlock Switches:Internal microswitches ensuring magnetron cannot fire if door latch is cracked.
3
Cooktop Task Illumination & Vent:Underside grease filter and halogen/LED work light illuminating cooktop surface.
APPLIANCE OPERATION • BUILT-IN MICROWAVETesting an over-the-range microwave oven with digital radiation leak survey meter and verifying the 30-inch clear cooking surface height and upper cabinet mounting bolts.
Drywall toggle bolts pulling out causing microwave to sag down toward cooktop
Inadequate vertical clearance (< 12") resulting in scorched plastic and melted controls
Damaged door glass, loose hinges, or defective safety door interlock switches
Unit sharing countertop circuit causing frequent nuisance breaker trips
Comparative technical illustration of code-compliant over-the-range microwave installation with stud-anchored rear bracket, top cabinet machine bolts, and proper 14-inch cooktop clearance versus sagging unanchored unit damaged by burner flames.
TEXAS FIELD TRIAGE: 3-STAGE SEVERITY SCALEField Inspection Progression Rubric
STAGE 1NORMAL TEXAS AGING (COSMETIC)
Condition:Splatter on microwave ceiling or turntable roller ring; fingerprint smudges on touchpad.
Action:Microwave bowl of water with lemon slices for 3 min; wipe down.Annual Log
Action:Clean latch interlock openings and replace interior bulb within 30–60 days.30–60 Days
STAGE 3ACT IMMEDIATELY (URGENT)
Condition:Microwave arcing with loud electrical buzzing; door glass cracked or frame warped (radiation leak).
Action:Unplug unit immediately; do not operate with damaged door seal or glass.Immediate
How It Works in Your Home
Your built-in microwave oven uses a magnetron tube to generate high-frequency electromagnetic waves that heat moisture molecules in food.
A microwave oven operates by converting standard 120-volt household electricity into high-voltage direct current that powers a specialized vacuum tube called a magnetron. The magnetron emits electromagnetic radiation at a frequency of 2.45 gigahertz (GHz). These waves reflect off the metal interior walls and penetrate food, causing polar water and fat molecules to oscillate billions of times per second, generating rapid frictional heat that cooks food from the inside out.
Over-the-range microwave units double as kitchen exhaust systems and cooktop task lighting. They are suspended by a heavy rear wall mounting plate screwed into wall framing studs, reinforced by two or three heavy steel bolts passing downward through the bottom shelf of the upper cabinet into the microwave chassis.
User safety relies on redundant electrical interlock door switches. When the door latch handle is pulled, secondary and monitor switches instantly cut power to the magnetron within milliseconds, ensuring zero microwave radiation can emit while the door is ajar.
Upper Cabinet Mounting Bolts:Heavy threaded bolts securing the top chassis of the microwave through the upper cabinet floor.
Safety Interlock Switches:Redundant microswitches that de-energize the magnetron the instant the door unlatches.
Mesh Door Screen & Choke Seal:The perforated metal door screen and perimeter wave choke preventing radiation leakage while allowing visibility.
What Can Go Wrong & What to Look For
Loose cabinet mounting, broken door interlock latches, and failing turntable motors are common microwave defects.
Loose mounting bolts are a significant hazard on over-the-range units. Heavy microwave vibration and cabinet wood shrinkage can loosen the top mounting bolts. If the rear wall bracket was fastened with drywall anchors instead of stud screws, the entire 60-pound microwave can pull away from the wall, crashing down onto a hot cooktop.
Cracked door glass, warped door frames, or loose hinges can compromise the microwave choke seal, allowing microscopic radiation leakage during operation.
When internal high-voltage diodes or capacitors fail, the microwave will run its fan and timer normally, but the magnetron will not generate heat.
Early Warning Signs & Red Flags
Microwave runs its turntable and count-down timer, but food remains completely cold
Microwave unit sags, wobbles, or pulls away from the upper cabinet when the door is pulled open
Sparks, arcing, or crackling noises inside the cooking cavity during operation
Glass turntable plate jerks, stutters, or refuses to rotate
Door latch sticks or requires slamming to start cooking
Loose Upper Cabinet Mounting BoltsROUTINE
Chassis sagging away from the upper cabinet due to stripped or un-tightened mounting bolts.
Failed Magnetron / No HeatingROUTINE
Microwave powers on and displays timer but produces zero cooking heat.
Damaged Waveguide CoverROUTINE
Mica waveguide cover on the internal cavity wall burned, scorched, or saturated with food grease.
Faulty Door Interlock MicroswitchIMMEDIATE ACTION
Unit continues running when door is unlatched or trips house breaker when door opens.
Over-the-range microwaves draw 1,500+ watts during startup; plugging them into shared countertop circuits or hanging them solely from drywall anchors without stud lag bolts invites failure.
How Texas Weather & Soil Affect It
Cooktop heat rising from extended Texas boiling can stress microwave electronic control boards.
In hot Texas kitchens, cooking large family meals on high-heat gas ranges releases heavy steam and convective heat directly against the bottom of over-the-range microwaves. If the microwave internal exhaust fan is not turned on during prolonged boiling, rising heat can bake the internal digital touch control board, causing display digits to fade or buttons to become unresponsive.
Electrical power surges during summer lightning storms frequently destroy delicate microwave electronic control boards unless protected by whole-house surge protective devices.
Texas Climate & Soil Stresses
Intense cooktop heat and steam stressing bottom microwave casing and controls
Severe thunderstorm power surges damaging digital control boards
Texas Field Pro Tips
Always turn on the microwave exhaust fan whenever you boil large pots of water on the front cooktop burners to divert steam away from the microwave control board.
Never run a microwave oven empty. Without food or water molecules to absorb the microwave energy, waves bounce back into the magnetron, burning it out within minutes.
How to Maintain & Protect It
Keep the internal waveguide cover clean and verify mounting security annually.
Wipe interior cavity walls and the mica waveguide cover (the small rectangular cardboard-like panel on the right interior wall) clean of grease splatters after every use. Food splatters left on the waveguide cover absorb microwave energy, char into carbon, and cause dramatic electrical arcing and sparks.
Check the upper cabinet mounting bolts once a year. Open the cabinet doors above the microwave and use a screwdriver to verify the two long mounting bolts are snug and have not vibrated loose.
Seasonal Walkthrough Checklist
Spring: Check upper cabinet mounting bolts to verify the microwave chassis is held firmly
Summer: Clean grease and steam residue from the bottom surface and grease filters
Fall: Inspect the mica waveguide cover for charring, burning, or food holes
Winter: Test the door safety interlock switches by opening the door during operation (fan and heating must stop instantly)
HOMEOWNER DECISION MATRIX
DIY Weekend Maintenance vs. Call a Qualified Pro
SAFE 15-MINUTE DIY CARE
Tightening upper cabinet mounting bolts with a screwdriver
Replacing a burned mica waveguide cover with a $5 snap-in replacement
Cleaning the turntable roller ring and glass plate
Washing under-microwave grease filters in hot soapy water
WHEN TO CALL A QUALIFIED PRO
Diagnosing and replacing a burned-out magnetron or high-voltage capacitor
Replacing internal door interlock safety microswitches
Re-mounting an over-the-range microwave into wall studs
Repairing main electronic control boards
CLINICAL DIFFERENTIAL FIELD TRIAGE & CONNECTED SYSTEMS§ 5.5 Diagnostic Rubric
Harmless Cosmetic Baseline
Warm exterior cabinet vent air and interior turntable rotation stopping instantly the split-second the door latch button is pressed show healthy interlocks.
Active Failure Signal
Continuing to hum or heat with the door ajar, arcing sparks inside peeling waveguide covers, sagging upper cabinet bolts, or tripping shared kitchen breakers.
60-Second Homeowner Check
Heat one cup of cold tap water on HIGH for 60 seconds (should steam briskly), and tug gently upward/downward on over-the-range units to check tight bolt support.
Texas Credential to VerifyTDLR Licensed Electrical Contractor (TECL) for dedicated 20A circuits; TDLR Licensed Residential Appliance Installer (RAIC) for cabinet mounting.
Municipal Permit & Inspection RuleMunicipal electrical permit required when pulling a new dedicated 20-amp branch circuit from the load center to the microwave cabinet.
3 Questions You Must Ask Before Hiring
“Is the upper cabinet receptacle on its own dedicated 20-amp circuit—not tapped off the small-appliance countertop GFCI loop or lighting circuit?”
“Will the heavy rear steel mounting plate be lag-bolted directly into at least one vertical wood wall stud in addition to upper cabinet through-bolts?”
“Did you rotate the internal blower housing 90 degrees to match my cabinet’s exact exhaust path (exterior roof/wall duct vs. front charcoal recirculation)?”
3 High-Pressure Red Flags & Scams
Hanging an 85-pound over-the-range microwave solely from hollow plastic drywall anchors and thin particleboard cabinet bottoms—which rip loose over a hot stove.
Leaving the factory internal blower aimed upward against a solid wood cabinet shelf with no duct hole—cooking the microwave’s electronics with trapped steam.
Powering a built-in microwave via an extension cord snaked through a drilled hole into an adjacent pantry or countertop outlet.
Check top mounting bolts annually to prevent falling units, keep internal waveguide covers clean of grease to avoid sparks, and never operate an empty microwave.
Recommended Action Steps
Confirm the microwave chassis is securely bolted to the upper cabinet without sagging.
Verify the door latches tightly and the unit shuts off instantly when opened.
Inspect the internal waveguide cover for burning or food scorch marks.
Immediate Priorities
Confirm the microwave chassis is securely bolted to the upper cabinet without sagging.
Verify the door latches tightly and the unit shuts off instantly when opened.
Inspect the internal waveguide cover for burning or food scorch marks.
Ongoing Annual Maintenance
Wipe food splatters off interior walls and waveguide covers promptly.
Wash the underside grease filters monthly.
Check the tightness of upper cabinet mounting bolts annually.
Typical Repair / Replacement Budget:$50 – $250($50–$100 to tighten mounting bolts and replace a waveguide cover; $150–$250 for professional installation of a new over-the-range unit.)
2021/2024 IRC M1504.1 / UL 923—Microwave Oven Installation and Clearances
STATUTORY MODEL CODE TEXT
Microwave ovens installed above cooking surfaces shall be listed and labeled for over-the-range installation and maintain minimum clearances to combustible surfaces specified by the appliance manufacturer. Dual interlock safety door switches shall instantly cease microwave energy emission upon door unlatching.
Exception: Countertop microwave units placed on open counter surfaces with standard 120V cord connections.
IN PLAIN ENGLISH
Over-the-range microwaves must be securely bolted to wall studs and upper cabinetry, maintain proper clearance above burners, and have functioning safety interlock switches that stop radiation the instant the door unlatches.
HOMEOWNER PRO TIP:Never operate a microwave oven with a cracked glass door, warped latch, or loose door seal. A broken door latch can allow dangerous microwave radiation to leak into your kitchen.
Ceiling Exhaust Motor Housing:Squirrel-cage blower quietly exhausting moist bathroom steam away from drywall.
2
Insulated Rigid / Semi-Rigid Duct:Smooth metal pipe wrapped in insulation to prevent condensation inside duct in winter.
3
Exterior Roof / Wall Termination Cap:Hood with flapper venting humid air completely outside (never into attic).
CODE COMPLIANCE • DIRECT EXTERIOR ROOF VENTINGInsulated rigid bathroom exhaust duct terminating through a dedicated roof cap with backdraft damper, preventing humid bathroom steam from dumping into the attic.
3D ARCHITECTURAL CUTAWAY • FIGURE 5.6
FIGURE 5.F: INSULATED BATH FAN DUCT VENTED THROUGH ROOF VS. MOISTURE DUMPED INTO ATTIC INSULATION
DONE RIGHT (CODE-COMPLIANT)
Continuous insulated duct (R-4.2 minimum) routed with positive upward slope to roof
Dedicated weatherproof roof cap with gravity backdraft damper and insect screen
100% of shower steam discharged outside the thermal envelope of the home
Quiet centrifugal blower fan operating without excessive bearing chatter
Severe black mold colonization and wood rot delaminating plywood roof sheathing
Uninsulated duct sweating in winter with water dripping back through ceiling grille
Duct directed at soffit screen where attic suction pulls humid air right back inside
Comparative technical illustration of code-compliant bathroom exhaust fan ducted through roof with R-4 insulation and backdraft damper versus improper installation dumping shower moisture into attic insulation causing black mold on rafters.
TEXAS FIELD TRIAGE: 3-STAGE SEVERITY SCALEField Inspection Progression Rubric
STAGE 1NORMAL TEXAS AGING (COSMETIC)
Condition:Bath exhaust fan cover grille coated in dry lint; faint motor squeak at startup.
Action:Pull down grille and vacuum lint from blower wheel twice yearly.Annual Log
STAGE 2WATCH & MAINTAIN (30–90 DAYS)
Condition:Exhaust fan venting into attic space or under blown insulation rather than through roof/wall cap.
Action:Extend smooth rigid duct to dedicated roof/wall terminal hood within 30–60 days.30–60 Days
STAGE 3ACT IMMEDIATELY (URGENT)
Condition:Exhaust fan motor seized and overheating with burning odor; ceiling moisture ring forming around fan.
Action:Turn off wall switch immediately; replace exhaust fan motor before using shower.Immediate
How It Works in Your Home
Your bathroom mechanical exhaust fan extracts humid shower steam and odors, discharging moisture completely outside your home's building envelope.
A typical 15-minute shower releases up to 1 to 2 pints of vaporized moisture into bathroom air. A ceiling exhaust fan uses a squirrel-cage blower wheel or axial fan to pull humid air through the ceiling grille and force it through an insulated duct directly to the outdoors.
In a code-compliant installation, the exhaust duct connects to a dedicated metal roof cap or exterior wall louver equipped with a spring-loaded or gravity backdraft damper. In unconditioned Texas attics, the duct must be wrapped in R-6 to R-8 insulation to prevent humid steam from condensing into liquid water inside the pipe during cold winter nights.
Bathroom infrared heat lamps and resistance ceiling heaters provide supplementary radiant warmth for comfort. Because high-wattage heating lamps (250W each) produce intense heat, they must be installed with proper clearance from combustible framing and utilize heat-resistant wiring.
Centrifugal Blower Motor:The electric motor and squirrel-cage impeller moving 50 to 110 CFM of air.
Insulated Exhaust Duct:Smooth or flexible duct wrapped in thermal insulation to prevent internal condensation in attics.
Backdraft Damper:A flap preventing cold outdoor air from blowing backward through the ceiling fan into the bathroom.
Dedicated Roof / Wall Cap:A watertight exterior flashing hood discharging moist air completely outside the attic envelope.
What Can Go Wrong & What to Look For
Dumping humid bathroom exhaust into attics and uninsulated sagging ducts are widespread building defects.
The single most hazardous bathroom exhaust defect is terminating the exhaust duct inside the attic, or pointing it loosely at a roof soffit vent. In humid Texas climates, blowing gallons of warm shower steam into an attic causes heavy condensation on plywood roof decking, rotting structural trusses and causing massive fungal mold blooms directly above living areas.
Uninsulated ducts running across cold attic floors act as condensers. Moisture vapor turns back into liquid water inside the duct; the water pools in low duct sags until it leaks through duct seams, soaking ceiling insulation and drywall.
Lint and dust accumulation on fan impellers drastically reduces airflow, causing the motor to overheat, buzz loudly, and become a potential electrical fire hazard.
Early Warning Signs & Red Flags
Bathroom mirrors remain fogged up for more than 15 minutes after a hot shower
Mold, mildew, or dark moisture droplets forming on bathroom ceilings or walls
Water dripping from the bathroom exhaust fan ceiling grille onto the floor
Fan motor buzzes loudly, squeaks, or turns slowly without moving noticeable air
Musty odors in the attic above master bathroom suites
Bathroom Fan Discharging into AtticIMMEDIATE ACTION
Exhaust duct terminating inside attic insulation or soffit instead of through the roof.
Uninsulated Duct with Water CondensationROUTINE
Uninsulated duct in attic causing steam to condense and leak back onto ceiling drywall.
Dust-Clogged Blower ImpellerROUTINE
Heavy lint and dust accumulation restricting airflow and causing motor overheating.
Missing or Inoperable Backdraft DamperROUTINE
Damper flap missing, allowing winter drafts and pests into bathroom ceiling.
ATTIC EXHAUST ROUTING • § 5.6
Never Terminate Bathroom Exhaust Fans Into Attic Soffits
Bathroom fans terminated loose inside attic insulation or aimed at perforated soffit vents suck warm shower steam right back into the attic, blackening roof sheathing with fungal growth.
How Texas Weather & Soil Affect It
High outdoor humidity and dark attic conditions make proper exterior termination critical.
Along the Texas Gulf Coast and across North/Central Texas, outdoor relative humidity routinely exceeds 80%. When coupled with warm indoor shower steam, any moisture released into an attic cannot evaporate. Instead, it creates a prime breeding ground for toxic black mold (Stachybotrys and Aspergillus) on attic roof sheathing.
During winter freezes, uninsulated metal ducts in cold attics turn shower steam into gallons of ice inside the duct, which melts and floods bathroom ceilings during the afternoon thaw.
Texas Climate & Soil Stresses
High outdoor ambient humidity preventing moisture dissipation in attics
Winter attic cold causing severe condensation in uninsulated exhaust ducts
Texas Field Pro Tips
Look into your attic: follow the silver duct from your bathroom ceiling. It must connect to a metal roof hood or wall vent, never end loosely in insulation.
Leave your bathroom exhaust fan running for 20 minutes after finishing a shower, or install a digital countdown timer switch to clear moisture automatically.
How to Maintain & Protect It
Annual fan grille vacuuming and duct insulation checks prevent mold and motor burnouts.
Pull down the plastic ceiling grille twice a year (it unclips easily with two spring wires) and wash it in warm soapy water. Use a vacuum brush attachment to clean lint and dust from the fan blower wheel and motor housing.
Inspect the duct connection in the attic once a year to confirm foil tape seams are airtight and the insulation sleeve covers the entire duct length.
Seasonal Walkthrough Checklist
Spring: Remove and wash ceiling exhaust fan grilles of accumulated dust and lint
Summer: Vacuum blower impellers with a soft brush attachment to restore full airflow
Fall: Check attic ductwork to ensure insulation is intact and the duct slopes toward the exterior
Winter: Confirm the exterior roof or wall damper flap closes tightly against cold north winds
HOMEOWNER DECISION MATRIX
DIY Weekend Maintenance vs. Call a Qualified Pro
SAFE 15-MINUTE DIY CARE
Vacuuming dust and lint from fan grilles and blower wheels
Testing fan suction with a single square of toilet paper (fan should hold paper firmly against grille)
Installing a digital push-button countdown timer switch
Washing plastic grilles in warm soapy water
WHEN TO CALL A QUALIFIED PRO
Extending attic ducts through the roof with dedicated flashing caps
Insulating uninsulated attic exhaust ducts with R-8 fiberglass sleeves
Replacing worn, noisy fan motor assemblies with ultra-quiet (under 1.0 sone) units
Repairing ceiling drywall damaged by condensate leaks
CLINICAL DIFFERENTIAL FIELD TRIAGE & CONNECTED SYSTEMS§ 5.6 Diagnostic Rubric
Harmless Cosmetic Baseline
Quiet 50–80 CFM draw clearing shower mirror fog within 10 minutes through an insulated attic duct connected to a dampered exterior roof cap is ideal.
Active Failure Signal
Rattling dust-choked squirrel cages, burning motor odors on bath heaters, or ducts dumping warm shower steam straight into attic fiberglass or soffit vents.
60-Second Homeowner Check
Switch the bath fan ON and hold a square of toilet tissue up to the ceiling grille—if it falls instead of clinging flat, vacuum the blower wheel and check the cap.
Texas Credential to VerifyTDLR Licensed Electrical Contractor (TECL) for fan/heater circuits; qualified roofer or TDLR TACLA technician for flashed exterior roof vent caps.
Municipal Permit & Inspection RuleMunicipal electrical permit required when adding high-wattage bathroom radiant/forced-air ceiling heaters or wiring fans inside shower/tub wet zones.
3 Questions You Must Ask Before Hiring
“Will this bathroom fan exhaust completely outdoors through an R-6 insulated duct and dampered roof/gable hood—NEVER terminating loose inside attic insulation or soffits?”
“Because this fan/light mounts directly over the shower stall, is the unit UL-listed for wet/damp shower zones AND wired through GFCI protection?”
“For a 1,500-watt ceiling bathroom heater, are you pulling a dedicated 20-amp copper circuit per manufacturer instructions rather than overloading bedroom lighting wires?”
3 High-Pressure Red Flags & Scams
Handymen laying uninsulated vinyl bath-fan flex hose right next to perforated eave soffit vents—where rising shower steam gets sucked straight back onto attic roof decking.
Splicing open wire nuts loose on top of attic drywall with zero metal junction box cover while retrofitting quiet bathroom fans.
Tying a high-amperage bathroom heat-lamp/blower combo onto an existing 15-amp bedroom AFCI circuit that trips every cold winter morning.
Never discharge bathroom exhaust into an attic, use insulated ductwork to prevent condensation leaks, and clean fan grilles twice a year.
Recommended Action Steps
Verify all bathroom exhaust fans terminate directly through the roof or an exterior wall.
Confirm attic ducts are insulated with R-6 or R-8 fiberglass jackets.
Test fan suction with a single sheet of toilet paper (it should stick to the grille).
Immediate Priorities
Verify all bathroom exhaust fans terminate directly through the roof or an exterior wall.
Confirm attic ducts are insulated with R-6 or R-8 fiberglass jackets.
Test fan suction with a single sheet of toilet paper (it should stick to the grille).
Ongoing Annual Maintenance
Vacuum fan grilles and blower impellers every 6 months.
Run the fan for 20 minutes after every shower to prevent bathroom wall mold.
Inspect the exterior roof cap annually for debris or stuck dampers.
Typical Repair / Replacement Budget:$75 – $350($75–$150 to replace a noisy fan motor; $250–$450 to cut, flash, and install a dedicated exterior roof exhaust cap.)
Expected Assembly Lifespan:Exhaust Fan Motor: 8–10 years; Insulated Duct: 25+ years; Roof Vent Cap: 20+ years
ICC DIGITAL CODES2021 / 2024 IRC
2021/2024 IRC M1501.1 / M1505.2—Bathroom Exhaust Ducts and Exterior Termination
STATUTORY MODEL CODE TEXT
Mechanical exhaust systems shall exhaust to the outdoors. Exhaust air shall not be directed into an attic, crawl space, ridge vent, soffit vent, or other unconditioned space. Ducts shall be equipped with a backdraft damper and terminate not less than 3 feet from property lines and building openings.
Exception: Bathrooms with openable exterior windows complying with natural ventilation standards (minimum 3 sq ft glazing).
IN PLAIN ENGLISH
Bathroom exhaust fans must vent completely to the outdoors through an insulated duct; dumping humid bathroom steam into an attic causes structural roof rot and toxic mold blooms.
HOMEOWNER PRO TIP:Check your attic space above bathrooms. If you see a flexible foil duct ending loosely in the insulation or blowing steam at a soffit vent, have a professional extend the duct through the roof immediately.
CHECK FREQUENCYMonthly 2×4 Block Auto-Reverse Test & Photo-Eye Check
RISK IF IGNOREDCRITICAL
Crushed Child / Pet Under Non-Reversing Door & Spring Hazard
1
2
3
WHAT YOU'RE LOOKING ATFIELD INSPECTION ANATOMY
1
Photoelectric Safety Eye:Optical beam sensor mounted strictly 6 inches above floor to detect pets or children.
2
Emergency Manual Release Cord:Red handle allowing quick mechanical disconnect from motorized carriage during power outages.
3
High-Tension Torsion Spring:Counterbalancing spring wound under extreme torque (never DIY serviceable).
LIFE SAFETY • PHOTOELECTRIC SAFETY REVERSEInfrared photoelectric safety sensor mounted exactly 6 inches above the garage floor slab, aligned with green LED indicator to trigger instant automatic door reversal.
3D ARCHITECTURAL CUTAWAY • FIGURE 5.7
FIGURE 5.G: GARAGE DOOR PHOTO-EYES AT 6" & AUTO-REVERSE VS. MISALIGNED SENSORS & CRUSHING HAZARD
Immediate auto-reverse within 2 seconds upon striking 1.5" flat 2×4 wood block
Emergency red release pull cord hanging ~6 ft above floor for manual operation
Extension springs equipped with continuous internal steel safety containment cables
COMMON DEFECT (SAFETY HAZARD)
Photo-eyes mounted near ceiling (defeated) leaving children unprotected at floor
Failure to auto-reverse on 2×4 block test exerting dangerous downward crushing force
Missing emergency disconnect handle preventing manual opening during power outages
Loose horizontal track brackets or frayed overhead steel door lift cables
Comparative technical illustration of code-compliant garage door operator with photoelectric safety sensors mounted 5 inches above floor and auto-reversing on a 2×4 wood block versus hazardous installation with defeated ceiling-mounted sensors and failed auto-reverse.
TEXAS FIELD TRIAGE: 3-STAGE SEVERITY SCALEField Inspection Progression Rubric
STAGE 1NORMAL TEXAS AGING (COSMETIC)
Condition:Metal hinges and rollers squeaking during opening cycle; light dust on overhead tracks.
Action:Lubricate hinges, rollers, and springs with silicone spray.Annual Log
Action:Reposition photo-eye sensors to 4–6 inches above floor and tighten chain tensioner.30 Days
STAGE 3ACT IMMEDIATELY (URGENT)
Condition:Door failing to auto-reverse when striking 2×4 on floor; frayed steel lift cable; cracked spring.
Action:Disconnect opener; do not touch high-tension springs; call garage door company immediately.Immediate
How It Works in Your Home
Your automated garage door operator combines high-torque motor drives, counterbalance spring tension, and dual life-safety reversal systems.
An overhead residential garage door is the largest and heaviest moving object in your home, weighing between 150 and 400 pounds. The door's heavy weight is counterbalanced by high-tension torsion springs mounted above the door header, or extension springs along the horizontal tracks. An electric garage door operator (belt-drive, chain-drive, or screw-drive) pulls and guides the balanced door along metal tracks.
Under federal safety standard 16 CFR Part 1211 and UL 325, all residential garage door openers manufactured since 1993 must incorporate two independent automatic safety reversing mechanisms: non-contact photoelectric sensors and contact pressure auto-reverse.
Photoelectric safety eyes project an invisible infrared light beam across the door opening. If a child, pet, or bicycle breaks the beam while the door is closing, the motor instantly stops and reverses to the fully open position. The second mechanism, contact pressure auto-reverse, detects physical resistance; if the bottom of the door strikes an object (such as a 1-1/2 inch high block of wood), internal force sensors trigger an immediate auto-reversal within 2 seconds.
Photoelectric Safety Eyes:Infrared beam transmitter and receiver mounted no higher than 6 inches above the floor slab.
Contact Auto-Reverse Mechanism:Internal motor torque sensor reversing the door when striking an obstruction.
Red Emergency Manual Release Cord:An emergency pull cord allowing manual operation during power outages, mounted within easy reach.
Wall Control Console:The interior push-button station mounted at least 5 feet high to keep buttons away from small children.
What Can Go Wrong & What to Look For
Photo-eyes mounted too high, failed auto-reverse pressure sensors, and missing emergency release handles cause severe entrapment injuries.
Mounting photoelectric sensors higher than 6 inches above the floor is a dangerous safety defect. If sensors are mounted 10 or 12 inches high, a crawling baby, toddler, or small pet lying beneath the beam will not break the light path; the closing door will continue downward, trapping and crushing the child.
Failure of the contact pressure auto-reverse is a common defect caused by maladjusted force limit screws. If the close-force setting is dialed too high, the door will not reverse when striking an obstruction, crushing vehicles, pets, or people.
Missing red manual emergency release handles prevent homeowners from disengaging the door during power outages, trapping vehicles inside during wildfire or hurricane evacuations.
Early Warning Signs & Red Flags
Garage door stops and reverses spontaneously when no obstruction is present (misaligned photo-eyes)
Photo-eye LED status light flickers or is off instead of glowing solid
Door slams hard into the concrete floor without slowing down
Garage door will not reverse when striking a 2×4 piece of wood placed on the floor
Emergency release rope is missing, frayed, or tied out of reach
Door fails to reverse when striking a 1-1/2 inch rigid block on the floor slab.
Missing Emergency Manual Release HandleROUTINE
Trolley lacking the red manual release cord and knob for emergency manual opening.
Wall Push-Button Mounted <5 Feet HighROUTINE
Control station mounted low within easy reach of unsupervised toddlers.
GARAGE DOOR BALANCE • § 5.7
Torsion Spring Balance & 2×4 Mechanical Auto-Reverse Testing
Pull the red manual release cord with the door closed and lift by hand: a balanced garage door stays effortlessly halfway open—never forcing the electric opener to lift dead door weight.
How Texas Weather & Soil Affect It
Foundation settlement and direct sunlight frequently misalign garage door tracks and safety sensors.
Garage slab settlement and expansive clay soil heave can shift the vertical steel tracks slightly out of plumb. When tracks shift, the door binds in the track, causing the opener to interpret the friction as an obstruction and refuse to close.
Intense direct Texas sunlight shining into east- or west-facing garages in the morning or late afternoon can overwhelm the receiving photo-eye lens with infrared sunlight, blinding the sensor and causing the door to reverse spontaneously.
Texas Climate & Soil Stresses
Garage apron slab heave causing track misalignment and roller binding
Blinding direct Texas sunlight causing optical photo-eye sensor tripping
Texas Field Pro Tips
If your garage door refuses to close only when the morning or afternoon sun is shining, shield the receiving sensor lens with a cardboard toilet paper tube or swap the sender and receiver units so the receiving lens faces away from the sun.
Test your garage door auto-reverse every month with a flat 2×4 piece of wood.
How to Maintain & Protect It
Monthly safety checks and silicone track lubrication ensure reliable, safe garage door operation.
Perform the monthly 2×4 block test: lay a 2×4 piece of wood flat on the garage floor directly under the center of the door path. Press the button to close the door. When the bottom edge strikes the wood, the door must automatically reverse to the full open position within 2 seconds without hesitation.
Perform the monthly photo-eye test: while the door is closing, wave a broomstick through the beam between the sensors. The door must reverse instantly. Measure from the floor to the center of the sensor lenses; it must be no higher than 6 inches.
Seasonal Walkthrough Checklist
Spring: Test contact auto-reverse with a flat 2×4 piece of wood on the floor slab
Summer: Clean photo-eye sensor lenses with a microfiber cloth and verify solid LED indicators
Fall: Lubricate steel rollers, hinges, and torsion spring coils with garage door silicone spray
Winter: Inspect the rubber bottom weather gasket to ensure a tight seal against cold drafts and pests
HOMEOWNER DECISION MATRIX
DIY Weekend Maintenance vs. Call a Qualified Pro
SAFE 15-MINUTE DIY CARE
Testing photo-eye beam reversal with a broomstick
Testing contact auto-reverse with a flat 2×4 piece of wood
Lubricating hinges and roller bearings with silicone spray (never use WD-40)
Re-aligning photo-eyes so both indicator LEDs glow solid green
WHEN TO CALL A QUALIFIED PRO
Adjusting or replacing high-tension torsion counter-balance springs (never attempt DIY; high tension is deadly)
Replacing worn steel lift cables and winding drums
Re-hanging bent vertical or horizontal metal tracks
Replacing burned-out operator motor drive gearboxes
CLINICAL DIFFERENTIAL FIELD TRIAGE & CONNECTED SYSTEMS§ 5.7 Diagnostic Rubric
Harmless Cosmetic Baseline
Smooth door travel that stays balanced effortlessly halfway open when disconnected manually and reverses within 2 seconds upon touching a 2x4 board is safe.
Active Failure Signal
Photo-eyes mounted >6 inches high, doors slamming shut when pulling the manual cord (broken spring), or failing to reverse off a flat 2x4 create entrapment risk.
60-Second Homeowner Check
Wave a broomstick across the bottom photo-eye beam while closing—the door must reverse immediately; check both sensors sit <=6 inches above the garage slab.
BEFORE YOU SIGN A BID • TEXAS CONTRACTOR VETTING & SCAM DEFENSE
Garage Door Torsion Springs & Opener Repair
§ 5.7 Playbook
Texas Credential to VerifyEstablished local overhead-door specialist with transparent cycle-rating part numbers and written labor warranty.
Municipal Permit & Inspection RuleWind-load reinforced garage door struts required in Texas Gulf Coast windstorm zones.
3 Questions You Must Ask Before Hiring
“Are you replacing BOTH torsion springs as a matched pair rated for 25,000+ cycles, rather than installing a cheap 10,000-cycle builder spring on one side?”
“Can I see the itemized part-and-labor total in writing BEFORE you touch the torsion shaft, with zero surprise ‘roller/cable kit’ add-ons?”
“Will you balance-test the door halfway off the floor by hand and verify both the photo-eye beam and mechanical down-force auto-reverse?”
3 High-Pressure Red Flags & Scams
Lead-generation call centers advertising “$29 Garage Door Service” that charge $950–$1,400 on the spot for basic $300 torsion springs and nylon rollers.
Replacing a single broken spring on a dual-spring shaft—leaving the fatigued second spring to snap weeks later.
Cranking up opener down-force limit screws to mask binding tracks instead of balancing the torsion shaft—creating a child entrapment hazard.
HOMEOWNER ACTION TAKEAWAYRISK LEVEL: CRITICAL
Garage Door Opener Entrapment Reversal Safety Protocol
Keep photo-eyes mounted within 6 inches of the floor, verify the 2×4 block auto-reverse test monthly, and never touch high-tension torsion springs.
Recommended Action Steps
Measure the height of the photo-eyes; adjust them to be no more than 6 inches above the floor.
Perform the 2×4 block test to confirm contact auto-reversal functions.
Verify the red emergency manual release pull cord is installed and accessible.
Immediate Priorities
Measure the height of the photo-eyes; adjust them to be no more than 6 inches above the floor.
Perform the 2×4 block test to confirm contact auto-reversal functions.
Verify the red emergency manual release pull cord is installed and accessible.
Ongoing Annual Maintenance
Test photo-eye beam reversal and contact auto-reverse monthly.
Lubricate roller bearings and hinges with garage door spray every 6 months.
Keep the floor area under the door clear of debris and clutter.
Typical Repair / Replacement Budget:$50 – $250($50–$90 to align and remount photo-eyes; $150–$250 for a professional spring and track balance tune-up; $350–$550 for a new belt-drive opener.)
Expected Assembly Lifespan:Garage Door Opener: 10–15 years; Torsion Springs: 10,000 cycles (7–10 years); Rollers: 5–8 years
ICC DIGITAL CODES2021 / 2024 IRC
2021/2024 IRC R309.5 / UL 325—Safety Reversal Sensors and 6-Inch Height Limit
STATUTORY MODEL CODE TEXT
Residential garage door operators manufactured after 1993 shall be equipped with an external entrapment protection device. Photoelectric infrared safety eyes shall be mounted across the door opening at a height of not more than 6 inches (152 mm) above the floor. Operators shall reverse closing motion within 2 seconds of sensor obstruction or contact with a 1-1/2-inch rigid block.
Exception: Manually operated overhead roll-up doors without automated power drive units.
IN PLAIN ENGLISH
Automated garage doors must have infrared photo-eyes mounted no higher than 6 inches above the slab and must automatically reverse if anything blocks the beam or touches the bottom of the door.
HOMEOWNER PRO TIP:Test your garage door safety monthly: place a 2×4 piece of wood flat on the garage floor where the door closes. When the door hits the wood, it must reverse automatically within 2 seconds.
5.8
Dryer Exhaust Systems: 4-Inch Smooth Rigid Metal Ducting, Maximum Length & Lint Fire Prevention
Severe Wall-Cavity Lint Fire & Clothes Dryer Carbon Monoxide
1
2
3
WHAT YOU'RE LOOKING ATFIELD INSPECTION ANATOMY
1
4-Inch Smooth Rigid Metal Duct:Code-mandated galvanized duct with smooth interior (zero sheet-metal screws).
2
Foil Tape Sealed Slip Joint:Airtight joint sealed with aluminum foil tape rather than duct tape or screws.
3
Exterior Gravity Flapper Hood:Louvered metal or plastic vent cap with backdraft flapper (no lint-trapping screen).
FIRE PREVENTION • SMOOTH RIGID METAL DRYER DUCT4-inch heavy-gauge smooth rigid metal dryer duct without screws protruding into the air stream, connecting to a clean exterior louvered vent hood without restrictive lint-trapping screens.
3D ARCHITECTURAL CUTAWAY • FIGURE 5.8
FIGURE 5.H: SMOOTH RIGID METAL DRYER DUCT & SCREENLESS HOOD VS. FOIL ACCORDION HOSE & LINT-CHOKED SCREEN
DONE RIGHT (CODE-COMPLIANT)
4-inch smooth-interior rigid galvanized metal duct with male joints facing airflow
Joints sealed with listed aluminum foil tape with strictly zero protruding screws
Maximum developed equivalent length within 35 feet (accounting for elbow deductions)
Exterior vent hood with free-swinging gravity damper flap and NO wire mesh screen
Sheet metal screws penetrating into duct interior catching clumps of flammable lint
Wire mesh screen installed on exterior hood choked solid with combustible lint
Duct run exceeding 35 equivalent feet without an approved inline dryer booster fan
Comparative technical illustration of code-compliant smooth rigid metal dryer duct with foil-taped joints and screenless gravity damper hood versus dangerous defect with crushed foil hose, interior screws, and lint-choked wire screen.
TEXAS FIELD TRIAGE: 3-STAGE SEVERITY SCALEField Inspection Progression Rubric
STAGE 1NORMAL TEXAS AGING (COSMETIC)
Condition:Small accumulation of lint in dryer door filter screen after single laundry cycle.
Action:Clean lint screen before every single load; check exterior hood.Annual Log
STAGE 2WATCH & MAINTAIN (30–90 DAYS)
Condition:Dryer transition duct made of corrugated plastic or ribbed foil; duct run exceeding 35 equiv ft.
Action:Replace plastic/foil duct with 4-inch smooth rigid metal pipe and foil tape within 30 days.30 Days
STAGE 3ACT IMMEDIATELY (URGENT)
Condition:Exterior damper clogged shut with massive lint plug; clothes taking 2+ cycles to dry; cabinet hot.
Action:Stop using dryer immediately; execute rotary brush cleaning of duct run before next load.Immediate
How It Works in Your Home
Your clothes dryer exhaust system expels high-velocity moist air and combustible lint safely outside your home through smooth metal ductwork.
A typical load of wet laundry contains approximately 1 gallon of water. As the clothes dryer tumbles, internal heating elements or gas burners heat air up to 135°F–150°F to vaporize this water. The internal blower fan propels this hot, moist air—along with microscopic cloth fibers (lint)—out through the rear exhaust collar.
Building codes mandate that dryer exhaust ducts must be constructed of 4-inch nominal diameter smooth rigid galvanized steel or aluminum pipe (minimum 0.016 inch thick). The interior wall of the pipe must be completely smooth to allow air to flow with minimal friction, keeping lint airborne until it exits the exterior termination hood.
Duct sections must fit together with the male crimped end pointing downstream in the direction of airflow. All joints must be secured strictly with high-temperature metal foil tape (UL 181A-P or 181B-FX). Sheet metal screws are strictly prohibited because screw tips protruding into the air stream snag lint like barbs, rapidly creating a combustible lint clog.
The duct must terminate on an exterior wall or roof with an approved louvered or damper hood. Exterior terminations must never have screens; a wire bird screen catches lint within weeks, forming a dense flammable plug.
Smooth Rigid Metal Duct:Heavy-gauge 4-inch galvanized or aluminum pipe with smooth interior walls.
Exterior Louvered Hood:Gravity-closing damper hood on the outside wall keeping pests out while blowing open during drying.
Transition Duct (UL 2158A):Semi-rigid flexible aluminum connector (maximum 8 feet) connecting the dryer to the wall box.
What Can Go Wrong & What to Look For
Protruding screws, plastic vinyl hoses, and screen-covered exterior hoods make dryer exhaust systems the leading cause of home laundry fires.
According to the National Fire Protection Association (NFPA), clothes dryers account for over 15,000 residential fires annually, with failure to clean lint from ducts being the leading cause. When corrugated flexible plastic or vinyl hoses are used, flammable lint packs into the internal ridges. As airflow chokes down, heat builds up to 200°F+, igniting the lint plug and spreading fire into wall framing.
Screws driven through duct joints act as lint traps. A single screw can catch enough wet lint in 6 months to completely block a 4-inch pipe.
Exhaust ducts that exceed maximum allowable lengths (typically 35 feet, reduced by 5 feet for every 90-degree elbow) lack sufficient air velocity (minimum 1,200 feet per minute) to carry lint out of the pipe, causing lint to settle in horizontal duct runs.
Early Warning Signs & Red Flags
Clothes take two or three cycles (more than 60 minutes) to dry completely
The top of the clothes dryer feels excessively hot to the touch during drying
The laundry room feels unusually hot, humid, or smells like burnt lint
The exterior vent hood damper does not blow open when the dryer is running
Little or no air blowing out of the exterior vent terminal outside
Protruding Sheet Metal Screws in DuctIMMEDIATE ACTION
Fasteners penetrating into duct interior, snagging lint and creating high fire risk.
Unrated combustible plastic or thin foil accordion hose connecting dryer to wall.
Protective Screen on Exterior Vent HoodIMMEDIATE ACTION
Wire mesh bird screen installed on exterior dryer hood, trapping lint into a fire plug.
Excessive Duct Length / Too Many ElbowsROUTINE
Duct run exceeding 35 equivalent feet without an approved booster fan.
LINT FIRE PREVENTION • § 5.8
Removing Exterior Pest Screens & Foil Accordion Hose Traps
Code strictly forbids screws protruding into dryer ducts and wire mesh over exterior dryer hoods—both snag wet lint into a dense plug that overheats heating elements and doubles drying time.
How Texas Weather & Soil Affect It
Texas pests and roof exhaust terminations require dedicated maintenance attention.
In Texas, exterior dryer vent hoods must protect against aggressive pest intrusion without using restrictive lint-trapping screens. Paper wasps, mud daubers, and rodents love warm, moist dryer vent openings. Utilizing heavy-duty gravity-closing dampers with magnetic closures keeps pests out while opening freely under exhaust air pressure.
When dryer vents terminate through second-story roofs on Texas homes, lint build-up can ignite on hot summer shingles where surface temperatures exceed 160°F. Roof-mounted dryer caps require annual inspection and cleaning.
Texas Climate & Soil Stresses
Pest intrusion (wasps and rodents) through broken or stuck exterior vent dampers
Clean your dryer lint trap screen after every single load of laundry—no exceptions.
Walk outside while your dryer is running. Feel the air blowing from the vent hood: it should be warm, strong, and the louvers should be wide open.
How to Maintain & Protect It
Annual professional duct sweeping and lint trap discipline virtually eliminate dryer fire risks.
Have your entire dryer exhaust duct professionally brushed and vacuumed out once a year, or use a rotary dryer vent brush kit attached to a cordless drill to clean the duct from the exterior hood to the laundry room.
Pull the dryer out every two years to vacuum behind the machine and verify the flexible semi-rigid aluminum transition duct is not crushed or kinked against the baseboard.
Seasonal Walkthrough Checklist
Spring: Check exterior vent hood louvers to verify they swing freely without lint clogging
Summer: Inspect transition duct behind the dryer to confirm it is not crushed against the wall
Fall: Have the full length of the dryer duct brushed and vacuumed clean of lint
Winter: Confirm the exterior damper flap closes tightly to block cold drafts when the dryer is off
HOMEOWNER DECISION MATRIX
DIY Weekend Maintenance vs. Call a Qualified Pro
SAFE 15-MINUTE DIY CARE
Cleaning the lint screen after every single drying load
Vacuuming out the lint trap housing beneath the lint screen with a crevice tool
Wiping down exterior vent hood louvers to remove lint fuzz
Replacing plastic or foil transition hoses with semi-rigid metal tubing
WHEN TO CALL A QUALIFIED PRO
Conducting a full rotary mechanical brush cleaning of long or roof-routed ducts
Replacing concealed flexible foil ductwork in wall cavities with rigid metal pipe
Installing an auxiliary inline dryer booster fan for runs exceeding 35 feet
Installing a recessed metal dryer box in the laundry room wall
CLINICAL DIFFERENTIAL FIELD TRIAGE & CONNECTED SYSTEMS§ 5.8 Diagnostic Rubric
Harmless Cosmetic Baseline
Towels drying completely in one 45-minute cycle with brisk warm airflow puffing open an unscreened exterior gravity damper confirm a clear 4-inch metal duct.
Active Failure Signal
Two-cycle damp clothes, hot laundry room walls, crushed white plastic or foil accordion hoses, or bird screens packing wet lint over exterior roof/wall hoods.
60-Second Homeowner Check
Start your dryer on normal heat and walk outside to locate its wall or roof vent hood—confirm strong warm air blows the flapper wide open with zero wire mesh.
Texas Credential to VerifyTDLR Licensed HVAC Contractor (TACLA) for concealed dryer duct installation/rerouting; CSIA Certified Dryer Exhaust Technician (C-DET) for rotary cleaning.
Municipal Permit & Inspection RuleMunicipal mechanical permit required when cutting new exterior wall/roof dryer exhaust terminations or rerouting concealed dryer ducts.
3 Questions You Must Ask Before Hiring
“Are you assembling 26-gauge smooth 4-inch rigid galvanized steel pipe taped ONLY with UL 181 foil tape—with ZERO sheet-metal screws protruding into the lint airstream?”
“Does the total equivalent length (counting every 90-degree elbow as 5 feet) stay under the 35-foot IRC maximum—or within the dryer manufacturer’s longer engineered chart?”
“Does the exterior roof jack or wall hood open freely with a gravity damper and ZERO wire pest mesh or bird screen that traps wet lint into a fire plug?”
3 High-Pressure Red Flags & Scams
Bait-and-switch “$39 Dryer Vent Cleaning” vans blowing leaf blowers for 3 minutes and then claiming you need a $900 “antimicrobial vent rebuild.”
Screwing wire hardware cloth over an exterior roof dryer hood to stop birds—guaranteeing a solid lint blockage that trips dryer thermal fuses within 60 days.
Burying thin foil slinky accordion hose inside wall framing or using PVC plumbing pipe (which builds static electricity and melts under dryer heat).
HOMEOWNER ACTION TAKEAWAYRISK LEVEL: HIGH
Dryer Exhaust Duct Smooth Metal Airflow Maintenance
Use only 4-inch smooth rigid metal pipe without screws, remove all wire mesh screens from exterior vent hoods, and clean the entire duct annually.
Recommended Action Steps
Verify the dryer exhaust duct is smooth metal with joints sealed by foil tape, not screws.
Check the exterior vent terminal to ensure no mesh screen is installed.
Replace any white plastic or vinyl accordion transition hose with semi-rigid metal.
Immediate Priorities
Verify the dryer exhaust duct is smooth metal with joints sealed by foil tape, not screws.
Check the exterior vent terminal to ensure no mesh screen is installed.
Replace any white plastic or vinyl accordion transition hose with semi-rigid metal.
Ongoing Annual Maintenance
Clean the dryer lint filter screen after every load.
Have the full duct cleaned with a rotary brush once a year.
Check that the exterior damper flap opens freely when the dryer runs.
Typical Repair / Replacement Budget:$75 – $250($75–$150 for professional rotary duct cleaning; $150–$300 to replace foil duct with rigid metal pipe.)
Expected Assembly Lifespan:Rigid Metal Duct: 50+ years; Exterior Louver Hood: 10–15 years; Transition Duct: 5–8 years
ICC DIGITAL CODES2021 / 2024 IRC
2021/2024 IRC M1502.4—Dryer Exhaust Duct Materials, Sizing and Termination
STATUTORY MODEL CODE TEXT
Dryer exhaust ducts shall be fabricated from metal not less than 0.016-inch thick, have a smooth interior finish, and be 4 inches nominal diameter. Ducts shall not be joined with screws or fasteners that extend into the interior of the duct. Exhaust ducts shall terminate outside the building and shall be equipped with a backdraft damper. Screens shall not be installed at the duct termination.
Exception: Transition ducts complying with UL 2158A not exceeding 8 feet in length connecting the dryer to the wall.
IN PLAIN ENGLISH
Dryer vents must be 4-inch smooth rigid metal without screws extending inside the pipe, and the exterior hood must have a backdraft damper but NEVER a mesh screen that traps lint.
HOMEOWNER PRO TIP:Never install a wire mesh bird screen over your exterior dryer vent hood. Wet lint catches on the mesh in weeks, blocking airflow and creating the #1 cause of residential laundry room fires.
5.9
Other Built-in Specialty Appliances: Wine Coolers, Trash Compactors, Central Vacuums & Ice Makers
Unobstructed front toe-kick louver grille allowing full condenser heat dissipation
Braided stainless steel water supply line replacing brittle 1/4-inch plastic tubing
Safety door interlock switches immediately cutting motor power when drawer opens
COMMON DEFECT (SAFETY HAZARD)
Ungrounded metal chassis energizing exterior stainless steel door with 120V shock hazard
Decorative wood baseboard blocking front toe-kick louvers causing compressor burnout
Brittle plastic water supply tubing kinked or leaking into kitchen base cabinetry
Trash compactor ram operating with drawer open presenting severe crush/amputation hazard
Comparative technical illustration of code-compliant built-in luxury appliance installation with bonded equipment grounding and unobstructed front-venting toe-kick versus dangerous defect with ungrounded live chassis and blocked condenser airflow.
TEXAS FIELD TRIAGE: 3-STAGE SEVERITY SCALEField Inspection Progression Rubric
STAGE 1NORMAL TEXAS AGING (COSMETIC)
Condition:Trash compactor drawer sticking on slide rails; wine cooler glass foggy after opening in humid room.
Action:Clean slide rails and wipe door magnetic gasket with soapy water.Annual Log
STAGE 2WATCH & MAINTAIN (30–90 DAYS)
Condition:Ice maker delivering undersized/hollow cubes; central vacuum inlet door loose on wall.
Action:Replace in-line water filter and tighten vacuum wall valve mounting screws within 60 days.60 Days
STAGE 3ACT IMMEDIATELY (URGENT)
Condition:Slow water leak beneath built-in wine cooler or icemaker rotting hardwood subfloor; shock hazard.
Action:Shut off appliance stop valve and circuit breaker immediately; dispatch technician.Immediate
How It Works in Your Home
Specialty built-in appliances enhance lifestyle convenience and require dedicated electrical circuits, continuous drainage, and adequate cabinet ventilation.
Modern luxury Texas homes frequently incorporate built-in specialty appliances into kitchens, butler pantries, wet bars, and media rooms. These include under-counter wine refrigerators, automatic clear-cube ice makers, trash compactors, and central vacuum systems.
Under-counter wine coolers and beverage centers feature compact compressor refrigeration systems with front-venting toe-kick grilles that pull cool air across the condenser coils and expel hot air forward into the room, allowing tight enclosure in custom cabinetry.
Built-in ice makers produce clear gourmet ice by running water continuously over a freezing cold evaporator plate. Because they produce ice continuously without storing frozen air (unlike a freezer), ice slowly melts and requires a dedicated continuous gravity drain or condensate drain pump.
Trash compactors use heavy hydraulic or gear-driven rams generating 2,000 to 5,000 pounds of pressure to compress household trash into compact bags, protected by key-lock safety switches to prevent unauthorized operation by children.
Front-Venting Toe-Kick Grille:Lower intake and exhaust grille allowing under-counter refrigeration coils to breathe.
Continuous Gravity / Pump Drain:Dedicated 1/2-inch drain line routing melted ice water safely into the plumbing waste system.
Dedicated 120V Circuit:Independent electrical branch circuit preventing motor overloads on kitchen appliance circuits.
Blocked toe-kick ventilation, leaking ice maker drains, and shared overloaded circuits are common issues.
Installing freestanding beverage coolers into enclosed cabinetry is a frequent builder mistake. Freestanding units vent heat from the back or sides; when slid into a tight cabinet without airflow, heat builds up to 120°F+, causing compressor burnout in 1 to 2 years.
Ice maker condensate drain leaks cause severe hidden cabinet damage. If the gravity drain tube kinks behind the machine or the auxiliary drain pump fails, melted ice water overflows silently onto hardwood flooring and into baseboards.
Central vacuum systems running through attics can develop pipe joint air leaks, drastically reducing suction and depositing fine dust into attic insulation.
Early Warning Signs & Red Flags
Under-counter wine cooler cabinet feels uncomfortably hot to the touch around countertops
Water pooling on the floor beneath an under-counter automatic ice machine
Wine cooler compressor runs continuously without cooling bottles to setpoint
Central vacuum suction weak at all wall inlet ports
Trash compactor ram makes loud squealing or groaning noises during compression
Blocked Under-Counter VentilationROUTINE
Compressor overheating due to rug or baseboard trim blocking front toe-kick intake grilles.
Leaking Ice Maker Drain LineIMMEDIATE ACTION
Drain line kinked or un-trapped, leaking water beneath custom cabinetry.
Central Vacuum Exhausting into Living SpaceROUTINE
Central vacuum canister exhaust pipe disconnected, blowing dust into utility closets.
MODERN SPECIALTY LOADS • § 5.9
Built-In Refrigeration Airflow & 240V Garage EV Charger Loads
Undercounter wine/beverage coolers require front kickplate ventilation louvers to reject compressor heat, while new garage EV chargers requireNEC load-calculation checks on 150A–200A panels.
How Texas Weather & Soil Affect It
Texas water hardness and ambient summer heat challenge under-counter refrigeration.
Hard Texas water causes heavy calcium scaling inside automatic ice makers. As minerals coat the ice-making grid and water sensors, ice production drops and cubes become cloudy or misshapen.
Summer room temperatures in uncooled pantries or pool cabanas place heavy continuous cooling loads on small beverage coolers, requiring clean condenser coils to avoid motor failure.
Texas Climate & Soil Stresses
Hard mineral water scaling ice maker freeze plates and float valves
High summer ambient heat demanding unobstructed under-counter coil ventilation
Texas Field Pro Tips
Clean front toe-kick condenser coils on wine coolers and ice machines every 6 months using a vacuum brush to ensure long compressor life.
Run an ice maker cleaner solution through your built-in ice machine twice a year to remove hard water scale and keep ice cubes crystal clear.
Vacuum the front toe-kick ventilation grille on wine coolers and beverage centers every six months. Lint and pet hair clog these coils rapidly, forcing compressors to run hotter and consume twice as much electricity.
Sanitize built-in ice machines with nickel-safe ice maker cleaner every 6 months to prevent mineral scale, bacterial biofilm, and mold growth in your family's ice.
Seasonal Walkthrough Checklist
Spring: Vacuum dust and pet hair from under-counter refrigeration toe-kick grilles
Summer: Run nickel-safe descaling solution through built-in ice makers
Adding dedicated 120V circuits for new specialty appliances
CLINICAL DIFFERENTIAL FIELD TRIAGE & CONNECTED SYSTEMS§ 5.9 Diagnostic Rubric
Harmless Cosmetic Baseline
Quiet compressor cycling on undercounter wine coolers with unobstructed front kickplate louvers and cool industrial 240V EV charger plugs show proper load care.
Active Failure Signal
Overheating residential 240V EV outlets, blocked toe-kick grilles cooking built-in beverage compressors, or weeping copper saddle valves behind refrigerators.
60-Second Homeowner Check
Vacuum pet hair off your built-in wine/ice-maker front kickplate louver, and feel your garage EV charger plug after 30 minutes of charging—warm is normal, hot is not.
BEFORE YOU SIGN A BID • TEXAS CONTRACTOR VETTING & SCAM DEFENSE
Built-In Refrigeration, Drain-Pump Ice Makers & Level 2 EV Chargers
§ 5.9 Playbook
Texas Credential to VerifyTDLR TECL Electrician for 240V EV chargers; TSBPE Plumber for built-in ice makers; Factory-Authorized Sealed-System Refrigeration Technician.
Municipal Permit & Inspection RuleMandatory municipal electrical permit and NEC 220.82 panel load-calculation verification for all 240V Level 2 garage EV charger circuits.
3 Questions You Must Ask Before Hiring
“Before installing a 48A–60A garage EV charger on my 150A or 200A panel, did you run a written NEC load calculation—or do we need an active load-management controller?”
“If installing a plug-in NEMA 14-50 EV outlet instead of hardwiring, are you using an industrial EV-grade receptacle (Hubbell/Bryant) torqued to spec plus a GFCI breaker?”
“For built-in undercounter ice makers and wine columns, did you preserve front kickplate condenser airflow louvers and connect a braided stainless supply line with leak pan?”
3 High-Pressure Red Flags & Scams
Installing a $12 residential-grade range outlet for daily 40-amp continuous EV charging—melting plastic faceplates and scorching garage walls within months.
Piercing a copper pipe with a needle-type “self-tapping saddle valve” to feed a refrigerator or ice maker—a notorious pinhole flood source banned by modern code.
Sealing custom cabinetry flush against the toe-kick of an undercounter beverage center, cooking its compressor to death in 18 months.
Keep toe-kick ventilation grilles clean of pet hair, descale ice machines semi-annually, and verify proper drain connections to prevent cabinet water leaks.
Recommended Action Steps
Verify under-counter beverage units are front-venting models, not trapped freestanding units.
Check beneath ice makers for evidence of drain leaks or kinked tubing.
Ensure trash compactors have a functioning key-lock safety switch.
Immediate Priorities
Verify under-counter beverage units are front-venting models, not trapped freestanding units.
Check beneath ice makers for evidence of drain leaks or kinked tubing.
Ensure trash compactors have a functioning key-lock safety switch.
Ongoing Annual Maintenance
Vacuum toe-kick condenser coils every 6 months.
Descale and sanitize ice makers semi-annually.
Empty central vacuum canisters before they become overfilled.
Typical Repair / Replacement Budget:$50 – $250($50–$100 for coil cleaning and descaling; $150–$350 to replace a failed ice maker water valve or drain pump.)
Expected Assembly Lifespan:Wine Cooler: 7–10 years; Built-In Ice Maker: 5–8 years; Trash Compactor: 10–12 years; Central Vac: 15–20 years
ICC DIGITAL CODES2021 / 2024 IRC
2021/2024 IRC M1307.1 / 2023 NEC 422.12—Dedicated Branch Circuits and Appliance Clearances
STATUTORY MODEL CODE TEXT
Appliances shall be installed in accordance with manufacturer instructions and safety listings. Specific appliances with continuous motor compressor loads, including under-counter ice makers and wine coolers, shall be served by dedicated branch circuits with accessible disconnection means and proper condensate disposal.
Exception: Cord-connected plug-in countertop specialty appliances under 15 amperes.
IN PLAIN ENGLISH
Built-in undercounter appliances like wine fridges and clear-cube ice makers require dedicated electrical circuits, accessible water shutoffs, and gravity condensate drainage.
HOMEOWNER PRO TIP:Built-in ice makers require routine maintenance. Clean and sanitize the internal water tray every 6 months to prevent mineral buildup and mold in your drinking ice.
Chapter 6 covers specialized outdoor property amenities: landscape sprinkler systems and backflow preventers, in-ground swimming pool shells, drains, and bonding, detached workshops and outbuildings, private water wellheads, on-site sewage facilities (OSSF), and luxury outdoor kitchens.
SCAN FOR LIVE DIGITAL TOOLS & UPDATES
Chapter 6 Digital Companion
Outdoor, Pool, Well & Septic Systems
Instant mobile access to sprinkler backflow certification guides, Texas pool barrier safety laws, private water wells, and aerobic septic logs.
CHAPTER VI • OPTIONAL & SPECIALTY SYSTEMSSpecialized property amenities: in-ground pools and spas, landscape irrigation, water wells, and septic systems.
CHAPTER VI MASTER ARCHITECTURAL CUTAWAY • ESTATE & OPTIONAL SYSTEMS
CHECK FREQUENCYMonthly Sprinkler Head Alignment • Annual Backflow Certification
RISK IF IGNOREDCRITICAL
Toxic Lawn Fertilizer Siphoned into Household Tap Water
1
2
3
WHAT YOU'RE LOOKING ATFIELD INSPECTION ANATOMY
1
Pressure Vacuum Breaker (PVB) Body:Brass valve assembly preventing lawn chemicals from siphoning into drinking water.
2
Calibrated Testing Cocks:Brass ports used by licensed backflow testers to verify check valve seals annually.
3
Freeze Relief Drain Petcock:Small drain valve used to blow water out of assembly before hard Texas freezes.
WATER SAFETY • IRRIGATION PVB BACKFLOW PREVENTERPressure Vacuum Breaker (PVB) backflow preventer assembly installed on an exterior brick wall 12 inches above the highest sprinkler head, protecting potable drinking water.
3D ARCHITECTURAL CUTAWAY • FIGURE 6.1
FIGURE 6.A: CODE-COMPLIANT PVB BACKFLOW & FOUNDATION DRIP VS. BURIED LOW ASSEMBLY & WALL OVERSPRAY
DONE RIGHT (CODE-COMPLIANT)
PVB backflow preventer mounted 12+ inches above the highest sprinkler head in the yard
Functioning rain and freeze sensor mounted on roof eave in open rainfall path
Dedicated foundation soaker/drip line maintaining uniform soil moisture 12 inches from slab
Pop-up rotary heads spraying lawn with minimum 18-inch clearance from exterior building walls
COMMON DEFECT (SAFETY HAZARD)
PVB assembly installed in sunken ground pit lower than yard heads (backflow siphon hazard)
Missing or disconnected rain sensor allowing sprinklers to operate during heavy downpours
Sprinkler heads spraying directly against brick veneer, windows, and outdoor AC condenser
Sunken or cracked spray nozzle eroding subgrade soil directly beneath foundation corner
Comparative technical illustration of code-compliant landscape irrigation installation featuring elevated PVB backflow assembly, unobstructed rain sensor, and foundation drip line versus common defects including submerged backflow device, missing rain sensor, and overspray damaging brick veneer and AC equipment.
TEXAS FIELD TRIAGE: 3-STAGE SEVERITY SCALEField Inspection Progression Rubric
STAGE 1NORMAL TEXAS AGING (COSMETIC)
Condition:Sprinkler spray head misaligned spraying against turf edge; minor clipping clogging nozzle.
Action:Turn nozzle turret to adjust arc; unscrew and rinse filter.Annual Log
STAGE 2WATCH & MAINTAIN (30–90 DAYS)
Condition:Sprinkler head spraying directly against house brick veneer or window; missing rain/freeze sensor.
Action:Re-aim head outward away from slab and install wireless rain/freeze sensor within 30 days.30 Days
Action:Shut off irrigation isolation valve immediately; call licensed irrigator for rebuild/RPZ.Immediate
How It Works in Your Home
Your automated landscape irrigation system delivers controlled water to distinct yard zones while strictly isolating fertilizer and pesticide runoff from home drinking water.
Residential sprinkler systems connect directly to your home's potable drinking water line. From the main supply, water routes through an exterior backflow prevention assembly—most commonly a cast-brass Pressure Vacuum Breaker (PVB) or Reduced Pressure Zone (RPZ) device. The backflow preventer contains spring-loaded check valves and an air relief poppet that instantly break vacuum suction if city water pressure drops, preventing dirty puddle water on the lawn from siphoning backward into your kitchen sink.
Downstream of the backflow assembly, an underground manifold of 24-volt electric solenoid valves controls water flow to individual yard zones (turf spray, shrub rotors, drip lines). An electronic digital controller in the garage operates these valves on programmed timers.
Modern systems incorporate a weather-sensing shutoff: a rain and freeze sensor mounted on the roof eave. When rain falls or temperatures drop below 32°F, the sensor automatically suspends scheduled watering cycles to prevent municipal water waste and dangerous sidewalk ice sheets.
Pressure Vacuum Breaker (PVB):Brass backflow device mounted at least 12 inches higher than all yard heads to protect potable water.
Zone Control Solenoid Valves:Low-voltage 24V electric valves buried in plastic ground boxes that open water to individual zones.
Rain & Freeze Sensor:Roof-mounted sensor that suspends irrigation during precipitation and sub-freezing temperatures.
Perimeter Foundation Drip Line:Subsurface pressure-compensating drip tubing buried 12–18 inches from the slab to stabilize clay soil moisture.
What Can Go Wrong & What to Look For
Sunken backflow preventers, overspray against brick veneer, and missing rain sensors cause structural decay and contaminated drinking water.
Installing a Pressure Vacuum Breaker (PVB) flush with the lawn or in a sunken ground pit is a critical cross-connection hazard. A PVB must be mounted at least 12 inches higher than the highest sprinkler head on the property. When installed in a low pit, standing water in higher elevated flowerbeds exerts head pressure that prevents the internal air relief poppet from opening during a siphon event, allowing toxic fertilizers and animal waste into your drinking water.
Sprinkler heads spraying directly against exterior brick veneer, siding, or air conditioning condensers cause massive structural and equipment damage. Continuous water spray saturates wall framing, promotes subterranean termite bridges, breaches foundation weep holes, and clogs delicate aluminum AC condenser coils with hard mineral scale.
Broken or sunken spray heads erode soil away from under concrete foundation corners, creating localized soil voids that induce differential slab settlement.
Early Warning Signs & Red Flags
Sprinkler heads spraying water directly against house walls, windows, or outdoor AC units
Geysers of water shooting 10 feet into the air from broken or mowed-off spray nozzles
Sprinklers operating during torrential downpours (broken or missing rain sensor)
Spongy, soggy ground or standing water around underground valve boxes
Irrigation controller displaying 'ERR' or zone failure codes
Sunken / Low Backflow PreventerIMMEDIATE ACTION
PVB backflow device installed less than 12 inches above highest sprinkler head, creating siphon hazard.
Building & AC Condenser OversprayIMMEDIATE ACTION
Heads spraying exterior brick veneer, siding, and air conditioning condenser aluminum fins.
Missing or Inoperable Rain / Freeze SensorROUTINE
System lacking rain sensor, causing municipal water waste and winter street ice hazards.
Sunken / Damaged Spray HeadsROUTINE
Heads buried in turf thatch or broken by lawnmowers, eroding soil near foundation beams.
IRRIGATION HYDRAULICS • § 6.1
Balancing Lawn Sprinkler Throw Against Brick Siding & Slab Edges
Misaligned rotor heads spraying brick walls create white efflorescence stains and rotting window trim, while broken zone valves erode cavernous voids beneath sidewalks and driveways.
How Texas Weather & Soil Affect It
In Texas, irrigation systems serve a vital secondary structural role: foundation hydration.
Central and North Texas expansive clay soils shrink dramatically during 100°F+ summer droughts, pulling 1 to 2 inches away from concrete foundation slab beams. This desiccation drops support from beneath the perimeter of the home, causing foundation settlement, sticking doors, and diagonal drywall cracks.
A dedicated foundation drip irrigation zone—consisting of brown 1/2-inch subsurface drip tubing buried 12 to 18 inches away from the slab perimeter—runs for 15 to 20 minutes daily during summer months to maintain uniform soil moisture equilibrium, effectively stabilizing the foundation against drought damage.
Winter Arctic freezes regularly freeze above-ground PVB backflow assemblies, bursting the heavy cast-brass body if not properly insulated or drained before freezing nights.
Texas Climate & Soil Stresses
Severe summer drought requiring dedicated foundation hydration to prevent clay shrinkage
Insulate your outdoor backflow preventer with a padded thermal jacket before freezing weather, or shut off its supply valve and open the test cocks to drain the brass valve body.
Check all sprinkler zones in spring: ensure no heads spray against brick weep holes or outdoor AC units.
How to Maintain & Protect It
Seasonal nozzle tune-ups and winter freeze draining keep irrigation systems efficient and freeze-proof.
Walk your yard every spring while running each zone for 2 minutes. Straighten tilted heads, clean clogged nozzle screens, and adjust spray arcs so water covers only lawn and mulch beds, never walls, driveways, or AC units.
Before sub-freezing winter storms, close the dedicated irrigation shutoff ball valve (usually in an underground box near the water meter). Open the test cocks on the brass PVB backflow assembly with a flathead screwdriver to let all water drain out of the valve body.
Seasonal Walkthrough Checklist
Spring: Test each zone, align spray arcs away from walls, and test the rain sensor
Summer: Calibrate foundation drip watering run times for 15 minutes twice daily during peak drought
Fall: Clear grass thatch from pop-up heads and verify zone valves close completely
Winter: Shut off main irrigation supply valve, drain backflow assembly, and slip on insulated thermal jacket
HOMEOWNER DECISION MATRIX
DIY Weekend Maintenance vs. Call a Qualified Pro
SAFE 15-MINUTE DIY CARE
Adjusting spray head arc nozzles with a small flathead screwdriver
Replacing cracked or mowed-off pop-up sprinkler nozzles
Draining the PVB backflow preventer and installing an insulated winter cover
Programming the digital controller for seasonal run times
WHEN TO CALL A QUALIFIED PRO
Annual testing and certification of PVB / RPZ backflow preventers
Replacing burned-out underground 24V electric solenoid valves
Installing a dedicated subsurface foundation drip hydration loop
Locating and repairing underground lateral pipe leaks beneath roots
CLINICAL DIFFERENTIAL FIELD TRIAGE & CONNECTED SYSTEMS§ 6.1 Diagnostic Rubric
Harmless Cosmetic Baseline
A brief pop of water from the exterior PVB backflow bell during initial zone pressurization and crisp head-to-head turf arcs missing brick walls are normal.
Active Failure Signal
Geysers from snapped risers, soggy mushy grass over leaking zone valves, missing backflow preventers, or rotors blasting brick weep holes and AC condensers.
60-Second Homeowner Check
Run each irrigation zone on MANUAL TEST for 60 seconds while walking the yard to spot buried geysers, tilted heads spraying siding, or dead rain sensors.
Texas Credential to VerifyTCEQ Licensed Irrigator (LI) for design/repair AND TCEQ Licensed Backflow Prevention Assembly Tester (BPAT) — verify active status at tceq.texas.gov.
Municipal Permit & Inspection RuleMandatory municipal irrigation permit + certified TCEQ BPAT backflow test report filed with the local water utility.
3 Questions You Must Ask Before Hiring
“What is your active TCEQ Licensed Irrigator (LI) number—not an unlicensed lawn-mowing crew operating illegally without hydraulic zoning plans?”
“Is the Pressure Vacuum Breaker (PVB) mounted at least 12 inches above the highest yard head (or upgraded to an RPZ where chemical fertigation or uphill slopes exist)?”
“Will you adjust every spray arc away from brick weep holes, wood fences, and AC condenser fins, and verify a working wireless rain/freeze shutoff sensor?”
3 High-Pressure Red Flags & Scams
Unlicensed “yard crews” tapping PVC sprinkler lines directly into domestic water pipes WITH ZERO backflow preventer—risking fertilizer/E. coli cross-contamination of tap water.
Burying solenoid control valves directly in dirt without accessible valve boxes, waterproof grease wire nuts, or isolation master valves.
Leaving broken subterranean zone heads gushing 20 GPM beneath driveways and slab edges, washing out cavernous clay voids.
Mount backflow preventers at least 12 inches higher than all heads to protect drinking water, eliminate building overspray, and protect brass valves from winter freezes.
Recommended Action Steps
Verify the PVB backflow preventer is mounted 12+ inches above the highest head in the yard.
Check all sprinkler heads to ensure zero water sprays against brick, siding, or AC equipment.
Confirm an operational rain and freeze shutoff sensor is installed on the roof eave.
Immediate Priorities
Verify the PVB backflow preventer is mounted 12+ inches above the highest head in the yard.
Check all sprinkler heads to ensure zero water sprays against brick, siding, or AC equipment.
Confirm an operational rain and freeze shutoff sensor is installed on the roof eave.
Ongoing Annual Maintenance
Test rain sensor function by pouring water onto the sensor cap during a watering cycle.
Drain and insulate the backflow preventer prior to winter freeze alerts.
Adjust spray head nozzles each spring to prevent water waste and soil erosion.
Typical Repair / Replacement Budget:$75 – $350($75–$150 to replace broken heads and re-align overspray; $250–$550 to replace a freeze-cracked brass PVB backflow assembly.)
Potable water supplies to lawn irrigation systems shall be protected against backflow by an atmospheric-type vacuum breaker, a pressure-type vacuum breaker (PVB) or a reduced pressure principle backflow preventer (RPZ). Where a PVB is installed, it shall be located not less than 12 inches (305 mm) above the highest downstream sprinkler head or discharge opening.
Exception: Systems supplied entirely by non-potable collected rainwater or dedicated unlinked agricultural wells.
IN PLAIN ENGLISH
Irrigation systems hooked to drinking water must have an approved backflow preventer (PVB or RPZ) mounted at least 12 inches higher than the highest sprinkler head in the yard to prevent contaminated lawn runoff from poisoning home drinking water.
HOMEOWNER PRO TIP:Protect your exterior backflow preventer before freezing nights. Wrap the brass valve body in an insulated thermal jacket or shut off its dedicated valve and open the test cocks to drain the water before an Arctic freeze.
6.2
Swimming Pools, Spas, Hot Tubs, and Equipment: Anti-Entrapment Drains (VGB Act), Barrier Fencing, Pumps & Heaters
48-Inch Self-Latching Safety Barrier:Safety fence with outward-opening, self-closing gate preventing toddler pool access.
2
VGB-Compliant Anti-Entrapment Drain Covers:Domed suction covers preventing hair or body entrapment at bottom of pool.
3
Solid Copper Equipotential Bonding Grid:Heavy 8 AWG bare copper wire tying all metal ladders, pumps, and rebar to prevent shock.
WATER SAFETY • SWIMMING POOL BONDING & BARRIEREvaluating in-ground swimming pool shells, Virginia Graeme Baker (VGB) compliant anti-entrapment dual main drains, equipotential bonding wire, and child barrier safety fencing.
3D ARCHITECTURAL CUTAWAY • FIGURE 6.2
FIGURE 6.B: VGB ANTI-ENTRAPMENT DUAL DRAINS & BONDED EQUIPMENT VS. SINGLE FLAT SUCTION & CRACKED MASTIC
DONE RIGHT (CODE-COMPLIANT)
Dual VGB-certified anti-entrapment suction outlets spaced ≥ 36 inches apart on center
Flexible polyurethane mastic expansion joint sealing coping to pool deck
Solid 8 AWG bare copper equipotential bonding wire securing pump motor to shell grid
48-inch perimeter child safety barrier with self-closing gate swinging outward away from pool
Action:Shut off pool sub-panel breaker immediately; prohibit swimming until certified pool electrician inspects.Immediate
How It Works in Your Home
Your residential swimming pool and spa combine high-capacity water circulation, chemical sanitation, water heating, and critical physical safety barriers.
A residential in-ground pool circulates thousands of gallons of water continuously through a closed hydraulic loop. An electric circulation pump pulls water from surface skimmers and bottom main drains, forces it through a high-surface-area filtration system (cartridge, diatomaceous earth, or silica sand), routes it through a gas heater or electric heat pump, and returns sanitized water through wall return eyeball jets.
To prevent tragic child drownings, the International Swimming Pool and Spa Code (ISPSC Section 305) mandates that outdoor pools be surrounded by a safety barrier fence at least 48 inches (4 feet) in height. All access gates must open outward away from the pool, be self-closing, and feature self-latching hardware with release latches located at least 54 inches above grade.
Under federal law (the Virginia Graeme Baker Pool & Spa Safety Act), pools must feature dual main drains teed together at least 3 feet apart or unblockable drain grates. Dual drains prevent body or hair entrapment; if a swimmer covers one drain cover, suction instantly diverts to the second drain without creating a deadly vacuum seal.
Equipotential bonding (NEC Article 680.26) connects all pool metal parts—rebar in gunite shells, metal ladders, pump motors, and light niches—into a continuous loop with solid 8 AWG bare copper wire to eliminate voltage differences that cause electric shock drowning.
VGB Anti-Entrapment Drain Covers:Domed suction covers certified to ASME/ANSI A112.19.8 that prevent swimmer entrapment.
Equipotential Copper Bonding Ring:Solid 8 AWG bare copper conductor encircling the pool perimeter to prevent electrical shock.
Circulation Pump & Multiport Filter:Electric pump motor and cartridge/DE filter maintaining water clarity and hygiene.
What Can Go Wrong & What to Look For
Broken suction grates, non-latching barrier gates, and missing electrical bonding create severe life-safety hazards.
A broken, flat, or single main drain cover is an extreme life-safety emergency. Powerful circulation pump suction on a broken or non-VGB compliant drain can trap a child's body or entangle hair underwater with hundreds of pounds of suction force, leading to drowning within seconds.
Safety barrier gates that fail to self-close or latch automatically from any open position allow unsupervised toddlers direct access to deep pool water. Over time, gate hinges sag and latch posts shift, preventing the lock from engaging.
Missing or corroded equipotential bonding allows stray electrical current from faulty underwater light fixtures or pump motors to electrify the pool water. Swimmers experience muscle paralysis ('electric shock drowning') without feeling an obvious shock.
Early Warning Signs & Red Flags
Pool barrier gate does not latch automatically when released from a 6-inch open angle
Bottom main drain suction grates are cracked, loose, flat, or have missing screws
Pool equipment electrical subpanel GFCI breaker fails to trip when tested
Water level drops more than 1/2 inch per day (indicating an active underground pipe or shell leak)
Water bubbling or air sputtering into the pump strainer basket during operation
Non-Compliant / Broken Main Drain CoversIMMEDIATE ACTION
Flat or cracked suction drain covers lacking certified VGB anti-entrapment dome geometry.
Failing Self-Closing Pool Gate LatchesIMMEDIATE ACTION
Barrier gate failing to swing closed and latch automatically from any position.
Missing Pool GFCI / Bonding ProtectionIMMEDIATE ACTION
Underwater pool lights or pump motors lacking functional GFCI breakers or bonding rings.
Active Structural Shell or Plumbing LeakROUTINE
Water loss exceeding normal evaporation due to cracked skimmer throats or return line fractures.
AQUATIC LIFE SAFETY • § 6.2
Equipotential #8 Copper Bonding & Self-Closing Pool Barriers
Equipotential copper bonding ties pumps, heaters, handrails, and deck steel to identical voltage potential—eliminating lethal stray-current gradients in water alongside GFCI breakers.
How Texas Weather & Soil Affect It
High summer evaporation and shifting clay soils test pool shells and plumbing lines.
Under 100°F+ Texas summer heat and dry breezes, normal evaporative water loss averages 1/4 to 3/8 inch of water daily. Homeowners should perform a simple 24-hour 'bucket test' to differentiate normal evaporation from serious structural or plumbing leaks.
Expansive clay soil movement frequently causes differential settlement between the rigid pool shell and the surrounding concrete pool deck. As soil expands and contracts, the expansion joint ('mastic joint') between the pool coping stones and the deck tears open. If this joint is not kept sealed with flexible polyurethane sealant, surface rainwater enters behind the pool wall, cracking pool coping and popping perimeter waterline tiles.
Texas Climate & Soil Stresses
High summer heat causing rapid evaporation and chemical chlorine degradation
Clay soil movement tearing expansion mastic joints between coping and concrete decks
Texas Field Pro Tips
Check your pool perimeter mastic expansion joint annually. Re-caulking cracked mastic with polyurethane pool sealant prevents thousands of dollars in winter freeze coping damage.
Inspect main drain covers visually through clear water. If you see cracks or missing screws, turn off the pump and replace the covers immediately.
How to Maintain & Protect It
Weekly gate checks, monthly filter backwashing, and balanced water chemistry ensure years of safe swimming.
Test pool barrier gate self-closing hinges and self-latching hardware every single week. Pull the gate open just 2 inches and release it; it must click securely shut every time without sticking.
Test GFCI circuit breakers serving pool lights and pump motors once a month by pressing the TEST button. Clean skimmer baskets and pump strainer baskets weekly, and monitor filter pressure gauges to backwash or rinse cartridges when pressure rises 8–10 PSI above clean baseline.
Seasonal Walkthrough Checklist
Spring: Inspect main drain covers, test all GFCI breakers, and re-caulk coping expansion joints
Summer: Maintain free chlorine (2–4 ppm) and pH (7.2–7.6) and check gate self-latching weekly
Fall: Clear autumn leaves from skimmers to prevent pump cavitation and check pool heater burners
Winter: Run freeze-protection pump cycles during sub-freezing nights to prevent pipe freeze bursts
HOMEOWNER DECISION MATRIX
DIY Weekend Maintenance vs. Call a Qualified Pro
SAFE 15-MINUTE DIY CARE
Testing and adjusting gate self-closing spring hinges
Testing pool GFCI breakers and clearing skimmer baskets
Testing water chemistry and adding balancing chemicals
Conducting a 24-hour bucket test to check for pool leaks
WHEN TO CALL A QUALIFIED PRO
Replacing underwater pool lights and rewiring light niches
Replacing cracked or expired VGB anti-entrapment main drain covers
Diagnosing and repairing underground suction/return plumbing leaks
Re-plastering worn gunite shells or re-pouring pool deck mastic joints
CLINICAL DIFFERENTIAL FIELD TRIAGE & CONNECTED SYSTEMS§ 6.2 Diagnostic Rubric
Harmless Cosmetic Baseline
Up to 1/4 inch per day of summer surface evaporation during windy 98°F Texas weeks and clear filter gauges within 8 PSI of clean baseline are expected.
Active Failure Signal
Pool gates failing to self-latch from 3 inches ajar, missing #8 solid copper pump bonding wires, expired flat drain covers, or losing >1/2 inch of water daily.
60-Second Homeowner Check
Hold your pool yard gate 4 inches open and let go—it must swing shut and latch automatically; then confirm bare solid copper wire clamps onto every pump motor.
BEFORE YOU SIGN A BID • TEXAS CONTRACTOR VETTING & SCAM DEFENSE
Swimming Pool Equipment, Electrical Bonding & Plaster
§ 6.2 Playbook
Texas Credential to VerifyTDLR Licensed Residential Appliance Installer Contractor (RAIC / TICL) or TECL Electrician for ALL pool pumps, heaters, and lights.
Municipal Permit & Inspection RuleElectrical/aquatic permit required for pump replacements, heater installs, and barrier modifications.
3 Questions You Must Ask Before Hiring
“What is your TDLR TICL or TECL license number authorizing legal electrical work on swimming pool pumps, underwater lights, and equipotential bonding?”
“Will you reconnect the #8 AWG solid bare copper equipotential bonding lug to the new variable-speed pump motor and verify GFCI breaker trip time?”
“Are all main-drain suction covers VGBA-certified anti-entrapment assemblies stamped with an active expiration year?”
3 High-Pressure Red Flags & Scams
Pool cleaning techs swapping 240V pool pump motors without reconnecting the solid copper bonding wire or installing GFCI protection—creating lethal stray-voltage shock risk.
Acid-washing thin, delaminating pool plaster that exposes rough gunite aggregate instead of disclosing true replastering lifespan.
Selling oversized single-speed pumps that violate federal DOE efficiency mandates and cavitate existing PVC suction manifolds.
HOMEOWNER ACTION TAKEAWAYRISK LEVEL: CRITICAL
Swimming Pool VGB Anti-Entrapment & Barrier Safety Protocol
Keep barrier gates self-closing and latched at all times, verify dual VGB anti-entrapment main drain covers, and test pool GFCI breakers monthly.
Recommended Action Steps
Verify pool barrier fences stand at least 48 inches high with self-latching gates.
Confirm bottom main drain suction grates are certified VGB anti-entrapment covers.
Test the GFCI circuit breakers protecting pool pumps and underwater lights.
Immediate Priorities
Verify pool barrier fences stand at least 48 inches high with self-latching gates.
Confirm bottom main drain suction grates are certified VGB anti-entrapment covers.
Test the GFCI circuit breakers protecting pool pumps and underwater lights.
Ongoing Annual Maintenance
Test gate self-closing mechanisms weekly.
Maintain water chemistry to protect plaster shells and equipment from scale or etching.
Inspect deck expansion mastic joints annually to prevent coping damage.
Typical Repair / Replacement Budget:$75 – $450($75–$150 to replace gate latch hardware; $150–$350 for certified VGB drain covers; $450–$1,200 for pool pump motor replacement.)
Expected Assembly Lifespan:Gunite Plaster Shell: 10–15 years; Pump Motor: 6–10 years; Gas Heater: 6–9 years; Filter Cartridges: 2–3 years
ICC DIGITAL CODES2024 ISPSC
2024 ISPSC 305 / 2023 NEC 680.26—Swimming Pool Safety Barriers and Equipotential Bonding
STATUTORY MODEL CODE TEXT
Outdoor swimming pools shall be surrounded by a barrier not less than 48 inches (1219 mm) in height with self-closing and self-latching gates opening outward away from the pool. An equipotential bonding ring consisting of a solid 8 AWG bare copper conductor shall encircle the pool perimeter between 18 and 24 inches from the inner wall.
Exception: Spas or hot tubs with a certified lockable safety cover conforming to ASTM F1346.
IN PLAIN ENGLISH
Swimming pools require a 48-inch child safety fence with self-latching gates that swing outward, dual anti-entrapment main drains to protect swimmers, and a copper bonding ring to eliminate electrical shock in the water.
HOMEOWNER PRO TIP:Check your pool fence gates weekly to ensure they latch shut automatically from any open angle. Never prop a pool safety gate open for parties or lawn care.
Electrical Subpanel Shock Hazard & Severe Wind Racking
1
2
3
WHAT YOU'RE LOOKING ATFIELD INSPECTION ANATOMY
1
Detached Subpanel Disconnect:60-to-100-amp electrical panel with separated neutral and ground bars and ground rods.
2
Engineered Roof Rafter Tie System:Collar ties and hurricane clips anchoring roof against high prairie wind gusts.
3
Treated Mud Sill Anchor Bolt:Pressure-treated bottom plate bolted to concrete foundation with moisture barrier.
OUTBUILDING STRUCTURE • WORKSHOP FRAMING & SUBPANELInspecting detached garages, barndominiums, and workshop outbuildings for monolithic slab integrity, subpanel 4-wire grounding separation, and structural roof framing.
3D ARCHITECTURAL CUTAWAY • FIGURE 6.3
FIGURE 6.C: 4-WIRE SUBPANEL WITH ISOLATED NEUTRAL & GROUND RODS VS. 3-WIRE BOOTLEG FEEDER & ROTTED SILL
DONE RIGHT (CODE-COMPLIANT)
4-wire feeder (2 hots, 1 neutral, 1 ground) routed in underground conduit from main house
Floating neutral bus bar strictly isolated from metal subpanel cabinet (no bonding screw)
Dedicated equipment ground bus bonded to cabinet and wired to dual 8-foot driven ground rods
Preservative-treated bottom sill plate bolted to concrete foundation 6+ inches above soil
COMMON DEFECT (SAFETY HAZARD)
Dangerous 3-wire feeder lacking separate equipment grounding conductor to detached garage
Green bonding screw installed in outbuilding subpanel neutral bar (lethal shock risk)
Missing grounding electrode rods at detached building (violates NEC Article 250.32)
Untreated lumber sill plate resting directly on wet dirt rotting from moisture and termites
Comparative technical illustration of code-compliant detached workshop subpanel featuring 4-wire feeder, isolated floating neutral bus, bonded ground bus with dual driven ground rods, and anchored sill plate versus common defects including 3-wire bootleg feeder, bonded subpanel neutral, and untreated wood sill rotting on bare dirt.
TEXAS FIELD TRIAGE: 3-STAGE SEVERITY SCALEField Inspection Progression Rubric
STAGE 1NORMAL TEXAS AGING (COSMETIC)
Condition:Minor weathering on detached storage shed paint; door latch needing silicone lubricant.
Action:Touch up exterior paint and check roof shingles during walk.Annual Log
STAGE 2WATCH & MAINTAIN (30–90 DAYS)
Condition:Detached garage subpanel missing ground rod; wood framing resting directly in yard soil without clearance.
Action:Drive 8-foot copper ground rod and install treated sill plates or concrete piers within 60–90 days.60–90 Days
STAGE 3ACT IMMEDIATELY (URGENT)
Condition:Detached outbuilding leaning significantly (>5 degrees out of plumb); subpanel fed with ungrounded wire on ground.
Action:Disconnect electrical power to shed; hire framing specialist for structural shoring/removal.Immediate
How It Works in Your Home
Detached outbuildings provide valuable workshop, vehicle storage, and living space while requiring independent structural, electrical, and weatherproofing standards.
Residential outbuildings encompass detached garages, workshops, storage barns, casitas, and pool cabanas. These structures rest on monolithic concrete slab-on-grade foundations or pier-and-beam wood skid platforms.
Where electrical power serves a detached building, the National Electrical Code (NEC Article 250.32) requires a dedicated 4-wire feeder routed from the main house panel (two hot conductors, one insulated neutral conductor, and one separate equipment grounding conductor). Inside the outbuilding subpanel, the neutral and ground busbars must remain strictly separated (isolated), and the subpanel must be connected to its own dedicated grounding electrode system (two copper ground rods driven 8 feet into the earth).
Wall framing sill plates in direct contact with concrete slabs must be pressure-treated lumber, anchored with 1/2-inch anchor bolts spaced every 6 feet to resist Texas windstorm uplift and shear forces.
4-Wire Feeder Cable:Four insulated/bare conductors delivering power while isolating ground from neutral.
Isolated Subpanel Busbars:Strict separation of white neutral wires from bare copper grounding wires in outbuilding panels.
Dedicated Grounding Electrodes:Dual 8-foot copper ground rods driven into earth at the outbuilding perimeter.
Treated Sill Plates & Anchor Bolts:Preservative-treated bottom framing plates bolted into the slab to resist rot and wind uplift.
What Can Go Wrong & What to Look For
Improper bonded subpanels, non-treated wood touching slabs, and unpermitted electrical feeds create severe hazards.
The most critical code and safety defect in detached outbuildings is an improper 3-wire feeder with bonded neutral and ground bars in the subpanel. When neutrals and grounds are bonded together in an outbuilding, normal electrical return current travels across metal conduits, building framing, and the earth, creating dangerous touch voltage on metal workshop walls and equipment cases.
Untreated wood framing resting directly on concrete foundation slabs draws up moisture, causing rapid structural rot and inviting subterranean termite colonies directly into wall studs.
Overhead or shallowly buried electrical feed wires that lack burial depth (minimum 18 to 24 inches for conduit or direct-burial cable) can be severed by garden tillers or lawn equipment.
Early Warning Signs & Red Flags
Tingling sensations or minor electrical shocks when touching metal workshop tools or metal siding
Subpanel inside outbuilding has white neutral wires and bare copper ground wires attached to the same metal bar
Wood sill plates along the floor are discolored, soft, crumbling, or show termite shelter tubes
Roof trusses inside the outbuilding sag, twist, or show cut/altered web chords
Water pools along the perimeter walls during rainfall due to flat grading
Detached garages and casitas require a 4-wire feeder with floating neutral busbars isolated from the metal enclosure plus local driven ground rods to prevent stray return current on metal frames.
How Texas Weather & Soil Affect It
High winds, severe lightning, and expansive clay heave require sturdy outbuilding construction.
Detached buildings frequently lack the heavy dead weight of main residences. During severe Texas severe thunderstorms and coastal windstorms, light outbuilding roofs experience intense aerodynamic uplift. Unanchored framing can blow off foundations unless secured with hurricane straps and heavy anchor bolts.
Lightning strikes frequently target detached workshops surrounded by open acreage. Without dual 8-foot earth ground rods, electrical surges cannot dissipate safely, destroying workshop tools and starting structural fires.
Texas Climate & Soil Stresses
Severe windstorms and straight-line winds requiring engineered hurricane tie-downs
Lightning surge strikes requiring low-resistance earth grounding systems
Texas Field Pro Tips
Open your detached garage subpanel: verify the white neutral wires and bare copper ground wires connect to separate bars. If they are tied together, hire an electrician to remove the bonding jumper.
Ensure soil outside the outbuilding slopes downward away from walls to prevent water ponding against foundation grade beams.
How to Maintain & Protect It
Annual sill plate inspections and subpanel maintenance protect your outbuilding investment.
Inspect wood sill plates around the interior perimeter of the workshop floor annually. Probe the wood with an awl or screwdriver to verify it remains solid and dry, and look for earthen termite mud tubes.
Keep flowerbeds, mulch, and soil graded at least 4 to 6 inches below the concrete slab edge around the entire building perimeter.
Seasonal Walkthrough Checklist
Spring: Inspect roof trusses and wall framing for storm wind uplift or water staining
Summer: Check exterior ground rod connections to ensure copper clamps are tight and uncorroded
CLINICAL DIFFERENTIAL FIELD TRIAGE & CONNECTED SYSTEMS§ 6.3 Diagnostic Rubric
Harmless Cosmetic Baseline
Dry elevated concrete workshop floors with 6-inch siding clearance and a dedicated 4-wire subpanel using isolated neutral busbars reflect sound outbuildings.
Active Failure Signal
Wood shed skids rotting directly in damp soil, indoor Romex wire strung overhead or shallowly buried in lawn grass, or neutral-bonded workshop subpanels.
60-Second Homeowner Check
Walk around your detached garage or shed to confirm soil and mulch sit below wood siding, and test workshop GFCI outlets with a three-light receptacle tester.
BEFORE YOU SIGN A BID • TEXAS CONTRACTOR VETTING & SCAM DEFENSE
Detached Workshops, Casitas, Metal Barns & 4-Wire Subpanels
§ 6.3 Playbook
Texas Credential to VerifyTDLR TECL Electrician for 4-wire underground subpanel feeders; TSBPE RMP for plumbing trenches; TBPE P.E. / TDI WPI-8 engineer in coastal counties.
Municipal Permit & Inspection RuleMunicipal building, impervious-cover/setback zoning, electrical trench-depth inspection, and coastal WPI-8 windstorm permits.
3 Questions You Must Ask Before Hiring
“Is the detached workshop subpanel fed by a 4-wire feeder with neutral busbars floating (isolated from the metal box) PLUS two local 8-foot copper ground rods?”
“Will underground electrical conduit meet full NEC burial depth (18 inches PVC / 24 inches direct-burial UF) with red underground warning ribbon above?”
“Does the detached slab include a turned-down perimeter grade beam, anchor bolts, and 6-inch wood-siding ground clearance—not raw wood resting on dirt?”
3 High-Pressure Red Flags & Scams
Running a 3-wire feeder to a detached barn and bonding neutral to ground again—energizing metal building siding and workshop tools with stray neutral current.
Burying indoor paper-wrapped NM-B Romex wire 4 inches under lawn grass inside white plumbing water PVC—a severe electrocution hazard.
Erecting pre-fab backyard offices or carports across city utility easements or HOA setback lines without a site survey—resulting in forced municipal demolition.
Isolate neutrals and grounds in outbuilding subpanels, install dedicated earth ground rods, and verify treated wood framing on concrete slabs.
Recommended Action Steps
Verify the outbuilding subpanel features an isolated neutral busbar (4-wire feeder).
Confirm dual 8-foot copper ground rods are installed at the outbuilding perimeter.
Check that sill plates in contact with the concrete floor are pressure-treated lumber.
Immediate Priorities
Verify the outbuilding subpanel features an isolated neutral busbar (4-wire feeder).
Confirm dual 8-foot copper ground rods are installed at the outbuilding perimeter.
Check that sill plates in contact with the concrete floor are pressure-treated lumber.
Ongoing Annual Maintenance
Inspect bottom plates annually for moisture or termite mud tubes.
Ensure exterior soil slopes away from the outbuilding perimeter.
Check that overhead electrical feeds maintain proper vertical clearance.
Typical Repair / Replacement Budget:$150 – $450($150–$300 to separate subpanel neutral/ground bars and install dual ground rods; $500–$1,200 to trench and pull a new 4-wire electrical feeder.)
Expected Assembly Lifespan:Outbuilding Framing: 50+ years; Treated Sill Plates: 30+ years; Metal Roofing: 30–40 years
ICC DIGITAL CODES2023 NEC
2023 NEC 250.32 / 2021/2024 IRC R317.1—Grounding at Separate Buildings and Decay Protection
STATUTORY MODEL CODE TEXT
A building or structure supplied by a feeder shall have a grounding electrode system. The feeder shall include a separate equipment grounding conductor (4-wire feeder: two hots, one insulated neutral, one bare equipment ground). The neutral busbar shall be isolated from the subpanel enclosure with zero bonding screws installed. Wood framing sill plates in contact with concrete shall be preservative-treated lumber.
Exception: Existing 3-wire feeders installed prior to modern code cycles with no continuous metallic paths between structures.
IN PLAIN ENGLISH
Detached workshops and garages powered by an electrical feeder require a 4-wire feed with strictly separated neutral and ground bars, dedicated ground rods, and pressure-treated wood on concrete slabs.
HOMEOWNER PRO TIP:Look inside your detached workshop electrical subpanel. The white neutral wires and bare copper ground wires must be attached to separate metal bars. Bonding them together in an outbuilding creates dangerous stray voltage on metal building frames.
CHECK FREQUENCYMonthly Pressure Switch Check • Annual Certified Water Lab Test
RISK IF IGNOREDCRITICAL
Coliform Bacteria & Agricultural Nitrates in Drinking Water
1
2
3
WHAT YOU'RE LOOKING ATFIELD INSPECTION ANATOMY
1
Sanitary Wellhead Seal & Screened Vent:Heavy steel casing cap keeping surface runoff and insects from entering aquifer.
2
Bladder Pressure Tank:Captive-air water tank maintaining uniform household line pressure between pump cycles.
3
40/60 PSI Pressure Switch:Electro-mechanical switch cycling deep-well submersible pump on and off.
WATER SUPPLY • SANITARY WELLHEAD & PRESSURE TANKTesting rural private water wells: sanitary wellhead seal 18 inches above grade, submersible pump electrical conduit, blue diaphragm pressure tank, and gallon-per-minute flow testing.
3D ARCHITECTURAL CUTAWAY • FIGURE 6.4
FIGURE 6.D: CODE-COMPLIANT SANITARY WELLHEAD & BLADDER TANK VS. BURIED CASING & WATERLOGGED TANK
DONE RIGHT (CODE-COMPLIANT)
Steel/PVC well casing terminating 12+ inches above grade with concrete sanitary collar
Watertight sanitary well seal with downward-turned, fine-mesh screened breather vent
Captive-air bladder tank calibrated 2 PSI below cut-in (38 PSI for 40/60 PSI switch)
Brass pressure relief valve and accessible electrical pump disconnect within sight
COMMON DEFECT (SAFETY HAZARD)
Casing terminated flush with lawn in depressed mud pit (surface runoff entry point)
Cracked, loose, or missing sanitary well cap allowing insects and rodents into well
Waterlogged pressure tank with ruptured bladder causing rapid pump short-cycling
Missing pressure relief valve on well manifold (severe explosion / rupture hazard)
Comparative technical illustration of code-compliant private water well installation featuring 18-inch elevated casing with screened sanitary cap, concrete apron, calibrated captive-air bladder tank, and pressure relief valve versus common defects including casing buried in dirt pit, open vent inviting contamination, waterlogged short-cycling tank, and missing relief valve.
TEXAS FIELD TRIAGE: 3-STAGE SEVERITY SCALEField Inspection Progression Rubric
STAGE 1NORMAL TEXAS AGING (COSMETIC)
Condition:Dust or spider webs on pressure tank bladder gauge; wellhead sanitary seal surface weathering.
Action:Check pressure tank air pre-charge biannually with tire gauge.Annual Log
STAGE 2WATCH & MAINTAIN (30–90 DAYS)
Condition:Well pump cycling on and off rapidly every few seconds (waterlogged tank); sanitary cap screen missing.
Action:Recharge/replace pressure tank and install 24-mesh insect vent screen on casing within 30 days.30 Days
STAGE 3ACT IMMEDIATELY (URGENT)
Condition:Well water smells of sulfur/sewage; test positive for E. coli/coliform; wellhead submerged by flood.
Action:Do not drink or cook with water; switch to bottled; shock well and hire licensed well contractor.Immediate
How It Works in Your Home
Your private water well taps deep underground aquifers, pumping pure water to a pre-pressurized storage tank to supply household fixtures on demand.
Rural and semi-rural Texas properties frequently rely on private water wells drilled hundreds of feet deep into underground aquifers (such as the Gulf Coast, Carrizo-Wilcox, or Edwards aquifers). A steel or PVC well casing lines the drilled borehole, sealed with concrete grout to prevent surface runoff from leaking into the groundwater.
A multi-stage submersible electric pump hangs deep in the well below the water table, suspended on rigid drop pipe. When household water pressure drops below your setpoint (typically 40 PSI), an electromechanical pressure switch clicks closed, sending 240-volt power down to the pump motor. The pump forces water upward into a blue steel diaphragm pressure tank located in your pump house or garage.
The pressure tank contains an internal rubber bladder separating water from compressed air. As water pumps into the tank, it compresses the air bladder. When you open a faucet, the compressed air pushes water through your pipes instantly without requiring the pump to cycle on for every glass of water. When pressure drops to 40 PSI, the pump re-engages, running until pressure reaches 60 PSI.
Sanitary Wellhead Cap:A gasketed, insect-proof seal bolted to the casing top with a downward-screened air vent.
Submersible Well Pump:Multi-stage 240V electric pump submerged deep below the aquifer water table.
Electromechanical Pressure Switch:Pressure-sensing electrical switch cycling the pump between 40 PSI cut-in and 60 PSI cut-out.
Diaphragm Pressure Tank:Pre-charged steel tank storing pressurized water to prevent pump motor short-cycling.
What Can Go Wrong & What to Look For
Cracked wellhead seals, waterlogged pressure tanks, and bacterial contamination threaten rural water supplies.
A damaged, cracked, or unsealed wellhead cap is a severe biological contamination hazard. If the cap is loose or lacks a fine mesh vent screen, surface storm runoff, fire ants, earwigs, and rodents fall directly into the well casing, contaminating your family's drinking water with deadly E. coli and coliform bacteria.
Waterlogged pressure tanks are the leading cause of premature well pump motor burnout. Over 5 to 8 years, internal rubber bladders rupture, filling the tank completely with water. Because water cannot be compressed, opening a faucet causes pressure to plunge instantly, forcing the pump to cycle on and off every few seconds ('short-cycling'), which burns out the motor windings in weeks.
Low casing height leaves wells vulnerable to flooding. If the steel casing terminates less than 12 inches above grade, heavy rainfall can submerge the wellhead, pouring muddy floodwater directly into your drinking aquifer.
Early Warning Signs & Red Flags
Well pump clicks on and off rapidly every few seconds whenever any faucet is running (waterlogged tank)
Water from faucets appears cloudy, muddy, or smells like sulfur / rotten eggs
Pumping pressure fluctuates wildly from strong surge to weak trickle during showers
Water well circuit breaker trips repeatedly during heavy water usage
A cracked wellhead sanitary seal or flooded well house allows insects, lawn fertilizer, and surface runoff straight into your aquifer—making annual accredited coliform/nitrate lab testing essential.
How Texas Weather & Soil Affect It
Summer drought drops aquifer water tables while winter freezes threaten above-ground tanks.
During severe Texas summer droughts, regional aquifer levels drop significantly. In shallow or marginal wells, the water table can drop below the pump intake depth, causing the pump to run dry and draw in fine sand that destroys pump impellers and clogs household filtration filters.
Above-ground well pressure tanks, pressure switches, and filter canisters installed in unheated well houses freeze rapidly during winter cold snaps. Ice ruptures the brass pressure switch fittings and cracks filter housings, cutting off all water to the home.
Texas Climate & Soil Stresses
Severe summer drought dropping aquifer water levels and causing pump sand-drawing
Winter Arctic freezes bursting uninsulated wellhouse pressure tanks and switches
Texas Field Pro Tips
Have your well water laboratory tested annually for total coliform, E. coli, nitrates, and heavy metals.
Keep a 100-watt heat lamp or small thermostatically controlled heater inside your well pump house during sub-freezing winter storms.
How to Maintain & Protect It
Annual water testing and pressure tank air calibration ensure pure drinking water and long pump life.
Check your pressure tank's air pre-charge once a year. Turn off the well pump breaker, open a faucet to drain all water from the tank, and use a tire pressure gauge on the Schrader valve on top of the tank. The air pressure must read exactly 2 PSI below the pump's cut-in pressure (e.g. 38 PSI for a 40/60 switch). Add air with a bicycle pump if low.
Inspect the wellhead monthly: confirm the sanitary cap bolts are snug, the downward vent screen is intact, and no ant mounds are built against the casing.
Seasonal Walkthrough Checklist
Spring: Submit a well water sample to a certified local laboratory for bacterial testing
Summer: Monitor pump run times during drought; ensure pump does not run continuously
Fall: Inspect well pump house insulation and test the thermostatic winter heater
Winter: Check that wellhead electrical conduit is tightly sealed against freezing drafts
HOMEOWNER DECISION MATRIX
DIY Weekend Maintenance vs. Call a Qualified Pro
SAFE 15-MINUTE DIY CARE
Checking and adjusting pressure tank air pre-charge with a tire gauge
Visual inspection of the wellhead sanitary cap and vent screen
Collecting water samples for laboratory testing
Replacing whole-house sediment filter cartridges
WHEN TO CALL A QUALIFIED PRO
Replacing a waterlogged pressure tank and calibrating pressure switch settings
Pulling and replacing a failed deep submersible well pump
Shock chlorinating a contaminated well casing to eliminate bacteria
Conducting a formal flow test (gallons per minute and recovery rate)
CLINICAL DIFFERENTIAL FIELD TRIAGE & CONNECTED SYSTEMS§ 6.4 Diagnostic Rubric
Harmless Cosmetic Baseline
Pump cycles lasting 60+ seconds between 40/60 PSI cut-in/cut-out thresholds with crystal-clear water and a tight sanitary wellhead seal indicate a healthy well.
Active Failure Signal
Rapid 5-second pump short-cycling (waterlogged bladder tank), sand/silt in aerators, cracked wellhead seals allowing insects in, or positive coliform lab tests.
60-Second Homeowner Check
Run a garden hose while watching the well pressure gauge—if the pump clicks ON and OFF every few seconds, your pressure tank air bladder is waterlogged.
BEFORE YOU SIGN A BID • TEXAS CONTRACTOR VETTING & SCAM DEFENSE
Private Water Well Drilling, Submersible Pumps & Sanitary Seals
§ 6.4 Playbook
Texas Credential to VerifyTDLR Licensed Water Well Driller (WWD) & Licensed Pump Installer (PI) — verify at tdlr.texas.gov; TCEQ NELAP-Accredited Water Laboratory.
Municipal Permit & Inspection RuleLocal Groundwater Conservation District (GCD) spacing/drilling permit + mandatory State of Texas Well Report filed with TDLR.
3 Questions You Must Ask Before Hiring
“Can I have a copy of the official TDLR State of Texas Well Report documenting total bore depth, annular cement grout depth, static water level, and GPM yield?”
“Does the wellhead sit atop an elevated, sloped concrete sanitary slab with a vermin-proof casing seal and screened downward-facing vent—at least 50–100 ft from septic systems?”
“After servicing the submersible pump, will you shock-disinfect the well column and wait 48+ hours after flushing before drawing a NELAP-accredited coliform/E. coli lab sample?”
3 High-Pressure Red Flags & Scams
Selling a well shock-chlorination and drawing the “clean” lab water sample the very next morning while residual bleach still masks live coliform bacteria in the aquifer.
Condemning a deep submersible well pump for $4,500 when only a $45 pressure switch, waterlogged bladder tank diaphragm, or control-box start capacitor failed.
Leaving open conduit holes or cracked two-piece wellhead seals where fire ants, earwigs, and lawn runoff drop straight into drinking water.
HOMEOWNER ACTION TAKEAWAYRISK LEVEL: HIGH
Private Water Wellhead Sanitary Seal & Pressure Tank Care
Ensure the wellhead cap is insect-proof and elevated 12+ inches above grade, test water purity annually, and prevent pump burnout by checking pressure tank air.
Recommended Action Steps
Verify the sanitary wellhead cap is tightly sealed with an intact fine mesh vent screen.
Check the pressure tank to ensure the pump is not short-cycling rapidly.
Order a certified laboratory drinking water test for coliform bacteria and nitrates.
Immediate Priorities
Verify the sanitary wellhead cap is tightly sealed with an intact fine mesh vent screen.
Check the pressure tank to ensure the pump is not short-cycling rapidly.
Order a certified laboratory drinking water test for coliform bacteria and nitrates.
Ongoing Annual Maintenance
Calibrate pressure tank air pressure annually (2 PSI below switch cut-in).
Keep fertilizers, pesticides, and livestock at least 100 feet away from the wellhead.
Insulate the pump house and pressure switch against winter freezing.
Typical Repair / Replacement Budget:$150 – $600($75–$150 for comprehensive lab water testing; $450–$950 to replace a waterlogged pressure tank; $2,500–$5,500 to replace a deep submersible well pump.)
Expected Assembly Lifespan:Submersible Well Pump: 10–15 years; Diaphragm Pressure Tank: 5–8 years; Pressure Switch: 5–8 years
All private domestic water well casings shall extend not less than 12 inches (305 mm) above the ground surface or 100-year flood elevation. Wellheads shall be capped with an approved, insect-proof sanitary well cap equipped with a downward-facing screened vent (minimum 16-mesh non-corroding screen) to prevent contamination of groundwater aquifers.
Exception: Pitless adapter installations where casing terminations meet certified pitless unit specifications.
IN PLAIN ENGLISH
Water well casing pipes must extend at least 12 inches above ground with a sealed sanitary cap and screened air vent to keep insects, floodwater, and rodents out of your drinking water.
HOMEOWNER PRO TIP:Have your well water tested annually for coliform bacteria, nitrates, and heavy metals. Keep all fertilizers, pesticides, and animal pens at least 100 feet away from your wellhead.
CHECK FREQUENCYQuarterly Maintenance Contract Service • Monthly Chlorine Check
RISK IF IGNOREDCRITICAL
Raw Pathogenic Sewage Spraying Across Yard & $10k–$25k System Failure
1
2
3
WHAT YOU'RE LOOKING ATFIELD INSPECTION ANATOMY
1
Continuous Linear Air Compressor Pump:Diaphragm compressor injecting oxygen into aeration chamber to break down waste biologically.
2
Tablet Chlorinator Disinfection Tube:Chlorine puck feed tube that sanitizes treated effluent before surface spray.
3
High-Water Alarm Float Box:Audio/visual beacon alerting homeowner if pump fails or water level backs up.
WASTEWATER SYSTEM • AEROBIC TREATMENT UNIT (ATU)Inspecting on-site sewage facilities (OSSF): aerobic treatment unit (ATU) clarifier tanks, air compressor linear pump, tablet chlorinator feeder, and purple effluent spray distribution heads.
3D ARCHITECTURAL CUTAWAY • FIGURE 6.5
FIGURE 6.E: 3-STAGE AEROBIC ATU WITH WORKING ALARM & SPRAY HEADS VS. DEAD COMPRESSOR & RAW SEWAGE BACKUP
DONE RIGHT (CODE-COMPLIANT)
3-stage ATU (trash tank, aeration chamber with active bubbler, pump tank with chlorinator)
Continuous-duty electric air compressor maintaining aerobic bacterial digestion
Functioning audio-visual alarm panel with exterior red beacon and high-water float switch
Surface spray heads maintaining required 10-ft property line and 20-ft building setbacks
COMMON DEFECT (SAFETY HAZARD)
Dead or failed aeration compressor causing wastewater to turn septic and anaerobic
Surfaced raw sewage pooling in yard above absorption field or tank access lids
Empty or clogged chlorine tablet dispenser discharging live pathogenic bacteria
Silenced or inoperable high-water warning alarm allowing sewage to backup into house
Comparative technical illustration of code-compliant 3-stage Aerobic Treatment Unit (ATU) featuring active aeration compressor, tablet chlorination, functioning high-water alarm beacon, and 10-ft spray head setbacks versus common defects including dead aerator, surfaced raw sewage, missing chlorine tablets, and spray hitting neighbor's fence.
TEXAS FIELD TRIAGE: 3-STAGE SEVERITY SCALEField Inspection Progression Rubric
STAGE 1NORMAL TEXAS AGING (COSMETIC)
Condition:Aerobic system chlorine tube low on dry calcium hypochlorite tablets; grass overgrowth at lids.
Action:Replenish chlorine tube with approved wastewater tablets; trim grass.Annual Log
STAGE 2WATCH & MAINTAIN (30–90 DAYS)
Condition:Septic tank high-water alarm sounding; spray heads misting during wind; sludge layer exceeding 1/3 depth.
Action:Silence alarm; restrict water use; call licensed OSSF provider within 24–48 hrs to pump/service.24–48 Hrs
STAGE 3ACT IMMEDIATELY (URGENT)
Condition:Raw untreated sewage pooling on surface of yard; strong sewage odor; aerator compressor dead.
Action:Stop water usage immediately; dispatch licensed OSSF service provider immediately.Immediate
How It Works in Your Home
Your On-Site Sewage Facility (OSSF) functions as a miniature municipal wastewater treatment plant, purifying sewage through biological breakdown and disinfection before returning clear water to the lawn.
Where public sewers are unavailable, Texas homes rely on On-Site Sewage Facilities (OSSF) governed by strict Texas Commission on Environmental Quality (TCEQ Title 30 TAC Chapter 285) rules. While older homes may utilize conventional anaerobic septic tanks with underground gravel drainfields, the vast majority of modern Texas properties feature an Aerobic Treatment Unit (ATU) with surface spray or drip disposal.
An aerobic system utilizes a three-compartment underground tank system: 1. Trash Tank (Pre-Treatment): Raw wastewater enters the first tank, where heavy solids settle to the bottom as sludge, and grease floats as scum. Anaerobic bacteria begin initial breakdown. 2. Aerobic Chamber: Liquid flows into the second tank, where an electric air compressor (aerator pump) pumps continuous oxygen into the water. Aerobic bacteria thrive in this oxygen-rich environment, digesting over 95% of organic waste and clarifying the water. 3. Pump / Disinfection Chamber: Clear treated water passes through a tablet chlorinator or liquid bleach injection pump into the third tank. When water reaches a high-level float switch, an electric effluent pump discharges sanitized, odorless water out through purple sprinkler heads across a designated surface spray field.
The system is monitored by an audiovisual alarm box mounted on an exterior wall or post. If the air compressor fails or high water threatens an overflow, a red flashing beacon and horn alert the homeowner immediately.
Electric Aerator Air Compressor:Continuous linear air pump delivering oxygen to aerobic bacteria in the middle tank.
Effluent Submersible Pump:High-head pump in the final tank discharging disinfected water through spray heads.
Audiovisual Alarm Beacon:Red flashing light and audible buzzer alerting to compressor failure or high-water tank emergencies.
What Can Go Wrong & What to Look For
Aerator pump failures, empty chlorinators, and severed spray heads cause severe environmental and health hazards.
When the electric aerator pump fails or is unplugged, oxygen stops flowing to the aerobic chamber. Within 24 to 48 hours, beneficial aerobic bacteria die off; the system converts into a foul-smelling anaerobic cesspool. The effluent pump then sprays raw, gray, untreated sewage across your lawn, creating massive foul odors and exposing children and pets to dangerous pathogens.
Allowing the chlorinator to run out of chlorine tablets is a serious violation of Texas environmental law. Sprinkling un-chlorinated wastewater onto a residential lawn creates immediate biological contamination risks.
Using swimming pool chlorine pucks instead of certified septic tablets can cause an explosion! Pool chlorine (trichlor) reacts with organic ammonia gases in the tank to form volatile nitrogen trichloride, which can explode violently when the tank lid is lifted. Only use certified calcium hypochlorite septic tablets.
Early Warning Signs & Red Flags
Red alarm light glowing or audible buzzer sounding on the septic control panel
Strong sewage odor in the yard around tank lids or when spray heads activate
Chlorinator feeder tube is completely empty of chlorine tablets
Spray heads bubbling or spraying geysers due to damaged or mowed-off nozzles
Wet, soggy ground or standing sewage puddles over the septic tank lids
Inoperable Aerator Air CompressorIMMEDIATE ACTION
Air pump failed or unplugged, converting the system to anaerobic waste and causing raw sewage spray.
Empty Chlorinator Tablet FeederIMMEDIATE ACTION
System spraying un-disinfected wastewater onto the residential lawn.
Alarm beacon or buzzer failed, leaving homeowners unaware of impending tank backups.
Damaged / Broken Purple Spray HeadsROUTINE
Broken lawn spray heads causing localized pooling of wastewater in violation of setback rules.
TEXAS OSSF STEWARDSHIP • § 6.5
Aerobic Spray Systems vs. Conventional Gravity Septic Drainfields
Heavy Texas clay soils rarely percolate fast enough for conventional leach trenches, making 3-tank Aerobic Treatment Units (ATUs) with continuous aeration and septic-rated disinfection the rural norm.
How Texas Weather & Soil Affect It
Dense clay soils and heavy downpours make aerobic spray systems the gold standard across Texas.
Over 80% of Texas terrain features dense, impermeable smectite clay ('black gumbo') or shallow limestone rock. In these soils, conventional gravity drainfields fail rapidly because water cannot percolate downward into the clay. Aerobic spray systems solve this by treating water to near-drinking quality inside the tanks and evaporating/transpiring it into the atmosphere via turf grass.
During severe Texas torrential rainstorms dropping 5 to 10 inches of rain, heavy surface runoff can saturate spray fields and flood unsealed tank access risers. Access lids must be tightly gasketed to prevent rainwater from overloading the tanks and tripping the high-water alarm.
Texas Climate & Soil Stresses
Dense clay soil preventing percolation and mandating aerobic treatment technology
Torrential subtropical downpours flooding unsealed septic tank access risers
Texas Field Pro Tips
Texas law requires homeowners with aerobic systems to maintain a continuous maintenance contract with a licensed OSSF provider who inspects the system every 4 months.
Only flush human waste and toilet paper. Never flush wipes, bleach, antibacterial soaps in excess, paint, or grease, which kill the living bacterial culture inside the tank.
How to Maintain & Protect It
Monthly chlorinator refills and scheduled tank pumping keep aerobic systems running odor-free.
Check your chlorine tablet feeder tube once a month. Keep it filled with 2 to 4 approved calcium hypochlorite septic tablets. Never let the tube run empty.
Have the pre-treatment trash tank and aerobic chamber pumped out by a licensed pumper every 3 to 5 years to remove accumulated non-biodegradable sludge before it washes into the pump chamber and clogs the spray nozzles.
Seasonal Walkthrough Checklist
Spring: Check chlorine tablet level and verify purple spray head nozzles distribute water evenly
Summer: Test the alarm toggle switch to verify the red beacon light and buzzer sound properly
Fall: Clean the air compressor intake filter sponge to keep the aerator motor running cool
Winter: Ensure tank lids are securely bolted down and gasketed against freezing air and rainwater
HOMEOWNER DECISION MATRIX
DIY Weekend Maintenance vs. Call a Qualified Pro
SAFE 15-MINUTE DIY CARE
Refilling the chlorinator tube with certified septic chlorine tablets monthly
Testing the audiovisual alarm switch by flipping the test toggle
Cleaning the small foam intake air filter on the aerator compressor
Replacing broken purple pop-up spray nozzles
WHEN TO CALL A QUALIFIED PRO
Quadrimonthly licensed OSSF maintenance contract inspections (mandated by county)
Pumping out accumulated tank sludge every 3 to 5 years
Replacing burned-out linear aerator compressors or high-head effluent pumps
Repairing electrical control timer boards and float switches
CLINICAL DIFFERENTIAL FIELD TRIAGE & CONNECTED SYSTEMS§ 6.5 Diagnostic Rubric
Harmless Cosmetic Baseline
Quiet continuous hum from an aerobic linear air compressor, unlit red tank alarm beacons, and odor-free night spray distribution reflect healthy OSSF operation.
Active Failure Signal
Sounding red high-water alarms, sewage odors near spray heads, spongy bright turf over gravity trenches, or swimming-pool trichlor tablets in chlorinators.
60-Second Homeowner Check
Step outside to listen for the steady hum of your aerobic air pump, press the TEST toggle on the control box alarm, and verify septic-rated disinfectant supply.
“Does your inspection pump AND visually inspect interior tank baffles after drawdown—rather than merely poking a stick through the lid?”
“Is the aerobic linear air compressor matched to the manufacturer’s CFM pressure curve, with working high-water audio/visual alarms?”
“Are you using approved calcium hypochlorite septic tablets (or liquid bleach system)—never corrosive swimming-pool trichlor pucks that void warranties and release toxic gas?”
3 High-Pressure Red Flags & Scams
Dropping cheap swimming-pool trichlor chlorine tablets into an aerobic septic chlorinator—which can cause violent chemical explosions and ruin plastic components.
Quoting a $15,000 drainfield replacement when only a clogged effluent filter, failed $250 aerator pump, or broken float switch is at fault.
Pumping only the clear liquid center chamber while leaving hardened sludge in the primary trash tank.
HOMEOWNER ACTION TAKEAWAYRISK LEVEL: CRITICAL
On-Site Sewage Facility (OSSF) Aerobic System Stewardship
Keep the chlorinator filled with certified septic chlorine, maintain a licensed maintenance contract, and never use explosive pool chlorine pucks.
Recommended Action Steps
Verify the aerator air compressor is humming and pumping air into the middle tank.
Check the chlorinator tube and replenish with certified septic chlorine tablets.
Test the audiovisual alarm box to confirm the red light and buzzer function.
Immediate Priorities
Verify the aerator air compressor is humming and pumping air into the middle tank.
Check the chlorinator tube and replenish with certified septic chlorine tablets.
Test the audiovisual alarm box to confirm the red light and buzzer function.
Ongoing Annual Maintenance
Refill chlorine tablets monthly.
Maintain a continuous maintenance contract with a licensed OSSF provider.
Pump out tank sludge every 3 to 5 years.
Typical Repair / Replacement Budget:$150 – $600($250–$350 annual maintenance contract; $450–$650 to pump tanks; $400–$750 to replace an aerator compressor or effluent pump.)
Aerobic treatment units (ATUs) utilizing surface spray application shall maintain continuous disinfection by an approved chlorinator or ultraviolet system. Surface spray effluent shall not produce ponding or runoff, and spray heads shall maintain mandatory setbacks (minimum 20 feet from property lines, 50 feet from wells). An audio and visual malfunction alarm shall be provided on an independent electrical circuit.
Exception: Conventional anaerobic septic tanks discharging to subsurface absorption drainfields in suitable permeable soils.
IN PLAIN ENGLISH
Aerobic septic systems treat wastewater using air pumps and chlorine tablets before spraying clean water across the yard; state law requires ongoing disinfection and functional visual/audible alarms.
HOMEOWNER PRO TIP:Never use swimming pool chlorine pucks in your aerobic septic chlorinator. Pool chlorine releases explosive gas when mixed with wastewater organic compounds. Use only certified calcium hypochlorite septic tablets.
6.6
Outdoor Kitchens and Built-in Appliances: Gas Grills, Refrigerator Drawers & Noncombustible Enclosures
Missing emergency gas shutoff valve or valve buried behind fixed cabinet walls
Standard indoor electrical outlet without GFCI protection exposed to rain and grease
Comparative technical illustration of code-compliant outdoor kitchen island installation featuring double-walled insulated heat jacket, high and low ventilation louvers, accessible gas shutoff, and GFCI in-use bubble cover versus common defects including drop-in grill touching bare wood studs, unvented cabinet trapping heavy propane, and non-GFCI electrical outlet.
TEXAS FIELD TRIAGE: 3-STAGE SEVERITY SCALEField Inspection Progression Rubric
Action:Scrape grill grates and wipe exterior with citrus degreaser.Annual Log
STAGE 2WATCH & MAINTAIN (30–90 DAYS)
Condition:Outdoor kitchen cabinet island lacking required high and low perimeter vents (trapped gas risk).
Action:Cut and install stainless louvered vents at top and bottom of island enclosure within 30 days.30 Days
STAGE 3ACT IMMEDIATELY (URGENT)
Condition:Smell of leaking gas inside enclosed island cavity; yellow rolling flare-ups behind knobs; island fire.
Action:Shut off main propane tank valve or natural gas island shutoff immediately; call fire department.Immediate
How It Works in Your Home
Your outdoor summer kitchen blends outdoor entertainment with professional cooking, requiring specialized thermal insulation, gas venting, and weatherproof electrical safety.
Custom Texas outdoor living pavilions feature built-in 304 stainless steel gas barbecue grills, side searing burners, outdoor refrigeration drawers, ice bins, and sink stations built into masonry islands constructed of Texas limestone, brick, or steel framing with cement backerboard.
Gas grills burn either natural gas delivered through rigid underground piping from the home meter, or liquefied petroleum (LP) gas from refillable 20-pound propane tanks housed inside the island cabinet.
Because gas grills generate intense radiant heat (up to 60,000 to 100,000 BTUs), grills built into combustible framing (wood studs or plywood) must be encased in a manufacturer-certified stainless steel insulated thermal jacket. Furthermore, custom island enclosures housing propane cylinders must feature dual ventilation openings (minimum 20 square inches each) located at the very top and very bottom of the island walls. Because propane gas is heavier than air, any gas leak pools silently at the floor of the island; low vent louvers allow leaking gas to escape into the open air rather than collecting into an explosive bomb.
304 Stainless Steel Gas Grill:Marine-grade corrosion-resistant gas barbecue grill built into custom masonry countertops.
Insulated Thermal Jacket:A double-walled stainless heat shield required when mounting grills into combustible cabinet framing.
Low & High Island Vent Louvers:Mandatory ventilation openings preventing heavy propane gas from pooling inside the island base.
While-In-Use Weatherproof GFCI:Electrical outlets protected by clear bubble covers and GFCI shock protection.
What Can Go Wrong & What to Look For
Unvented propane islands, combustible framing contact, and missing GFCI bubble covers are major explosion and fire hazards.
The most dangerous defect in outdoor kitchens is an unvented island housing a propane cylinder. Propane vapor is significantly heavier than air. If a cylinder valve weeps or a flexible hose cracks inside an unvented stone island, gas sinks to the bottom and fills the enclosed cavity like water in a bathtub. When the homeowner turns on the grill and presses the electric igniter, the spark ignites the accumulated gas pool, triggering a catastrophic masonry explosion that blows stone slabs outward.
Building gas grills into untreated wood framing without an insulated thermal jacket is a major fire hazard. Over time, high grill heat pyrolyzes adjacent wood studs, lowering their combustion temperature until framing ignites inside the cabinet.
Using standard indoor electrical outlets without weatherproof 'while-in-use' bubble covers allows rainwater to enter receptacles, tripping GFCI breakers and creating electrical shock hazards during patio use.
Early Warning Signs & Red Flags
Smell of gas or rotten eggs when opening outdoor island cabinet access doors
Island cabinet lacks visible exterior ventilation louvers near the ground line
Wood framing inside the island touching the metal sides or bottom of the gas grill
Outdoor GFCI breaker trips every time it rains or when outdoor appliances run
Rust and pitting on outdoor refrigerator cabinets or hinges
Missing Propane Island Ventilation LouversIMMEDIATE ACTION
Custom island housing LP gas cylinder lacking required high and low ventilation openings.
Grill in Combustible Framing Without Thermal JacketIMMEDIATE ACTION
Gas grill installed directly into wood framing without certified heat-insulating jacket.
Outdoor receptacles lacking deep protective bubble covers, exposing plugs to rain.
Damaged Flexible Gas Appliance ConnectorIMMEDIATE ACTION
Kinked, corroded, or crushed gas flex connector routed through sharp stone edges.
OUTDOOR LIVING SAFETY • § 6.6
Insulating Liners, Low/High Island Vents & Covered-Patio Exhaust
Built-in gas grills generate intense radiant heat; wood-framed patio islands require stainless insulating jackets, high/low gas-leak vents (natural gas rises, propane sinks), and 1,200+ CFM hoods.
How Texas Weather & Soil Affect It
High humidity, salt air, and intense sun demand marine-grade materials and regular inspection.
Along the Texas Gulf Coast and in humid inland areas, coastal salt air and summer humidity rapidly corrode cheap 430-grade stainless steel, causing rust holes in grill burners and flame tamers within 2 to 3 years. Authentic 304-grade commercial stainless steel resists corrosion and maintains structural integrity.
Patio slab movement can cause hairline cracking in outdoor kitchen masonry mortar joints. Flexible gas piping entering the island must feature adequate slack to accommodate minor slab shifting without straining pipe joints.
Texas Climate & Soil Stresses
Coastal salt air and humidity oxidizing inferior-grade stainless steel grills
Patio slab settlement stressing underground gas supply connections
Texas Field Pro Tips
Look at your outdoor kitchen island: verify there are metal louvered vents at the bottom and top of the stone base. If the island is completely solid without vents, hire a contractor to cut vent openings immediately.
Keep a dry chemical ABC fire extinguisher mounted near your outdoor kitchen pavilion.
How to Maintain & Protect It
Regular burner degreasing and soapy water gas leak checks ensure safe outdoor grilling.
Perform a soapy water bubble test on all propane cylinder connections and gas valves at the start of each grilling season. Brush a 50/50 mix of dish soap and water onto all joints and hoses; if growing bubbles appear, tighten fittings or replace hoses before lighting the grill.
Clean grill flame tamers and grease drip trays monthly. Heavy grease accumulation in bottom catch pans can ignite into uncontrollable grease fires that damage custom stone countertops.
Seasonal Walkthrough Checklist
Spring: Perform soapy water leak test on all gas joints, hoses, and cylinder connections
Summer: Clean grease catch trays and inspect burner ports for spider webs and mud dauber nests
Fall: Verify island vent louvers are unobstructed by leaves or mulch
Winter: Install fitted canvas weatherproof covers over all outdoor appliances and grills
HOMEOWNER DECISION MATRIX
DIY Weekend Maintenance vs. Call a Qualified Pro
SAFE 15-MINUTE DIY CARE
Performing soapy water leak tests on propane connections
Cleaning burner tube orifices of spider webs with a venturi brush
Emptying and lining grease drip trays with aluminum foil
Installing fitted vinyl weather covers over appliances
WHEN TO CALL A QUALIFIED PRO
Cutting and installing certified ventilation louvers in masonry islands
Installing an insulated thermal jacket around built-in grills
Running rigid underground gas lines from the house meter to the patio
Replacing outdoor GFCI outlets and dedicated electrical circuits
CLINICAL DIFFERENTIAL FIELD TRIAGE & CONNECTED SYSTEMS§ 6.6 Diagnostic Rubric
Harmless Cosmetic Baseline
Crisp blue grill burner flames inside a non-combustible steel/stone island with open upper/lower gas vents and strong overhead patio hood capture are safe.
Active Failure Signal
Scorched wood framing inside grill cabinets, missing upper/lower gas-relief vents, grease buildup under wood patio ceilings, or indoor non-GFCI outlets.
60-Second Homeowner Check
Open the access doors beneath your built-in grill: verify steel/cement framing (zero bare wood touching the firebox), open vent louvers, and an accessible gas valve.
BEFORE YOU SIGN A BID • TEXAS CONTRACTOR VETTING & SCAM DEFENSE
Outdoor Kitchens, Built-In Gas Grills & Patio Exhaust Hoods
§ 6.6 Playbook
Texas Credential to VerifyTSBPE RMP Plumber (or RRC LP-Gas licensee) for fuel piping; TDLR TECL Electrician for WR/GFCI circuits; TDLR TACLA for patio capture hoods.
Municipal Permit & Inspection RuleMunicipal gas/plumbing, electrical, and HOA architectural permits required for permanent outdoor cooking islands under covered patios.
3 Questions You Must Ask Before Hiring
“Is the outdoor kitchen frame built strictly from non-combustible steel studs and cement board—or fitted with the grill manufacturer’s listed stainless insulating liner?”
“Did you include BOTH upper AND lower cross-ventilation louvers in the island enclosure (natural gas rises; heavy propane gas pools explosively at floor level)?”
“Under my covered patio ceiling, is the exhaust hood commercial-depth (30–36 inches) rated 1,200+ CFM in 304 stainless steel, with an accessible exterior gas shutoff?”
3 High-Pressure Red Flags & Scams
Framing an outdoor gas grill island out of combustible 2x4 pine lumber and OSB plywood right against a 700°F stainless firebox—a catastrophic patio fire setup.
Mounting an indoor 350-CFM kitchen hood over an outdoor flare-up charcoal or gas grill under a cedar tongue-and-groove patio ceiling.
Installing indoor-rated receptacles without Weather-Resistant (WR) GFCI protection and Bubble-Style “In-Use” wet-location covers.
HOMEOWNER ACTION TAKEAWAYRISK LEVEL: HIGH
Outdoor Kitchen Insulated Jacket & Gas Shutoff Protocol
Vent propane island cabinets at top and bottom to prevent gas explosions, verify insulated jackets around combustible framing, and use weatherproof GFCI outlets.
Recommended Action Steps
Confirm the outdoor kitchen island has ventilation louvers at the top and bottom.
Check that gas grills built into wood framing are protected by an insulated thermal jacket.
Perform a soapy water bubble leak test on gas connections each spring.
Clean grease drip trays regularly to prevent flare-up fires.
Keep outdoor kitchen vent louvers free of leaves, mulch, and insect nests.
Typical Repair / Replacement Budget:$75 – $350($75–$150 to install metal ventilation louvers in a masonry island; $250–$550 to retrofit a stainless insulated thermal jacket around a built-in grill.)
Expected Assembly Lifespan:304 Stainless Grill: 12–15 years; Island Masonry: 30+ years; Outdoor Refrigerator: 5–8 years
ICC DIGITAL CODES2021 / 2024 IRC
2021/2024 IRC G2447 / NFPA 54—Enclosures for Outdoor Built-In Gas Grills
STATUTORY MODEL CODE TEXT
Gas appliances installed in outdoor custom masonry or island enclosures shall be constructed of noncombustible materials or utilize a listed insulated jacket. Custom enclosures utilizing LP gas (propane) cylinders shall feature dual ventilation openings located at the top and bottom of the cylinder enclosure, with each opening providing not less than 20 square inches of free area.
Exception: Natural gas appliances with dedicated exterior shutoff valves venting above ground level.
IN PLAIN ENGLISH
Outdoor kitchen islands housing gas grills must be made of noncombustible stone or metal or have an insulated heat jacket, and propane cylinder cabinets require high and low ventilation vents to prevent explosive gas pockets.
HOMEOWNER PRO TIP:Propane is heavier than air. If a propane cylinder leaks inside an unvented outdoor kitchen island, gas pools silently along the bottom until the grill ignition sparks an explosion. Always ensure island vent louvers are clean and open.
Illegal backfeeding into panel without mechanical interlock (severe electrocution risk)
Unanchored generator resting on bare earth settling against gas connection piping
Automated security gate lacking photoelectric sensors, failing auto-reverse crush test
Comparative technical illustration of code-compliant standby generator installation featuring 5-foot clearance from operable windows, listed Automatic Transfer Switch (ATS) with utility interlock, and automated gate with photoelectric reversing eyes versus common defects including generator exhaust directly beneath bedroom window, illegal suicide backfeed cord, and gate lacking obstruction sensors.
TEXAS FIELD TRIAGE: 3-STAGE SEVERITY SCALEField Inspection Progression Rubric
Action:Clean battery terminals with baking soda paste; schedule factory generator service within 30 days.30 Days
STAGE 3ACT IMMEDIATELY (URGENT)
Condition:Generator leaking raw fuel inside enclosure; ATS manual bypass failed leaving home in blackout.
Action:Shut down generator fuel valve immediately; call certified generator electrician.Immediate
How It Works in Your Home
Specialized exterior systems—including whole-house standby generators, automated driveway security gates, and waterfront bulkheads—safeguard power reliability, property access, and shoreline stability.
Whole-house standby generators (fueled by natural gas or propane) provide emergency electrical power during grid blackouts. When utility power fails, an automatic transfer switch (ATS) detects the loss within seconds, starts the generator engine, and shifts household circuits to generator power while mechanically isolating the home from the utility grid to prevent electrocuting utility line workers.
Automated driveway security gates utilize low-voltage DC or hydraulic arm operators powered by 120V circuits or solar panels with battery backup. Gates must feature safety reverse mechanisms—including infrared photo-eyes and obstruction-sensing pressure edges—to stop and reverse closing motion if an obstacle or vehicle is detected in the driveway opening.
Waterfront properties along Texas coastal canals, lakes, and bays rely on marine bulkheads (seawalls) constructed of treated timber, corrugated vinyl sheet piling, or reinforced concrete. Bulkheads resist immense lateral soil and hydrostatic water pressure using underground tie-back deadman anchor rods embedded 12 to 20 feet back into lawn subsoils.
Automatic Transfer Switch (ATS):Certified electrical transfer switch preventing backfeeding of power into the utility grid.
Engine Generator Set:Engine-driven electrical generator mounted on a level exterior concrete or composite pad.
Driveway Gate Infrared Safety Eyes:Optical sensors across driveway openings preventing automated gates from striking vehicles or children.
Bulkhead Deadman Tie-Back Anchors:Galvanized steel rods anchoring waterfront seawalls deep into stable lawn soils.
What Can Go Wrong & What to Look For
Deadly generator carbon monoxide exhaust, non-reversing driveway gates, and failing seawall tie-back anchors are critical defects.
Installing permanent standby generators too close to home windows, doors, or fresh air intakes is a deadly carbon monoxide hazard. Engine exhaust containing high levels of odorless CO can be sucked into bedroom windows or HVAC intake vents. NFPA 37 mandates that generators sit at least 5 feet from operable windows, doors, and combustible walls.
Driveway security gates lacking functioning safety reverse photo-eyes or obstruction edges can trap and crush children or smash into vehicles.
Waterfront bulkheads fail when steel tie-back anchor rods corrode from saltwater or soil moisture. When tie-back rods snap, the top of the seawall bows outward toward the water ('kick-out'), creating deep sinkholes along the lawn edge and threatening backyard foundations.
Early Warning Signs & Red Flags
Standby generator exhaust discharging toward operable bedroom windows or soffit vents
Generator fails to start automatically during weekly scheduled self-test exercise cycles
Automated driveway gate continues closing when an object blocks the driveway entrance
Waterfront lawn soil sinking or creating sinkhole depressions directly behind the bulkhead wall
Bulkhead timber pilings leaning outward toward the canal or showing marine borer rot
Generator Installed <5 Feet from WindowsIMMEDIATE ACTION
Exhaust termination dangerously close to home openings, risking deadly carbon monoxide entry.
Sinkholes 6 feet behind a canal seawall signal soil escaping through split sheet-pile joints or corroded tie-back rods, while standby generators must stay ≥5 feet from windows to block CO entry.
Following Winter Storm Uri and subsequent Texas grid events, whole-house standby generators have become widespread. However, unmaintained generators with neglected starter batteries or stale fuel fail precisely when freezing temperatures knock out utility power.
Along Texas coastal bays and canals, hurricane storm surges and wave action exert immense hydraulic forces against bulkheads. Weep holes in seawalls must have geotextile filter fabric intact to let trapped groundwater drain out after storm surges without washing away lawn soil.
Tropical storm and hurricane storm surges testing waterfront bulkheads and docks
Texas Field Pro Tips
Check your standby generator's starter battery every 2 years. A dead 12V starter battery is the #1 reason standby generators fail to start during an emergency power outage.
Inspect waterfront bulkheads after every major storm. If you see soil washing out from behind the wall or sinkholes appearing, call a marine contractor immediately.
Set your standby generator to run a 15-minute weekly exercise cycle (usually factory programmed). Listen for smooth engine running and confirm the green status LED indicator is illuminated.
Test automated driveway gate safety sensors monthly by placing a cardboard box in the driveway path. The gate must stop and reverse immediately without crushing the obstacle.
Seasonal Walkthrough Checklist
Spring: Service generator engine oil, spark plugs, and air filter after winter use
Summer: Test driveway gate safety photo-eyes and lubricate gate arm hinge pivots
Fall: Inspect waterfront bulkhead tie-backs, weep holes, and dock pilings before winter tides
Winter: Check generator 12V starter battery voltage and ensure exterior generator vents are clear
HOMEOWNER DECISION MATRIX
DIY Weekend Maintenance vs. Call a Qualified Pro
SAFE 15-MINUTE DIY CARE
Verifying the generator weekly exercise cycle runs smoothly
Testing driveway gate photo-eye reverse with a cardboard box
Visual inspection of waterfront bulkheads for lawn sinkholes
Lubricating gate hinges and opener drive chains
WHEN TO CALL A QUALIFIED PRO
Annual professional generator engine and automatic transfer switch servicing
Installing or repairing underground 240V generator feeder circuits and ATS panels
Marine bulkhead deadman anchor rod replacement and tie-back re-tensioning
Driveway gate electronic control board programming and loop detector repair
CLINICAL DIFFERENTIAL FIELD TRIAGE & CONNECTED SYSTEMS§ 6.7 Diagnostic Rubric
Harmless Cosmetic Baseline
Scheduled 10-minute weekly standby generator self-exercise cycles, level lawn soil behind canal bulkheads, and instant gate reversal on obstacle contact.
Active Failure Signal
Red fault lights on generator controllers, soil sinkholes forming 4–8 feet behind waterfront bulkheads, or motorized gates lacking dual UL 325 photo-eyes.
60-Second Homeowner Check
Check the status LED window on your standby generator (confirm clear of shrubs and >=5 ft from windows), and walk canal bulkhead lawns for hidden sinkhole dips.
BEFORE YOU SIGN A BID • TEXAS CONTRACTOR VETTING & SCAM DEFENSE
Whole-Home Standby Generators, Waterfront Bulkheads & Electric Gates
§ 6.7 Playbook
Texas Credential to VerifyTDLR TECL Electrician + TSBPE RMP Plumber for standby generators; TBPE Marine/Structural P.E. for bulkheads; UL 325 Certified Gate Installer.
Municipal Permit & Inspection RuleMandatory municipal electrical + gas permits (verifying 5-ft window CO clearance & utility ATS); USACE / GLO / canal permits for marine bulkheads.
3 Questions You Must Ask Before Hiring
“Is the standby generator pad placed >=5 feet from all operable windows, doors, and attic soffit vents, with an upgraded utility gas meter regulator sized for full kW load?”
“For my canal bulkhead repair, are you excavating to inspect corroded steel tie-back rods and deadman anchors—not just pumping foam into sinkholes behind a leaning wall?”
“Does this motorized driveway gate include DUAL UL 325 entrapment safeguards (monitored photo-eyes PLUS reversing edge/force sensing) so children cannot be pinned?”
3 High-Pressure Red Flags & Scams
Wiring a portable generator via an illegal double-male “suicide cord” into a dryer outlet without a mechanical panel interlock—capable of electrocuting Texas utility linemen.
Installing a 24kW natural gas generator onto a standard 250-CFH residential gas meter without coordinating a utility meter upgrade—causing the engine to stall under AC startup.
Cosmetically capping a bowing waterfront vinyl/wood bulkhead cap without replacing snapped subterranean tie-back rods or torn filter cloth.
Maintain 5-foot clearance from windows for generator exhaust, verify mechanical interlocks on transfer switches, and test gate safety reversal monthly.
Recommended Action Steps
Confirm the standby generator sits at least 5 feet away from windows, doors, and vents.
Verify an approved transfer switch or mechanical interlock prevents utility backfeeding.
Test automated driveway gates for functional photo-eye obstruction reversal.
Immediate Priorities
Confirm the standby generator sits at least 5 feet away from windows, doors, and vents.
Verify an approved transfer switch or mechanical interlock prevents utility backfeeding.
Test automated driveway gates for functional photo-eye obstruction reversal.
Ongoing Annual Maintenance
Confirm the generator runs its weekly self-test exercise cycle.
Replace generator starter batteries every 2 to 3 years.
Inspect waterfront bulkheads for sinkholes or bowing seawall timbers.
Typical Repair / Replacement Budget:$150 – $750($150–$300 for annual generator maintenance; $250–$450 to repair gate safety sensors; $2,500–$8,000+ for waterfront bulkhead tie-back and seawall repairs.)
NFPA 37 / 2023 NEC 702.5—Standby Generator Clearances and Transfer Equipment
STATUTORY MODEL CODE TEXT
Stationary standby engine generators shall be installed not less than 5 feet (1524 mm) from operable windows, doors, and combustible walls. Transfer equipment shall be listed and labeled and shall be designed and installed to prevent the inadvertent interconnection of normal and alternate sources of power in any operation of the transfer equipment.
Exception: Generators with tested and listed fire-containment enclosures complying with NFPA 37 18-inch clearance standards.
IN PLAIN ENGLISH
Permanent standby generators must sit at least 5 feet away from home doors and windows to prevent deadly exhaust gas from entering, and must use an automatic transfer switch so electricity cannot backfeed into utility power lines.
HOMEOWNER PRO TIP:Test your standby generator under load monthly. Run it for 20 minutes to exercise the engine and recharge the starter battery so it starts reliably during Texas grid winter freezes or hurricane outages.
Chapter 7 provides Texas homeowners and buyers with a comprehensive, consumer-protective guide to indoor microbial ecology and Texas Department of Licensing and Regulation (TDLR) mold rules under 25 TAC Chapter 295. It details the physical mechanisms of moisture intrusion, relative humidity psychrometrics, and attic duct condensation; explains the legal separation between Mold Assessment Consultants (MAC) and Remediation Contractors (MRC); illustrates scientific 15 L/min air-o-cell sampling with outdoor baseline controls; and guides homeowners through 6-mil negative air containment and the critical Certificate of Mold Damage Remediation (Form MDR-1) required for Texas property insurability.
SCAN FOR LIVE DIGITAL TOOLS & UPDATES
Chapter 7 Digital Companion
Mold & Indoor Air Quality
Instant mobile access to indoor relative humidity targets, Texas TDLR mold assessment protocols, and post-remediation clearance checklists.
Digital Hygrometer RH Monitor (74% RH):Digital hygrometer verifying ambient indoor relative humidity at 74% RH, well above the 60% threshold.
BUILDING SCIENCE • MOISTURE & FUNGAL DIAGNOSTICSInterpreting fungal colonization: relative humidity over 60%, air infiltration across building envelopes, and spore trap laboratory analysis thresholds.
3D ARCHITECTURAL CUTAWAY • FIGURE 7.1
FIGURE 7.1: CONTROLLED INDOOR PSYCHROMETRICS VS. UNCONDITIONED ATTIC CONDENSATION & ACTIVE MOLD
DONE RIGHT (CODE-COMPLIANT)
Indoor relative humidity maintained between 40% and 50% via calibrated HVAC sizing
Auxiliary drain pan overflowing with bacterial algae sludge lacking float safety shutoff
Active Stachybotrys chartarum and Aspergillus colonies blooming on wet ceiling drywall paper
Comparative technical illustration of code-compliant indoor moisture control featuring sealed R-8 flex ductwork, primary condensate trap with float safety switch, and indoor RH maintained below 50% versus common defects including sweating uninsulated attic ducts, overflowing condensate drain pan, indoor RH above 70%, and active mold colonies on ceiling drywall.
TEXAS FIELD TRIAGE: 3-STAGE SEVERITY SCALEField Inspection Progression Rubric
STAGE 1NORMAL TEXAS AGING (COSMETIC)
Condition:Indoor relative humidity 45%–55%; mirror condensation clearing within 10 min of shower.
Action:Run bath fan for 20 min post-shower; keep thermostat on AUTO.Annual Log
STAGE 2WATCH & MAINTAIN (30–90 DAYS)
Condition:Indoor relative humidity 58%–65% for consecutive days; surface mildew on shower caulk.
Action:Run dehumidifier and recaulk tub/shower joints with mold-resistant silicone within 30 days.30 Days
STAGE 3ACT IMMEDIATELY (URGENT)
Condition:Active fungal growth covering >10 contiguous sq ft of wallboard; persistent damp musty odor.
Action:Fix water source immediately; do not disturb mold dry; hire licensed TDLR Mold Consultant (MAC).Immediate
How It Works in Your Home
Microscopic mold spores exist naturally everywhere in outdoor Texas air. Inside your home, they only become a problem when uncontrolled moisture creates an environment for active growth.
Fungal spores enter homes every day through open doors, window screens, on family pets, and via fresh air ventilation intakes. In their dry, airborne state, spores are completely harmless and normal. However, active fungal colonization requires three specific elements: dormant spores, an organic cellulose food source (such as drywall paper backing, solid wood framing studs, oriented strand board subflooring, or carpet dust), and liquid moisture or sustained high humidity.
When organic building materials stay damp for 24 to 48 hours, spores germinate and send out microscopic root-like structures called hyphae. These hyphae digest the cellulose fibers, creating visible blooms and releasing microbial volatile organic compounds (MVOCs)—the familiar musty odor associated with damp spaces.
Relative Humidity (RH):The percentage of water vapor present in the air compared to the maximum amount the air can hold at that temperature.
Dew Point Temperature:The exact temperature at which air cools enough for invisible water vapor to condense into liquid water droplets.
Evaporator Coil Condensate:The water extracted from humid indoor air by your central AC system, typically 15 to 20 gallons daily in humid Texas summers.
What Can Go Wrong & What to Look For
Concealed condensation, clogged drain pans, and high indoor humidity can quietly nurture mold behind walls and inside attic spaces.
In hot Texas summers, flexible AC ducts and air handlers run through unconditioned attics that frequently reach 130°F to 140°F. When 55°F conditioned air flows through ducts with damaged or sub-R-6 insulation, the outer jacket drops below the attic dew point. Water droplets condense continuously on the duct exterior, soaking into ceiling drywall and insulation.
Similarly, if primary AC condensate drain lines clog with bacterial algae sludge and the emergency overflow pan lacks an automatic float switch, gallons of water flood into ceiling drywall. Pinhole plumbing leaks behind tile showers, leaking refrigerator supply lines, and foundation weep holes blocked by flowerbed mulch also supply the continuous moisture mold requires to thrive.
Early Warning Signs & Red Flags
Persistent musty or earthy odors that intensify when the air conditioner turns on
Discoloration, dark spotting, or powdery white-green growth along baseboards or ceiling corners
Indoor relative humidity consistently reading above 60% on home hygrometers
Soft, spongy, or bowing drywall beneath attic mechanical units
Auxiliary drain pan without an automatic shutoff sensor, risking ceiling flooding if primary line clogs.
High Indoor Relative Humidity (>60%)MONITOR
Oversized AC unit short-cycling or inadequate dehumidification promoting surface mold blooms.
MOISTURE PSYCHROMETRICS • § 7.1
Breaking the Mold Triangle: Spores + Cellulose Food + Moisture
Mold spores exist naturally in outdoor Texas air; fungal colonies only amplify indoors when drywall paper, wood framing, or dust stays above 60% relative humidity or >16% wood moisture content.
How Texas Weather & Soil Affect It
Subtropical Gulf Coast moisture and extreme summer temperature splits make indoor moisture control a daily building science challenge in Texas.
Along the Texas Gulf Coast and across East and Central Texas, summer air regularly carries 80% to 95% relative humidity. When this heavy, moisture-laden air meets conditioned 72°F indoor spaces, the temperature difference creates immense vapor drive pushing outdoor moisture inward through brick, stucco, and wood siding.
A common mistake in Texas home construction is installing an oversized air conditioning unit (e.g., 5 tons of cooling capacity where 3.5 tons is appropriate). An oversized unit cools the air rapidly in 8 to 10 minutes and shuts off before it can pull moisture out of the air. The home feels cold and clammy, maintaining 70% indoor humidity that allows mold to flourish on shoes, clothes, and drywall.
Texas Climate & Soil Stresses
Gulf Coast Humidity: Ambient dew points frequently exceed 75°F from May through October.
Expansive Soil Cracking: Soil shrinkage allows summer deluge rains to channel directly against foundation slabs.
Texas Field Pro Tips
Keep your digital thermostat fan setting set to 'AUTO' rather than 'ON'; running the fan continuously re-evaporates coil moisture back into the home.
Place an inexpensive digital hygrometer in your living area and master closet to monitor relative humidity.
How to Maintain & Protect It
Consistent maintenance of your air conditioning drainage and vigilant monitoring of indoor humidity keeps your home healthy and mold-free.
The most effective mold prevention is keeping building surfaces dry and indoor relative humidity strictly between 40% and 50%. Regular maintenance of your HVAC condensate line prevents 80% of residential ceiling moisture disasters in Texas.
Inspect supply registers and ceiling drywall under attic units every spring. If you ever experience a water leak or plumbing overflow, dry the affected building materials completely within 24 to 48 hours using high-velocity air movers and commercial dehumidifiers to prevent fungal germination.
Seasonal Walkthrough Checklist
Spring: Pour 1 cup of distilled white vinegar into the primary AC condensate cleanout tee.
Spring: Test the auxiliary AC drain pan float switch by gently lifting the sensor float while cooling runs.
Fall: Inspect exterior brick weep holes and clear away garden mulch, leaves, and soil.
HOMEOWNER DECISION MATRIX
DIY Weekend Maintenance vs. Call a Qualified Pro
SAFE 15-MINUTE DIY CARE
Flush AC condensate cleanout pipe with vinegar every 30 days during peak cooling season.
Replace return air filters every 60 to 90 days with quality pleated MERV 8 to 11 filters.
Keep flowerbed mulch at least 4 to 6 inches below brick weep holes.
WHEN TO CALL A QUALIFIED PRO
Licensed HVAC contractor to seal duct connections with mastic and replace damaged R-8 insulation jackets.
Professional moisture assessment consultant if water stains, musty odors, or unexplained allergies persist.
CLINICAL DIFFERENTIAL FIELD TRIAGE & CONNECTED SYSTEMS§ 7.1 Diagnostic Rubric
Harmless Cosmetic Baseline
Minor surface mildew specks on silicone shower caulk that wipe clean—while drywall moisture stays <12% and indoor RH stays <55%—are routine housekeeping.
Active Failure Signal
Earthy musty odors, fuzzy velvety blotches spreading across drywall or closet shoes, swollen baseboards, or wet ceilings left damp past 48 hours.
60-Second Homeowner Check
Check your indoor hygrometer (<55% RH target), sniff sink cabinets and AC return closets for earthy VOC odors, and dry any water spill within 24–48 hours.
BEFORE YOU SIGN A BID • TEXAS CONTRACTOR VETTING & SCAM DEFENSE
Mold Assessment vs. Mold Remediation (Texas Conflict-of-Interest Law)
§ 7.1 Playbook
Texas Credential to VerifyTDLR Mold Assessment Consultant (MAC) to test/write protocol AND a SEPARATE TDLR Mold Remediation Contractor (MRC) to clean.
Municipal Permit & Inspection RuleTDLR state notification required when contiguous visible mold reaches or exceeds 25 contiguous square feet.
3 Questions You Must Ask Before Hiring
“Are you an independent TDLR-licensed Mold Assessment Consultant (MAC) with zero financial ownership in any remediation company—per Texas conflict-of-interest law?”
“Does the remediation bid follow a written MAC Protocol specifying negative-air HEPA containment, source-leak repair, and dry-material removal?”
“Will final payment be held until the independent MAC performs a Post-Remediation Verification (PRV) visual + air clearance test and issues a Certificate of Mold Damage Remediation?”
3 High-Pressure Red Flags & Scams
A single company offering “Free Mold Testing” and then bidding $12,000 to remediate their own test—Texas law strictly prohibits the same firm from performing both regulated assessment and remediation on a project!
“Fogging” or spraying antimicrobial bleach/paint over wet, moldy drywall without physical HEPA containment or cutting out contaminated porous board.
Remediating mold before fixing the underlying roof, plumbing, or HVAC humidity source—guaranteeing regrowth within weeks.
HOMEOWNER ACTION TAKEAWAYRISK LEVEL: HIGH
Moisture control is your primary defense against indoor mold.
Recommended Action Steps
Monitor indoor relative humidity and keep it strictly below 60% year-round.
Inspect AC drain lines, cleanout ports, and emergency float switches every spring.
Dry any plumbing overflow or roof leak completely within 24 to 48 hours.
Auxiliary drain pans shall be installed under evaporator coils where damage to any building components could occur from pan overflow. Auxiliary pans shall be provided with a minimum 3/4-inch (19 mm) drain line or an emergency water-level detection device complying with UL 508 that shuts off the equipment upon detecting water. Indoor spaces shall maintain relative humidity below 60 percent to prevent microbial proliferation.
Exception: A secondary drain line discharging to a conspicuous point of disposal is permitted in lieu of an emergency float switch where approved by the building official.
IN PLAIN ENGLISH
Your air conditioner must have an emergency overflow pan with an automatic float switch that shuts the system off if water backs up, and indoor humidity should stay below 60% to keep mold from growing.
HOMEOWNER PRO TIP:Test your AC drain line float switch each spring and pour one cup of distilled white vinegar into the condensate cleanout pipe monthly during the summer cooling season.
7.2
Texas Department of Licensing & Regulation (TDLR) Mold Protocols & Air Sampling
Baseline Outdoor Control Reference:Reference air sample captured outdoors under identical meteorological conditions.
TDLR MAC #1544 • AMBIENT SPORE TRAP AIR SAMPLINGCalibrated high-volume rotary vane air pump and Air-O-Cell cassette collecting a 15-liter/minute indoor air sample at breathing height under TDLR assessment protocols.
3D ARCHITECTURAL CUTAWAY • FIGURE 7.2
FIGURE 7.2: CALIBRATED 15 L/MIN AIR-O-CELL PUMP & OUTDOOR CONTROL VS. UNCALIBRATED DIY SETTLED DISH
DONE RIGHT (CODE-COMPLIANT)
Calibrated high-volume vacuum pump pulling exactly 15 L/min at 4-ft breathing zone
Simultaneous outdoor ambient air baseline sample collected for direct ratio comparison
Analysis conducted by independent AIHA-accredited environmental microbiology laboratory
Strict TDLR license separation: MAC consultant writes protocol with zero remediation conflict
COMMON DEFECT (NEEDS REPAIR)
Unscientific DIY petri dish settled dust kit (detects ubiquitous dead dust spores)
Indoor air sample collected without outdoor baseline control (scientifically useless)
Uncalibrated hand pump pulling unknown air volume skewing laboratory calculations
Unlicensed remediation contractor performing testing and bidding on same demolition
Comparative technical illustration of code-compliant mold air sampling methodology featuring calibrated 15 L/min vacuum pump, tripod-mounted Air-O-Cell cassette at breathing zone, and outdoor baseline control versus unscientific DIY settled dust petri dish kits lacking airflow calibration or outdoor baseline comparison.
TEXAS FIELD TRIAGE: 3-STAGE SEVERITY SCALEField Inspection Progression Rubric
Texas has some of the most rigorous, consumer-protective mold assessment laws in the United States.
Enacted under Texas Occupations Code Chapter 1958 and administered by the Texas Department of Licensing and Regulation (TDLR) under 25 TAC Chapter 295, the Texas Mold Remediation Rules protect homeowners from unethical practices. The cornerstone of Texas law is the strict separation between assessment and remediation: a licensed Mold Assessment Consultant (MAC) who tests and designs a cleanup protocol cannot have any financial interest in or perform the physical remediation work.
Professional air sampling utilizes calibrated non-viable spore trap cassettes (such as Air-O-Cell) mounted on a survey tripod at breathing height (3 to 5 feet). A calibrated vacuum pump draws exactly 15 liters of air per minute for 5 to 10 minutes. Airborne spores impact a specialized collection medium inside the cassette, which is then analyzed under a microscope by an independent AIHA-accredited laboratory.
Mold Assessment Consultant (MAC):A state-licensed professional who conducts inspections, gathers lab samples, and designs formal remediation protocols.
Spore Trap Cassette (Air-O-Cell):A calibrated optical sampling device that captures airborne fungal spores onto an adhesive collection slide.
Outdoor Baseline Control:A mandatory outdoor air sample collected simultaneously to compare indoor spore counts against natural background ambient levels.
What Can Go Wrong & What to Look For
Unscientific DIY test kits and conflicts of interest can mislead homeowners into costly, unnecessary panic or failed cleanups.
The most common mistake homeowners make is purchasing retail 'petri dish' mold test kits from hardware stores. Because fungal spores exist everywhere in ambient air, placing an open agar dish on a table will always grow mold within days. These kits provide no airflow measurement, no volume calculation, and no outdoor baseline comparison, rendering them scientifically meaningless.
Similarly, allowing a remediation company to perform its own testing creates an inherent conflict of interest. An unscrupulous contractor can easily manipulate sampling conditions to justify thousands of dollars in unnecessary demolition.
Early Warning Signs & Red Flags
Contractor offering 'free mold testing' who also bids on remediation work
Air testing conducted without taking a simultaneous outdoor control sample
DIY test kits showing mold growth without quantification of air volume or spore genera
Unexplained respiratory symptoms, allergic reactions, or eye irritation while inside the home
DIY Petri Dish TestingMONITOR
Uncalibrated settling dishes that cultivate harmless ambient spores without scientific validity.
Missing Outdoor Baseline ControlIMMEDIATE ACTION
Indoor samples analyzed without an outdoor reference, making accurate interpretation impossible.
Dual-Role Contractor ConflictIMMEDIATE ACTION
Remediation firm evaluating its own cleanup work rather than an independent licensed consultant.
LABORATORY DIAGNOSTICS • § 7.2
How Accredited Labs Compare Indoor Spore Counts to Outdoor Baselines
Raw spore numbers mean nothing without a simultaneous outdoor control sample and physical moisture mapping—water-indicator genera like Stachybotrys or Chaetomium indoors signal wet building materials.
How Texas Weather & Soil Affect It
Fluctuating outdoor spore ecology across Texas requires careful seasonal interpretation of laboratory air samples.
Outdoor air across Texas contains fluctuating populations of Cladosporium, Curvularia, and Alternaria spores originating from vegetation, agricultural fields, and damp soils. In East and South Texas following spring rainfalls, outdoor counts frequently exceed 20,000 to 50,000 spores per cubic meter.
A properly conditioned Texas home with functional filtration should exhibit indoor spore concentrations significantly lower than the outdoor control (typically 30% to 50% or less), with the same general distribution of common outdoor species. The detection of water-damage indicator molds such as Stachybotrys chartarum, Chaetomium, or Memnoniella indoors indicates active building envelope or plumbing moisture.
Texas Climate & Soil Stresses
Seasonal Rainfall: Spring and autumn deluges drive natural outdoor spore counts into tens of thousands per cubic meter.
High Soil Organic Matter: Heavy black gumbo clay soils naturally harbor fungal decomposers that release outdoor spores.
Texas Field Pro Tips
Never accept DIY petri dish test kits as evidence in a Texas real estate transaction; they are not recognized by building scientists or insurance carriers.
Verify your consultant holds an active TDLR Mold Assessment Consultant license before authorizing testing.
How to Maintain & Protect It
Rely on independent, state-licensed building science professionals whenever suspect indoor air quality questions arise.
If you suspect hidden mold due to water damage or unexplained odors, retain an independent licensed Mold Assessment Consultant to perform an inspection. The consultant will conduct visual inspection, moisture mapping, and calibrated air sampling with simultaneous outdoor controls.
If testing confirms elevated levels or water-damage indicator molds, the consultant will prepare a comprehensive Mold Remediation Protocol outlining the exact physical containment, engineering controls, and clearance criteria required for remediation.
Seasonal Walkthrough Checklist
Option Period: Order professional mold air sampling if the property exhibits water stains, musty odors, or past flooding.
Post-Remediation: Ensure clearance air testing is performed by the independent consultant before containment is removed.
HOMEOWNER DECISION MATRIX
DIY Weekend Maintenance vs. Call a Qualified Pro
SAFE 15-MINUTE DIY CARE
Regularly inspect accessible plumbing fixtures, water heater closets, and AC drain pans for dampness.
Use a flashlight to check under kitchen and bathroom sinks every quarter.
WHEN TO CALL A QUALIFIED PRO
Licensed TDLR Mold Assessment Consultant for formal IAQ evaluations and remediation protocols.
AIHA-accredited laboratory for microscopic fungal identification and spore counting.
CLINICAL DIFFERENTIAL FIELD TRIAGE & CONNECTED SYSTEMS§ 7.2 Diagnostic Rubric
Harmless Cosmetic Baseline
Indoor airborne spore counts lower than—and matching the natural fungal genera profile of—simultaneous outdoor Texas air samples reflect normal indoor air.
Active Failure Signal
Indoor detection of water-damage indicator spores (Stachybotrys, Chaetomium) or amplified Penicillium/Aspergillus plumes backed by elevated wall moisture.
60-Second Homeowner Check
Before paying anyone for mold testing, look up their personal TDLR Mold Assessment Consultant (MAC) license at tdlr.texas.gov and verify an outdoor control sample.
Texas Credential to VerifyTDLR Licensed Mold Assessment Consultant (MAC) working under a Licensed Mold Assessment Company (ACO) + TDLR-licensed AIHA microbiology lab.
Municipal Permit & Inspection RuleWritten TDLR MAC Mold Remediation Protocol required prior to regulated remediation (>=25 contiguous sq ft); strict Texas statutory conflict-of-interest separation.
3 Questions You Must Ask Before Hiring
“What is your active TDLR Mold Assessment Consultant (MAC) license number, and do you confirm zero ownership or referral kickbacks with any remediation contractor?”
“Does your assessment combine infrared thermography, calibrated pin/pinless moisture mapping, indoor psychrometrics, AND accredited lab spore-trap comparisons against an outdoor control?”
“If elevated mold or hidden cavity moisture is confirmed, does your fee include a detailed TDLR Remediation Protocol specifying containment boundaries and clearance criteria?”
3 High-Pressure Red Flags & Scams
Unlicensed “Indoor Air Quality Specialists” mailing off $29 gravity Petri dishes (which fail scientific air-volume standards and grow normal outdoor spores in every home).
Taking a single indoor air sample with NO simultaneous outdoor baseline sample—making laboratory spore counts scientifically meaningless.
Writing vague one-page “clean the bathroom” letters instead of a true room-by-room TDLR protocol that forces competitive apples-to-apples remediation bids.
HOMEOWNER ACTION TAKEAWAYRISK LEVEL: MEDIUM
Always maintain separation between testing and remediation.
Recommended Action Steps
Hire a licensed assessment consultant to test and write any remediation protocol.
Require simultaneous outdoor baseline samples for every air test.
Obtain independent clearance testing before paying a remediation contractor.
ICC DIGITAL CODESTexas Standards
Texas Occupations Code §1958.151 / 25 TAC §295.303—Licensing Separation of Mold Assessment and Remediation
STATUTORY MODEL CODE TEXT
A person may not perform both mold assessment and mold remediation on the same project. A licensed mold assessment consultant must perform an initial assessment, prepare a mold remediation protocol specifying the scope of work and clearance criteria, and conduct a post-remediation clearance inspection.
Exception: Routine residential cleaning of visible surface mildew under 25 contiguous square feet does not require a licensed mold assessment protocol or remediation contractor.
IN PLAIN ENGLISH
Texas law strictly forbids the company diagnosing mold from also doing the remediation work, ensuring you receive unbiased lab testing without inflated contractor repair bids.
HOMEOWNER PRO TIP:Always hire an independent licensed Mold Assessment Consultant (MAC) to write the protocol and verify clearance before paying a mold remediation contractor.
7.3
Remediation Clearance, Critical Containment & Form MDR-1
CHECK FREQUENCYPermanent Filing with County Deed Records & Insurer
RISK IF IGNOREDCRITICAL
Total Property Uninsurability, Denied Claims & Clouded Title
1
2
3
WHAT YOU'RE LOOKING ATFIELD INSPECTION ANATOMY
1
6-Mil Polyethylene Isolation Zipper:Airtight dust and spore containment barrier isolating work zone under negative pressure.
2
DOP-Tested Commercial HEPA Scrubber:99.97% air filtration machine ducting scrubbed air directly outside building.
3
Official Texas Form MDR-1 Certificate:State Certificate of Mold Damage Remediation protecting property resale and insurability.
POST-REMEDIATION • HEPA CONTAINMENT & FORM MDR-1Critical containment barrier with zippered poly entrance and negative air HEPA scrubber during post-remediation clearance inspection for the Texas Form MDR-1 Certificate.
3D ARCHITECTURAL CUTAWAY • FIGURE 7.3
FIGURE 7.3: NEGATIVE AIR HEPA CONTAINMENT & FORM MDR-1 VS. UNCONTAINED DEMOLITION & BLEACH COVERUP
Official State Form MDR-1 Certificate of Mold Damage Remediation filed with TDI
COMMON DEFECT (NEEDS REPAIR)
Uncontained demolition ripping moldy drywall, blowing billions of spores into living areas
Spraying household bleach over porous drywall (bleach water feeds mold roots deeper)
Unlicensed contractor performing remediation without written protocol from licensed MAC
Missing Certificate Form MDR-1 causing insurance underwriting complications and property devaluation
Comparative technical illustration of code-compliant mold remediation featuring 6-mil poly containment under negative air pressure, HEPA filtration exhausting outdoors, and official Form MDR-1 clearance certification versus common defects including uncontained demolition blowing spores through home, ineffective bleach spraying, and missing clearance paperwork.
TEXAS FIELD TRIAGE: 3-STAGE SEVERITY SCALEField Inspection Progression Rubric
STAGE 1NORMAL TEXAS AGING (COSMETIC)
Condition:Valid Certificate of Mold Damage Remediation (Form MDR-1) on file with Texas Dept of Insurance.
Action:Archive certificate with deed and provide copy to insurer.Annual Log
STAGE 2WATCH & MAINTAIN (30–90 DAYS)
Condition:Historical mold remediation completed by prior owner but Form MDR-1 certificate missing from file.
Action:Contact remediator or TDLR database to retrieve historical inspection clearance within 60 days.60 Days
STAGE 3ACT IMMEDIATELY (URGENT)
Condition:Uncertified mold demolition performed without negative air containment, HEPA, or clearance testing.
Action:Order formal post-remediation clearance testing and TDLR re-inspection immediately.Immediate
How It Works in Your Home
Under Texas law, professional mold remediation is a standardized engineering process with legally defined endpoints.
Under Texas law, any mold cleanup involving 25 or more contiguous square feet of visible mold triggers mandatory state oversight. The cleanup cannot be performed by an ordinary handyman or general remodeling contractor. A licensed Mold Assessment Consultant must draft a formal remediation protocol, and a licensed Mold Remediation Contractor must execute the cleanup.
The primary risk during mold cleanup is cross-contamination—where tearing out moldy drywall aerosolizes billions of dormant spores into household air conditioning ducts. To prevent this, contractors build critical containment barriers using 6-mil polyethylene sheeting sealed under negative air pressure, while commercial HEPA air scrubbers vent filtered exhaust to the outdoors.
25-Square-Foot Rule:The Texas statutory threshold (approximately the size of one sheet of drywall) requiring licensed mold remediation oversight.
Negative Air Containment:A sealed 6-mil plastic chamber under continuous negative pressure (-0.02 in. w.g.) ensuring air always flows inward.
Certificate of Mold Damage Remediation (Form MDR-1):The official state document certifying the property was remediated and cleared according to state standards.
What Can Go Wrong & What to Look For
Uncontained demolition and superficial bleach treatments frequently spread mold contamination throughout living spaces.
A common homeowner mistake is spraying household chlorine bleach onto porous materials like drywall or wood framing. Bleach contains roughly 90% water; while the chlorine chemical oxidizes surface mold spores, it cannot penetrate porous materials. The water base soaks deep into the gypsum core, actually feeding the root hyphae beneath the surface.
Similarly, ripping out moldy materials without negative pressure containment disperses microscopic spores across furnishings and through AC returns, contaminating clean rooms and triggering severe health reactions.
Early Warning Signs & Red Flags
Contractor tearing out water-damaged drywall without plastic containment or HEPA air scrubbers
Contractor recommending bleach spraying over porous drywall or structural wood framing
Lack of formal Post-Remediation Assessment (Clearance) before walls are re-sheetrocked
Missing Form MDR-1 after remediation of projects over 25 square feet
Uncontained DemolitionIMMEDIATE ACTION
Ripping moldy drywall without negative air containment, dispersing spores across the residence.
Bleach Treatment on Porous SurfacesMONITOR
Spraying bleach on porous drywall, which leaves moisture that feeds sub-surface mold roots.
Missing Form MDR-1 CertificateIMMEDIATE ACTION
Completed remediation without official state certification, clouding property title and insurability.
REMEDIATION VERIFICATION • § 7.3
Why Painting or Bleaching Moldy Drywall Fails Every Time
Spraying bleach or stain-blocking primer over damp gypsum leaves allergenic fungal hyphae intact inside the wall cavity; proper TDLR remediation physically removes porous damaged board under HEPA negative air.
How Texas Weather & Soil Affect It
Texas property insurers strictly examine past mold history; Form MDR-1 is your statutory shield against insurance blacklisting.
Following historic Texas flood and hurricane events, insurance carriers faced massive mold claims. In response, Texas Insurance Code Chapter 544 (Subchapter F) established that an insurer licensed in Texas cannot deny homeowner coverage, refuse renewal, or charge an underwriting surcharge based on past mold damage if the homeowner holds an official Form MDR-1.
When selling a Texas home, attaching Form MDR-1 to the Seller's Disclosure Notice legally demonstrates that past microbial issues were professionally remediated and passed clearance, eliminating buyer hesitation and protecting your sales price.
Texas Climate & Soil Stresses
Hurricane and Tropical Storm Deluges: Rapid structural drying within 48 hours is vital following severe storms.
High Coastal Humidity: Makes containment dehumidification essential during remediation projects.
Texas Field Pro Tips
Never pay the final remediation invoice until your independent Mold Assessment Consultant conducts clearance air testing and issues written passing results.
Keep your Form MDR-1 permanently filed with your homeowner closing papers and consider recording it in county deed records.
How to Maintain & Protect It
Ensure any significant mold remediation strictly follows Texas protocol requirements to protect both your health and your property equity.
If mold remediation is required in your home, ensure your consultant prepares a formal written protocol. Verify the remediation contractor constructs critical containment with zippered airlocks and commercial HEPA negative air filtration.
After cleanup, the consultant will perform a white-glove visual dust inspection and aggressive clearance air sampling. Once passed, the consultant must issue the official Form MDR-1 within 10 calendar days.
Seasonal Walkthrough Checklist
Post-Remediation: Confirm Form MDR-1 has been executed by both the consultant and remediation contractor.
Insurance Renewal: Provide a copy of Form MDR-1 to your insurance agent if past claims arise during underwriting.
HOMEOWNER DECISION MATRIX
DIY Weekend Maintenance vs. Call a Qualified Pro
SAFE 15-MINUTE DIY CARE
Small surface mildew cleanups under 25 square feet can be safely cleaned using detergent, water, and thorough drying.
Maintain clean, dry surfaces in bathrooms and around plumbing fixtures.
WHEN TO CALL A QUALIFIED PRO
Licensed Mold Remediation Contractor (MRC) for any microbial remediation exceeding 25 square feet.
Licensed Mold Assessment Consultant (MAC) for post-remediation clearance testing and Form MDR-1 issuance.
CLINICAL DIFFERENTIAL FIELD TRIAGE & CONNECTED SYSTEMS§ 7.3 Diagnostic Rubric
Harmless Cosmetic Baseline
Sealed 6-mil poly containment bowed slightly inward under negative HEPA pressure—followed by bare clean studs (<16% MC) before rebuild—marks proper remediation.
Active Failure Signal
Contractors tearing out moldy drywall with open doors and running house AC fans, spraying bleach over wet gypsum, or rebuilding walls before MAC clearance.
60-Second Homeowner Check
Hold a tissue strip at the containment zipper seam—air must pull INWARD toward the HEPA scrubber; never release final payment before signed MAC clearance.
Texas Credential to VerifyTDLR Licensed Mold Remediation Contractor (MRC / RCO) to clean AND an independent TDLR Mold Assessment Consultant (MAC) to certify clearance.
Municipal Permit & Inspection RuleMandatory 5-day advance TDLR state notification (>=25 contiguous sq ft) + official Certificate of Mold Damage Remediation issued within 10 days of completion.
3 Questions You Must Ask Before Hiring
“Will you file the 5-day TDLR state notification, erect 6-mil zipper containment under continuous HEPA negative pressure, and bag all porous debris before leaving the room?”
“Is the underlying plumbing, roof, or HVAC moisture source 100% repaired and verified dry (<16% wood moisture) before containment teardown?”
“Will BOTH the independent MAC and your MRC sign the official Texas Certificate of Mold Damage Remediation so my home’s insurance and resale history are legally protected?”
3 High-Pressure Red Flags & Scams
Contractors talking you into skipping TDLR notification on large losses “to keep mold off your home’s permanent record”—which forfeits your statutory Certificate of Mold Damage Remediation protection!
Rebuilding new drywall BEFORE the independent TDLR MAC inspects bare wall studs and passes Post-Remediation Verification (PRV) air/visual clearance.
Running ozone generators or fogging harsh biocides through occupied ducts instead of physically HEPA-vacuuming and removing contaminated gypsum board.
HOMEOWNER ACTION TAKEAWAYRISK LEVEL: CRITICAL
Professional clearance and Form MDR-1 guarantee property insurability.
Recommended Action Steps
Use 6-mil negative air containment for remediation exceeding 25 square feet.
Avoid spraying bleach on drywall or wood; remove contaminated materials.
Secure Form MDR-1 within 10 days of passing clearance inspection.
ICC DIGITAL CODESTexas Standards
Texas Insurance Code §544.303 / TDI Form MDR-1—Certificate of Mold Damage Remediation and Property Insurability
STATUTORY MODEL CODE TEXT
On successful completion of mold remediation meeting the protocol clearance criteria, the mold assessment consultant shall issue a Certificate of Mold Damage Remediation (Form MDR-1). An insurer may not make an underwriting decision regarding a residential property based on previous mold claims if an MDR-1 certificate has been filed with the Texas Department of Insurance.
Exception: Properties where remediation was performed without licensed assessment oversight or failed post-remediation clearance cannot receive an official MDR-1 certificate.
IN PLAIN ENGLISH
Form MDR-1 is your official certificate proving mold was professionally removed and passed lab testing, legally preventing Texas homeowners insurance companies from denying coverage or hiking premiums based on past mold history.
HOMEOWNER PRO TIP:File your Form MDR-1 with your county deed records and keep copies in your home closing binder to protect your resale value and insurability.
Chapter 8 delivers an authoritative homeowner guide to wood-destroying insect identification, biology, and defense across Texas. It covers subterranean termite mud tubes and Formosan super-colonies, drywood termite frass and wood-boring beetles, perimeter conducive conditions such as mulch-covered weep holes and wood-to-ground contact, and the official Texas Structural Pest Control Service (Form SPCS/T-4) disclosure report required for real estate transactions.
SCAN FOR LIVE DIGITAL TOOLS & UPDATES
Chapter 8 Digital Companion
Wood Destroying Insects & Termites
Instant mobile access to subterranean and Formosan termite mud-tube identification, conducive slab clearances, and Texas WDI inspection guides.
CHAPTER VIII • WOOD DESTROYING INSECTSDefending against subterranean termites, carpenter ants, and moisture-conducive perimeter conditions.
CHAPTER VIII MASTER ARCHITECTURAL CUTAWAY • WOOD-DESTROYING INSECTS
Subterranean & Formosan Termite Defense: Clear Foundation Reveal vs. Hidden Mud-Tube Bridges
Split 3D forensic cutaway showing how piled mulch, soil contact, and plumbing slab penetrations invite subterranean termite colonies (left) versus a clean 6-inch concrete foundation reveal and continuous termiticide trench (right).
Earthen Mud Shelter Tube:Soil-and-saliva tunnel built by worker termites to retain humidity while crossing bare concrete.
2
Bare Concrete Foundation Reveal:4-inch vertical inspection zone where mud tubes are exposed to plain view.
3
Concealed Wall Sole Plate Entry:Target wood framing member where termites enter living area and devour studs.
WDI EVIDENCE • SUBTERRANEAN TERMITE MUD TUBESEarthen subterranean termite mud shelter tubes ascending a vertical concrete slab edge to bypass the foundation and penetrate framing behind the exterior brick veneer.
Comparative technical illustration of code-compliant foundation slab inspection perimeter with non-repellent chemical termiticide barrier versus common subterranean termite defects including active mud shelter tubes bridging concrete grade beams and hidden sill plate honeycombing.
TEXAS FIELD TRIAGE: 3-STAGE SEVERITY SCALEField Inspection Progression Rubric
STAGE 1NORMAL TEXAS AGING (COSMETIC)
Condition:Exposed concrete foundation reveal clearly visible around entire perimeter with zero mud tubes.
Action:Walk perimeter quarterly in spring and fall to verify band.Annual Log
STAGE 2WATCH & MAINTAIN (30–90 DAYS)
Condition:Inactive/dry mud tube fragment on exterior foundation; landscape timber resting within 6" of slab.
Action:Scrape tube to confirm active status; schedule SPCS-licensed pest inspection within 30 days.30 Days
STAGE 3ACT IMMEDIATELY (URGENT)
Condition:Active earthen mud shelter tubes crawling up slab into brick weeps; live termite swarmers in living room.
Action:Dispatch SPCS-licensed pest operator immediately for liquid non-repellent termiticide barrier.Immediate
How It Works in Your Home
Subterranean termites live underground in vast social colonies and construct earthen highway tunnels to reach wood framing in your home.
Subterranean termites (primarily Reticulitermes species and invasive Formosan termites) live in large colonies deep within the soil. They are organized into reproductive kings and queens, soldiers with protective mandibles, and millions of pale, blind workers. Workers forage continuously through the earth, searching for cellulose to consume and share with the colony.
Because termites have thin, delicate bodies, open air quickly desiccates and kills them. To travel out of the damp soil and across exposed concrete foundation walls, they construct protective mud tubes—narrow tunnels crafted from soil grains, chewed wood pulp, and saliva—that maintain 100% relative humidity while shielding workers from sunlight and predators.
Mud Shelter Tubes:Pencil-width earthen tunnels constructed across foundation concrete to maintain humidity between underground nests and wood framing.
Termite Workers & Soldiers:Blind, sterile workers that eat and digest wood framing; soldiers defend foraging tubes with biting pincers.
Alate Swarmers:Winged reproductive termites that emerge in warm spring weather to establish new underground colonies.
What Can Go Wrong & What to Look For
Undetected subterranean termites eat wood from the inside out, often leaving framing structurally hollowed while exterior paint appears intact.
Termites selectively digest the soft, porous springwood layers of structural framing lumber, leaving the harder summerwood rings behind like pages in a brittle book. The hollowed galleries are packed with brown soil and fecal mud.
Formosan subterranean termites present an even more aggressive threat across coastal and southern Texas. A single Formosan colony can contain millions of foragers that chew timber ten times faster than native species. Under high moisture conditions from roof or plumbing leaks, Formosan termites can construct above-ground secondary nests called 'carton,' surviving without direct soil contact.
Early Warning Signs & Red Flags
Pencil-width dirt tubes traveling vertically up exterior concrete slabs or plumbing pipes
Piles of translucent, silvery discarded insect wings on window sills or doorways in spring
Drywall paper appearing wavy or rippled, or wood baseboards that sound hollow or crunch when tapped
Pinhead-sized mud specks on interior painted sheetrock where foraging workers punctured the surface
Active Mud Tubes on FoundationIMMEDIATE ACTION
Earthen shelter tubes bridging the concrete grade beam to reach sill plates.
Hollowed Structural Sill PlatesIMMEDIATE ACTION
Framing timber eaten along growth rings and packed with mud, compromising structural strength.
Formosan Carton NestingIMMEDIATE ACTION
Above-ground secondary nest inside a wet wall cavity surviving without soil connection.
TERMITE FORAGING • § 8.1
Native Subterranean vs. Aggressive Formosan Aerial Cartons
While native subterranean termites must return to moist Texas soil daily via mud tubes, Formosan colonies along the Gulf Coast can build moist sponge-like carton nests directly inside damp walls.
How Texas Weather & Soil Affect It
Texas sits squarely in USDA Termite Infestation Probability Zone 1—the highest risk designation in the United States.
The warm, humid climate and expansive clay soils of Texas provide an ideal environment for subterranean termites. Warm soils allow colonies to remain actively foraging twelve months a year.
During hot summer droughts, heavy clay soil shrinks and cracks open, forming deep subterranean crevices that allow termite foragers to bypass chemical perimeter barrier treatments and reach underneath foundation slabs directly.
Texas Climate & Soil Stresses
USDA Zone 1 Hazard: The entire state of Texas is classified as having very heavy termite infestation probability.
Spring Rain Swarms: Humid 80°F days following spring rains trigger massive swarming flights across neighborhoods.
Texas Field Pro Tips
Learn to differentiate termites from flying ants: termites have straight antennae, thick waists, and equal-length wings; flying ants have elbowed antennae, pinched waists, and unequal wings.
Maintain a transferable subterranean termite warranty that includes structural repair coverage, not just retreatments.
How to Maintain & Protect It
Regular visual inspections and professional chemical barrier defenses keep subterranean termites out of your framing.
The primary homeowner defense against subterranean termites is preserving a clean, visible inspection barrier around your foundation slab. Keep mulch, soil, and landscaping clear of the concrete edge.
Modern professional pest control relies on non-repellent liquid soil treatments (such as fipronil) or exterior baiting stations. Because non-repellent chemicals cannot be detected by termites, workers pass through the treated zone and transfer the active ingredient back to the queen via mutual grooming.
Seasonal Walkthrough Checklist
Spring: Inspect interior window sills and door frames for discarded termite swarmer wings.
Spring: Walk the exterior perimeter with a flashlight checking the concrete slab reveal for mud tubes.
Fall: Ensure lawn sprinkler heads are angled away from the house foundation so they do not wash away soil chemical barriers.
HOMEOWNER DECISION MATRIX
DIY Weekend Maintenance vs. Call a Qualified Pro
SAFE 15-MINUTE DIY CARE
Maintain at least 4 to 6 inches of clear, bare concrete visible between your garden beds and the bottom siding/brick.
Keep firewood, scrap lumber, and cardboard storage at least 20 feet away from exterior walls.
WHEN TO CALL A QUALIFIED PRO
Licensed pest control applicator to inject non-repellent liquid termiticide barriers or service perimeter bait stations.
Structural pest inspector to perform an annual wood-destroying insect inspection.
CLINICAL DIFFERENTIAL FIELD TRIAGE & CONNECTED SYSTEMS§ 8.1 Diagnostic Rubric
Harmless Cosmetic Baseline
Winged black ants with pinched waists and elbowed antennae emerging near porch lights after spring rain are harmless ant swarmers—not straight-waisted termites.
Active Failure Signal
Pencil-wide mud shelter tubes climbing concrete foundation edges, piles of translucent equal-length shed wings on windowsills, or hollow blistered baseboards.
60-Second Homeowner Check
Walk the entire exterior slab perimeter with a flashlight looking for vertical tan mud tubes crossing bare concrete, and tap ground-floor wood sills with a screwdriver handle.
BEFORE YOU SIGN A BID • TEXAS CONTRACTOR VETTING & SCAM DEFENSE
Subterranean & Formosan Termite Treatment
§ 8.1 Playbook
Texas Credential to VerifyTexas Department of Agriculture (TDA) Structural Pest Control Service (SPCS) Business License & Certified Termite Applicator.
Municipal Permit & Inspection RuleState-mandated TDA SPCS treatment sticker posted under kitchen sink/breaker panel + exact termiticide dilution disclosure.
3 Questions You Must Ask Before Hiring
“Are you applying a non-repellent liquid termiticide (such as fipronil / Termidor HE) via continuous perimeter trenching AND sub-slab rodding at bath traps and expansion joints?”
“Does your annual renewal warranty cover re-treatment ONLY, or does it also include structural wood-damage repair coverage?”
“Will you provide the official TDA post-treatment graph mapping exact linear footage treated, chemical EPA registration number, and concentration?”
3 High-Pressure Red Flags & Scams
Selling “spot spray” surface treatments on one mud tube without trenching plumbing penetrations or bath traps—driving subterranean colonies five feet sideways.
Installing plastic bait stations around a slab and walking away without quarterly monitoring or addressing wood-to-soil conducive conditions.
Pressuring homeowners with vague “wood beetle” claims without identifying active frass vs. decades-old inactive exit holes.
HOMEOWNER ACTION TAKEAWAYRISK LEVEL: HIGH
Protect your foundation clear zone to stop termites before they reach framing.
Keep garden mulch and landscape plants away from exterior brick weep holes.
Schedule annual professional termite inspections.
ICC DIGITAL CODES2021 / 2024 IRC
IRC R318.1 / R318.2—Protection Against Subterranean Termites
STATUTORY MODEL CODE TEXT
In areas subject to very heavy termite damage, structures shall be protected from subterranean termites by an approved method: chemical termiticide barrier, termite baiting system complying with ASTM E1026, pressure-preservative-treated wood, or a physical metal/mesh barrier system. Foundation walls shall provide a minimum 6-inch vertical clearance between finished grade and wood framing.
Exception: Noncombustible structural systems such as reinforced concrete slabs and light-frame cold-formed steel need only protect structural connections and interior combustible trim.
IN PLAIN ENGLISH
Building codes require all new Texas homes to have either a chemical soil barrier or bait stations installed, along with at least 6 inches of bare concrete exposed above ground so termites cannot sneak inside.
HOMEOWNER PRO TIP:Walk your foundation perimeter twice a year with a flashlight looking for thin pencil-wide dirt tubes climbing up the exposed concrete edge.
Hollowed rafter tail weakened by extensive internal larval feeding galleries
Comparative technical illustration of sound, borate-treated structural framing versus wood-destroying insect defects including drywood termite kick-out holes with hexagonal fecal pellets, powderpost beetle shot-holes, and carpenter ant moisture galleries.
TEXAS FIELD TRIAGE: 3-STAGE SEVERITY SCALEField Inspection Progression Rubric
STAGE 1NORMAL TEXAS AGING (COSMETIC)
Condition:Exterior treated wood fascia showing natural grain checks with zero frass, pellets, or exit holes.
Action:Keep exterior wood sealed with exterior paint or stain.Annual Log
STAGE 2WATCH & MAINTAIN (30–90 DAYS)
Condition:Small localized pile of six-sided hexagonal frass pellets beneath attic rafter or wood window frame.
Action:Collect pellet sample in plastic bag and contact pest specialist for identification within 30 days.30 Days
STAGE 3ACT IMMEDIATELY (URGENT)
Condition:Extensive structural framing hollowed out by drywood termites; structural rafter sag; active kickout holes.
Action:Hire licensed structural fumigation company or localized borate injection contractor immediately.Immediate
How It Works in Your Home
Drywood termites and wood-boring beetles infest sound, seasoned lumber without ever needing contact with the ground.
Drywood termites (Incisitermes snyderi and Cryptotermes brevis) enter homes by flight during warm summer twilight. They land on roof fascias, exposed rafter tails, or crawl through unscreened attic vents, sealing themselves directly into cracks in dry wood.
Because they live entirely inside wood, they extract all necessary water from metabolic digestion of cellulose and wood moisture. To keep their internal gallery clean, workers bore pinhead-sized 'kick-out holes' to push out waste, leaving characteristic mounds of dry, hexagonal sand-like pellets on window sills or attic floorboards.
Drywood Kick-Out Holes:Tiny 1mm holes through which workers eject fecal pellets from interior galleries.
Powderpost Beetle Shot Holes:Round 1mm to 2mm emergence holes accompanied by talcum-powder-fine wood dust.
What Can Go Wrong & What to Look For
Because drywood pests live deep inside framing, structural damage can progress undetected until wood strength is compromised.
Unlike subterranean termites, drywood colonies eat across the wood grain, hollowing large continuous chambers until only a paper-thin exterior veneer of wood remains. Rafter tails, window trim, and historic door jambs can lose all structural integrity.
Similarly, true powderpost beetles (Lyctidae) lay eggs inside the pores of seasoned hardwoods (oak flooring, structural timber, cabinetry). Developing larvae feed on the wood starch for years before adults bore out, leaving small circular holes and talcum-fine powder.
Early Warning Signs & Red Flags
Small, tidy piles of uniform sand-like pellets beneath window sills, door frames, or attic rafters
Tiny round holes (1mm to 3mm) in wood trim, antique hardwood furniture, or subflooring
Fine, flour-like powdery wood dust falling from exposed crawlspace beams or floor joists
Black carpenter ants crawling along exterior trim, accompanied by coarse wood shavings
Drywood Termite Kick-Out ActivityIMMEDIATE ACTION
Active frass ejection indicating established colony inside structural rafters.
Powderpost Beetle Emergence HolesIMMEDIATE ACTION
Multiple shot holes in hardwood joists or subflooring indicating active internal larval feeding.
Carpenter Ant Nesting CavityMONITOR
Clean, sandpaper-smooth galleries carved into damp wood framing.
WOOD PEST DIFFERENTIATION • § 8.2
Distinguishing Drywood Pellets, Beetle Flour & Carpenter Ant Shavings
Accurate species identification saves thousands: drywood termites eject hard six-sided pellets, powderpost beetles leave fine talcum-like flour, and carpenter ants push coarse pencil-sharpener wood shavings.
How Texas Weather & Soil Affect It
Coastal warmth and high humidity make the Texas Gulf Coast particularly susceptible to drywood termite swarms.
Drywood termites are most prevalent in Galveston, Houston, Corpus Christi, and coastal counties. Warm Gulf air allows reproductive alates to swarm during late spring and early summer evenings.
Crawlspace humidity in older pier-and-beam homes creates prime conditions for powderpost beetles and wood-boring anobiid beetles, which thrive in wood with moisture contents between 14% and 20%.
Texas Climate & Soil Stresses
Coastal Climate Range: Drywood termites are heavily concentrated within 60 miles of the Texas Gulf Coastline.
Humid Crawlspaces: Encourages powderpost beetle re-infestation in unconditioned pier-and-beam homes.
Texas Field Pro Tips
Inspect attic soffits and gable louvers; verify that all vent openings are screened with intact 1/8-inch wire mesh.
Avoid bringing untreated antique furniture or rustic reclaimed barnwood into the home without prior pest inspection.
How to Maintain & Protect It
Protecting exterior wood with paint and screening attic vents blocks the primary pathways drywood pests use to enter.
Keep exterior wood surfaces well-painted and caulked. Drywood termites seek unpainted cracks, exposed rafter tails, and gaps around window trim to begin boring.
If a drywood termite infestation is localized, targeted foam or liquid termiticide injections into the galleries can eradicate the colony. However, if multiple widespread colonies exist throughout attic framing and roof sheathing, whole-structure tent fumigation is required.
Seasonal Walkthrough Checklist
Late Spring: Check attic vent screens for tears or gaps before drywood swarming flights begin.
Summer: Vacuum window sills and inspect for recurring mounds of sand-like hexagonal pellets.
Fall: Seal exterior wood joints and paint raw rafter tails to prevent entry.
HOMEOWNER DECISION MATRIX
DIY Weekend Maintenance vs. Call a Qualified Pro
SAFE 15-MINUTE DIY CARE
Seal exterior gaps in fascia boards and caulk around exterior window casings.
Keep attic spaces well-ventilated and dry.
WHEN TO CALL A QUALIFIED PRO
Licensed pest professional for localized borate or termiticide gallery injection.
Certified fumigation contractor if widespread structural drywood infestations exist.
CLINICAL DIFFERENTIAL FIELD TRIAGE & CONNECTED SYSTEMS§ 8.2 Diagnostic Rubric
Harmless Cosmetic Baseline
Loose black spider droppings or coarse irregular sawdust mixed with dead insect parts (carpenter ants) differ sharply from uniform drywood termite pellets.
Active Failure Signal
Coffee-ground piles of hard six-sided pellets reappearing below tiny 1/16-inch kick-out holes on coastal windowsills, attic rafters, or antique furniture.
60-Second Homeowner Check
Examine suspect wood dust under your smartphone macro lens: hard grooved barrel pellets mean drywood termites; ultra-fine talcum flour means powderpost beetles.
BEFORE YOU SIGN A BID • TEXAS CONTRACTOR VETTING & SCAM DEFENSE
Drywood Termite Fumigation, Powderpost Beetles & Carpenter Ants
§ 8.2 Playbook
Texas Credential to VerifyTexas Department of Agriculture (TDA) Structural Pest Control Service (SPCS) Business License + Certified Applicator in Termite & Structural Fumigation.
Municipal Permit & Inspection RuleStrict EPA/TDA structural fumigation log, chloropicrin warning agent, secondary door locks, and calibrated <=1 ppm aeration clearance before re-entry.
3 Questions You Must Ask Before Hiring
“Did your Certified Applicator examine the actual frass under magnification to confirm active drywood six-sided pellets vs. powderpost beetle flour or carpenter ant shavings?”
“Is localized borate/foam gallery injection viable for a single isolated window sill, or does widespread attic/rafter activity genuinely warrant whole-structure tent fumigation?”
“Remembering that drywood gas fumigation leaves ZERO residual soil barrier, what preventive borate wood treatment or warranty protects attic rafters afterward?”
3 High-Pressure Red Flags & Scams
Selling a $2,800 subterranean perimeter soil trench to treat drywood termites living high inside dry attic rafters—soil termiticide never touches drywood colonies!
Pitching “orange-oil / heat spot treatments” as a 100% whole-house cure when drywood termite colonies are actively kicking pellets across multiple inaccessible wall cavities.
Quoting live beetle eradication on 40-year-old rough-sawn barn beams or hardwood floors whose exit holes have been completely inactive since the lumber mill.
HOMEOWNER ACTION TAKEAWAYRISK LEVEL: HIGH
Look for sand-like pellets and shot-holes to catch drywood pests early.
Recommended Action Steps
Check window sills and rafters for distinctive six-sided frass pellets.
Screen all attic and crawlspace vents with 1/8-inch mesh.
Treat localized colonies promptly before whole-house tenting is needed.
ICC DIGITAL CODES2021 / 2024 IRC
IRC R317.1 / ASTM D3345—Protection of Wood Framing Against Decay and Non-Soil Wood Destroying Insects
STATUTORY MODEL CODE TEXT
Structural wood members in exterior exposures or unconditioned attic spaces subjected to elevated wood moisture contents exceeding 19 percent shall be naturally durable decay-resistant species or preservative-treated wood. Structural framing exhibiting powderpost beetle emergence holes or drywood frass accumulation shall be evaluated for structural capacity and treated.
Exception: Wood framing enclosed within conditioned building envelopes maintaining continuous equilibrium moisture content below 12 percent is exempt from chemical preservative treatment.
IN PLAIN ENGLISH
Unlike subterranean termites that live underground, drywood termites nest directly inside attic rafters and window frames, leaving tiny sand-like hexagonal pellets below their kick-out holes.
HOMEOWNER PRO TIP:Check window sills and attic floorboards for piles of what looks like coarse sand or coffee grounds, especially in coastal Texas regions where drywood termites swarm during warm evenings.
Direct Termite Highway into Living Area & Voided Pest Warranties
1
2
3
WHAT YOU'RE LOOKING ATFIELD INSPECTION ANATOMY
1
Mulch Piled Over Foundation:Organic wood mulch holding moisture directly against brick veneer above slab edge.
2
Obstructed Brick Weep Hole:Weep opening blocked by landscape soil, giving termites dark hidden entry path.
3
High Soil Grade Level:Improper soil elevation that violates the required 4-inch minimum concrete clearance.
CONDUCIVE CONDITION • MULCH COVERING WEEP HOLESFlowerbed soil and heavy hardwood mulch piled directly against exterior brick veneer, obstructing weep holes and creating a hidden moisture highway for termite entry.
Air conditioner condensate line dripping onto bare earth without drain pipe
Comparative technical illustration contrasting a code-compliant foundation perimeter with 6-inch concrete reveal, unblocked brick weeps, and detached fence post against severe conducive conditions including mulch-buried weep holes, wood-to-ground contact, and pooling water.
TEXAS FIELD TRIAGE: 3-STAGE SEVERITY SCALEField Inspection Progression Rubric
STAGE 1NORMAL TEXAS AGING (COSMETIC)
Condition:Flowerbed soil line maintaining full 4-inch vertical concrete clearance below bottom brick veneer row.
Action:Maintain clearance during plantings; never raise grade.Annual Log
STAGE 2WATCH & MAINTAIN (30–90 DAYS)
Condition:Wood fence pickets or wood landscape edging touching exterior walls; mulch piled within 2" of weeps.
Action:Trim fence pickets to 2-inch clearance and pull mulch back 12 inches within 30 days.30 Days
STAGE 3ACT IMMEDIATELY (URGENT)
Condition:Exterior siding buried below grade; firewood stacked against walls; chronic plumbing leak under slab.
Action:Remove soil and wood debris immediately; fix plumbing leak to cut termite highway.Immediate
How It Works in Your Home
Termites do not randomly attack homes; they follow moisture trails and hidden bridges directly into building envelopes.
A 'conducive condition' is any environmental or structural factor that creates moisture, provides food, or bridges the physical inspection gap between ground soil and wood framing. In nature, termites serve as vital decomposers breaking down fallen logs; when conditions around your house mimic a forest floor, termites naturally invade.
Your concrete foundation slab is engineered to act as a physical barrier. Because termites cannot eat concrete, they must crawl out in the open where they can be seen. However, when homeowners build planter beds, heap mulch against brick veneer, or allow wooden fences to touch siding, they build a hidden highway directly into the house.
Brick Weep Holes:Open vertical joints in exterior brick veneer designed to drain cavity condensation and ventilate wall framing.
Clear Concrete Inspection Band:A continuous 4- to 6-inch vertical exposure of bare foundation concrete above finished soil grade.
Wood-to-Earth Contact:Wooden fence posts, siding, or deck stairs directly touching soil, creating a subterranean entry bridge.
What Can Go Wrong & What to Look For
The most common conducive conditions are easily created during routine landscaping and home improvement projects.
The single most prevalent violation in Texas suburban homes is piling hardwood mulch and topsoil over the brick ledge and covering weep holes. Mulch holds moisture against the brick, keeping the wall cavity damp. Subterranean termites tunnel through the moist mulch, enter the open weep hole, and penetrate the structural bottom plate behind the wall without building a visible mud tube.
Other frequent conducive conditions include wooden fences attached directly to the home with posts buried in damp earth, dripping outdoor hose bibs that puddle water against the foundation, downspouts discharging roof runoff at the slab edge, and landscape irrigation sprayers hitting the brick wall daily.
Early Warning Signs & Red Flags
Garden soil or hardwood mulch piled above the bottom brick line or covering weep holes
Wooden privacy fence pickets or gate posts touching the house wall and entering the ground
Persistent damp soil or standing puddles beneath outdoor hose spigots or AC condensate drains
Trellises, tree branches, or dense shrubbery brushing against siding or roof eaves
Landscaping covering drainage weeps and bridging the foundation inspection zone.
Wood-to-Ground ContactIMMEDIATE ACTION
Untreated wooden framing or siding touching soil, providing direct subterranean pest access.
Foundation Moisture PoolingMONITOR
Dripping hose bibs or downspouts discharging water directly against the slab beam.
PERIMETER CLEARANCE • § 8.3
Eliminating the Five Classic Texas Termite Conducive Conditions
Pulling hardwood mulch 6 inches below brick weep holes, removing stacked firewood against siding, fixing dripping AC lines, and trimming tree limbs break the moisture-and-shelter highway pests rely on.
How Texas Weather & Soil Affect It
Expansive clay soils and torrential downpours make water management around Texas foundations essential.
When downspouts discharge roof runoff directly against the slab, the expansive clay soil becomes saturated, creating a sustained subterranean moisture reservoir that attracts foraging termite colonies from across the neighborhood.
Conversely, summer droughts cause clay to pull away from the foundation. If homeowners attempt to hydrate their foundation by spraying water against the brick veneer, they saturate wall cavities and wash away protective termiticide chemical barriers.
Texas Climate & Soil Stresses
Severe Rain Storms: Roof deluges deposit hundreds of gallons at building corners if downspout extensions are missing.
High Soil Temperature: Accelerates organic decomposition of mulch, generating subterranean heat and fungal food sources.
Texas Field Pro Tips
Extend all gutter downspouts at least 5 to 6 feet away from the slab perimeter or tie them into underground solid drain pipes.
Keep flowerbed shrubs trimmed back at least 12 inches from exterior walls to allow sunlight and airflow to keep the slab dry.
How to Maintain & Protect It
Correcting conducive conditions is inexpensive, highly effective, and eliminates 90% of termite risks.
Walk your home exterior every spring with a shovel and hand rake. Pull mulch back at least 6 inches from the foundation, creating a pea-gravel or bare-soil buffer zone that stays dry and easily inspected.
Fix dripping outdoor faucets immediately, install downspout extensions to direct rainwater away from the house, and isolate wooden fence posts with galvanized steel standoff brackets instead of burying wood in soil.
Seasonal Walkthrough Checklist
Spring: Rake mulch back from the brick ledge; verify all weep holes are completely unobstructed.
Summer: Check that sprinkler spray patterns hit only lawn turf and do not spray against house walls.
Fall: Clear dead leaves, grass clippings, and garden debris out of foundation corners.
HOMEOWNER DECISION MATRIX
DIY Weekend Maintenance vs. Call a Qualified Pro
SAFE 15-MINUTE DIY CARE
Rake flowerbed mulch down to maintain 4 inches of clear concrete below brick weep holes.
Add downspout splash blocks or flexible extensions to route water 5 feet away from the foundation.
Cut back tree limbs and bushes that touch the exterior walls or roofline.
WHEN TO CALL A QUALIFIED PRO
Plumber to repair leaking outdoor hose bibs or leaking vacuum breakers.
Carpenter to install metal standoff brackets on wooden fence posts or deck stairs.
CLINICAL DIFFERENTIAL FIELD TRIAGE & CONNECTED SYSTEMS§ 8.3 Diagnostic Rubric
Harmless Cosmetic Baseline
Hardwood mulch raked 6 inches below brick weep holes, firewood stored 20 feet off the slab on racks, and dry AC drain terminations starve pests of shelter.
Active Failure Signal
Flowerbed soil covering the slab edge, wood siding or fence posts buried in dirt, dense English ivy climbing brick, or dripping hose bibbs beside foundation walls.
60-Second Homeowner Check
Take a garden rake this Saturday and pull bark mulch back around every flowerbed until 4 to 6 inches of bare gray concrete slab shows continuously.
Texas Credential to VerifyInsured Exterior Drainage & Siding Specialist coordinated with a TDA SPCS Certified Applicator; Texas 811 locate before perimeter scraping.
Municipal Permit & Inspection RuleNo permit needed for mulch/soil pullback; municipal building permit required if sistering rotted sill plates or structural porch posts.
3 Questions You Must Ask Before Hiring
“Will you lower flowerbed soil and hardwood mulch cleanly around the entire house to restore a continuous 4-to-6-inch visible concrete foundation slab reveal?”
“Where wood siding, fence pickets, or porch trim touch soil or concrete flatwork, will you trim/flash a minimum 2-to-6-inch clearance gap and seal cut end-grain?”
“Will you pipe AC condensate drains, water-heater T&P lines, and gutter downspouts at least 3 to 5 feet past the perimeter beam so slab soil stays dry?”
3 High-Pressure Red Flags & Scams
Landscapers dumping 6 inches of fresh dyed pine-bark mulch right over brick weep holes every spring—building a moist cellulose superhighway straight into wall framing.
Spraying surface bug killer over rotting wood siding touching dirt without cutting back the wood-to-ground contact.
Encapsulating a damp pier-and-beam crawlspace with spray foam directly over termite inspection zones—blinding future WDI inspectors and voiding termite bonds.
HOMEOWNER ACTION TAKEAWAYRISK LEVEL: MEDIUM
Keep your foundation perimeter clean, dry, and visible.
Recommended Action Steps
Never allow flowerbed mulch to cover brick weep holes.
Isolate all wooden fence posts from direct ground contact.
Direct gutter downspout water 5 feet away from foundation edges.
ICC DIGITAL CODES2021 / 2024 IRC
IRC R404.1.6 / R703.8.6—Foundation Clearances and Drainage of Masonry Cavities
STATUTORY MODEL CODE TEXT
Exterior masonry veneer weep holes shall be located immediately above the foundation slab brick ledge and spaced not more than 33 inches apart. Finished earth grade and organic mulch landscaping shall maintain a minimum clearance of not less than 4 inches below the brick ledge weep holes and 6 inches below exterior wood or fiber-cement wall siding.
Exception: Concrete pavement or patio slabs may abut the foundation provided they maintain a 2-inch clearance below siding and slope away from the structure at not less than 2 percent.
IN PLAIN ENGLISH
Never pile mulch or garden dirt over your foundation edge or brick weep holes; covering these openings gives termites a hidden tunnel directly into your walls without you ever seeing them.
HOMEOWNER PRO TIP:Pull mulch back at least 6 inches from the house perimeter and install stainless steel wire mesh weep hole covers to keep bugs out while letting trapped wall moisture escape.
8.4
Texas SPCS Disclosure & Form SPCS/T-4
Wood Destroying Insects8 min readEdition 3.0
TYPICAL TEXAS LIFESPANOfficial Real Estate Document: 30-Day Real Estate Option Validity
CHECK FREQUENCYEvery Real Estate Transaction • Re-Inspect Annually
RISK IF IGNOREDHIGH
Buying Infested Home with Voided Insurance Claim & Unfunded Repairs
1
2
3
WHAT YOU'RE LOOKING ATFIELD INSPECTION ANATOMY
1
Structural Inspection Diagram:Grid drawing mapping exact locations of mud tubes, frass, or conducive moisture.
2
Active Infestation Checkbox:Critical legal determination on Page 2 mandating immediate treatment before closing.
3
Certified SPCS Inspector Signature:Certified pest control technician license number providing warranty backing.
SPCS LIC. No. 089201 • TEXAS OFFICIAL WDI DISCLOSURECompleting the official Texas Structural Pest Control Service (SPCS/T-4) inspection report on site, documenting insect activity findings, previous treatments, and conducive conditions.
3D ARCHITECTURAL CUTAWAY • FIGURE 8.4
FIGURE 8.4: OFFICIAL TEXAS SPCS REPORT & WARRANTY COVERAGE VS. ACTIVE DEFECTS & INACCESSIBLE ZONES
DONE RIGHT (CODE-COMPLIANT)
Official Form SPCS/T-4 with clean Section 10 findings (no active termites)
Permanent yellow SPCS treatment sticker inside electric panel detailing chemical and date
Active, transferable 1-year termite warranty including structural repair coverage
Complete 360-degree perimeter access with zero obstructed inspection zones
Multiple inaccessible perimeter zones caused by heavy storage and low crawlspaces
Missing treatment sticker inside electric panel leaving chemical history unknown
Expired or non-transferable warranty leaving buyer exposed to structural repair costs
Comparative technical illustration of official Texas Form SPCS/T-4 WDI disclosure showing clear Section 10 findings and electrical panel treatment sticker versus common defects including active Section 10A findings, uninspected inaccessible zones, and missing treatment records.
TEXAS FIELD TRIAGE: 3-STAGE SEVERITY SCALEField Inspection Progression Rubric
STAGE 1NORMAL TEXAS AGING (COSMETIC)
Condition:Official Texas WDI Report (Form SPCS/T-4) shows "No active infestation and no conducive conditions."
Action:Store report with deed; enroll in annual inspection warranty.Annual Log
Action:Remediate all conducive conditions identified in Section 11 of the form within 30 days.30 Days
STAGE 3ACT IMMEDIATELY (URGENT)
Condition:Form SPCS/T-4 identifies "Active infestation of subterranean termites in structural framing" during purchase.
Action:Negotiate seller-paid termiticide treatment and structural repair escrow before option period ends.Immediate
How It Works in Your Home
In Texas real estate transactions, wood-destroying insect evaluations must be documented on an official state form by a licensed applicator.
Under Texas law administered by the Texas Department of Agriculture Structural Pest Control Service (SPCS), all commercial WDI inspections connected to real estate transactions must be recorded on the official Form SPCS/T-4.
The report documents four critical areas: active insect infestations (Section 10A), evidence of previous infestations or treatments (Section 10B), evidence of structural damage (Section 10C), and environmental conducive conditions (Section 10D). Lenders review this form to ensure their collateral is structurally sound.
Official Form SPCS/T-4:The prescribed Texas Wood Destroying Insect Report required by lenders during real estate purchases.
Section 10 Findings:The core disclosure section documenting active insects, past damage, treatment history, and conducive conditions.
Electric Panel Treatment Sticker:A permanent yellow statutory label affixed inside the main breaker panel recording chemical treatment dates.
What Can Go Wrong & What to Look For
Active termite findings or uninspected 'inaccessible' areas on Form SPCS/T-4 can halt mortgage funding or leave buyers with hidden repair bills.
If Section 10A is marked indicating active termites, mortgage underwriters (especially VA and FHA loans) will refuse to fund the loan until a licensed pest control business performs an approved treatment and issues a clean certification.
Another major pitfall is excessive 'Inaccessible Areas' listed in Section 7. If heavy garage clutter, low crawlspaces, or locked gates prevent the inspector from viewing the foundation perimeter, the buyer assumes all liability for any structural damage hidden behind those blind spots.
Early Warning Signs & Red Flags
Section 10A checked 'Active Infestation' on Form SPCS/T-4 without an accompanying treatment bid
Large portions of the crawlspace, attic, or garage perimeter listed as 'Inaccessible' in Section 7
Missing yellow pest treatment disclosure sticker on the main electrical service panel
Previous termite damage noted in Section 10B without documentation of structural framing repairs
Active WDI Infestation on ReportIMMEDIATE ACTION
Section 10A defect halting mortgage closing until professional treatment is completed.
Inaccessible Perimeter ZonesMONITOR
Heavy storage or locked gates preventing inspection, creating blind liability risks.
Expired or Missing Treatment WarrantyMONITOR
Lack of statutory treatment sticker or warranty transfer documentation.
Check inside the kitchen sink cabinet or electrical panel door for historical TDA SPCS treatment stickers, and look along porch/garage expansion joints for patched 1/2-inch rodding holes.
How Texas Weather & Soil Affect It
Because all of Texas is in a high-risk termite zone, lenders strictly enforce WDI inspection standards.
Federal lending guidelines require mandatory WDI clearances for VA guaranteed loans in Texas. Even conventional lenders routinely condition loan closing on a clean SPCS/T-4 report.
Texas law mandates that when a property is chemically treated for termites, the licensed pest control company must place a permanent treatment sticker inside the main electrical service panel door, detailing the chemical used, concentration, date, and license number.
Texas Climate & Soil Stresses
USDA Zone 1 Mandates: Triggers strict underwriting rules for government-backed mortgage financing.
Chemical Degradation: Intense summer ground heat causes soil termiticide barriers to break down after 5 to 7 years.
Texas Field Pro Tips
Always open the main electrical panel door and check for the yellow SPCS termite treatment sticker to verify past chemical treatments.
If purchasing a home with an existing termite baiting system, verify whether the service contract can be transferred into your name.
How to Maintain & Protect It
Maintaining continuous warranty coverage and keeping detailed records protects your home value and resale ease.
When buying a home, request a copy of the seller's existing termite warranty. Many quality pest control companies offer annual renewable warranties that can be transferred to a new buyer for a modest transfer fee.
Ensure your warranty includes structural damage repair coverage, not merely free chemical retreatment. If active termites ever breach your foundation, a comprehensive warranty covers the carpentry costs to replace damaged sill plates and studs.
Seasonal Walkthrough Checklist
Closing: Secure the official SPCS/T-4 report and verify transfer of any existing termite treatment warranty.
Annual: Renew your pest warranty agreement and schedule an annual perimeter inspection.
HOMEOWNER DECISION MATRIX
DIY Weekend Maintenance vs. Call a Qualified Pro
SAFE 15-MINUTE DIY CARE
Keep garage walls clear of dense storage so the perimeter slab remains easily inspected.
Check the electric panel sticker annually to note when chemical retreatments may be recommended.
WHEN TO CALL A QUALIFIED PRO
Licensed SPCS Certified Applicator to complete official real estate WDI disclosure reports.
Structural pest company to maintain warranty coverage and inspect bait stations.
CLINICAL DIFFERENTIAL FIELD TRIAGE & CONNECTED SYSTEMS§ 8.4 Diagnostic Rubric
Harmless Cosmetic Baseline
Posted TDA treatment stickers under the kitchen sink paired with patched 1/2-inch porch drill plugs show proactive historical termite barrier stewardship.
Active Failure Signal
Heavy garage storage or spray-foam insulation concealing perimeter sill plates, lapsed termite renewal bonds, or un-repaired wood rot masking active galleries.
60-Second Homeowner Check
Open your kitchen sink cabinet and breaker box door right now to photograph any TDA SPCS treatment stickers, noting the applicator company and treatment year.
Texas Credential to VerifyTDA SPCS Licensed Certified Applicator or Technician in the Termite category working under an insured SPCS Business — verify at tda.texas.gov.
Municipal Permit & Inspection RuleOfficial Texas WDI Inspection Report diagram + permanent TDA inspection/treatment sticker posted inside kitchen sink cabinet, breaker box, or water heater closet.
3 Questions You Must Ask Before Hiring
“Will your official Texas WDI Inspection Report include a scaled perimeter diagram mapping every active/previous pest sign, conducive condition, AND obstructed/inaccessible wall zone?”
“Did you check inside the sink cabinet, electrical panel, and attic hatch for historical TDA treatment stickers—and probe perimeter drill plugs along porches and bath traps?”
“If buying a newly constructed home, can the builder provide the pre-pour soil termiticide certificate or borate frame-treatment warranty documentation?”
3 High-Pressure Red Flags & Scams
Drive-by “15-minute $55 WDI letters” where the technician never opens the attic hatch, crawls the pier-and-beam space, or probes window sills.
Confusing “no visible evidence on accessible surfaces today” with a guarantee that concealed framing behind heavy garage shelving or spray foam is pest-free.
Letting an annual termite warranty lapse over a missed $175 renewal notice—forcing a $2,200 full re-treatment years later.
HOMEOWNER ACTION TAKEAWAYRISK LEVEL: CRITICAL
Form SPCS/T-4 protects your loan closing and confirms treatment history.
Recommended Action Steps
Confirm Section 10A shows no active infestation before final loan funding.
Inspect the main electrical panel door for the yellow treatment disclosure sticker.
Maintain active transferable warranty coverage with damage repair protection.
All inspections for wood destroying insects conducted in connection with a real estate transaction in Texas shall be recorded on the official Form SPCS/T-4 issued by the Texas Department of Agriculture Structural Pest Control Service. The report shall detail active infestations, previous treatments, evidence of prior damage, and specific environmental conducive conditions.
Exception: A standard property condition inspection does not substitute for a certified SPCS/T-4 report unless conducted by an inspector dually licensed as a Certified WDI Applicator.
IN PLAIN ENGLISH
Lenders (including VA, FHA, and conventional mortgage underwriters) require the official Texas SPCS/T-4 WDI disclosure report before funding, ensuring the property has no active termites or concealed structural damage.
HOMEOWNER PRO TIP:Review Section 10 of your SPCS/T-4 report to see whether the home has a transferrable warranty or active bait system contract from the previous owner.
Chapter 9 • IX
Environmental Hazards
Lead Paint, Asbestos, Radon Gas, Carbon Monoxide & Indoor Toxins
Chapter 9 covers legacy environmental health and indoor safety hazards encountered in Texas residential housing. It provides building science guidance on pre-1978 lead-based paint and drinking water plumbing, acoustic popcorn ceilings and asbestos-containing floor tiles, subterranean radon gas migration and active sub-slab depressurization mitigation, and fuel-fired combustion hazards including cracked heat exchangers and carbon monoxide alarm standards.
SCAN FOR LIVE DIGITAL TOOLS & UPDATES
Chapter 9 Digital Companion
Lead, Asbestos, Radon & CO Safety
Instant mobile access to pre-1978 lead paint safety rules, popcorn ceiling asbestos lab testing, radon mitigation, and carbon monoxide defense.
3D environmental health map identifying legacy pre-1980 building materials (lead-based trim paint, chrysotile popcorn texture, 9×9 vinyl tile), sub-slab radon/soil-gas depressurization, potable water testing, and combustion CO zones.
TYPICAL TEXAS LIFESPANPre-1978 Lead Coatings: Permanent Hazard if Disturbed / Safe if Encapsulated
CHECK FREQUENCYPrior to Any Renovation/Drilling in Pre-1978 Homes • Annual Dust Check
RISK IF IGNOREDCRITICAL
Permanent Childhood Neurological Damage & Federal EPA Citations
1
2
3
WHAT YOU'RE LOOKING ATFIELD INSPECTION ANATOMY
1
Handheld XRF Analyzer Shutter:High-precision radiation detector measuring lead concentration in paint without scraping.
2
Window Friction Abrasion Trough:High-wear surface where sliding sashes grind paint into toxic inhalable micro-dust.
3
Lab-Certified Ghost Wipe Template:Standard 1-square-foot disposable template used for legal clearance wipe sampling.
EPA PROTOCOL • XRF LEAD PAINT TESTINGSafe EPA sampling protocols for vintage pre-1978 Texas properties: XRF lead paint spectrum testing on high-friction window jambs and lead solder plumbing evaluations.
3D ARCHITECTURAL CUTAWAY • FIGURE 9.1
FIGURE 9.1: LEAD-FREE PLUMBING & ENCAPSULATED COATINGS VS. CHIPPING LEAD FRICTION SURFACES & 50/50 LEAD SOLDER
DONE RIGHT (CODE-COMPLIANT)
Modern lead-free PEX and Type L copper plumbing joined with lead-free alloy solder (<0.2% lead)
Modern vinyl replacement windows eliminating painted friction surfaces and lead dust wear
Encapsulated intact vintage trim coated with certified elastomeric lead-barrier paint
Point-of-use NSF 53 or NSF 58 certified lead-reducing drinking water filtration
COMMON DEFECT (NEEDS REPAIR)
Double-hung wood window sashes grinding lead paint into toxic microscopic dust on sills
Alligatoring, flaking pre-1978 exterior lead paint shedding toxic chips into soil
50/50 lead-tin soldered copper plumbing joints leaching lead into domestic water
Malleable lead water service lateral pipe connecting municipal main to house
Comparative technical illustration of code-compliant modern lead-free plumbing and encapsulated window trim versus common pre-1978 lead defects including sliding wood window friction dust, alligatoring lead paint, and 50/50 lead-soldered copper pipes.
TEXAS FIELD TRIAGE: 3-STAGE SEVERITY SCALEField Inspection Progression Rubric
STAGE 1NORMAL TEXAS AGING (COSMETIC)
Condition:Pre-1978 home with intact, fully encapsulated paint on all trim with zero flaking or chipping.
Action:Maintain painted surfaces sealed; clean sills with wet wipes.Annual Log
STAGE 2WATCH & MAINTAIN (30–90 DAYS)
Condition:Peeling or cracking paint on friction surfaces (window sashes, door jambs); lead-soldered pipes.
Action:Test paint with EPA-recognized lead kit; install NSF-53 certified lead water filter within 30 days.30 Days
STAGE 3ACT IMMEDIATELY (URGENT)
Condition:Flaking lead paint accessible to toddler teeth; uncontained lead paint sanding; tap water lead >15 ppb.
Action:Isolate room immediately; hire certified EPA RRP contractor; switch to bottled water.Immediate
How It Works in Your Home
Before 1978, lead was a standard additive in residential paints and drinking water plumbing across the United States.
Prior to the federal consumer ban in 1978, lead was commonly blended into architectural paints to increase durability, resist moisture, and speed drying times. Homes built before 1940 almost certainly contain high concentrations of lead paint, while homes built through 1977 carry significant probability.
When lead paint is intact and encapsulated beneath coats of modern latex paint, it poses minimal immediate risk. Danger arises when paint deteriorates or when painted surfaces rub together, generating microscopic, invisible lead dust that settles on floors and window sills.
Friction Surfaces:Sliding window sashes, door jambs, and stair treads where daily movement grinds paint into fine toxic dust.
XRF Spectrum Analysis:Non-destructive X-ray fluorescence testing that measures lead content through all paint layers down to the substrate.
50/50 Lead-Tin Plumbing Solder:Historical pipe solder used until 1986 that can leach lead into stagnant drinking water.
What Can Go Wrong & What to Look For
Invisible lead dust is the primary pathway for childhood lead poisoning in older homes.
The primary hazard from lead paint is not large peeling paint chips, but microscopic dust. Sliding vintage double-hung window sashes abrade painted jambs with every opening and closing, showering window sills with fine lead dust that crawling children easily ingest.
In pre-1986 plumbing, interior copper pipes were routinely joined using 50/50 lead-tin solder. If drinking water sits overnight in these pipes, lead dissolves into the water column. In older urban areas, the exterior service lateral pipe connecting the city main to the water meter may even be composed of pure malleable lead.
Early Warning Signs & Red Flags
Peeling, flaking, or 'alligator-pattern' cracked paint on exterior siding or interior window trim
Fine paint powder collecting on window sills beneath sliding wood sash tracks
Homes constructed prior to 1978 with original un-replaced wood windows or doors
Vintage copper plumbing joined with dull gray, rounded solder beads installed before 1986
Friction Surface Lead DustIMMEDIATE ACTION
Sliding wood window sashes pulverizing lead paint into microscopic airborne dust.
Alligatoring Lead PaintIMMEDIATE ACTION
Brittle, flaking pre-1978 paint shedding toxic chips into soil or living areas.
Lead-Soldered Copper PlumbingMONITOR
Historical copper plumbing joints leaching lead into domestic drinking water.
In pre-1978 homes, opening and closing painted wood windows grinds lead-based paint into invisible sweet-tasting dust—making wet-cleaning and accredited lab dust-wipe verification vital for young children.
How Texas Weather & Soil Affect It
Intense Texas sun accelerates paint breakdown, shedding lead residues directly into yard soil.
In historic Texas neighborhoods (such as Houston's Heights, San Antonio's King William, and central Dallas/Austin), exterior trim experiences intense UV thermal baking. This accelerates paint embrittlement and chalking, allowing exterior lead paint to wash into drip-line flowerbed soils where children and pets play.
Municipal water chemistry in Texas is generally treated with corrosion inhibitors to coat interior pipe walls, but private well systems or older urban infrastructure can experience lead leaching if water is acidic.
Texas Climate & Soil Stresses
Intense UV Thermal Shock: Causes brittle cracking and chalking of vintage exterior oil paints.
Perimeter Soil Contamination: Decades of paint scraping deposit lead residues along foundation drip lines.
Texas Field Pro Tips
Always use certified point-of-use drinking water filters rated for NSF Standard 53 (lead reduction) or NSF 58 (reverse osmosis) in pre-1986 homes.
When remodeling a pre-1978 Texas home, verify that your contractor holds an active EPA Lead-Safe Certification.
How to Maintain & Protect It
Encapsulation, wet cleaning, and safe remodeling practices keep vintage homes healthy.
Never dry-scrape, power-sand, or use an open-flame heat gun on pre-1978 painted surfaces. Always mist surfaces with water before scraping, use HEPA-filtered vacuum attachments, and seal work areas with heavy plastic sheeting.
Clean window sills and uncarpeted floors weekly using wet disposable cleaning cloths or wet mops with specialized lead-specific detergents to capture fine settled dust.
Seasonal Walkthrough Checklist
Quarterly: Wet-wipe interior window sills and tracks to remove friction dust.
Annual: Inspect vintage painted trim for chipping or flaking; repaint promptly with elastomeric coating.
HOMEOWNER DECISION MATRIX
DIY Weekend Maintenance vs. Call a Qualified Pro
SAFE 15-MINUTE DIY CARE
Use wet-wiping techniques rather than dry sweeping or standard household vacuums on painted trim.
Run cold tap water for 1 to 2 minutes before drinking or cooking in pre-1986 homes.
WHEN TO CALL A QUALIFIED PRO
Certified Lead Risk Assessor to conduct an on-site XRF paint inspection and dust wipe laboratory testing.
EPA Lead-Safe Certified contractor for all painting, window replacement, and remodeling in pre-1978 homes.
CLINICAL DIFFERENTIAL FIELD TRIAGE & CONNECTED SYSTEMS§ 9.1 Diagnostic Rubric
Harmless Cosmetic Baseline
Smooth, intact, unchipped gloss paint in a pre-1978 home—left undisturbed and wiped clean with damp microfiber cloths—poses minimal day-to-day exposure risk.
Active Failure Signal
Alligatoring or peeling paint on pre-1978 window troughs, porch railings, and baseboards—or uncontained dry sanding during remodeling—creates toxic lead dust.
60-Second Homeowner Check
Check your home’s build year: if pre-1978, inspect painted window sills for chalky friction dust and flush cold kitchen taps 30 seconds after overnight stagnation.
Municipal Permit & Inspection RuleFederal EPA RRP Lead-Safe containment mandatory when disturbing >6 sq ft interior or >20 sq ft exterior paint in pre-1978 homes; DSHS filing for abatement.
3 Questions You Must Ask Before Hiring
“Can I see your active EPA Lead-Safe RRP Firm and Certified Renovator certificates—and will you give me the EPA ‘Renovate Right’ pamphlet before starting work?”
“Will you seal off HVAC supply/return vents with 6-mil poly, use wet-scraping or HEPA-shrouded tools, and NEVER use open-flame torches or unshrouded heat guns above 1,100°F?”
“Where young children or pregnant family members live in a pre-1978 home, will an independent DSHS Lead Risk Assessor run accredited lab dust-wipe clearance (<10 ug/ft2 floors) afterward?”
3 High-Pressure Red Flags & Scams
Painters dry-sanding 1950s exterior clapboard or interior window troughs onto bare soil and hardwood floors, then sweeping toxic lead dust with a household broom.
Relying solely on expired hardware-store color-change swabs across multi-layer historic plaster instead of calibrated XRF spectrum analyzers.
Replacing pre-1986 lead-soldered copper faucets without flushing lines or testing first-draw morning tap water (<15 ppb EPA action level; zero ideal) at a NELAP lab.
HOMEOWNER ACTION TAKEAWAYRISK LEVEL: CRITICAL
Encapsulate vintage paint and filter drinking water in older homes.
Recommended Action Steps
Verify lead status using an XRF analyzer before major remodeling.
Use wet-wiping methods for cleaning to prevent airborne lead dust.
Install certified lead-reducing filters on kitchen drinking water taps.
ICC DIGITAL CODESEPA Standards
40 CFR Part 745 / EPA RRP Rule—Lead-Based Paint Renovation, Repair, and Painting (RRP) Protocol
STATUTORY MODEL CODE TEXT
Work performed for compensation in housing constructed prior to 1978 that disturbs more than 6 square feet of interior painted surfaces or 20 square feet of exterior surfaces must be performed by EPA-certified Lead-Safe firms utilizing containment, HEPA dust collection, and certified cleaning verification protocols.
Exception: Housing certified as lead-free by an accredited state-licensed lead inspector using X-ray fluorescence (XRF) testing is exempt from RRP requirements.
IN PLAIN ENGLISH
Homes built before 1978 likely contain lead-based paint; any renovation that sands or scrapes paint must follow strict dust containment rules to protect children and pets from toxic lead dust.
HOMEOWNER PRO TIP:Never dry-sand or heat-gun peeling vintage paint; use wet-wiping sponges and HEPA vacuum cleaners, and test vintage brass plumbing fixtures for lead solder leaching.
9.2
Asbestos Materials & Popcorn Ceilings
Environmental Hazards8 min readEdition 3.0
TYPICAL TEXAS LIFESPANAsbestos Materials: Indefinite if Undisturbed • Immediate Abatement if Damaged
CHECK FREQUENCYPrior to Any Sheetrock Demolition or Popcorn Scraping
RISK IF IGNOREDCRITICAL
Incurable Mesothelioma & Fatal Asbestosis from Inhaled Fibers
1
2
3
WHAT YOU'RE LOOKING ATFIELD INSPECTION ANATOMY
1
Textured Popcorn Ceiling Layer:Friable acoustic ceiling spray often containing 1% to 15% chrysotile asbestos fibers.
2
Wet-Method Core Sampling Tool:Brass coring sleeve used with surfactant to extract samples without releasing fibers.
3
Sealed NVLAP Laboratory Sample Bag:Double-bagged specimen sent for Polarized Light Microscopy (PLM) analysis.
MATERIAL TESTING • ASBESTOS SAMPLING PROTOCOLMicro-sampling protocol of textured acoustic popcorn ceiling material in a 1974 residence, utilizing wetting surfactant and sealed airtight sample bags for laboratory PLM analysis.
3D ARCHITECTURAL CUTAWAY • FIGURE 9.2
FIGURE 9.2: ENCAPSULATED CEILINGS & MODERN VENTING VS. DAMAGED FRIABLE ASBESTOS & BROKEN TILES
DONE RIGHT (CODE-COMPLIANT)
Popcorn ceiling encapsulated by 1/4-inch drywall overlay or durable elastomeric paint
Double-wall metal B-vent chimney pipe replacing brittle transite flue in attic
Water-damaged ceiling drywall sagging and shedding friable acoustic texture into living areas
Comparative technical illustration of code-compliant asbestos encapsulation (sheetrock overlay, modern metal B-vent flue, floating LVP floor) versus common defects including flaking popcorn ceiling releasing fibers, cracked transite flue, and crumbling 9×9 floor tiles.
TEXAS FIELD TRIAGE: 3-STAGE SEVERITY SCALEField Inspection Progression Rubric
STAGE 1NORMAL TEXAS AGING (COSMETIC)
Condition:Acoustic popcorn ceiling texture prior to 1980 intact, unpainted/well-sealed, with zero cracking.
Action:Leave undisturbed; never scrape, sand, drill, or nail into it.Annual Log
STAGE 2WATCH & MAINTAIN (30–90 DAYS)
Condition:Isolated hairline crack or small gouge in popcorn ceiling drywall tape joint; intact 9×9 vinyl tile.
Action:Mist gouge with water and patch with joint compound; seal tile under luxury vinyl plank within 60 days.60 Days
STAGE 3ACT IMMEDIATELY (URGENT)
Condition:Water-damaged, disintegrating popcorn ceiling collapsing into living area; fibrous pipe insulation torn.
Action:Evacuate room; seal HVAC registers; hire licensed asbestos abatement contractor under TDLR.Immediate
How It Works in Your Home
Asbestos is a naturally occurring mineral fiber that was celebrated for its fireproofing and acoustic dampening properties before health risks were fully recognized.
From the 1940s through 1980, asbestos was incorporated into dozens of residential construction products: spray-applied acoustic popcorn ceilings, 9×9-inch vinyl floor tiles, dark asphaltic cutback adhesives, exterior cement siding shingles, and rigid 'transite' chimney flues.
The key distinction in home safety is between friable and non-friable materials. Non-friable asbestos (such as intact vinyl floor tiles or solid cement siding) binds the fibers tightly within a matrix and releases no fibers under normal living conditions. Friable materials (such as soft, unpainted popcorn ceiling texture) can be easily crumbled or flaked by hand, presenting severe inhalation risks if disturbed.
Acoustic Popcorn Ceiling:Spray-applied textured ceiling finish frequently containing 1% to 10% chrysotile asbestos fibers in homes built before 1981.
9×9-Inch Vinyl Floor Tiles:Resilient vintage floor tiles and underlying black cutback mastic commonly containing bound chrysotile fibers.
Transite Vent Flue:Rigid cement-asbestos pipe historically used to vent gas water heaters and furnaces through attic spaces.
What Can Go Wrong & What to Look For
Uncontrolled dry scraping or power sanding of textured ceilings can contaminate an entire home with microscopic asbestos needles.
When asbestos-containing popcorn texture is dry-scraped without water misting and HEPA containment, billions of microscopic silicate fibers enter the air. These microscopic needles remain suspended in household air for days, circulating through the HVAC system and settling onto furniture and bedding.
When inhaled, microscopic asbestos fibers lodge permanently in deep lung tissue. Over 15 to 40 years of latency, this chronic irritation can cause asbestosis, lung cancer, and mesothelioma. Intact, un-scraped ceilings that are sealed with paint do not release fibers.
Early Warning Signs & Red Flags
Acoustic textured popcorn ceilings in homes built prior to 1982 that are flaking, water-stained, or shedding powder
Square 9×9-inch floor tiles (or 12×12 tiles installed with dark asphalt-black adhesive)
Gray, fibrous cement vent pipes in the attic connected to water heater or furnace flues
White, paper-like fibrous insulation wrapped around vintage ductwork plenums
Damaged Friable Popcorn CeilingIMMEDIATE ACTION
Flaking acoustic ceiling material shedding microscopic asbestos fibers into living areas.
Cracked Transite Flue PipeIMMEDIATE ACTION
Brittle cement-asbestos chimney pipe in attic cracked and leaking exhaust gases.
Broken 9×9 Floor TilesMONITOR
Cracked vinyl composition tiles exposing deteriorating black cutback mastic adhesive.
PRE-RENOVATION LAB RULE • § 9.2
Sample Before You Scrape: Protecting Indoor Air During Remodels
Intact popcorn ceilings, 9×9 vinyl floor tiles, black mastic, and white cloth duct tape pose minimal risk left undisturbed—only dry sanding, scraping, or demolition releases microscopic fibers.
How Texas Weather & Soil Affect It
Attic roof leaks and high summer humidity can destabilize textured ceiling adhesives in Texas homes.
Severe spring thunderstorms and roof windstorm damage frequently result in localized ceiling moisture intrusion. When rainwater saturates acoustic popcorn texture, the water dissolves water-soluble binders, causing the texture to sag, crumble, and release fibers into room air.
In vintage homes, unconditioned attic heat exceeding 140°F causes cement-asbestos transite chimney pipes to become brittle. Subsequent roof repairs or HVAC replacements can easily crack the fragile pipe, spilling combustion gases into the attic.
High Attic Thermal Stress: Accelerates embrittlement of vintage transite chimney pipes.
Texas Field Pro Tips
If you desire a smooth modern ceiling, consider installing 1/4-inch drywall directly over the popcorn ceiling; encapsulation is safer, cleaner, and more affordable than scraping.
Never disturb or sand vintage 9×9 floor tiles; install modern floating luxury vinyl plank (LVP) directly over them.
How to Maintain & Protect It
Leave intact asbestos materials undisturbed and rely on encapsulation whenever possible.
If your home contains textured ceilings from the 1970s that are intact and in sound condition, the safest approach is to leave them alone or apply a fresh coat of latex paint to seal the surface. Paint encapsulates the fibers securely.
If you plan a renovation that involves cutting, drilling, or removing textured ceilings, collect a small sample (wetted with soapy water) inside a sealed bag and submit it to an accredited laboratory for Polarized Light Microscopy (PLM) analysis before touching the surface.
Seasonal Walkthrough Checklist
Annual: Inspect ceilings beneath bathrooms and attics for water staining or flaking texture.
Pre-Remodel: Test suspect acoustic ceilings and vintage floor tiles before any demolition begins.
HOMEOWNER DECISION MATRIX
DIY Weekend Maintenance vs. Call a Qualified Pro
SAFE 15-MINUTE DIY CARE
Apply heavy latex paint over intact popcorn ceilings to encapsulate fibers securely.
Cover vintage 9×9 floor tiles with new floating flooring rather than tearing them out.
Dry-scraping damp peeling popcorn texture, pulverizing brittle white cloth-wrapped attic duct tape, or jackhammering old black floor mastic releases airborne fibers.
60-Second Homeowner Check
Before demoing ANY pre-1985 ceiling texture, sheet vinyl, or siding, pause and order a $150 accredited PLM bulk lab test—never rely on visual guessing.
Municipal Permit & Inspection RuleEPA Lead RRP containment rules mandatory in pre-1978 homes; DSHS protocols for friable asbestos.
3 Questions You Must Ask Before Hiring
“Are your crews EPA Lead-Safe RRP certified, and will you use plastic zip-wall containment and HEPA-shrouded sanders rather than dry-scraping pre-1978 trim?”
“Before demolishing pre-1982 popcorn ceilings, vinyl 9×9 floor tiles, or white duct tape, did an accredited Polarized Light Microscopy (PLM) lab confirm 0% chrysotile asbestos?”
“Will you provide official hazardous-waste disposal manifests and independent air-clearance results before my family re-occupies the work zone?”
3 High-Pressure Red Flags & Scams
Remodeling crews dry-scraping popcorn ceilings or sanding 1960s window sashes with shop-vacs—contaminating your entire HVAC return duct system with lead or asbestos dust.
Demanding expensive tear-out of intact, undisturbed non-friable asbestos siding or floor tile that can be safely and legally encapsulated in place.
Using cheap DIY hardware-store swab kits on plaster instead of accredited XRF or laboratory testing.
HOMEOWNER ACTION TAKEAWAYRISK LEVEL: CRITICAL
Encapsulation is safer and more affordable than dry scraping.
Recommended Action Steps
Test vintage popcorn texture with a wetted sample before remodeling.
Choose drywall overlay encapsulation for a smooth modern look.
Never dry-scrape or power-sand suspect textured ceilings.
ICC DIGITAL CODESTexas Standards
25 TAC §295.31 / EPA NESHAP 40 CFR 61—Identification and Handling of Asbestos-Containing Materials
STATUTORY MODEL CODE TEXT
Building materials containing greater than 1.0 percent asbestos by polarized light microscopy (PLM) are classified as asbestos-containing materials. Disturbance of friable asbestos acoustic texture, insulation, or 9×9-inch floor tiles during remodeling requires licensed abatement contractors and regulated disposal.
Exception: Intact, non-friable materials in sound condition (such as painted popcorn ceilings with no water damage or shedding) present minimal airborne exposure risk and may be encapsulated in place.
IN PLAIN ENGLISH
Acoustic popcorn ceilings and vinyl tiles installed before the early 1980s often contain asbestos; as long as the ceiling is undisturbed and painted, it is safe, but scraping it dry releases microscopic fibers into your air.
HOMEOWNER PRO TIP:Before scraping popcorn ceilings or tearing up vintage vinyl floor tiles, send a small wetted sample to a certified lab to confirm whether asbestos is present.
Active Sub-Slab Venting Pipe:3-to-4-inch PVC riser penetrating foundation pulling radioactive radon out of soil.
3
U-Tube Manometer Liquid Gauge:Visual differential pressure gauge confirming active inline exhaust fan is running.
EPA ACTION LEVEL • CONTINUOUS RADON MONITOR (CRM)Continuous electronic radon gas monitor installed in the lowest living level of a Texas home for a 48-hour EPA closed-building test, measuring pCi/L exposure levels.
3D ARCHITECTURAL CUTAWAY • FIGURE 9.3
FIGURE 9.3: ACTIVE SUB-SLAB DEPRESSURIZATION (ASD) VS. SUB-SLAB RADON INFILTRATION
DONE RIGHT (CODE-COMPLIANT)
Continuous active inline radon exhaust fan venting soil gases safely above the roof ridge
Indoor radon concentrations tested and verified below the 2.0 pCi/L target threshold
COMMON DEFECT (NEEDS REPAIR)
Radon gas entering home through unsealed plumbing knockouts under bathtubs and showers
Slab settlement cracks allowing pressurized soil gases to bypass foundation barriers
Indoor radon concentrations testing at or above 8.4 pCi/L (double the EPA action limit)
Missing or inoperable mitigation system leaving family exposed to chronic alpha radiation
Comparative technical illustration of code-compliant active sub-slab depressurization (ASD) system with continuous roofline exhaust and U-tube manometer versus common defects including slab crack migration, unsealed bathtub knockouts, and elevated 8.4 pCi/L indoor levels.
TEXAS FIELD TRIAGE: 3-STAGE SEVERITY SCALEField Inspection Progression Rubric
STAGE 1NORMAL TEXAS AGING (COSMETIC)
Condition:Radon test reading below EPA action guideline of 2.0 pCi/L (outdoor ambient is ~0.4 pCi/L).
Action:Retest every 2 to 3 years or after foundation underpinning.Annual Log
STAGE 2WATCH & MAINTAIN (30–90 DAYS)
Condition:Initial short-term charcoal canister test reading between 2.1 pCi/L and 3.9 pCi/L in living space.
Action:Deploy a 90-day long-term alpha-track radon test kit or continuous electronic monitor.90 Days
STAGE 3ACT IMMEDIATELY (URGENT)
Condition:Confirmed radon test levels at or exceeding EPA action level of 4.0 pCi/L in living area.
Action:Hire NRPP-certified radon mitigation specialist to install active sub-slab depressurization fan within 30 days.30 Days
How It Works in Your Home
Radon gas enters homes from underlying soil through foundation cracks, plumbing penetrations, and expansion joints.
Radon (Rn-222) is an invisible, odorless, naturally occurring radioactive gas formed by the radioactive decay of trace radium and uranium in bedrock and soils. As the gas seeps upward through the ground, it enters homes through gaps around plumbing pipes, concrete slab cracks, sump pits, and construction joints.
Homes act like natural vacuums due to the 'stack effect': warm air rises and escapes through attic vents, drawing air and subterranean soil gases upward through the foundation slab. If radon gas concentrates indoors, radioactive decay products (alpha particles) are inhaled into the lungs, where they damage DNA and increase lung cancer risk.
Continuous Radon Monitor (CRM):A calibrated electronic sensor that measures hourly radon concentrations in picocuries per liter (pCi/L) over 48 hours.
EPA 4.0 pCi/L Action Level:The federal threshold at which the EPA recommends installing an active radon reduction mitigation system.
Active Sub-Slab Depressurization (ASD):A system using a continuous inline fan and PVC pipe to vacuum radon gas from beneath the slab and vent it above the roof.
What Can Go Wrong & What to Look For
Because radon is completely odorless and invisible, elevated levels can persist for years without detection.
The only way to determine whether a home has dangerous radon levels is through testing. Short-term testing involves deploying a continuous electronic radon monitor or activated charcoal test canister in the lowest living area for 48 hours under closed-building conditions.
If a home tests at or above 4.0 pCi/L, an active mitigation system should be installed. A common defect in existing mitigation systems is fan failure: if the inline exhaust fan burns out or the pressure switch fails, radon gas resumes entering living spaces unnoticed.
Early Warning Signs & Red Flags
Homes located in the Central Texas Llano Uplift granite belt, Texas Panhandle, or mountainous West Texas
Large plumbing block-out knockouts beneath bathtubs that were left unsealed down to bare earth
An active mitigation system where the liquid levels on the U-tube manometer are completely level (indicating zero fan suction)
Mitigation exhaust pipes that discharge near bedroom windows or beneath roof overhangs
Radon Levels ≥ 4.0 pCi/LIMMEDIATE ACTION
Indoor radioactive gas concentrations exceeding the federal EPA action threshold.
Inoperative Mitigation FanIMMEDIATE ACTION
Burned-out inline exhaust fan with level U-tube manometer liquid indicating loss of sub-slab suction.
Unsealed Slab PenetrationsMONITOR
Open foundation penetrations under bathtubs allowing soil gases to enter freely.
Alongside continuous 48-hour indoor radon monitoring in Llano Uplift, Panhandle, and tight energy-efficient homes, rural groundwater wells should be screened for naturally occurring arsenic and nitrates.
How Texas Weather & Soil Affect It
While most of coastal Texas has low radon risk, specific Texas geological regions feature significant uranium deposits.
The EPA divides Texas into three radon potential zones: Zone 1 (highest potential, primarily the Texas Panhandle including Amarillo); Zone 2 (moderate potential, including parts of West Texas and the Red River corridor); and Zone 3 (low potential, including Houston, Dallas-Fort Worth, and the Gulf Coast).
However, localized granite formations in Central Texas (the Llano Uplift covering Burnet, Llano, Blanco, and Gillespie counties) frequently produce elevated radon readings exceeding 6.0 to 12.0 pCi/L. High summer HVAC usage can intensify negative indoor pressure, drawing more gas into living spaces.
Texas Climate & Soil Stresses
Central Texas Granite Geology: Granitic rocks naturally contain elevated uranium that releases radon gas.
Summer HVAC Negative Pressure: Powerful central air handlers draw subterranean air upward through slab joints.
Texas Field Pro Tips
Include an optional 48-hour continuous radon test during your inspection option period when buying in Central or Panhandle Texas.
Check that bathtub plumbing block-outs in the concrete slab are sealed with expanding polyurethane foam.
How to Maintain & Protect It
Radon mitigation systems are simple, quiet, and highly reliable when monitored periodically.
If your home has an active radon mitigation system, check the U-tube manometer mounted on the PVC suction pipe once a month. The colored liquid should show an uneven reading (one side higher than the other), confirming the fan is pulling a continuous vacuum under the slab.
Retest your home's radon levels every two years using an EPA-approved test kit to verify that shifting soils or foundation movement have not altered sub-slab depressurization performance.
Seasonal Walkthrough Checklist
Monthly: Check the U-tube manometer liquid levels on the radon suction pipe.
Biennial: Deploy a short-term radon test kit to verify levels remain below 2.0 pCi/L.
HOMEOWNER DECISION MATRIX
DIY Weekend Maintenance vs. Call a Qualified Pro
SAFE 15-MINUTE DIY CARE
Seal foundation expansion joints and visible slab shrinkage cracks with polyurethane caulk.
Check the manometer fluid levels monthly.
WHEN TO CALL A QUALIFIED PRO
Certified radon measurement professional to conduct 48-hour continuous monitor testing.
Licensed NRPP/NRSB radon mitigation contractor to design and install active depressurization systems.
CLINICAL DIFFERENTIAL FIELD TRIAGE & CONNECTED SYSTEMS§ 9.3 Diagnostic Rubric
Harmless Cosmetic Baseline
Long-term indoor radon averages below 2.0 pCi/L (and strictly under the 4.0 pCi/L EPA action threshold) alongside clean annual well lab reports confirm safe air/water.
Active Failure Signal
48-hour continuous radon monitor averages >=4.0 pCi/L, dead U-tube manometers on existing mitigation pipes, or elevated arsenic/nitrates in private well water.
60-Second Homeowner Check
Place a calibrated digital continuous radon monitor 3 feet off the ground floor away from drafts—especially in Hill Country granite, Panhandle, or tight foam homes.
BEFORE YOU SIGN A BID • TEXAS CONTRACTOR VETTING & SCAM DEFENSE
Radon Soil-Gas Testing, Sub-Slab Mitigation & Well Contaminant Labs
§ 9.3 Playbook
Texas Credential to VerifyNRPP or NRSB Certified Radon Measurement / Mitigation Specialist; TCEQ NELAP-Accredited Environmental Drinking Water Laboratory.
Municipal Permit & Inspection RuleClosed-building protocol mandatory 12 hours prior to and during 48-hour radon tests; municipal electrical/building permit for sub-slab fan vent stacks.
3 Questions You Must Ask Before Hiring
“Is your continuous electronic radon monitor NRPP/NRSB device-listed with a current annual calibration certificate and tamper/barometric motion sensors?”
“If indoor levels average >=4.0 pCi/L, will the Active Sub-Slab Depressurization (ASD) fan mount in the attic or exterior—NEVER inside conditioned space where a pipe crack leaks radon indoors?”
“For our rural Texas well (Llano Uplift, Ogallala, Gulf Coast, or Trinity aquifer), does the NELAP lab panel test arsenic, nitrates, lead, uranium, and gross alpha radiation?”
3 High-Pressure Red Flags & Scams
Dismissing radon testing entirely with the myth “Texas has zero radon”—ignoring documented >=4.0 pCi/L pockets in the Panhandle, Hill Country granite, West Texas, and tight spray-foam slabs.
Mounting a radon suction fan inside a garage living wall or basement utility closet where positive-pressure exhaust joints can pump concentrated soil gas indoors.
Selling a $6,000 carbon water filter for well arsenic or nitrates without lab speciation proving the media actually removes trivalent/pentavalent arsenic.
HOMEOWNER ACTION TAKEAWAYRISK LEVEL: CRITICAL
Test for radon during purchase and maintain sub-slab depressurization.
Recommended Action Steps
Test for radon in Zone 1, Zone 2, and Central Texas granite regions.
Install active sub-slab depressurization if levels reach 4.0 pCi/L.
Check the U-tube manometer monthly to verify fan suction.
ICC DIGITAL CODES2021 / 2024 IRC
IRC Appendix AF / EPA Action Level 402-R-92-003—Radon Reduction Systems and 4.0 pCi/L Action Threshold
STATUTORY MODEL CODE TEXT
Buildings constructed in Zone 1 and designated radon-prone jurisdictions shall incorporate passive sub-slab depressurization systems including a 3-inch or 4-inch gas-tight vent pipe routed from sub-slab aggregate through the roof ridge. Testing resulting in concentrations of 4.0 picocuries per liter (pCi/L) or greater requires installation of an inline continuous radon exhaust fan.
Exception: Testing conducted in accordance with EPA closed-building protocols showing verified levels below 2.0 pCi/L requires no immediate mitigation, with retesting recommended every two years.
IN PLAIN ENGLISH
Radon is an invisible, odorless radioactive gas released from natural underground granite and soil; if your test reads 4.0 pCi/L or higher, a sub-slab exhaust fan should be installed to vent the gas safely above your roof.
HOMEOWNER PRO TIP:Radon is most common in the Texas Panhandle and Central Texas Hill Country; order a 48-hour continuous radon test during your home inspection option period.
CHECK FREQUENCYMonthly Alarm Button Test • Semi-Annual Battery Change
RISK IF IGNOREDCRITICAL
Silent Asphyxiation Death During Sleep from Gas Appliance Flue
1
2
3
WHAT YOU'RE LOOKING ATFIELD INSPECTION ANATOMY
1
Electronic Flue Gas Probe:High-temperature wand sampling combustion exhaust to ensure CO is under 400 PPM air-free.
2
Digital Electrochemical CO Sensor:Living room detector with digital readout alerting occupants at dangerous 35+ PPM levels.
3
Appliance Draft Hood Air Gap:Diverter opening verifying chimney draft pulls all toxic flue gases up and out.
LIFE SAFETY • COMBUSTION CO ANALYZERFlue-gas probe wand measuring parts-per-million (PPM) of carbon monoxide and draft pressure inside a gas appliance exhaust vent to verify safe combustion.
3D ARCHITECTURAL CUTAWAY • FIGURE 9.4
FIGURE 9.4: INTERCONNECTED UL 2034 CO ALARMS & INTACT FLUES VS. CRACKED HEAT EXCHANGERS & GARAGE GAS MIGRATION
DONE RIGHT (CODE-COMPLIANT)
Interconnected UL 2034 carbon monoxide alarms installed outside every bedroom and on each floor
Intact gas furnace heat exchanger cells with 100% isolation from supply air ductwork
Atmospheric water heater flue backdrafting exhaust fumes directly into utility closet
Missing or inoperable carbon monoxide alarms near bedrooms with dead batteries
Vehicle idling inside attached garage allowing exhaust fumes to seep through unsealed walls
Comparative technical illustration of code-compliant interconnected UL 2034 carbon monoxide alarm placement and intact furnace venting versus dangerous defects including cracked heat exchangers blowing CO into ducts and garage exhaust migration.
TEXAS FIELD TRIAGE: 3-STAGE SEVERITY SCALEField Inspection Progression Rubric
Action:Evacuate all occupants and pets to fresh air immediately; call 911 from outside; do not re-enter.Immediate
How It Works in Your Home
Carbon monoxide is an invisible, odorless byproduct of incomplete fuel combustion that requires dedicated electronic detection.
Carbon monoxide is formed when fossil fuels (natural gas, propane, gasoline, wood) burn without sufficient oxygen. When inhaled, it bonds with blood hemoglobin roughly 200 times more tightly than oxygen, rapidly depriving the brain and vital organs of oxygen.
Because humans cannot see, smell, or taste carbon monoxide, electronic detection is mandatory. Modern UL 2034 listed alarms use electrochemical sensors to track carbon monoxide concentrations and sound high-decibel horns before toxic thresholds are reached.
UL 2034 Carbon Monoxide Alarm:Interconnected electrochemical sensor alarms installed outside sleeping areas and on every floor.
Furnace Heat Exchanger:Sealed metal combustion chambers that isolate toxic exhaust flames from household supply air.
Chimney Flue Draft:Vertical B-vent piping that utilizes natural thermal buoyancy to carry hot exhaust gases safely outdoors.
What Can Go Wrong & What to Look For
Cracked furnace heat exchangers, backdrafting water heaters, and garage vehicle exhaust are common residential CO sources.
In gas furnaces, decades of heating and cooling cycles cause metal fatigue, rust perforation, and hairline stress cracks in the heat exchanger. When the indoor circulating blower turns on, air pressure forces toxic carbon monoxide out of the cracked cells directly into bedroom supply vents.
Similarly, in tightly sealed homes, powerful kitchen range exhaust hoods can create negative indoor pressure, pulling combustion exhaust backward down the water heater flue (backdrafting) instead of venting outside.
Early Warning Signs & Red Flags
Yellow or flickering furnace burner flames instead of crisp, steady blue flames
Soot or dark staining around furnace inspection ports, water heater draft hoods, or chimney flues
Unexplained headaches, dizziness, nausea, or chronic fatigue that improves when leaving the home
Missing, expired, or chirping carbon monoxide detectors near sleeping areas
Cracked Furnace Heat ExchangerIMMEDIATE ACTION
Perforated metal combustion chamber spilling carbon monoxide into supply ducts.
Warming up vehicles or running portable generators inside an attached garage sends odorless carbon monoxide through shared attic pull-down stairs and unsealed duct chases into bedrooms above.
How Texas Weather & Soil Affect It
Winter freezes and power outages significantly elevate carbon monoxide risks across Texas.
During sudden winter cold snaps (such as Winter Storm Uri), gas furnaces that sat idle all summer suddenly run continuously for days. Existing hairline metal cracks expand under thermal stress, releasing carbon monoxide into living areas.
Additionally, emergency power outages lead homeowners to run portable gasoline generators too close to windows or inside attached garages, causing fatal carbon monoxide poisonings.
Texas Climate & Soil Stresses
Arctic Freeze Events: Sudden continuous operation of older gas furnaces strains aged heat exchangers.
Hurricane Power Outages: Increases reliance on portable generators and temporary fuel equipment.
Texas Field Pro Tips
Never run a portable generator inside a garage, under a carport, or within 20 feet of any door or window.
Have a licensed HVAC technician perform an electronic flue gas combustion analysis every autumn before turning on the furnace.
How to Maintain & Protect It
Regular detector testing and annual professional heating tune-ups keep your family safe.
Test all smoke and carbon monoxide detectors on the first day of every month. Replace standard 9-volt backup batteries annually, or upgrade to 10-year sealed lithium tamper-resistant units.
Ensure the door between your attached garage and living area is solid-core or steel-clad, equipped with self-closing spring hinges and weatherstripping, to block vehicle exhaust fumes from migrating inside.
Seasonal Walkthrough Checklist
Fall: Schedule a professional HVAC furnace inspection including heat exchanger camera checks.
Monthly: Press the 'TEST' button on all carbon monoxide alarms to confirm buzzer and sensor operation.
HOMEOWNER DECISION MATRIX
DIY Weekend Maintenance vs. Call a Qualified Pro
SAFE 15-MINUTE DIY CARE
Test detector buttons monthly and replace batteries at daylight saving time changes.
Check that the garage self-closing door latches fully closed on its own.
WHEN TO CALL A QUALIFIED PRO
Licensed HVAC technician to inspect furnace heat exchangers and test draft pressure.
Licensed plumber to evaluate gas water heater chimney drafting and sediment traps.
CLINICAL DIFFERENTIAL FIELD TRIAGE & CONNECTED SYSTEMS§ 9.4 Diagnostic Rubric
Harmless Cosmetic Baseline
Digital CO monitors reading 0 ppm year-round with upward hot flue draft and a tight self-closing attached-garage door confirm healthy combustion isolation.
Active Failure Signal
Any non-zero CO ppm reading, flu-like headaches improving outdoors, soot/melted plastic rings atop gas water heater draft hoods, or warming cars in garages.
60-Second Homeowner Check
Verify a UL 2034 carbon monoxide alarm sits within 10 feet of EVERY bedroom door across every floor, and check plastic grommets atop your gas water heater for melting.
Texas Credential to VerifyTDLR TACLA Contractor + NCI Combustion Safety Technician for flue/heat-exchanger CO diagnostics; TSBPE RMP for water heater flues.
Municipal Permit & Inspection RuleMunicipal mechanical or plumbing permit required whenever replacing atmospheric draft hoods, Type B flue vents, or induced-draft assemblies.
3 Questions You Must Ask Before Hiring
“Will you measure undiluted flue-gas CO ppm AND run a worst-case Combustion Appliance Zone (CAZ) depressurization test with bath fans, dryer, and range hood all running?”
“Did you inspect the attached-garage ceiling, attic pull-down stair gasket, shared duct penetrations, and self-closing fire door to block vehicle/generator exhaust entry?”
“Beyond standard UL 2034 70-ppm emergency alarms, should we place a low-level digital display CO monitor (alerting at 10–15 ppm) for infants, seniors, or pregnant occupants?”
3 High-Pressure Red Flags & Scams
Holding a match near a cold water-heater draft hood for 3 seconds and declaring combustion safe without running a calibrated digital flue-gas analyzer.
Running portable gasoline generators inside an open attached garage or within 20 feet of soffits/windows during Texas hurricane or freeze blackouts.
Leaving orphaned, oversized masonry chimneys unlined when upgrading to a high-efficiency furnace—stranding lone gas water heaters that condense and spill CO.
HOMEOWNER ACTION TAKEAWAYRISK LEVEL: CRITICAL
Carbon monoxide cannot be detected by human senses; reliable alarms are essential.
Recommended Action Steps
Place interconnected CO alarms outside each bedroom area.
Have gas furnaces inspected annually for cracked heat exchangers.
Operate emergency generators at least 20 feet away from all home openings.
ICC DIGITAL CODES2021 / 2024 IRC
IRC R315.3 / NFPA 720—Carbon Monoxide Alarms in Residential Construction
STATUTORY MODEL CODE TEXT
Carbon monoxide alarms shall be installed in dwelling units containing a fuel-fired appliance, a fireplace, or an attached garage with a communicating opening. Alarms shall be located outside of each separate sleeping area in the immediate vicinity of bedrooms and on every level of the residence, including basements.
Exception: Dwelling units without fuel-fired appliances and without attached garages are exempt from residential carbon monoxide alarm requirements.
IN PLAIN ENGLISH
Every Texas home with gas furnaces, gas water heaters, fireplaces, or an attached garage must have working carbon monoxide detectors outside each bedroom wing to protect your family while sleeping.
HOMEOWNER PRO TIP:Replace carbon monoxide alarm sensor units every 7 to 10 years, as the internal electrochemical sensor degrades over time even if the test beep sounds normal.
Chapter 10 • X
Texas Component Lifespans
Service Life Expectancies, Texas Heat & Soil Degradation, Capital Expenditure Forecasting & 30-Year Replacement Reserve Formulas
Chapter 10 provides realistic, field-verified service life expectancies and replacement cost budgeting for Texas residential building systems. It covers asphalt and metal roof degradation under extreme solar radiation and hail, accelerated HVAC compressor burnout from 2,500-hour cooling seasons, hard water scale inside water heaters, sub-slab cast iron channeling, expansive clay soil foundation movement, and mathematically sound 30-year replacement reserve formulas.
SCAN FOR LIVE DIGITAL TOOLS & UPDATES
Chapter 10 Digital Companion
Texas Lifespans & Replacement Costs
Instant mobile access to interactive Texas replacement cost calculators, inflation adjustment tables, and capital replacement schedules.
CHAPTER X • COMPONENT LIFESPANS & CAPEXForecasting capital replacements: service life curves, heat degradation, and 30-year reserve budgeting.
CHAPTER X MASTER ARCHITECTURAL CUTAWAY • TEXAS LIFESPANS & RESERVES
The 30-Year Capital Lifecycle Map: Texas Heat-Adjusted Service Lives & Reserve Planning
3D asset-management cutaway spotlighting every high-dollar residential assembly whose service life is accelerated by Texas UV radiation, 135°F attic heat, hard limestone water, and expansive clay soil movement.
THERMAL SHOCK • ASPHALT SHINGLE UV BREAKDOWNThermal degradation of asphalt shingles: UV radiation and intense attic heat accelerate asphalt volatilization, cutting shingle service life by 30% compared to national benchmarks.
3D ARCHITECTURAL CUTAWAY • FIGURE 10.1
FIGURE 10.1: TEXAS ROOF LIFESPAN UNDER EXTREME UV & HAIL VS. CODE-COMPLIANT CLASS 4 SYSTEM
DONE RIGHT (CODE-COMPLIANT)
Class 4 SBS-modified impact shingle with 20–25 year realistic Texas lifespan
Balanced continuous ridge and soffit intake airflow dropping attic to 115°F
Radiant barrier foil roof decking reflecting 97% of radiant solar thermal energy
Self-adhering modified bitumen ice and water leak barrier in valleys and eaves
COMMON DEFECT (NEEDS REPAIR)
Builder-grade 3-tab shingles failing after only 11 years of Texas heat exposure
Severe granule loss exposing raw fiberglass scrim to immediate UV embrittlement
Hailstone impact fractures breaking adhesive seal strips and causing wind blow-offs
Comparative technical illustration contrasting a code-compliant Class 4 SBS-modified architectural shingle system with balanced attic ventilation against a prematurely failing 11-year builder-grade 3-tab roof suffering from unventilated 145°F attic baking, thermal curling, and hail bruising.
TEXAS FIELD TRIAGE: 3-STAGE SEVERITY SCALEField Inspection Progression Rubric
STAGE 1NORMAL TEXAS AGING (COSMETIC)
Condition:Architectural shingles aged 1 to 8 years with full granule coverage, flat tabs, and sound flashings.
Condition:Shingles aged 12 to 16 years exhibiting moderate granule loss in gutters, surface cupping, or brittle tabs.
Action:Schedule roof tune-up to replace brittle ridge caps; begin budgeting for full replacement in 2–4 yrs.60–90 Days
STAGE 3ACT IMMEDIATELY (URGENT)
Condition:Shingles aged 18–22+ years with widespread fiberglass exposure, hailstone craters, or multiple leaks.
Action:Obtain 3 bids from certified roofing contractors for tear-off and Class 4 replacement.Immediate
How It Works in Your Home
Your roof covering forms the primary barrier shielding your home from Texas sun, driving rain, and hail.
In asphalt shingles, ceramic mineral granules protect petroleum-based asphalt coating a fiberglass reinforcing mat. When balanced ridge-and-soffit ventilation continuously flushes attic air, roof decking temperatures remain manageable, allowing shingles to maintain their flexible sealant bonds and shed rainwater safely into gutters.
What Can Go Wrong & What to Look For
Intense Texas summer sun bakes asphalt shingles, evaporating their natural volatile oils.
Without sufficient attic ventilation, trapped heat exceeding 140°F cooks shingles from underneath, causing shingles to blister, curl at the edges, and lose granules. Once granules wash away, UV radiation attacks the bare asphalt, causing it to crack and tear off during thunderstorms, allowing moisture to rot roof decking and soak ceiling insulation.
INSURANCE & ROOF LIFE • § 10.1
WPI-8 Windstorm Certificates & UL 2218 Class 4 Hail Shingles
Archiving your roofer’s TDI WPI-8 certificate (in coastal counties) or upgrading to SBS polymer-modified Class 4 impact shingles protects insurability and extends Texas roof life by 5–8 years.
How Texas Weather & Soil Affect It
Texas leads the nation in catastrophic hail losses while relentless solar radiation and 140°F attic heat shorten roof service lifespans by up to 40% compared to national averages.
South- and west-facing roof slopes absorb peak solar ultraviolet radiation, causing the volatile oils in petroleum-based asphalt shingles to dry out, volatilize, and embrittle decades ahead of manufacturer marketing warranties. As ceramic granules loosen and wash into gutters, exposed fiberglass scrim suffers rapid solar degradation, allowing subsequent thunderstorms to lift curling tabs.
Severe Texas spring weather adds severe hail impact stresses that bruise fiberglass reinforcement mats and shatter brittle adhesive bonding strips. Along the Gulf Coast, intense hurricane-force wind gusts tear through compromised shingle edges, turning minor thermal degradation into sudden whole-house water penetration hazards.
Texas Climate & Soil Stresses
Prolonged triple-digit heat and intense solar UV radiation accelerating asphalt embrittlement
Severe spring thunderstorm hail strikes bruising fiberglass reinforcement and cracking water seals
High coastal and plains wind gusts lifting thermally unbonded shingle tabs
Rapid thermal cycling between 145°F attic daytime peaks and sudden rainstorm cooldowns
Texas Field Pro Tips
Conduct ground-level binocular roof inspections twice annually, paying special attention to south- and west-facing slopes for mineral granule washout.
Maintain a dedicated high-yield cash reserve covering your policy's 1% or 2% windstorm and hail insurance deductible.
When replacing an aging roof, invest in Class 4 impact-resistant SBS modified asphalt shingles to earn up to a 25% annual premium reduction from Texas homeowners insurers.
How to Maintain & Protect It
Visually inspect your roof twice a year from the ground using binoculars to check for curled tabs, missing granules, or hail dents.
Keep attic soffit intake grilles and ridge exhaust vents completely clear of insulation. When replacement time arrives, invest in Class 4 impact-resistant shingles or standing-seam metal, which withstand hail and qualify for significant homeowner insurance discounts in Texas.
HOMEOWNER DECISION MATRIX
DIY Weekend Maintenance vs. Call a Qualified Pro
SAFE 15-MINUTE DIY CARE
Conduct twice-yearly binocular inspections from the ground to check south- and west-facing slopes for missing tabs, lifted shingles, or hail pitting.
Clear fallen tree branches, pine needles, and leaf debris from roof valleys and gutters to prevent standing water damming.
Inspect attic rafter decking from the attic access hatch during heavy rains for dark damp stains or active dripping.
WHEN TO CALL A QUALIFIED PRO
Widespread fiberglass mat exposure or granule loss covering >20% of shingle surface area (nearing end of 15–20 yr life).
Hail impact craters or crease fractures breaking adhesive wind seals across multiple slopes.
Sagging roof decking, daylight visible around roof valleys, or active interior ceiling sheetrock staining.
CLINICAL DIFFERENTIAL FIELD TRIAGE & CONNECTED SYSTEMS§ 10.1 Diagnostic Rubric
Harmless Cosmetic Baseline
Architectural shingles at Year 8–10 with intact pliant tabs, clean valleys, and ventilated attic sheathing under 125°F have years of reliable Texas service ahead.
Active Failure Signal
Cupped brittle shingle edges at Year 14+, widespread bald fiberglass patches, rotted neoprene pipe boots, or missing coastal WPI-8 documentation signal end-of-life.
60-Second Homeowner Check
Look up your roof permit year: at Year 8–10, budget $600 to swap sun-cracked rubber plumbing vent boots for lead/silicone jacks before ceiling leaks start.
Texas Credential to VerifyIndependent Haag Certified Roof Inspector or TBPE TDI-Appointed Windstorm Engineer BEFORE soliciting commission roofing bids.
Municipal Permit & Inspection RuleMunicipal reroof permit + TDI WPI-8 Windstorm Certificate of Compliance in coastal counties (essential for TWIA and private carrier renewals).
3 Questions You Must Ask Before Hiring
“Does my 12-year-old Texas roof truly need full replacement today, or will a $750 Roof Tune-Up (replacing cracked neoprene pipe boots with lifetime lead/silicone jacks and re-sealing flashings) safely add 4–5 years?”
“What exact annual homeowners insurance premium discount does my carrier grant for UL 2218 Class 4 SBS impact-modified shingles, and will you sign their Class 4 certification form?”
“In coastal counties, is the TDI-appointed windstorm engineer inspecting IN-PROGRESS deck re-nailing and sealed-deck tape so we earn a smooth WPI-8 without destructive tear-backs?”
3 High-Pressure Red Flags & Scams
Filing speculative zero-payout or sub-deductible “hail claims” after minor storms—which permanently logs a CLUE claim on your property and triggers Texas carrier non-renewal!
Using deliberately scuffed coin/knuckle marks on hot summer shingles to fake hail bruises during unsolicited free roof inspections.
Installing expensive 50-year shingles over an unventilated 150°F “hot pocket” attic that cooks the new asphalt mat brittle in 11 years.
HOMEOWNER ACTION TAKEAWAYRISK LEVEL: HIGH
Plan roof replacement budgeting around realistic regional climate lifespans.
Recommended Action Steps
Expect 3-tab shingles to last 10 to 14 years and architectural shingles 15 to 20 years in Texas.
Set aside your windstorm/hail insurance deductible in a dedicated emergency cash reserve.
Upgrade to Class 4 impact-resistant shingles upon reroofing for up to 25% insurance premium discounts.
Inspect roof surfaces with binoculars twice a year and clear valleys of leaf debris.
ICC DIGITAL CODES2021 / 2024 IRC
2021/2024 IRC R905.2—Asphalt Shingle Manufacturing Standards and Wind Resistance
STATUTORY MODEL CODE TEXT
Asphalt shingles shall conform to ASTM D3462 and shall be fastened to solidly sheathed decks. Shingles shall have a minimum design wind resistance meeting ASTM D3161 Class F or ASTM D7158 Class H for high-wind coastal regions.
IN PLAIN ENGLISH
Asphalt shingles must meet strict durability standards and be fastened securely to withstand high Texas winds and prevent storm tears.
HOMEOWNER PRO TIP:In Texas, intense UV and attic heat shorten shingle lifespans by 30% to 45%; ensure continuous ridge-and-soffit ventilation to prevent premature blistering.
10.2
HVAC Compressors and Water Heater Lifespans: Hard Texas Water Scale, Coastal Salt Air Corrosion & Replacement Timeline
Component Lifespans & Budgeting9 min readEdition 3.0
TYPICAL TEXAS LIFESPANAC Compressor: 10–14 Yrs / Tank Water Heater: 8–12 Yrs (Hard Water)
HVAC Blowout on 105°F Holiday Weekend ($8k–$16k Replacement)
1
2
3
WHAT YOU'RE LOOKING ATFIELD INSPECTION ANATOMY
1
Formicary & Salt Air Coil Corrosion:Flaking aluminum fins and pitted copper tubing caused by high humidity and salt air.
2
Water Heater Bottom Rim Rust:Brown scaling at base of tank indicating slow internal glass lining breakdown.
3
Dielectric Union Scale Build-up:Dissimilar metal connection where copper meets galvanized steel with heavy calcium crust.
COASTAL CORROSION • CONDENSER & TANK WATER SCALEAccelerated condenser failure: airborne salts and non-stop 2,800-hour annual cooling cycles cut compressor and coil lifespans down to 8–12 years along the Texas Gulf Coast.
3D ARCHITECTURAL CUTAWAY • FIGURE 10.2
FIGURE 10.2: HVAC COMPRESSOR & WATER HEATER SERVICE LIFE: TEXAS RUNTIME & HARD WATER VS. PREVENTATIVE MAINTENANCE
DONE RIGHT (CODE-COMPLIANT)
16-SEER2 condenser with clean spine fins and dual-run capacitor tested annually
10–14 year realistic Texas lifespan extended to 15+ years via bi-annual tune-ups
Tankless water heater with annual vinegar descaling flush preventing calcium choke
Sacrificial magnesium anode rod inspected and replaced every 4 years in tank heaters
COMMON DEFECT (NEEDS REPAIR)
Aged 11-year condenser with acid-burned scroll compressor and bulging capacitor
Crushed bent aluminum fins choked with lawn clippings causing high head pressure
Water heater tank failure from 6 inches of rock-hard calcium scale insulating bottom
Depleted sacrificial anode rod allowing aggressive hard water to rust steel tank walls
Comparative technical diagram illustrating a maintained 16-SEER2 condenser and descaled tankless water heater with 15+ year longevity versus an unmaintained 11-year system with acid-choked scroll compressor, failing capacitor, and a tank water heater rotted by 6 inches of hard calcium sediment.
TEXAS FIELD TRIAGE: 3-STAGE SEVERITY SCALEField Inspection Progression Rubric
STAGE 1NORMAL TEXAS AGING (COSMETIC)
Condition:Split-system AC compressor and water heater aged 1 to 5 years operating quietly with optimal Delta-T.
Action:Replace filters monthly; flush water heater tank sediment.Annual Log
STAGE 2WATCH & MAINTAIN (30–90 DAYS)
Condition:AC aged 9 to 12 years (nearing average 10–14 yr Texas lifespan) with high electrical draw or rust; heater 7–9 yrs.
Condition:Compressor seized or grounded; R-410A refrigerant leaking from rusted coil; water heater tank ruptured.
Action:Replace equipment with modern high-efficiency heat pump or tankless water heater immediately.Immediate
How It Works in Your Home
Your cooling system relies on a closed refrigerant loop where the outdoor condenser compressor expels indoor heat outside, while your water heater continuously heats domestic supply water.
In a well-maintained system, clean coils allow heat rejection with minimal electrical resistance, and a sacrificial anode rod inside the water heater corrodes intentionally to protect the steel tank from mineral-rich Texas water.
What Can Go Wrong & What to Look For
Because Texas air conditioners run 2,500+ hours each year, motor run capacitors weaken and compressor bearings wear prematurely.
Along the coast, airborne salts eat aluminum coil fins, choking airflow. Inside water heaters, hard limestone water causes calcium carbonate to precipitate into thick sediment at the tank bottom, overheating the burner surface until the tank bottom cracks and leaks.
ACCELERATED TEXAS WEAR • § 10.2
Why Coastal Salt Air & Hard Water Halve Equipment Lifespans
Within 15 miles of the Gulf Coast, salt mist corrodes unprotected aluminum condenser fins in 6–9 years, while un-flushed hard-water sediment bakes gas water heater tank bottoms to failure.
How Texas Weather & Soil Affect It
Hot Texas summers demand 2,500+ hours of continuous cooling operation from May through October, while limestone aquifer mineral hardness shortens water heating service lifespans by up to a third.
Continuous triple-digit temperatures force residential air conditioning compressors and fan motors to operate under extreme head pressures for months without reprieve. This relentless thermal workload degrades electrical run capacitors, bakes compressor winding insulation, and accelerates bearing friction. In coastal regions within 15 miles of the Gulf of Mexico, airborne salt chlorides create aggressive formicary corrosion that eats aluminum fins and pits copper refrigerant tubing.
Simultaneously, municipal water drawn from the Edwards, Trinity, or Carrizo-Wilcox aquifers carries high concentrations of dissolved calcium and magnesium carbonates. As cold water heats inside residential storage tanks or tankless copper heat exchangers, these minerals precipitate out as dense mineral scale. This insulating chalk layer forces burners and electric elements to overheat, blistering tank bottoms and inducing catastrophic structural ruptures years ahead of schedule.
Texas Climate & Soil Stresses
Continuous cooling demands exceeding 2,500 annual runtime hours straining compressor valves and motor windings
High concentrations of calcium and magnesium carbonates in Edwards and Trinity aquifers accelerating tank scale buildup
Coastal airborne salt fog inducing severe formicary and galvanic corrosion across outdoor condenser fins
Attic ambient heat exceeding 140°F stressing attic-mounted air handlers and uninsulated primary drain lines
Texas Field Pro Tips
Schedule an annual spring HVAC tune-up before May heat arrives to test compressor amp draw, capacitor microfarads, and refrigerant subcooling.
Inspect and replace the water heater's sacrificial magnesium or aluminum anode rod every 3 to 4 years to prevent tank wall rusting.
Perform a bi-annual sediment drain flush on tank water heaters or an annual vinegar circulation flush on tankless heat exchangers to dissolve hard mineral scale.
How to Maintain & Protect It
Have your HVAC system professionally tuned up twice a year: once in spring for cooling and once in fall for heating.
Clear at least 24 inches of shrubs away from the outdoor condenser unit. Flush 3 to 5 gallons of water from your tank water heater twice a year to purge loose sediment, and descale tankless units with a vinegar flush annually.
HOMEOWNER DECISION MATRIX
DIY Weekend Maintenance vs. Call a Qualified Pro
SAFE 15-MINUTE DIY CARE
Inspect and replace return air filters (MERV 8) monthly to maintain evaporator airflow and protect the compressor from overheating.
Gently rinse outdoor condenser coil fins annually with a low-pressure garden hose (never a pressure washer) to remove cottonwood and dust.
Pour 1 cup of distilled white vinegar into the primary condensate drain T-pipe monthly to dissolve algae and prevent overflow pans from filling.
WHEN TO CALL A QUALIFIED PRO
AC supply-to-return temperature split (Delta-T) drops below 14°F or exceeds 22°F, indicating refrigerant leak or airflow restriction.
Loud clunking, rattling, or metallic screeching from compressor at startup (failing start capacitor or seized bearing).
Water heater tank popping/rumbling loudly under heat, corrosion around lower fittings, or active water weeping from base seams.
CLINICAL DIFFERENTIAL FIELD TRIAGE & CONNECTED SYSTEMS§ 10.2 Diagnostic Rubric
Harmless Cosmetic Baseline
A maintained 9-year-old split AC holding an 18°F Delta-T split and a flushed 7-year-old tank water heater with a dry drain pan still deliver dependable value.
Active Failure Signal
Repeated R-410A refrigerant leaks on a 12-year-old AC, crumbling coastal condenser fins, or rusty seepage at the bottom seam of a 10-year-old attic water heater.
60-Second Homeowner Check
Decode the serial-number year on your outdoor AC nameplate and water heater label today—start getting calm March/October bids once units pass Year 10–12.
BEFORE YOU SIGN A BID • TEXAS CONTRACTOR VETTING & SCAM DEFENSE
Proactive Shoulder-Season HVAC & Water Heater Lifecycle Bidding
§ 10.2 Playbook
Texas Credential to VerifyTDLR TACLA Contractor (HVAC) & TSBPE Responsible Master Plumber (RMP) — interviewed proactively in March/October rather than July emergencies.
Municipal Permit & Inspection RuleMunicipal mechanical/plumbing permits + AHRI matched-system certificate (required to unlock federal tax credits and Oncor/CenterPoint/CPS rebates).
3 Questions You Must Ask Before Hiring
“Since my AC is 12+ years old (or water heater is 9+ years old), what off-season spring/fall replacement pricing and utility rebate incentives save 15%–25% versus a July emergency call?”
“Within 15 miles of the Texas Gulf Coast, does this condenser include factory phenolic/epoxy coastal coil coating and stainless hardware to stop salt-air fin rot?”
“For my hard-water limestone area, will replacing the sacrificial anode rod and flushing sediment extend my healthy tank, or has lower-seam rust already begun?”
3 High-Pressure Red Flags & Scams
Private-equity Roll-Up HVAC techs trained to condemn every 8-year-old system over a failed $35 dual-run capacitor by quoting an inflated $950 “capacitor + contactor revitalization kit.”
Pitching tankless water heaters as “zero maintenance forever”—hiding the annual white-vinegar descaling flush required to survive hard Texas water.
Signing 10-year “equipment lease/rental” liens recorded against your property title at double the cash price of a new heat pump.
HOMEOWNER ACTION TAKEAWAYRISK LEVEL: HIGH
Budget proactively for inevitable 10-year HVAC and water heater replacements.
Recommended Action Steps
Anticipate AC compressors lasting 10 to 14 years and tank water heaters lasting 8 to 10 years in Texas.
Replace pleated return air filters every 30 to 60 days to prevent blower motor burnout.
Flush sediment from tank water heaters annually and inspect emergency pan float switches.
Set aside monthly reserves ($100–$150/mo) for planned HVAC and plumbing equipment retirement.
Heating and cooling equipment shall be sized in accordance with ACCA Manual S based on building loads calculated in accordance with ACCA Manual J or other approved heating and cooling calculation methodologies.
IN PLAIN ENGLISH
HVAC systems must be properly sized using building load calculations rather than rules of thumb to prevent short-cycling and control indoor humidity.
HOMEOWNER PRO TIP:Texas cooling demand requires regular coil cleaning and annual tune-ups; replace filters every 30 to 60 days to maximize equipment lifespan.
CHECK FREQUENCYSemi-Annual Visual Inspection of Exposed Pipes & Breaker Heat
RISK IF IGNOREDCRITICAL
Sudden Main Pipe Burst Flooding Home or Welded Breaker Electrical Fire
1
2
3
WHAT YOU'RE LOOKING ATFIELD INSPECTION ANATOMY
1
80% Internal Rust Occlusion:Cross-section showing internal rust tubercles that choke water pressure and release lead.
2
External Pipe Thread Rust:Weeping joint with chalky rust bloom ready to snap under water hammer surge.
3
Outdated Breaker Busbar Stabs:Discolored electrical panel stabs prone to breaker welding and thermal runaways.
INFRASTRUCTURE FORENSICS • GALVANIZED PIPE CORROSIONGalvanized water supply pipe occlusion: internal galvanic corrosion and mineral deposits choke water volume, eventually causing pinhole leaks behind wall framing after 40–50 years.
3D ARCHITECTURAL CUTAWAY • FIGURE 10.3
FIGURE 10.3: PLUMBING & ELECTRICAL INFRASTRUCTURE LIFESPANS: CAST IRON CHANNELING & OBSOLETE PANELS VS. MODERN PEX & SURGE-PROTECTED DISTRIBUTION
DONE RIGHT (CODE-COMPLIANT)
Continuous PEX homerun manifold distribution with zero buried joints under slab
Schedule 40 PVC sanitary sewer lines with 75–100 year chemical degradation immunity
Modern 200A electrical service panel with Type 2 whole-home surge protection
Dual-function AFCI/GFCI breakers preventing arc faults and electrical shock hazards
COMMON DEFECT (NEEDS REPAIR)
Channeled 45-year cast iron sewer line with bottom rusted out, eroding slab subgrade
Galvanized supply pipe choked with internal rust scale, choking water volume flow
Hazardous Federal Pacific Stab-Lok panel with un-trippable breakers and melted bus bar
Brittle gray polybutylene supply tubing with micro-fractured acetal plastic fittings
Comparative technical drawing contrasting modern PEX homerun plumbing and a 200A surge-protected electrical panel against aged failing infrastructure including channeled sub-slab cast iron sewer pipe, corroded galvanized supply lines, and a hazardous Federal Pacific Stab-Lok panel.
TEXAS FIELD TRIAGE: 3-STAGE SEVERITY SCALEField Inspection Progression Rubric
STAGE 1NORMAL TEXAS AGING (COSMETIC)
Condition:PEX supply piping and modern copper-bus 200A panel aged 1 to 15 years in clean, corrosion-free shape.
Action:Plan copper/PEX repipe within 12–24 months; upgrade electrical service to 200A.60–90 Days
STAGE 3ACT IMMEDIATELY (URGENT)
Condition:Galvanized water pipes leaking behind walls; defective FPE Stab-Lok or Zinsco panel failing to trip.
Action:Shut off water/power; execute immediate whole-home repipe or electrical panel replacement.Immediate
How It Works in Your Home
Clean water enters your home under pressure through incoming supply pipes and is distributed to fixtures, while waste drains away via gravity through sewer lines.
Electrical current passes from the utility meter into a central breaker panel, where calibrated circuit breakers distribute safe power to lighting and appliance branch circuits.
What Can Go Wrong & What to Look For
Over 40 to 50 years, galvanized steel water pipes corrode internally, choking water volume to a trickle and leaking at threaded fittings.
Under foundation slabs, older cast iron sewer pipes rot out along the bottom channel, eroding soil. In electrical panels, aging circuit breakers fail to trip during short circuits, and obsolete brands like Federal Pacific or Zinsco pose active fire hazards from bus bar arcing.
HIDDEN INFRASTRUCTURE • § 10.3
Planning Ahead for 40-Year Electrical Panels & Legacy Piping
Unlike appliances you see daily, corroded galvanized supply pipes and 40-year-old breaker busbars age behind drywall—proactive infrared scans and repipe budgeting prevent sudden insurance non-renewals.
How Texas Weather & Soil Affect It
Expansive clay soil movement exerts severe shear stress on under-slab plumbing pipes, while high garage temperatures and severe thunderstorm lightning surges degrade residential electrical service panels.
The relentless shrink-swell cycles of Texas smectite clay soils place profound bending and shearing loads on rigid under-slab cast iron drain piping and copper water supply lines. Over 40 to 50 years, cast iron sewer lines suffer bottom channel acid corrosion, eventually fracturing under shifting foundation beams and washing away supporting subsoil. In vintage homes plumbed with galvanized steel, dissolved minerals accelerate internal tuberculation, choking flow volume until pinhole leaks develop behind wall framing.
Simultaneously, exterior and garage-mounted electrical main service panels endure extreme ambient temperatures exceeding 115°F during summer afternoons. This continuous thermal stress degrades breaker bi-metallic thermal trip elements, weakens spring tension, and promotes busbar oxidation. Combined with intense Gulf Coast and Central Texas thunderstorm lightning strikes, unshielded panels and branch wiring suffer accelerated insulation breakdown.
Texas Climate & Soil Stresses
Smectite clay shrink-swell cycles exerting shearing and bending stress on rigid underground cast iron sewer drains
Mineral-dense aquifer water accelerating galvanic tuberculation and internal scaling in galvanized piping
Order a fiber-optic sewer camera scope and hydrostatic pressure test on any home built before 1985 to evaluate sub-slab drain condition.
Schedule an infrared thermal imaging scan of your main electrical panel to identify overheated breakers or loose terminal lugs before failure.
Install a Type 2 whole-house surge protective device (SPD) in the main service panel to safeguard expensive HVAC and appliance inverter electronics.
How to Maintain & Protect It
Check the brand and age of your electrical panel; if it is a Federal Pacific Stab-Lok or Zinsco unit, replace it immediately with a modern 200A load center and whole-home surge protector.
If your home was built before 1980 with cast iron drain lines under the foundation, schedule a sewer camera inspection to verify pipe integrity before costly slab movement occurs.
HOMEOWNER DECISION MATRIX
DIY Weekend Maintenance vs. Call a Qualified Pro
SAFE 15-MINUTE DIY CARE
Test all GFCI and AFCI circuit breakers and receptacles monthly using the built-in "TEST" button to ensure mechanical trip operation.
Inspect exposed piping under kitchen and bathroom sinks quarterly for green copper verdigris, white mineral scale, or moisture dampness.
Check main electrical panel exterior cover for rust, missing knockouts, or excessive heat with back of hand.
WHEN TO CALL A QUALIFIED PRO
Electrical panel is a known hazardous brand (Federal Pacific Electric Stab-Lok, Zinsco, Challenger) or exhibits scorch marks/buzzing.
Chronic low water pressure across all fixtures simultaneously, or brown/rusty water running when faucets open after sitting.
Sputtering faucets, water meter spinning continuously when all home fixtures are off (slab leak indicator), or aluminum wiring connections.
CLINICAL DIFFERENTIAL FIELD TRIAGE & CONNECTED SYSTEMS§ 10.3 Diagnostic Rubric
Harmless Cosmetic Baseline
1990s+ Type L copper or PEX supply plumbing, PVC sanitary drains, and modern copper-bus 200A load centers routinely deliver 40–60+ years of clean service.
Touch a refrigerator magnet to an exposed water pipe under your utility sink—if it sticks strongly, you have legacy galvanized steel pipes nearing repipe age.
BEFORE YOU SIGN A BID • TEXAS CONTRACTOR VETTING & SCAM DEFENSE
Phased Modernization of 40-Year Electrical Panels & Legacy Piping
§ 10.3 Playbook
Texas Credential to VerifyTDLR TECL Master Electrical Contractor & TSBPE Responsible Master Plumber (RMP) providing written permit-backed modernization scopes.
Municipal Permit & Inspection RuleMandatory municipal electrical and plumbing permits + city final sign-off certificates (vital proof for Texas insurance 4-Point / older-home underwriting).
3 Questions You Must Ask Before Hiring
“Will you provide signed municipal permit sign-off documentation and clear ‘after’ photos so my Texas insurance broker can remove older-home surcharges (FPE/Zinsco/galvanized/polybutylene)?”
“Can we bundle whole-home PEX repiping or panel replacement RIGHT BEFORE planned kitchen/bath remodeling or interior painting so drywall restoration happens only once?”
“While the 200A panel is upgraded for modern loads, are we adding future-ready spare spaces for solar, standby generator interlock, or garage EV charging?”
3 High-Pressure Red Flags & Scams
Panic-selling a $28,000 complete copper house rewire on a solid 1985 copper-wired home that only needs a modern $3,200 load-center panel and AFCI/GFCI breakers.
Performing unpermitted panel or repipe work on a historic Texas home—which backfires when insurance underwriters demand city permit proof.
HOMEOWNER ACTION TAKEAWAYRISK LEVEL: CRITICAL
Replace obsolete electrical panels and aging piping before safety failures occur.
Recommended Action Steps
Replace uninsurable obsolete panels (Federal Pacific, Zinsco) with modern 200A arc-fault equipment.
Plan whole-home PEX repiping if legacy galvanized iron or polybutylene piping is present.
Test AFCI and GFCI breakers biannually to maintain branch circuit fire and shock protection.
Budget for service entrance cable and meter base upgrades at the 30-to-40-year milestone.
ICC DIGITAL CODES2023 NEC
2023 NEC 230.70—Plumbing Materials Corrosion Resistance and Electrical Panel Service Capacity
STATUTORY MODEL CODE TEXT
The service disconnecting means shall be installed at a readily accessible location either outside of a building or structure or inside nearest the point of entrance of the service conductors.
IN PLAIN ENGLISH
Main electrical disconnects must be readily accessible, and water distribution piping must be corrosion resistant to prevent premature system failure.
HOMEOWNER PRO TIP:Have an electrician evaluate breaker panels older than 25 years and replace aging gate valves with modern full-port quarter-turn ball valves.
10.4
Foundation and Exterior Envelope Lifespans: Slab Settlement Rates, Stucco Caulk Joints, Brick Lintels & Window Seals
Component Lifespans & Budgeting9 min readEdition 3.0
MASONRY DEFECT • STEEL LINTEL RUST-JACKINGRust-jacking structural damage: unpainted steel window lintels oxidize, expand up to ten times their original volume, and fracture exterior masonry cladding.
3D ARCHITECTURAL CUTAWAY • FIGURE 10.4
FIGURE 10.4: FOUNDATION SLAB STABILITY & EXTERIOR ENVELOPE AGING: MOISTURE-MANAGED POST-TENSION SLAB VS. CLAY DESICCATION HEAVE & SEALANT FAILURE
DONE RIGHT (CODE-COMPLIANT)
Uniform foundation perimeter hydration preventing clay shrinkage voids under slab
Primed and flashed galvanized steel lintel with zero rust expansion over windows
Flexible elastomeric sealant joint renewed every 5–7 years around window frames
Clear 4-inch slab reveal and open brick weep holes preventing termite and water bridging
COMMON DEFECT (NEEDS REPAIR)
Severe soil desiccation pulling away from slab edge, causing corner drop and fractures
Fogged double-pane window with broken IGU perimeter seal showing internal condensation
Comparative architectural cross-section contrasting a stable 100+ year post-tension slab with uniform perimeter soil hydration and sealed brick lintel against a settled slab edge caused by severe clay desiccation shrinkage, accompanied by rusted lintel jacking and failed stucco sealant.
TEXAS FIELD TRIAGE: 3-STAGE SEVERITY SCALEField Inspection Progression Rubric
STAGE 1NORMAL TEXAS AGING (COSMETIC)
Condition:Post-tension slab aged 1 to 10 years with stable elevation profile (<0.5" differential); brick joints crisp.
Action:Maintain perimeter soaker hoses on automated schedules.Annual Log
Action:Recaulk exterior joints with polyurethane sealant; hire engineer to map baseline floor elevations.60–90 Days
STAGE 3ACT IMMEDIATELY (URGENT)
Condition:Foundation settlement exceeding 2.0 inches with active slab shear fractures, jammed doors, or loose brick.
Action:Engage structural engineer and foundation underpinning contractor for pier installation.Immediate
How It Works in Your Home
Your home's foundation and exterior wall envelope form a continuous protective boundary.
An engineered concrete slab-on-grade transfers structural weight into the supporting earth, while exterior brick veneer, stucco, or fiber-cement siding deflects wind-driven rain. Flashing systems and elastomeric sealants prevent moisture from entering window perimeters and wall framing cavities.
What Can Go Wrong & What to Look For
In Texas, seasonal drought causes expansive clay soils to dry out and shrink away from foundation edges, leaving concrete slab corners unsupported and prone to downward settlement fractures.
Above windows, unpainted steel lintels rust when moisture penetrates mortar; as steel oxidizes, it expands dramatically, cracking brick veneer in a process called rust jacking. Furthermore, window caulk dries out every 5 to 7 years, allowing rainwater into interior walls.
CENTURY ENVELOPE CARE • § 10.4
50-Year Masonry Skins Need 7-Year Sealant & Paint Renewal
Brick, stone, and concrete slabs can endure 80+ years in Texas—provided elastomeric window caulk, expansion-joint sealant, and steel lintel rust-inhibitive paint are renewed every 5–8 years.
How Texas Weather & Soil Affect It
Texas smectite clays experience severe volumetric shrink-swell cycles that destabilize foundation perimeters, while intense ultraviolet rays degrade exterior window caulking and drive moisture into steel lintels.
Highly active expansive soils—such as Houston Black Gumbo, Austin Chalk clay, and North Texas Eagle Ford formations—shrink dramatically during prolonged summer droughts. As soil desiccates and pulls 1 to 2 inches away from grade beams, perimeter slab edges lose critical downward earth support, causing localized settlement and diagonal masonry cracks. Conversely, torrential tropical rainstorms saturate dried fissures rapidly, triggering violent rebound heaving that wracks structural door frames and shears drywall seams.
Simultaneously, extreme solar ultraviolet exposure breaks down exterior acrylic and latex caulking within 3 to 5 years, converting flexible weatherproofing joints into brittle conduits for wind-driven moisture. When rainwater penetrates porous brick veneer mortar, it accumulates on unpainted mild steel angle lintels supporting masonry above window openings. The resulting oxidation forms iron oxide scales that expand up to ten times the original metal thickness, lifting brick courses in an aggressive structural failure known as rust-jacking.
Texas Climate & Soil Stresses
Extreme summer drought clay shrinkage pulling supporting soil 1 to 2 inches away from foundation perimeter beams
Sudden deluge rainstorms penetrating dried soil fissures and inducing violent rebound foundation heave
High solar UV index breaking down exterior window and door perimeter caulk joints within 3 to 5 years
Renew exterior window and door perimeter caulk joints every 5 to 7 years using commercial-grade polyurethane or elastomeric sealant.
Inspect steel angle lintels above exterior windows annually; wire-brush surface corrosion and apply an exterior zinc-chromate rust-inhibiting primer and paint.
Maintain a clear 4-inch concrete slab reveal around the home perimeter to verify soil moisture stability and facilitate early termite detection.
How to Maintain & Protect It
Operate foundation soaker hoses 12 to 18 inches from your slab during summer months to keep soil moisture uniform.
Inspect steel window lintels annually and coat exposed metal with rust-inhibiting primer and paint. Re-caulk all window and door frame perimeters every 5 to 7 years with high-performance polyurethane or silicone elastomeric sealants.
HOMEOWNER DECISION MATRIX
DIY Weekend Maintenance vs. Call a Qualified Pro
SAFE 15-MINUTE DIY CARE
Inspect exterior expansion joints and window perimeter caulk annually; replace failing caulk with 100% polyurethane/elastomeric sealant.
Clear grass, leaves, and landscape soil away from brick weep holes to maintain a continuous 4-inch foundation reveal.
Run foundation perimeter soaker hoses on automated timers 2–3 times weekly during July–August droughts to prevent clay shrinkage.
WHEN TO CALL A QUALIFIED PRO
Exterior masonry stair-step cracks exceeding 1/4 inch, or exterior doors jamming tightly against top door headers.
Fogged moisture condensation between double-pane window glass panes (failed thermal seal requiring sash or IGU replacement).
CLINICAL DIFFERENTIAL FIELD TRIAGE & CONNECTED SYSTEMS§ 10.4 Diagnostic Rubric
Harmless Cosmetic Baseline
Brick masonry, fiber-cement siding, and post-tension concrete slabs easily outlast 75+ years when their sacrificial exterior caulk and paint skins stay renewed.
Press your thumbnail into the exterior caulk bead around a sunny south or west window—if it feels hard and cracked like dry plastic instead of rubbery, re-caulk.
BEFORE YOU SIGN A BID • TEXAS CONTRACTOR VETTING & SCAM DEFENSE
Exterior Sealant Renewal, Masonry Lintel Care & Envelope Painting
§ 10.4 Playbook
Texas Credential to VerifyInsured Exterior Envelope & Painting Specialist (EPA Lead-Safe RRP Certified for pre-1978 homes); TBPE Structural P.E. for multi-year elevation baselines.
Municipal Permit & Inspection RuleNo permit required for routine caulking/painting; municipal structural permit required if replacing rusted structural steel brick lintels.
3 Questions You Must Ask Before Hiring
“Are you cutting out old brittle caulk and installing closed-cell foam backer rod with ASTM C920 polyurethane/elastomeric sealant—not smearing cheap painters acrylic over dirty cracks?”
“Before painting steel brick lintels over windows and garage doors, will you wire-brush rust scale to bare metal, prime with rust-inhibitive primer, AND leave the top/bottom flashing edge uncaulked so trapped water drains?”
“Will your painters explicitly mask off and keep EVERY bottom-course brick weep hole, window weep slot, and stucco weep screed 100% open?”
3 High-Pressure Red Flags & Scams
Spray-painting ceramic/elastomeric “liquid vinyl siding” coatings with lifetime claims that trap wall moisture, blister, and peel off fiber-cement or stucco in sheets.
Pressure-washing soft historic brick mortar, cedar siding, or asphalt shingles at 3,500 PSI—blasting decades of life off your home’s exterior in one afternoon.
Caulking the horizontal bottom lap edge of fiber-cement siding planks or the outer lip of steel window lintels—sealing water inside the wall assembly.
HOMEOWNER ACTION TAKEAWAYRISK LEVEL: MEDIUM
Protect slab foundations with consistent moisture and renew exterior sealants.
Recommended Action Steps
Maintain perimeter soaker hoses 12 to 18 inches from slab edges during dry Texas heat waves.
Repaint exterior trim and inspect brick lintels for rust jacking every 5 to 7 years.
Re-caulk exterior window perimeters and door thresholds using high-grade elastomeric sealant.
Keep finished soil grade sloped 6 inches over 10 feet away from the foundation perimeter.
ICC DIGITAL CODES2021 / 2024 IRC
2021/2024 IRC R703.1.1—Water-Resistive Barriers and Masonry Lintel Corrosion Protection
STATUTORY MODEL CODE TEXT
The exterior wall envelope shall be designed and constructed in a manner that prevents the accumulation of water within the wall assembly by providing a water-resistant barrier behind the exterior veneer and a means for draining water.
IN PLAIN ENGLISH
Exterior walls must have a continuous moisture barrier and drainage path so water that penetrates cladding drains safely outside without damaging framing.
HOMEOWNER PRO TIP:Keep exterior brick weep holes clear and inspect steel lintels above windows annually for rust to prevent destructive masonry jacking.
10.5
The 30-Year Texas Homeowner Replacement Budget: Reserve Fund Formulas, Emergency Escrow & Contractor Bidding Rules
Component Lifespans & Budgeting10 min readEdition 3.0
TYPICAL TEXAS LIFESPAN30-Year Capital Reserve Forecasting Cycle • Adjusted Annually
CHECK FREQUENCYAnnual Budget Reconciliation & Home Repair Escrow Review
Year 10–15 Replacement Convergence:Steep replacement peak where roof, AC, and water heater simultaneously reach end-of-life.
2
Monthly Sinking Fund Allocation:Recommended $350–$550 monthly homeowner savings formula to avoid debt.
3
Emergency Contingency Cushion:15% surplus margin buffered for unanticipated Texas hail or hard freeze events.
CAPITAL BUDGETING • 30-YEAR REPLACEMENT FORECASTLong-term home capital reserve roadmap: tracking component ages against Texas accelerated degradation curves allows homeowners to budget predictably rather than absorbing sudden five-figure emergency repair bills.
3D ARCHITECTURAL CUTAWAY • FIGURE 10.5
FIGURE 10.5: 30-YEAR CAPITAL REPLACEMENT RESERVE BUDGET: STRUCTURED COMPONENT RESERVE ESCROW VS. UNBUDGETED EMERGENCY FINANCING CRUNCH
DONE RIGHT (CODE-COMPLIANT)
Component-weighted monthly escrow fund ($450–$850/mo) in high-yield account
Predictable cash absorption of Year 12–15 roof and dual-HVAC replacement crunch
Zero high-interest consumer debt or predatory lease-to-own equipment financing
Liquid cash buffer ready for 1%–2% Texas windstorm/hail insurance deductibles
COMMON DEFECT (NEEDS REPAIR)
Zero capital reserve savings, relying on emergency credit cards at 24% APR
Overwhelmed by simultaneous roof, dual-HVAC, and water heater breakdown window
Predatory lease-to-own HVAC financing turning $12k unit into $24k debt
Delayed roof replacement causing secondary sheetrock, ceiling, and mold damage
Comparative financial diagram contrasting a disciplined component-weighted monthly reserve escrow strategy that smoothly absorbs major roof, HVAC, and plumbing replacement cycles against an unbudgeted emergency financing path that accumulates high-interest consumer debt.
TEXAS FIELD TRIAGE: 3-STAGE SEVERITY SCALEField Inspection Progression Rubric
STAGE 1NORMAL TEXAS AGING (COSMETIC)
Condition:Capital reserve fund funded at 100% of benchmark ($1.00/sq ft/year in savings); equipment under 7 yrs.
Condition:Home entering Years 12–18 with multiple original systems (roof, AC, heater) near end-of-life.
Action:Increase monthly savings allocation; schedule sequential replacements to prevent double outages.60–90 Days
STAGE 3ACT IMMEDIATELY (URGENT)
Condition:Unfunded catastrophic failure of roof ($15,000) and dual AC systems ($22,000) during summer heat wave.
Action:Review HELOC or financing options; execute prioritized life-safety replacements first.Immediate
How It Works in Your Home
A component-weighted capital reserve account functions like your own personal escrow fund for major home replacements.
By estimating the replacement cost of your roof, HVAC units, and water heaters and dividing by each system's remaining useful life in years, you determine a steady monthly savings amount that accumulates before the equipment wears out.
What Can Go Wrong & What to Look For
Treating predictable component lifecycles as sudden emergencies forces homeowners to rely on high-interest credit cards (22% to 28% APR) or predatory HVAC leasing programs, doubling total replacement costs.
When a 12-year-old home simultaneously needs a new roof ($14,000) and two HVAC systems ($20,000), an unbudgeted $34,000 crunch can trigger severe financial distress.
CAPITAL RESERVE MODEL • § 10.5
Turning Surprise $14,000 Breakdowns Into Predictable Monthly Savings
Commercial asset managers never guess when roofs or chillers will fail—applying the same Remaining Useful Life (RUL) reserve table to your home eliminates high-interest emergency financing.
How Texas Weather & Soil Affect It
Because Texas climate extremes accelerate mechanical wear and roofing degradation, major residential systems frequently fail in simultaneous clusters between years 12 and 15 of a home's lifespan.
In more temperate regions, a 15-year-old home might experience gradual, staggered component renewals spread across several decades. In Texas, however, the compounded effects of 100°F+ summer heatwaves, hard mineral-rich aquifer water, and frequent severe hail storms cause asphalt roofs, air conditioning condensers, and domestic water heaters to reach terminal failure at roughly the exact same chronological milestone.
This 'Year 12–15 Cluster Failure' phenomenon can trigger an unexpected $25,000 to $40,000 capital crunch within a single calendar year. Relying on generic national rules of thumb—such as saving 1% of home value annually—leaves homeowners vulnerable to predatory high-interest equipment financing or emergency home equity debt unless an actuarial sinking fund is maintained.
Texas Climate & Soil Stresses
Compounded Texas heat and UV radiation accelerating simultaneous mechanical and envelope depreciation
Convergence of roof, AC, and water heater failures within a narrow 12- to 15-year window
High windstorm and hail insurance deductibles (typically 1% to 2% of total dwelling value)
Volatile regional contractor labor and material replacement pricing surges following hurricane and freeze events
Texas Field Pro Tips
Maintain a dedicated high-yield savings escrow account allocating $450 to $850 monthly specifically earmarked for anticipated capital component replacements.
Keep a liquid cash reserve equal to your insurance policy's full 1% or 2% windstorm/hail deductible separate from general emergency savings.
Solicit at least three detailed, line-item bids from licensed and insured contractors before commissioning any major roof, HVAC, or foundation overhaul.
How to Maintain & Protect It
Establish a dedicated high-yield savings account solely for home capital reserves, depositing $450 to $850 each month depending on home age and system count.
Maintain a separate $5,000 cash buffer to cover insurance windstorm/hail deductibles. When bidding major projects, always solicit three written estimates with detailed equipment specifications.
HOMEOWNER DECISION MATRIX
DIY Weekend Maintenance vs. Call a Qualified Pro
SAFE 15-MINUTE DIY CARE
Audit home equipment serial numbers and manufacture dates into a personal spreadsheet or the Chapter 11 maintenance log.
Establish a dedicated, high-yield capital reserve savings account separate from daily checking for future major replacements ($1/sq ft/year).
Review annual property insurance policy to confirm roof deductible (1% vs 2%) and verify dwelling replacement coverage matches construction costs.
WHEN TO CALL A QUALIFIED PRO
Certified Master Inspector or reserve study specialist for comprehensive 30-year capital forecasting baseline.
Licensed structural engineer for assessment when major structural renovations, additions, or pier underpinning are contemplated.
Independent insurance broker or public adjuster when disputing depreciation schedules on equipment nearing end of statistical lifespan.
CLINICAL DIFFERENTIAL FIELD TRIAGE & CONNECTED SYSTEMS§ 10.5 Diagnostic Rubric
Harmless Cosmetic Baseline
Auto-transferring 1% to 1.5% of your home’s value annually into a high-yield Capital Reserve account turns predictable system replacements into stress-free cash purchases.
Active Failure Signal
Zero emergency reserve savings paired with reliance on $650 home warranty policies loaded with $1,500 refrigerant/code exclusions—forcing 19% APR panic loans.
60-Second Homeowner Check
List your roof, AC, and water heater ages on one sticky note: divide each remaining replacement cost by months left to set your automated monthly transfer today.
BEFORE YOU SIGN A BID • TEXAS CONTRACTOR VETTING & SCAM DEFENSE
Evaluating Home Warranty Contracts vs. Self-Funded Reserve Accounts
§ 10.5 Playbook
Texas Credential to VerifyTexas Department of Licensing and Regulation (TDLR) Residential Service Company Registration.
Municipal Permit & Inspection RuleReview exact dollar caps on refrigerant, crane/attic access, code upgrades, and pre-existing rust exclusions.
3 Questions You Must Ask Before Hiring
“What is the exact maximum dollar payout cap for HVAC refrigerant, under-slab plumbing access, and municipal code-upgrade modifications?”
“Do I have the right to choose my own licensed Texas contractor if your dispatched vendor cannot arrive within 24 hours during a 102°F July heatwave?”
“Does this contract deny claims labeled ‘lack of maintenance,’ ‘improper prior installation,’ or ‘rust/sediment’—and what documentation defeats unfair denials?”
3 High-Pressure Red Flags & Scams
Assuming a $650 residential service contract will pay $12,000 for a full SEER2 AC replacement—only to discover $10/lb refrigerant caps and $1,800 uncovered “non-covered ductwork/pan modification” fees.
Mailers disguised as urgent “County Deed / Mortgage Warranty Expiration Final Notices” tricking new Texas homebuyers into buying junk coverage.
Skipping your own $200/month high-yield Home Capital Reserve account—which gives you 100% control over top-rated contractors with zero claim denials.
HOMEOWNER ACTION TAKEAWAYRISK LEVEL: LOW
Maintain a dedicated monthly replacement reserve to eliminate debt emergencies.
Recommended Action Steps
Deposit 1% to 2% of your home's purchase value annually into a dedicated high-yield reserve account.
Map home components by age against Texas climate lifespans using a 10-year capital forecast.
Prioritize water heater, AC compressor, and roof reserves before elective cosmetic renovations.
Maintain insurance deductible reserves in cash to avoid high-interest financing after severe storms.
ICC DIGITAL CODESASTM
ASTM E2018-24—Baseline Property Condition Assessment and Long-Term Capital Reserve Planning
STATUTORY MODEL CODE TEXT
The property condition assessment provides an objective evaluation of physical systems and deferred maintenance, establishing an expected useful life (EUL) and remaining useful life (RUL) schedule for capital budgeting.
IN PLAIN ENGLISH
A professional capital reserve schedule estimates remaining component lifespans to help homeowners save monthly for high-dollar future replacements.
HOMEOWNER PRO TIP:Maintain a dedicated high-yield savings account funded monthly to cover HVAC, roof, and water heater replacements without taking on high-interest debt.
Chapter 11 • XI
New Homeowner Move-In Checklist
The 48-Hour Move-In Emergency Protocol, Foundation Moisture Stewardship, HVAC Seasonal Servicing & Year-Round Texas Maintenance Calendar
Chapter 11 serves as the ultimate practical homeowner roadmap for Texas property stewardship. It establishes the critical 48-hour move-in emergency protocol, spring pre-cooling tune-ups, summer drought foundation hydration, fall and winter polar vortex freeze defense, and a master 12-month preventative maintenance calendar designed to prevent expensive compound building failures.
SCAN FOR LIVE DIGITAL TOOLS & UPDATES
Chapter 11 Digital Companion
Preventative Maintenance Schedule & Log
Instant mobile access to monthly automated calendar alerts, 48-hour move-in punch lists, and seasonal home maintenance walkthroughs.
CHECK FREQUENCYComplete within First 48 Hours of Move-In • Test Twice Annually
RISK IF IGNOREDCRITICAL
$50,000+ Catastrophic Flooding from Inability to Stop Water Main
1
2
3
WHAT YOU'RE LOOKING ATFIELD INSPECTION ANATOMY
1
Curb Stop Shutoff Valve:Brass gate valve located ahead of water meter requiring 90-degree turn with meter key.
2
Brass Water Meter Register:Digital or mechanical spinner dial used to detect running water or underground slab leaks.
3
5-Foot Steel Water Key:Essential T-handled emergency wrench kept in garage for rapid water main isolation.
EMERGENCY READINESS • 48-HOUR UTILITY ISOLATIONEmergency water isolation: having a dedicated steel meter key ready to operate the curb stop valve protects against catastrophic flooding if an interior shutoff fails.
3D ARCHITECTURAL CUTAWAY • FIGURE 11.1
FIGURE 11.1: THE 48-HOUR EMERGENCY SHUTOFF PROTOCOL: IDENTIFIED & LABELED MASTER VALVES VS. UNLABELED / OBSTRUCTED EMERGENCY DISCONNECTS
DONE RIGHT (CODE-COMPLIANT)
High-visibility tagged brass ball valve inside garage for instant water cutoff
Accessible street curb meter box with dedicated 5-foot steel T-handle meter key
Natural gas meter with dedicated 10-inch crescent wrench zip-tied to pipe
Accurately mapped 200A electrical panel directory and tested AFCI/GFCI breakers
COMMON DEFECT (NEEDS REPAIR)
Unlabeled water shutoff hidden behind drywall or stored moving boxes
Street curb meter box buried under 6 inches of soil and overgrown turf grass
Seized gas valve with no wrench available during sudden indoor gas odor leak
Blank unmapped electrical panel directory causing panic during breaker trips
Comparative technical illustration contrasting a prepared 48-hour move-in setup—featuring high-visibility labeled water ball valve, curb meter key, gas meter wrench, and mapped electrical panel—against an unprepared home with a buried meter box, seized valves, and unmapped breakers.
TEXAS FIELD TRIAGE: 3-STAGE SEVERITY SCALEField Inspection Progression Rubric
STAGE 1NORMAL TEXAS AGING (COSMETIC)
Condition:Interior brass water shutoff valve tagged with blue label; 5-foot curb meter key stored in garage.
Action:Ensure all adult occupants know locations; test quarter-turn.Annual Log
STAGE 2WATCH & MAINTAIN (30–90 DAYS)
Condition:Master water valve stiff or partially obstructed by stored boxes; curb meter box filled with dirt/ants.
Action:Clear out curb meter box with trowel; purchase 5-foot water key; label breakers within 7 days.7 Days
Action:Run to street curb meter box with steel meter key immediately; turn brass tang 90 degrees.Immediate
How It Works in Your Home
Your home relies on three central utility networks: pressurized potable water, natural gas, and electrical service.
Each network is equipped with a master cutoff mechanism designed to isolate the entire property instantly during an emergency, stopping water flooding, gas leaks, or electrical short circuits before catastrophic damage occurs.
What Can Go Wrong & What to Look For
In many older or builder-grade Texas homes, the interior master water valve is seized, unlabeled, or hidden behind stored boxes in the garage.
If a pipe bursts or an appliance supply hose snaps at 2:00 AM, scrambling in the dark without knowing where the valve is discharges 15 to 20 gallons of water per minute into finished living areas, causing tens of thousands of dollars in ruined flooring and drywall.
GARAGE EMERGENCY STATION • § 11.1
Staging Your Dedicated Garage Utility Shutoff & Diagnostic Station
Keep a dedicated steel water-meter curb key, 10-inch adjustable gas wrench, tactical flashlight, and labeled PEX manifold map mounted together so any household adult can isolate water or gas in under 90 seconds.
How Texas Weather & Soil Affect It
Texas municipal water meter boxes frequently fill with washed-in clay silt and aggressive fire ant colonies, obstructing access to emergency curb valves right when flash flooding or pipe ruptures occur.
During intense Gulf Coast rainstorms and spring flash-flood deluges, roadside ditches and curbside swales overflow, depositing dense clay silt into sunken municipal meter boxes. Over time, fire ant super-colonies colonize these warm utility vaults, building subterranean mud mounds that completely encase brass curb stop valves. In a midnight plumbing emergency, attempting to dig through mud and venomous fire ants with bare hands leads to dangerous delays.
Furthermore, the Texas electrical grid experiences intense lightning transient surges during severe weather fronts, alongside frequent summer localized brownouts. Knowing the exact location of your exterior 200-amp main service disconnect and exterior natural gas meter shutoff is vital to protecting your family from electrical fires and gas leaks following severe storms.
Texas Climate & Soil Stresses
Heavy thunderstorm deluges washing clay silt and yard debris directly into sunken street curb meter boxes
Aggressive red imported fire ant colonization of utility vaults encasing shutoff valves in protective mud
Severe lightning storms and ERCOT grid brownout events necessitating rapid whole-house electrical disconnect
Sudden plumbing rupture risks under high municipal static supply pressures (often exceeding 80 PSI)
Texas Field Pro Tips
Keep a dedicated 5-foot steel T-handle water meter curb key and an adjustable gas shutoff wrench hanging prominently in your garage.
Inspect your curbside water meter box during your move-in weekend; shovel out accumulated silt and apply insecticidal bait around the perimeter.
Tag your interior master ball valve and electrical main disconnect with bright high-visibility fluorescent tags so every family member can find them in the dark.
How to Maintain & Protect It
During your first 48 hours, locate your primary water shutoff valve (in the garage or utility closet) and tag it with high-visibility blue tape. Purchase a 5-foot steel T-handle water meter key to keep in your garage.
Zip-tie a 10-inch crescent wrench in a weather-sealed bag to your exterior gas meter riser. Rekey all exterior deadbolts and clear old remote codes on garage door openers.
HOMEOWNER DECISION MATRIX
DIY Weekend Maintenance vs. Call a Qualified Pro
SAFE 15-MINUTE DIY CARE
Locate master interior water shutoff valve (garage or utility closet); tag with high-visibility blue tape and test quarter-turn operation.
Clear dirt, spiders, and fire ant nests from the street curb water meter box; confirm you have a 5-foot steel T-handle meter key on site.
Place an adjustable 10-inch crescent wrench in a weather-sealed bag zip-tied directly to the vertical pipe of the exterior gas meter.
Replace all HVAC return air filters immediately to remove construction/move-in dust and verify smoke/CO detector batteries.
WHEN TO CALL A QUALIFIED PRO
Master water shutoff valve is frozen, seized, heavily corroded, or continues dripping when closed completely (requires plumber).
Smell of natural gas (mercaptan rotten-egg odor) near meter or inside home (evacuate immediately; call gas utility from outdoors).
Electrical service disconnect breaker feels excessively hot to the touch, buzzes loudly, or fails to trip when manually operated.
CLINICAL DIFFERENTIAL FIELD TRIAGE & CONNECTED SYSTEMS§ 11.1 Diagnostic Rubric
Harmless Cosmetic Baseline
Every adult in the home knowing the exact location of the main water valve, street curb key, gas meter lug, and main 200A breaker establishes total readiness.
Active Failure Signal
Mud-packed inaccessible street water meter boxes, painted-shut interior main valves, unknown previous-owner lock keys, or un-reset garage opener remotes.
60-Second Homeowner Check
Walk to your garage or utility wall right now and turn your main house water ball valve 90 degrees OFF and back ON to prove it is not frozen with mineral scale.
BEFORE YOU SIGN A BID • TEXAS CONTRACTOR VETTING & SCAM DEFENSE
Golden Rules Before Signing Any Texas Home Improvement Contract
§ 11.1 Playbook
Texas Credential to VerifyVerify state trade license (TDLR / TSBPE / TBPE / TDA), General Liability Certificate, and City Permit Portal.
Municipal Permit & Inspection RuleNever allow a contractor to talk you into pulling a “Homeowner Permit” for hired trade work—that shifts legal liability onto you.
3 Questions You Must Ask Before Hiring
“Will you obtain at least 3 itemized, apples-to-apples written bids specifying exact equipment model numbers, materials, permit fees, and cleanup?”
“Is the payment schedule tied strictly to verified milestones (never >10–25% deposit), with final 15% paid ONLY after city permit green-tag and signed unconditional lien waivers?”
“Does the written contract include Texas’s statutory 3-business-day right to cancel (for off-premise/in-home sales) and clear start/completion dates?”
3 High-Pressure Red Flags & Scams
Contractors asking YOU to pull the city permit as the homeowner—a classic red flag indicating an unlicensed operator or suspended state license.
Paying 100% before subcontractors/material suppliers sign lien waivers—Under Texas Property Code Ch. 53, unpaid suppliers can file a mechanic’s lien on your homestead even if you already paid the general contractor!
Verbal “handshake change orders” or Venmo/Zelle-only personal-name payments with no physical Texas business address.
HOMEOWNER ACTION TAKEAWAYRISK LEVEL: CRITICAL
Master master utility shutoffs during your first 48 hours in the home.
Recommended Action Steps
Locate the interior master water ball valve and test smooth 90-degree isolation.
Acquire a 5-foot steel water meter key and clear silt/insects from the street curb box.
Attach a 10-inch crescent wrench in a weather-sealed bag to the exterior gas meter riser.
Identify the exterior main electrical service disconnect breaker and map interior branch circuits.
ICC DIGITAL CODES2021 / 2024 IRC
2021/2024 IRC P2903.9.3—Emergency Shutoff Valve Locations and Exterior Electrical Disconnects
STATUTORY MODEL CODE TEXT
Each dwelling unit shall be provided with an accessible main shutoff valve near the entrance of the water service. An exterior emergency electrical service disconnect shall be provided on all one- and two-family dwellings.
IN PLAIN ENGLISH
Every home must have an accessible main water shutoff valve and an exterior main electrical disconnect for fast emergency isolation.
HOMEOWNER PRO TIP:Within your first 48 hours, locate your primary water shutoff in the garage or curb meter box and confirm you have a 5-foot water meter key on site.
11.2
Spring Texas Maintenance Checklist: AC Tune-Up, Condensate Line Bleach Flush, Roof Valley Cleaning & Gutter Runoff
Move-In & Seasonal Maintenance9 min readEdition 3.0
Open PVC Drain Access T-Cap:Unthreaded pipe cleanout where 1 cup of distilled white vinegar is poured monthly.
2
Secondary Drain Pan Float Switch:Emergency safety sensor wired to kill AC compressor if primary drain line clogs.
3
3/4-Inch Primary PVC Drain Line:Trapped drain pipe routing condensate water safely into bathroom plumbing waste.
PRE-SUMMER READINESS • AC CONDENSATE FLUSH & GUTTERSMonthly AC condensate treatment: pouring one cup of distilled white vinegar into the cleanout tee dissolves microbial algae before it blocks the line and floods ceiling sheetrock.
3D ARCHITECTURAL CUTAWAY • FIGURE 11.2
FIGURE 11.2: SPRING TEXAS MAINTENANCE: CLEAR CONDENSATE LINES & CLEANED VALLEYS VS. CLOGGED DRAIN ALGAE PAN OVERFLOW & ROOF GUTTER BACKUP
DONE RIGHT (CODE-COMPLIANT)
Primary condensate line treated with vinegar/bleach every 30 days to kill algae
Secondary drain pan equipped with functional electronic float safety switch
Roof valleys and gutters swept clean of spring live oak pollen tassels and debris
Downspout extensions discharging storm water 5+ feet away from foundation slab
Missing or bypassed float switch allowing condensate water to collapse ceiling sheetrock
Oak catkins and leaves damming roof valley, causing capillary shingle leaks
Discharging downspout dumping roof water directly against foundation grade beam
Comparative technical illustration contrasting a maintained spring HVAC setup with cleared condensate drain, active float switch, and clean roof gutters against an unmaintained system with an algae-clogged drain pan flooding ceiling drywall and oak tassel gutter dams saturating foundation soils.
TEXAS FIELD TRIAGE: 3-STAGE SEVERITY SCALEField Inspection Progression Rubric
STAGE 1NORMAL TEXAS AGING (COSMETIC)
Condition:Spring walkthrough reveals clean roof valleys, clear AC primary condensate line, and sound weatherstrips.
Action:Flush condensate line with 1 cup vinegar; wash AC fins.Annual Log
STAGE 2WATCH & MAINTAIN (30–90 DAYS)
Condition:AC primary condensate drain dripping sluggishly; gutters clogged with oak catkins; hose bibb packing loose.
Action:Clear gutters and splash blocks; flush condensate trap; tighten hose bibb nut within 14 days.14 Days
STAGE 3ACT IMMEDIATELY (URGENT)
Condition:Condensate line totally blocked backing up into attic emergency pan; debris damming roof valley with leak.
Action:Vacuum out condensate line from exterior using wet/dry vac; dispatch roofer for storm repair.Immediate
How It Works in Your Home
During humid Texas springs, your air conditioning system removes gallons of atmospheric moisture daily as indoor air passes over the cold evaporator coil.
Water collects in an internal drain pan and flows through a 3/4-inch PVC drain line to discharge outside, while roof gutters and valleys channel spring storm deluges safely away from foundation soil.
What Can Go Wrong & What to Look For
In unconditioned attics reaching 120°F in spring, warm standing water inside condensate lines fosters a gelatinous microbial slime (algae plug).
Without treatment, this plug blocks the pipe, causing water to fill the auxiliary emergency drain pan. If the safety float switch is missing or broken, the pan overflows, collapsing bedroom ceiling drywall and creating hidden mold colonies.
SPRING & WARRANTY AUDIT • § 11.2
Spring Commissioning & New-Home 11th-Month Warranty Walkthroughs
March and April are prime months to flush AC drain lines, clear oak tassels from gutters, and—for new-build owners—document builder warranty defects before the 12-month bumper-to-bumper coverage expires.
How Texas Weather & Soil Affect It
Texas spring weather delivers a double threat: heavy oak pollen tassels that choke gutter systems, followed immediately by severe thunderstorm deluges that flood foundation perimeters and overwhelm uncleaned AC condensate drains.
Across Central, East, and North Texas, mature live oak trees shed millions of pounds of catkins (pollen tassels) and hardened spring leaves throughout March and April. This organic debris rapidly forms dense water-absorbing mats across roof valleys and inside gutter troughs. When sudden spring squall lines drop 2 to 4 inches of rain in an hour, obstructed gutters overflow, dumping thousands of gallons directly against bare foundation grade beams and triggering localized clay soil heave.
Simultaneously, indoor air handlers begin continuous dehumidification cycles as outdoor temperatures climb into the 80s and 90s. In unconditioned Texas attics, warm stagnant condensate water fosters rapid bacterial and fungal zoogleal growth (algae slime) inside 3/4-inch PVC drain pipes. Without regular preventive clearing, this gelatinous plug blocks gravity drainage, filling secondary drain pans and threatening catastrophic ceiling collapse.
Texas Climate & Soil Stresses
Live oak and cedar elm catkin pollen tassel shedding clogging roof valleys and gutter troughs
Severe spring thunderstorm squall lines dropping heavy rainfall volumes exceeding gutter capacity
Elevated attic temperatures incubating rapid zoogleal bacterial and fungal slime clogs in AC drain pipes
Pre-summer heat spikes testing aging compressor capacitors and dirty outdoor condenser fins
Texas Field Pro Tips
Test your AC secondary drain pan's inline Safe-T-Switch float sensor in April to confirm it kills the compressor if water rises.
Pour 1 cup of distilled white vinegar into the primary condensate drain cleanout access tee every 30 days throughout the cooling season.
Clean gutters thoroughly after the spring oak tassel drop and install rigid splash blocks extending downspout discharge 5 feet from the slab.
How to Maintain & Protect It
Every spring in April, schedule a professional AC tune-up to clean outdoor condenser coils and test motor capacitors.
Pour 1 cup of distilled white vinegar down the primary condensate drain cleanout tee every 30 days. Clean oak tassels and debris from roof valleys and gutter troughs, verifying downspout extensions route water 5+ feet away from the slab.
HOMEOWNER DECISION MATRIX
DIY Weekend Maintenance vs. Call a Qualified Pro
SAFE 15-MINUTE DIY CARE
Flush HVAC primary condensate drain line with 1 cup distilled white vinegar and verify water flows freely to the exterior termination.
Clear accumulated tree pollen, leaves, and debris from roof valleys, gutter downspouts, and AC condenser exterior grilles.
Inspect weatherstripping on all exterior doors; replace torn or compressed vinyl bulb seals to block humid spring air infiltration.
Test all exterior GFCI outdoor outlets with a plug-in circuit tester prior to spring power tool and lawn equipment usage.
WHEN TO CALL A QUALIFIED PRO
HVAC technician for comprehensive spring refrigerant charge check, electrical contactor cleaning, and motor amperage testing.
Roofing contractor to repair lifted flashing, bruised shingles, or cracked chimney cap mortar discovered after severe hail storms.
Licensed pest control specialist if winged termite swarmers or mud shelter tubes are observed along slab edges during warm spring rains.
CLINICAL DIFFERENTIAL FIELD TRIAGE & CONNECTED SYSTEMS§ 11.2 Diagnostic Rubric
Harmless Cosmetic Baseline
Flushed AC condensate traps, oak-tassel-free gutters, and documented Month-11 new-construction warranty punch lists set your home up before May supercells hit.
Active Failure Signal
Algae-plugged AC drain lines backing up in April, winter hail damage left uninspected, or letting a new home’s 12-month builder warranty expire undocumented.
60-Second Homeowner Check
Pour 1 cup of distilled white vinegar into your attic/closet AC condensate cleanout tee each spring, and clear live-oak pollen tassels out of valley gutters.
BEFORE YOU SIGN A BID • TEXAS CONTRACTOR VETTING & SCAM DEFENSE
11th-Month New-Home Builder Warranty Audits & Spring Commissioning
§ 11.2 Playbook
Texas Credential to VerifyIndependent Licensed Texas Home Inspector (zero builder affiliation) for 10th/11th-month warranty audits; TDLR TACLA technician for spring AC prep.
Municipal Permit & Inspection RuleSubmit itemized warranty defect reports via builder portal AND timestamped certified mail BEFORE Month 12 workmanship coverage expires.
3 Questions You Must Ask Before Hiring
“Are you 100% independent of my production builder—and will your 11th-month audit include full attic framing/duct inspection, roof walking, and infrared moisture scans?”
“During spring AC commissioning, will you measure static pressure, subcooling/superheat, capacitor microfarads, AND flush the primary condensate trap—with zero surprise add-on fees?”
“Did we photograph and log post-settlement drywall nail pops, grading washouts, and sticky doors before the builder’s strict 365-day workmanship clock runs out?”
3 High-Pressure Red Flags & Scams
Builder warranty reps verbally promising “that slab crack or pooling yard swale is normal settling—call us next year” just to stall you past Day 365.
Loss-leader “$29 Spring AC Cleanings” designed solely to put a commission salesperson in your attic to invent “black mold on your blower wheel” for $2,400.
Hiring gutter cleaners who walk heavy ladders across brittle clay tile or hot 3-tab shingles instead of working safely from stabilizer standoffs.
HOMEOWNER ACTION TAKEAWAYRISK LEVEL: HIGH
Complete spring HVAC and drainage service before triple-digit heat arrives.
Recommended Action Steps
Flush primary condensate drain lines with distilled white vinegar and test secondary float switches.
Wash outdoor AC condenser coils with low-pressure garden hose water to restore heat transfer.
Clear spring tree blossoms and debris from roof valleys, gutters, and downspout splash blocks.
Inspect foundation perimeter soil and test soaker hose connections before summer drought.
ICC DIGITAL CODES2021 / 2024 IRC
2021/2024 IRC M1411.3.1—Air Conditioning Condensate Drainage Maintenance and Disposal
STATUTORY MODEL CODE TEXT
Condensate disposal piping shall be not less than 3/4-inch internal diameter and shall not decrease in size from the drain pan connection to the point of condensate disposal, sloping toward the drain outlet at not less than 1/8 unit vertical in 12 units horizontal.
IN PLAIN ENGLISH
Air conditioner drain lines must be at least 3/4 inch in diameter and slope continuously downward to prevent standing water and overflow into ceilings.
HOMEOWNER PRO TIP:Flush your primary AC condensate drain line with one cup of distilled white vinegar every 30 to 60 days during hot Texas summers to dissolve algae.
11.3
Summer Texas Heat & Drought Maintenance: Foundation Soaker Hose Calibration, Attic Ventilation & Tree Trimming
Move-In & Seasonal Maintenance9 min readEdition 3.0
SUMMER DROUGHT • FOUNDATION SOAKER HOSE CARESoil desiccation damage: prolonged summer droughts cause expansive clay to shrink away from the slab perimeter, removing bearing support and dropping foundation grade beams.
3D ARCHITECTURAL CUTAWAY • FIGURE 11.3
FIGURE 11.3: SUMMER DROUGHT FOUNDATION SOAKER CARE: UNIFORM CLAY SOIL HYDRATION VS. SOIL DESICCATION GAP & FOUNDATION CORNER CRACKING
DONE RIGHT (CODE-COMPLIANT)
Porous soaker hose positioned 12–18 inches away from concrete foundation beam
Automated timer running 15–20 minutes in early morning, 2–3 times per week
Soil moisture maintained like a squeezed sponge; 6-inch screwdriver test passes
Zero foundation watering during 60-day August drought, baking clay rock-hard
Severe soil shrinkage gap (2–4 inches wide) pulling away from concrete slab beam
Loss of soil bearing support causing slab edge to drop, shearing interior drywall
Tree roots within 5 feet of foundation extracting 100+ gallons/day from clay
Comparative technical cross-section contrasting a calibrated foundation soaker hose setup maintaining uniform soil moisture 12–18 inches from the slab against unwatered desiccated Texas clay pulling away from the slab, causing severe corner settlement and diagonal drywall shearing.
TEXAS FIELD TRIAGE: 3-STAGE SEVERITY SCALEField Inspection Progression Rubric
STAGE 1NORMAL TEXAS AGING (COSMETIC)
Condition:Foundation soil moist like a squeezed damp sponge; soaker hoses cycling on timers 2–3 mornings weekly.
Action:Probe soil weekly with 6-inch screwdriver; check timer.Annual Log
STAGE 2WATCH & MAINTAIN (30–90 DAYS)
Condition:Soil pulling away 1 to 1.5 inches from concrete slab edge during extended 100°F heat wave.
Action:Increase soaker hose runtime to 30 min 3 times weekly; verify outward spray away from house.7–14 Days
STAGE 3ACT IMMEDIATELY (URGENT)
Condition:Deep soil fissures (>2 inches wide, 3+ ft deep) around slab edge; foundation corner dropping with door jammed.
Action:Slow-soak foundation perimeter over 72 hours; install dedicated foundation drip irrigation system.Immediate
When surrounding soil moisture is held constant, the clay beneath the slab exerts steady support across the entire footprint, preventing localized slab bending or foundation heave.
What Can Go Wrong & What to Look For
During triple-digit Texas summer droughts, baked expansive clay shrinks dramatically, pulling away from concrete perimeter grade beams.
This leaves foundation corners cantilevered in mid-air without bearing soil. The perimeter beam drops 1 to 2 inches, shearing interior drywall tape seams, racking door frames out of square, and cracking ceramic floor tiles.
Gentle garden-hose rinsing of outdoor condenser coils, crisp 30-day filter changes, and consistent 15-minute morning/evening foundation drip cycles keep both utility bills and slab movement flat.
How Texas Weather & Soil Affect It
Relentless triple-digit heatwaves evaporate soil moisture rapidly, causing Texas expansive clay to shrink and pull away up to 2 inches from foundation grade beams.
During prolonged summer droughts from June through August, smectite clay formations (including Houston Black Gumbo, Dallas Blackland Prairie, and Austin Chalk) lose up to 10% to 15% of their hydrated volume. As the ground shrinks, wide desiccation fissures open deep into the subsoil, and soil pulls away from perimeter grade beams. Deprived of uniform earth support, foundation corners cantilever in midair and settle downward under gravitational loads, causing drywall cracks and sticking doors.
Simultaneously, mature shade trees (such as live oaks and pecan trees) consume up to 150 to 300 gallons of groundwater daily. Their extensive lateral root networks extend beneath foundation footings, aggressively drinking subsurface moisture and creating severe localized subsidence pockets along slab corners.
Install porous rubber soaker hoses 12 to 18 inches away from the foundation perimeter connected to battery-powered automated faucet timers.
Perform the weekly 6-inch screwdriver test: the shank should slide smoothly into perimeter soil like a firm damp sponge.
Schedule soaker hose runs for 20 to 30 minutes in the early morning before 7:00 AM to minimize evaporative losses.
How to Maintain & Protect It
Position porous soaker hoses 12 to 18 inches away from your foundation perimeter.
Run hoses on an automated timer for 15 to 20 minutes, 2 to 3 times per week before 7:00 AM. Perform the simple screwdriver test weekly: push a 6-inch metal screwdriver into soil 12 inches from the slab; if it penetrates smoothly, soil moisture is balanced.
HOMEOWNER DECISION MATRIX
DIY Weekend Maintenance vs. Call a Qualified Pro
SAFE 15-MINUTE DIY CARE
Place soaker hoses 12–18 inches from the foundation perimeter and connect to an automated faucet timer (2–3 times weekly for 20–30 min).
Check perimeter soil moisture by inserting a 6-inch screwdriver into soil—it should penetrate smoothly like a firm damp sponge.
Verify attic eave/soffit intake vents and ridge vents remain completely unblocked by blown insulation or storage boxes.
Set ceiling fans to rotate counterclockwise at medium speed to create a cooling downdraft during triple-digit heat waves.
WHEN TO CALL A QUALIFIED PRO
Foundation repair specialist if soil separates >2 inches from slab edge and exterior brick stair-step cracks open >1/8 inch.
HVAC technician if indoor relative humidity exceeds 60% with AC running constantly, or if evaporator coil freezes into solid ice.
Electrician if AC condenser repeatedly trips main 30A/50A breaker during peak afternoon grid stress.
CLINICAL DIFFERENTIAL FIELD TRIAGE & CONNECTED SYSTEMS§ 11.3 Diagnostic Rubric
Harmless Cosmetic Baseline
Clean MERV 8–11 filters swapped every 30 days, rinsed outdoor condenser coils, and moist perimeter soil keeping clay gaps <1/2 inch conquer 104°F Augusts.
Active Failure Signal
2-inch wide drought fissures pulling clay away from the slab perimeter, grass clippings matting outdoor AC fins, or choked air filters freezing coils in July.
60-Second Homeowner Check
Slide out your return air filter today (if gray, swap immediately), and walk the sunny west/south slab edge checking for dry soil pulling away from the concrete.
BEFORE YOU SIGN A BID • TEXAS CONTRACTOR VETTING & SCAM DEFENSE
Summer Heat Defense, Condenser Care & Drought Foundation Hydration
§ 11.3 Playbook
Texas Credential to VerifyTCEQ Licensed Irrigator (LI) for dedicated perimeter foundation drip zones; TDLR TACLA technician for peak-summer cooling diagnostics.
Municipal Permit & Inspection RuleFollow municipal Stage 1–3 drought schedules (foundation drip/soaker watering is typically allowed under variance rules; permits required for new irrigation zones).
3 Questions You Must Ask Before Hiring
“Is my foundation drip/soaker line positioned 12 to 18 inches away from the slab edge (never dumping water straight down a drought gap) on balanced morning/evening 15-minute cycles?”
“When cleaning outdoor condenser coils in July, will you rinse gently from the inside out with low-pressure garden water—never high-pressure washers or acid cleaners that strip coastal fin coatings?”
“Are large shade trees within 20 feet of my slab served by a dedicated root-barrier or deep-root watering zone so thirsty live oaks stop desiccating clay beneath one corner of my home?”
3 High-Pressure Red Flags & Scams
Over-watering one side of a parched Texas slab for 4 hours straight in August—converting uniform dry settlement into sudden differential upheaval that cracks tile floors.
Spraying harsh alkaline foaming acid on microchannel aluminum AC coils without thorough rinsing—eating pinhole refrigerant leaks within months.
Installing MERV 16 allergy-pleated filters in a standard 1-inch return grille during 104°F heatwaves—choking airflow and freezing the indoor coil solid.
HOMEOWNER ACTION TAKEAWAYRISK LEVEL: CRITICAL
Maintain consistent perimeter soil moisture to prevent foundation settlement.
Recommended Action Steps
Run perimeter soaker hoses on automatic timers 15 to 20 minutes twice daily in peak summer heat.
Keep soil moisture uniform around all sides of the foundation to avoid differential settlement.
Replace AC air filters monthly during continuous summer cooling cycles to prevent coil icing.
2021/2024 IRC R401.2—Foundation Perimeter Moisture Equilibrium in Expansive Soils
STATUTORY MODEL CODE TEXT
Foundations shall be constructed on controlled soil or engineered to accommodate anticipated soil movements in expansive clay regions conforming to ASCE guidelines for residential foundation design on expansive soils.
IN PLAIN ENGLISH
Foundations built on expansive clay must be protected by uniform moisture management around the entire perimeter to prevent differential foundation movement.
HOMEOWNER PRO TIP:During summer droughts, run foundation soaker hoses 12 to 18 inches away from the slab edge for 15 to 20 minutes daily to maintain soil moisture consistency.
11.4
Fall and Winter Texas Freeze Protection: Hose Bib Insulation Caps, Furnace Heat Exchanger Inspection & Pipe Wrapping
Move-In & Seasonal Maintenance9 min readEdition 3.0
All exposed water pipes in garage and attic wrapped in 3/4" closed-cell foam sleeves
Interior vanity doors opened and faucets dripping during prolonged sub-25°F freezes
COMMON DEFECT (NEEDS REPAIR)
Garden hose left connected, trapping water inside sillcock barrel
Expanding ice splits brass barrel inside wall cavity; floods wall when turned on
Uninsulated PEX/copper water pipes in unheated garage freezing and bursting
Sprinkler PVB backflow preventer cracked from trapped water expanding inside brass body
Comparative technical illustration contrasting a winter-ready home with disconnected garden hose, insulated faucet cover, foam-wrapped garage pipes, and opened sink vanity doors against a freeze-damaged home with a connected hose splitting a frost-free sillcock inside a brick wall cavity.
TEXAS FIELD TRIAGE: 3-STAGE SEVERITY SCALEField Inspection Progression Rubric
STAGE 1NORMAL TEXAS AGING (COSMETIC)
Condition:Insulated styrofoam freeze caps installed over all outdoor hose bibbs; garden hoses drained; filter fresh.
Action:Verify freeze covers are clamped tight prior to freeze.Annual Log
Action:Shut off irrigation isolation valve and open test cocks to drain backflow preventer; install spigot caps.24 Hrs
STAGE 3ACT IMMEDIATELY (URGENT)
Condition:Exterior spigot freezing and bursting during hard freeze; uninsulated attic pipe ruptured spraying ceiling.
Action:Shut off main water valve immediately; open faucets to relieve pressure; call emergency plumber.Immediate
How It Works in Your Home
Exterior frost-free sillcocks are designed with a long stem that seals inside the warm interior wall framing, allowing residual water in the barrel to drain out by gravity once closed.
Closed-cell foam insulation sleeves trap ambient heat around exposed indoor water pipes, keeping liquid water flowing during brief freeze events.
What Can Go Wrong & What to Look For
If a garden hose is left attached to an outdoor faucet during freezing weather, water cannot drain from the sillcock barrel.
Expanding ice splits the brass barrel inside the wall cavity. Because the ice remains frozen, the homeowner notices nothing until temperatures rise or the faucet is turned on in spring, when hundreds of gallons of pressurized water spray into wall cavities and under hardwood floors.
ARCTIC FREEZE PLAYBOOK • § 11.4
The Hard-Freeze Protocol Learned From Winter Storm Uri
Before sub-25°F Arctic fronts arrive: disconnect every garden hose, drain and wrap your brass sprinkler PVB assembly, keep tankless heaters plugged into backup power, and open sink cabinet doors.
How Texas Weather & Soil Affect It
Because Texas homes are engineered primarily to ventilate extreme summer heat, domestic water pipes frequently route across unconditioned attics and uninsulated garage walls that freeze rapidly during sudden Arctic polar vortex events.
Texas winter weather is notorious for rapid temperature drops where 'Blue Norther' arctic fronts drop ambient temperatures from 75°F to 20°F in under four hours. Unlike northern construction where plumbing lines run through interior heated basements, Texas homes frequently feature PEX and copper water lines traversing unconditioned ventilated attics directly above roof insulation, or running inside uninsulated exterior garage walls.
When temperatures drop below 25°F for consecutive hours, these vulnerable plumbing runs freeze solid. If garden hoses remain attached to exterior spigots, the trapped water column expands within frost-free sillcocks, bursting the internal brass barrel inside interior wall cavities. When the thaw occurs, pressurized water sprays undetected behind sheetrock, causing extensive flooring and drywall flooding.
Texas Climate & Soil Stresses
Arctic polar plunge cold fronts dropping temperatures 40°F in under four hours
Plumbing pipes routed through unconditioned attics above insulation and within unheated garage walls
Extended multi-day sub-freezing weather accompanied by regional electrical grid instability
Leaving garden hoses connected preventing frost-free sillcock barrels from draining by gravity
Texas Field Pro Tips
Disconnect all garden hoses by November 15 and install insulated dome freeze caps securely over every outdoor spigot.
During hard freezes below 25°F, open under-sink vanity cabinet doors and allow faucets along exterior walls to run at a steady pencil-lead trickle.
Wrap all exposed water lines and water heater piping in unheated garages with 3/4-inch closed-cell elastomeric foam insulation sleeves.
How to Maintain & Protect It
Disconnect all garden hoses by November 15 and install insulated foam caps over all exterior hose bibbs.
Wrap all exposed water supply lines in your garage and attic with 3/4-inch closed-cell foam sleeves. Schedule an annual furnace inspection to check burner flame quality and heat exchanger integrity, and install fresh batteries in carbon monoxide detectors.
HOMEOWNER DECISION MATRIX
DIY Weekend Maintenance vs. Call a Qualified Pro
SAFE 15-MINUTE DIY CARE
Disconnect all garden hoses from exterior spigots and install insulated styrofoam freeze caps over all outdoor hose bibbs before freeze warnings.
Shut off irrigation system main isolation valve and open manual test cocks on backflow preventer (PVB/RPZ) to drain standing water.
Replace furnace return air filter and verify exterior furnace combustion air intake and exhaust flue pipes are free of bird nests.
Test smoke alarms and carbon monoxide detectors on each level; replace 9V backup batteries if not 10-year sealed units.
WHEN TO CALL A QUALIFIED PRO
Licensed HVAC technician to perform annual gas furnace safety inspection, including heat exchanger crack testing and CO flue draft analysis.
Plumber to repair burst exterior pipes or restore seized main water shutoff valves if freeze damage occurs.
Certified chimney sweep to inspect and clean wood-burning fireplace flue and spark arrestor before burning seasonal firewood.
CLINICAL DIFFERENTIAL FIELD TRIAGE & CONNECTED SYSTEMS§ 11.4 Diagnostic Rubric
Harmless Cosmetic Baseline
Disconnected garden hoses, foam-hooded exterior spigots, drained irrigation PVB bells, and tested gas furnaces let Texas homes ride out 15°F freezes unharmed.
Active Failure Signal
Garden hoses left attached during freezes, pressurized exterior brass backflow bells, uninsulated attic PEX near soffits, or unplugged exterior tankless heaters.
60-Second Homeowner Check
Before the first 28°F forecast: unscrew every garden hose outdoors, shut and drain your sprinkler backflow valve, and open sink cabinets on exterior walls.
Texas Credential to VerifyTSBPE Responsible Master Plumber (RMP) for freeze-proof valves/repairs; TDLR TACLA Contractor for fall heating safety; TCEQ LI/BPAT for backflow winterizing.
Municipal Permit & Inspection RuleDuring statewide Texas freeze disasters, emergency leak repairs may proceed immediately, but a licensed TSBPE RMP must still file the follow-up city permit.
3 Questions You Must Ask Before Hiring
“Before sub-25°F freezes arrive, did we disconnect all garden hoses, close the interior irrigation isolation valve, and drain the brass exterior PVB backflow bell?”
“Since my gas tankless water heater mounts on an exterior/garage wall, is its 120V freeze-protection heater plugged into a battery UPS backup in case the grid drops?”
“If hiring a plumber after a freeze burst, what is your verifiable TSBPE RMP license number and Texas shop address—never an out-of-state price-gouging storm van?”
3 High-Pressure Red Flags & Scams
Leaving garden hoses screwed onto “frost-free” hose bibbs during a Texas freeze—which traps water inside the stem and splits copper pipe hidden inside your brick wall!
Shutting off power or unplugging an exterior tankless water heater during a winter power outage without draining its internal copper heat exchanger via the bottom drain plugs.
Out-of-state unlicensed disaster chasers demanding $5,000 cash after a Texas freeze to slap push-to-connect fittings inside wet walls with zero pressure test or permit.
HOMEOWNER ACTION TAKEAWAYRISK LEVEL: CRITICAL
Winterize exterior hose bibbs and protect attic pipes before hard freezes.
Recommended Action Steps
Disconnect all garden hoses and install foam insulated faucet covers before the first freeze.
Insulate exposed plumbing pipes in unconditioned attics, garages, and crawlspaces.
Open under-sink vanity cabinet doors and allow faucets to drip slowly during sub-freezing nights.
Test furnace heating cycle and check smoke and carbon monoxide detectors before winter.
ICC DIGITAL CODES2021 / 2024 IRC
2021/2024 IRC P2603.5—Freezing Protection for Water Pipes and Exterior Hose Connections
STATUTORY MODEL CODE TEXT
Water piping installed in exterior walls, unconditioned attics, or exposed to freezing temperatures shall be protected by insulation, heat trace, or placement within conditioned thermal envelopes.
IN PLAIN ENGLISH
Plumbing pipes subject to freezing temperatures must be insulated or enclosed within warm wall cavities to prevent bursting.
HOMEOWNER PRO TIP:Before winter freeze warnings, disconnect all garden hoses from exterior spigots and install insulated foam covers over every exterior hose bibb.
11.5
The Annual Preventative Maintenance Log: Smoke/CO Detector Battery Dates, Water Heater Flushing & Inspection Recertification
Move-In & Seasonal Maintenance10 min readEdition 3.0
TYPICAL TEXAS LIFESPANSmoke Detectors: 10 Yrs / CO Detectors: 5–7 Yrs / Water Heaters: 8–12 Yrs
Chronic Deferred Maintenance & 15–25% Accelerated Home Devaluation
1
2
3
WHAT YOU'RE LOOKING ATFIELD INSPECTION ANATOMY
1
Smoke / CO Alarm Expiration Date:Stamped manufacture date on back of alarm requiring full unit disposal after 10 years.
2
Heavy-Duty Tank Flush Drain Hose:3/4-inch brass-coupled garden hose routed to driveway to flush tank sediment.
3
Annual Preventative Inspection Log:Printed record binder tracking filter dates, AC tune-ups, and warranty receipts.
PREVENTATIVE LOG • 12-MONTH MAINTENANCE CADENCEHomeowner maintenance readiness: equipping your home with essential diagnostic tools and maintaining a disciplined 12-month log protects equipment warranties and prevents five-figure compound repairs.
3D ARCHITECTURAL CUTAWAY • FIGURE 11.5
FIGURE 11.5: THE ANNUAL HOMEOWNER PREVENTATIVE MAINTENANCE CALENDAR: PROACTIVE 12-MONTH SCHEDULE VS. DEFERRED MAINTENANCE COMPOUND BREAKDOWN
DONE RIGHT (CODE-COMPLIANT)
12-month seasonal maintenance calendar executed on the 1st of every month
Annual water heater sediment flush removing hard calcium scale
Life-safety detectors replaced every 10 years; batteries refreshed biannually
Professional 3- to 5-year Texas home inspection recertification walkthrough
COMMON DEFECT (NEEDS REPAIR)
Zero preventative maintenance log resulting in reactive emergency repairs
Water heater never flushed; 6" rock-hard scale ruptures tank after 8 years
Expired 14-year-old smoke alarms failing to sound during night house fire
Undetected attic AC drain leak rotting ceiling joists and causing toxic mold
Comparative system workflow diagram contrasting an organized 12-month preventative maintenance schedule—featuring seasonal HVAC tune-ups, annual water heater flushes, and detector testing—against an unmaintained home suffering from compound deferred maintenance failures.
TEXAS FIELD TRIAGE: 3-STAGE SEVERITY SCALEField Inspection Progression Rubric
STAGE 1NORMAL TEXAS AGING (COSMETIC)
Condition:Annual maintenance log updated on schedule; water heater flushed; detector batteries tested; door reverse ok.
Action:Record dates and equipment model numbers in logbook.Annual Log
STAGE 2WATCH & MAINTAIN (30–90 DAYS)
Condition:Annual maintenance deferred by 6 to 12 months; water heater tank showing mineral sediment; opener sluggish.
Action:Dedicate one weekend morning to execute the complete Chapter 11 annual maintenance checklist.30 Days
STAGE 3ACT IMMEDIATELY (URGENT)
Condition:Complete neglect of home systems (>3 yrs) resulting in simultaneous furnace failure, ceiling leak, dead alarms.
Action:Commission comprehensive Certified Master Inspector maintenance inspection for clean baseline.Immediate
How It Works in Your Home
A residential maintenance calendar breaks complex home systems into small, manageable monthly tasks.
By addressing specific seasonal requirements—like AC tune-ups in spring, foundation watering in summer, and freeze protection in fall—homeowners extend equipment life and maintain warranty coverage.
What Can Go Wrong & What to Look For
Ignoring routine maintenance leads to compound system failures.
An unserviced AC filter chokes airflow, causing the evaporator coil to freeze into a block of ice; when it thaws, water overflows an uncleaned drain pan, collapsing the ceiling below and spawning toxic mold colonies.
HOMEOWNER TOOLKIT • § 11.5
The Essential 15-Tool Texas Homeowner Diagnostic Kit
A $150 homeowner kit—three-light GFCI receptacle tester, pinless moisture meter, infrared thermometer, water curb key, white vinegar, and elastomeric sealant—pays for itself ten times over.
How Texas Weather & Soil Affect It
Violent seasonal temperature swings across Texas—from 105°F summer heatwaves to sub-freezing Arctic polar plunges—impose compounded stresses across residential mechanical equipment and structural envelopes that require a synchronized 12-month preventative maintenance cadence.
The extreme environmental swings of the Texas climate leave zero margin for reactive maintenance neglect. Unserviced HVAC air filters lead directly to iced evaporator coils and water pan overflows during humid July heatwaves; neglected foundation watering during August droughts triggers five-figure structural settlement fractures; and uninsulated outdoor hose bibbs burst during sudden February freezes.
Maintaining a rigorous 12-month physical maintenance logbook creates an irrefutable chain of custody for manufacturer equipment warranties and residential insurance claims. When the time comes to sell your Texas home, presenting a meticulously documented maintenance journal directly substantiates property value and reassures prospective buyers that the home has been impeccably preserved.
Texas Climate & Soil Stresses
Violent seasonal temperature swings stressing structural materials and mechanical expansion joints
High-humidity mold proliferation risks following uncontained indoor condensate leaks
Rapid municipal water mineral scaling necessitating scheduled bi-annual water heater flushing
Severe storm fronts and hail events requiring immediate post-weather exterior envelope verification
Texas Field Pro Tips
Establish a physical or digital 12-month maintenance logbook recording every filter replacement, detector battery change, and equipment service date.
Perform a bi-annual water heater flush using a heavy-duty 3/4-inch drain hose until discharged water runs completely free of calcium flakes.
Schedule an independent professional home inspection recertification every 3 to 5 years to catch concealed attic leaks, structural shifting, and electrical hazards early.
How to Maintain & Protect It
Dedicate 15 minutes on the first day of every month to home upkeep.
Change HVAC return air filters, flush the AC condensate line with vinegar, and inspect foundation soil moisture. Once a year, flush 3 to 5 gallons of calcium sediment from your water heater tank, and schedule an independent home health inspection every 3 to 5 years.
HOMEOWNER DECISION MATRIX
DIY Weekend Maintenance vs. Call a Qualified Pro
SAFE 15-MINUTE DIY CARE
Connect garden hose to water heater drain valve and flush 3–5 gallons of sediment-laden water until discharge runs crystal clear.
Test garage door opener auto-reverse safety mechanism using a 2×4 block laid flat on the floor beneath the closing door.
Inspect washing machine rubber supply hoses for bulges, blisters, or cracking; upgrade to stainless-steel braided hoses.
Log dates of all filter replacements, detector tests, and service appointments in the physical back-of-book maintenance log.
WHEN TO CALL A QUALIFIED PRO
Licensed plumber to replace sacrificial water heater anode rod every 3–5 years in hard Texas municipal water areas.
Garage door technician to adjust overhead torsion spring tension or replace frayed lift cables (never attempt spring repair DIY).
Licensed pest control operator for annual termite inspection and renewal of subterranean soil treatment warranty.
CLINICAL DIFFERENTIAL FIELD TRIAGE & CONNECTED SYSTEMS§ 11.5 Diagnostic Rubric
Harmless Cosmetic Baseline
A stocked 15-tool homeowner diagnostic kit and chronological binder of permits, filter logs, and warranties compound equity and streamline future buyer inspections.
Active Failure Signal
Lost roof/foundation warranty paperwork, untested 12-year-old smoke/GFCI devices, or skipping $15 caulk/filter habits until multi-thousand-dollar claims strike.
60-Second Homeowner Check
Create one cloud folder labeled “Home Stewardship Log” on your phone today and snap photos of your AC, water heater, panel, and termite stickers in 60 seconds.
BEFORE YOU SIGN A BID • TEXAS CONTRACTOR VETTING & SCAM DEFENSE
Evaluating Annual Service Memberships & Organizing Your Home Binder
§ 11.5 Playbook
Texas Credential to VerifyDirect Texas trade licenses ONLY (TDLR TACLA, TDLR TECL, TSBPE RMP, TDA SPCS) — verify every vendor at tdlr.texas.gov, tsbpe.texas.gov, or tda.texas.gov.
Municipal Permit & Inspection RuleArchive every municipal permit final approval, AHRI certificate, WPI-8, WDI graph, and lien waiver in a permanent digital + physical Home Stewardship Binder.
3 Questions You Must Ask Before Hiring
“Does your annual HVAC/plumbing maintenance plan send salaried diagnostic technicians with written micron/subcooling/static-pressure checklists—or commission sales techs with quotas?”
“Can I cancel this monthly service membership anytime without penalty, and does it guarantee priority 24-hour dispatch during peak July heatwaves and winter freezes?”
“Did I collect a signed unconditional mechanic’s lien waiver and municipal permit final approval receipt before releasing final payment on every capital project this year?”
3 High-Pressure Red Flags & Scams
App-based “all-in-one home concierge subscriptions” charging $99/month while dispatching unvetted, unlicensed gig-workers to touch gas, electrical, or plumbing systems.
Losing track of roof WPI-8 certificates, foundation P.E. letters, or TDLR Certificates of Mold Damage Remediation—costing thousands in buyer concessions when you sell.
Paying a general contractor’s final invoice without collecting subcontractor/supplier lien waivers under Texas Property Code Chapter 53.
SCAN FOR LIVE DIGITAL TOOLS & UPDATES
Downloadable & Printable Maintenance Logs
Digital Checklists • Excel & PDF Spreadsheets • Calendar Sync
Scan with your phone to download printable maintenance log templates (PDF & Excel), sync seasonal reminders to your digital calendar, and log service dates.
Establish a disciplined monthly maintenance rhythm to protect your investment.
Recommended Action Steps
Conduct monthly 15-minute walks to test GFCIs, check under sinks for drips, and inspect air filters.
Maintain a dedicated home records binder with equipment manuals, permit docs, and service receipts.
Schedule professional spring HVAC tune-ups and annual water heater flushes.
Track seasonal maintenance tasks using a recurring digital calendar reminder.
ICC DIGITAL CODESASTM
ASTM E2018 / ASHRAE 62.2—Operational Records, Preventative Maintenance and System Re-Inspection
STATUTORY MODEL CODE TEXT
Preventative building maintenance protocols require systematic operational logging, scheduled filter replacement, detector verification, and periodic professional condition re-inspections.
IN PLAIN ENGLISH
Keeping an annual maintenance log of filter dates, detector batteries, and equipment service preserves property value and catches problems early.
HOMEOWNER PRO TIP:Set recurring reminders on your phone or use this reference book's annual log to track filter replacements, water heater flushing, and detector testing.
The Stewardship of Homeownership
Preserving Value, Safety, and Peace of Mind Across Decades
EPILOGUE • STEWARDSHIPTrue home stewardship balances regular seasonal care with timely capital reinvestment to preserve equity and comfort across generations.
As you complete this reference guide, one principle rises above all others: successful homeownership is not an event, but a continuous discipline of stewardship. A well-built home will shelter multiple generations if cared for with attentiveness and respect for the natural forces acting upon it.
The Texas environment will inevitably test your home. Shingles will weather under unrelenting ultraviolet radiation; expansive clay soils will shrink during hot summers and swell with winter rains; mechanical compressors and water heaters will run thousands of hours keeping your family comfortable. None of these occurrences represent failures—they are the natural lifecycle of residential construction.
By establishing a predictable maintenance routine, monitoring your foundation moisture, changing filters, flushing water heaters, and keeping tree branches and mulch clear of your building envelope, you eliminate 90% of premature home defects. You protect your family against sudden emergencies and preserve the hard-earned equity that makes homeownership so profoundly rewarding.
Keep this volume accessible. Mark the pages that correspond to your specific systems. When you hire contractors, use the building code inserts to ensure work meets current standards. And when questions arise, know that knowledge and proactive maintenance are your greatest assets as a Texas homeowner.
“A house is built with hands, but a home is preserved with knowledge, care, and continuous stewardship.”
Homeowner Property Profile
Record critical property data, system serial numbers, and installation dates here for fast reference during maintenance, warranty claims, and insurance inquiries.
Property & Construction Baseline
Property Address
e.g. 1234 Bluebonnet Trail, Houston, TX 77002
Year Built
e.g. 2018
Square Footage & Stories
e.g. 2,850 sq ft / 2 Stories
Foundation Type
e.g. Post-Tension Monolithic Concrete Slab
Roof Covering & Age
e.g. Architectural Fiberglass Asphalt Shingle (Installed 2021)
Exterior Cladding
e.g. Clay Brick Veneer & HardiePlank Fiber Cement
Utility Providers & Meter Locations
Water Utility & Account #
e.g. City of Houston Public Works / Meter at Front Curb
Electric Utility / Retail Provider
e.g. CenterPoint Energy (TDU) / Main Panel on Garage Exterior
Natural Gas Provider
e.g. CenterPoint Gas / Meter on North Exterior Wall
Sewer / Septic System
e.g. Municipal Sanitary Sewer / Cleanout 5ft from Front Porch
Internet / Cable Demarcation
e.g. Fiber ONT in Garage / Coaxial Box on East Wall
Make: Rachio 3 • 8 Zones • Location: Garage North Wall
Trusted Service Providers & Emergency Contacts
Licensed Home Inspector
Secured Inspections LLC • (832) 396-9870
Licensed HVAC Contractor
Company Name • Phone • Emergency Line
Licensed Master Plumber
Company Name • Phone • License #
Licensed Electrician
Company Name • Phone • License #
Roofer / Windstorm Specialist
Company Name • Phone
Pest & Termite (WDI) Contractor
Company Name • Phone • Annual Bond Renewal Date
Texas Seasonal Maintenance Log
Follow this quarterly rhythm to maintain peak system efficiency, safeguard against weather extremes, and prevent costly deferred maintenance.
SCAN FOR LIVE DIGITAL TOOLS & UPDATES
Downloadable & Printable Maintenance Logs
Digital Checklists • Excel & PDF Spreadsheets • Calendar Sync
Scan with your phone to download printable maintenance log templates (PDF & Excel), sync seasonal reminders to your digital calendar, and log service dates.
Drain and flush sediment from tank water heaters to prevent mineral buildup and element burnout
Annual
Water Heating
BOTH
WinterDecember – February
Seasonal Focus: Hard Freeze Defense, Pipe Insulation & Emergency Preparedness
Maintenance Task
Frequency
Target System
Type
Disconnect all garden hoses and install insulated foam caps on all exterior hose bibbs before freeze
Prior to Freeze Warning
Plumbing Supply
DIY
Inspect insulation on exposed attic and garage piping; wrap bare copper or PEX lines
Annual (Early Winter)
Plumbing Freeze Protection
DIY
Locate and exercise main water shutoff valve to confirm smooth manual operation
Annual
Emergency Preparedness
DIY
Exercise standby generator or test portable generator interlock switch under load
Quarterly
Emergency Power
DIY
Check garage door auto-reverse sensors and lubricate garage door torsion springs and rollers
Bi-Annual
Appliances & Openers
DIY
Inspect clothes dryer rigid metal duct for lint accumulation and clean with rotary brush
Annual
Dryer Exhaust Safety
BOTH
ASSET LIFECYCLE & WARRANTY DIRECTORY
Home Equipment, Serial Number & Warranty Master Registry
Record your major mechanical, structural, and environmental assemblies below using the Section 2 Data Plate Decoder. Pro Tip: Registering newly installed HVAC units and water heaters online within 60 days of installation typically doubles manufacturer parts coverage from 5 years to 10 years at $0 cost.
Residential Assembly
Brand & Model Number
Serial Number & Decoded Year
Install Date
Installer & Warranty Term
1. Roof Covering, Underlayment & Flashings
e.g., Owens Corning Duration Class 4 Impact Shingle
Lot # / Permit Year (e.g., Installed 2023)
MM / YYYY
Contractor Name • Ltd Lifetime / 10-Yr Workmanship
2. Primary HVAC Condenser & Furnace / Air Handler
e.g., Trane XR16 • 036 (3.0 Ton) • R-454B
Serial # / Decoded Week-Year
MM / YYYY
TDLR TACLA# • 10-Yr Registered Parts Exp.
3. Secondary / Zoned HVAC System (Upstairs or Suite)
e.g., Carrier Comfort • 024 (2.0 Ton) • Heat Pump
Serial # / Decoded Week-Year
MM / YYYY
TDLR TACLA# • 10-Yr Registered Parts Exp.
4. Primary Water Heater (Tank or Tankless)
e.g., Bradford White 50-Gal Gas / Navien NPE-240A2
Serial # / Decoded Mfg Date
MM / YYYY
TSBPE Master Plumber M-# • 6/10/15-Yr Tank Exp.
5. Secondary / Recirculating Water Heater
e.g., Rheem Performance Platinum 40-Gal / Rinnai
Serial # / Decoded Mfg Date
MM / YYYY
TSBPE Master Plumber M-# • Warranty Exp.
6. Main Electrical Service Panel & Whole-House SPD
e.g., Square D QO 200A Copper Bus + HEPD80 Surge
Panel Series / SPD Install Date
MM / YYYY
TDLR TECL# • Municipal Permit #
7. Built-In Kitchen Suite (Range/Oven, Dishwasher, Hood)
e.g., Bosch 800 DW / GE Profile Dual-Fuel Range
Primary Serial #s (Attach Receipts)
MM / YYYY
Retailer / Mfg Extended Plan #
8. Pool / Spa Equipment & Irrigation Backflow (PVB)
e.g., Pentair IntelliFlo3 VSF + Febco 765 PVB
Pump Serial # / Last PVB Test Date
MM / YYYY
TDLR RAIL# / TCEQ BPAT Tester #
9. Private Water Well Pump / Aerobic OSSF Septic
e.g., Grundfos 1.5 HP Submersible / Clearstream ATU
Well Depth & GPM / OSSF Air Pump Date
MM / YYYY
TDLR Driller # / County OSSF Maintenance Co.
10. Standby Generator / Termite Bond / Coastal WPI-8
Log every major capital upgrade, licensed repair, engineering report, mold clearance, termite treatment, and municipal permit closure below. Presenting a documented, license-verified stewardship dossier at resale eliminates buyer renegotiation friction and substantiates Seller Disclosure accuracy.
Texas Annual Capital Reserve Formula: Capital Reserve Planning Formula: Annual Reserve Contribution = Estimated Replacement Cost / Remaining Useful Life (RUL in Years). Across Texas climates, setting aside 1.5% to 2.5% of property value annually in a dedicated high-yield home reserve account turns inevitable roof, HVAC, and water-heater replacements into calm, interest-free cash events.
INTERACTIVE DIGITAL COMPANION TOOL
Texas Home Capital Reserve & Replacement Horizon Calculator
Date • Sec. 8.1 / 8.4 Subterranean Termite Treatment or Bait Renewal • TDA SPCS TPCL# • Diagram & Renewable Bond Transfer Fee
Company:
Permit #:
$
____/____/20__
§ ______
Date • Sec. 1.5 / 1.8 Exterior Elastomeric Re-Caulking, Lintel Painting, or Window IGU Replacement • Vendor • Product & Cost
Company:
Permit #:
$
____/____/20__
§ ______
Date • Sec. 6.1 / 6.2 / 6.7 Pool Equipment, PVB Backflow Test, or Standby Generator Service • TX License # • Receipt & Warranty
Company:
Permit #:
$
BACK-OF-BOOK REFERENCE STANDARD
Homeowner's Plain-English Glossary
136 plain-English translations of technical construction terms, model codes, and Texas building science concepts.
A
AFCI (Arc-Fault Circuit Interrupter)Electrical
[AY-eff-see-eye]
An advanced circuit breaker that detects dangerous electrical arcing—unintended sparking caused by frayed cords, loose connections, or drywall screws piercing hidden wires—and cuts power in milliseconds before wall framing can ignite.
A one-way mechanical valve installed beneath sinks or kitchen islands that opens under negative pressure to let air into the drainage system, preventing water seals from siphoning out of P-traps without penetrating the roof.
A continuous plane of materials (such as sealed housewrap, taped sheathing, and gaskets) that prevents uncontrolled air leakage between the conditioned interior and the hot, humid Texas outdoors.
Heavy-gauge steel bolts embedded deep into concrete foundation grade beams during pouring, securing the bottom wooden sill plate of exterior walls against hurricane wind uplift and lateral shifting.
A plumbing backflow safety mechanism incorporated into outdoor hose bibbs and irrigation lines that automatically breaks vacuum pressure to prevent contaminated garden or lawn chemicals from siphoning back into drinking water.
A required metal safety bracket bolted to the floor or rear wall that captures the rear leg of a freestanding kitchen range, preventing the stove from tipping forward if a child climbs on an open oven door.
A heavy-duty, multi-layered laminated asphalt roof shingle featuring dimensional thickness, superior wind resistance (110–130 MPH), and enhanced longevity compared to flat traditional 3-tab shingles.
A heat-resistant fibrous mineral widely used in construction prior to the late 1970s in acoustic popcorn ceilings, pipe wrap, and floor tile; poses severe lung disease and mesothelioma hazards if disturbed and airborne.
The dangerous reverse flow of toxic combustion gases (including deadly carbon monoxide) down a furnace or water heater flue pipe into living areas, caused when negative air pressure from powerful exhaust fans overcomes natural chimney draft.
A specialized check-valve assembly installed on lawn irrigation and commercial water connections that prevents non-potable fertilizer, weed-killer, and stagnant soil water from flowing backward into household drinking water.
The vertical decorative posts or spindles installed beneath a stair handrail or guardrail; building codes require spacing of less than 4 inches so small children cannot slip their heads or bodies through.
A narrow strip of wood or composite trim used to cover vertical seams between wide exterior wall siding panels (as in board-and-batten siding) to shed rainwater and seal building joints.
Loose-fill fiberglass or treated cellulose insulation distributed pneumatically across attic floors to achieve continuous, uniform thermal resistance (R-38 in Texas) without gaps around framing.
The permanent mechanical interconnection of metallic piping, structural steel, gas tubing (CSST), and pool frames to the electrical grounding system to equalize electrical potential and eliminate electrocution hazards.
The individual circuit wiring extending from an electrical panel breaker to power a specific group of lights, wall receptacles, or dedicated motor loads throughout the house.
Heavy, solid copper or aluminum conductive metal bars mounted in an electrical panel that carry main utility power and serve as the mounting base for individual plug-in circuit breakers.
Flexible steel-sheathed electrical cable used to enclose insulated circuit wires in locations subject to physical damage, such as water heater hookups, furnace closets, and garage walls.
A colorless, odorless, tasteless toxic gas created by incomplete combustion of fossil fuels (gas furnaces, water heaters, fireplaces, cars); interferes with oxygen delivery in the bloodstream and can be fatal.
A flexible, waterproof elastomeric compound applied to joints around windows, exterior door frames, and siding trim to prevent wind-driven rain from entering exterior wall cavities.
A motor-driven pump that utilizes a high-speed spinning impeller to circulate water through swimming pool filters, irrigation loops, or wastewater holding tanks.
A small peaked roof structure constructed on the high side of a chimney where it meets the sloped roof, designed to divert shedding rainwater and leaves away from the chimney brick and into roof valleys.
A mechanical safety switch mounted inside an electrical service panel that automatically trips open to cut current flow whenever electrical amperage exceeds safe wiring limits or detects a short circuit.
A horizontal dimensional board connecting opposing pairs of roof rafters in the upper third of an attic, engineered to resist wind uplift forces that attempt to pull rafters apart at the ridge board.
Fresh outside air ducted directly to gas furnaces, water heaters, and fireplaces to provide adequate oxygen for complete fuel burning and safe flue gas venting.
The heavy mechanical motor pump inside the outdoor air conditioning condenser that pressurizes and circulates chemical refrigerant through the cooling loop to transport heat out of the home.
A dedicated PVC drainage pipe that channels condensed water extracted from humid indoor air by the evaporator coil safely away from the air handler to an outdoor drain or plumbing fixture.
The outdoor cabinet of a split-system air conditioner housing the compressor pump, aluminum finned coil, cooling fan, and electrical controls that reject heat into outdoor air.
Any environmental or structural situation—such as wood touching soil, excessive garden moisture, leaking hose bibbs, or heavy mulch against brick—that fosters termite colonies and wood rot.
An unfinished shallow under-floor area beneath a pier-and-beam home providing human access to inspect and repair plumbing lines, electrical conduits, and floor framing.
The slow, permanent progressive sag or deformation of structural wooden joists, concrete beams, or soil under long-term sustained dead weight and thermal cycles.
Flexible yellow-jacketed stainless steel piping used for distributing natural gas inside walls and attics; requires direct electrical bonding to prevent lightning strikes from puncturing the tubing wall.
A heavy cylindrical steel locking bolt operated by a key or thumb-turn that extends at least one full inch into a reinforced door jamb strike plate to provide primary security against forced entry.
The distance a floor joist, ceiling beam, or foundation slab flexes or bends downward under live occupant weight or dead structural load; building codes limit floor deflection to span length divided by 360 (L/360).
The temperature difference between the warm return air entering an AC system and the cool supply air exiting its registers; an efficient Texas cooling system maintains a 15°F to 20°F differential.
A specialized pipe fitting incorporating an insulating plastic gasket that physically separates dissimilar metals (such as copper water lines connected to galvanized steel water heaters) to stop rapid galvanic corrosion.
The louvered grill covering an air supply duct opening designed to distribute conditioned cool or warm air evenly throughout a room with minimal airflow resistance and noise.
A framed structural window projection extending vertically from a sloping roof plane to provide additional usable headspace, daylight, and ventilation to an upper-floor room or attic.
A vertical aluminum, copper, or vinyl pipe that conveys stormwater collected in roof gutters safely down to ground level and discharges it at least 5 feet away from the foundation slab.
An L-shaped corrosion-resistant metal flashing installed along roof eaves and rakes that guides runoff water cleanly off the roof deck into gutters without soaking underlying wooden fascia boards.
Structural wood decay caused by specialized wood-decay fungi that break down cellulose fibers, leaving framing timber brittle, cracked, and crumbly even after ambient moisture has dried out.
Large interior wall and ceiling panels composed of gypsum plaster pressed between sheets of thick paper, providing smooth paintable finishes and essential 30- to 60-minute fire resistance.
Wood-boring termites that live and feed entirely inside dry structural framing and furniture without needing ground soil moisture; identified by piles of tiny, hexagonal fecal frass pellets.
A high-voltage cylindrical electrical capacitor inside an outdoor AC condenser that stores electrical energy to provide starting torque and running phase shifts for both the compressor and fan motors.
A thick, flexible, fiber-reinforced water-based paste applied to metal and flexible duct joints to create permanent airtight seals that will not peel or dry out under extreme 140°F Texas attic temperatures.
The integrated network of plumbing pipes that removes blackwater and greywater from home fixtures while balancing air pressure through rooftop vent pipes to keep water seals intact.
The lower horizontal edges of a pitched roof that overhang exterior walls, shielding siding from driving rain and providing space for perforated soffit intake vents.
A white powdery salt residue deposited on brick masonry or concrete surfaces when moisture wicks through porous masonry and evaporates into air, leaving dissolved mineral salts behind.
High-wattage electric resistance heating elements built into heat pump air handlers that activate automatically when outdoor winter temperatures plunge too low for the compressor to warm the home efficiently.
The total thermal energy contained in moist air—combining sensible dry-bulb heat and latent water-vapor heat—used by building scientists to calculate total Texas AC cooling and dehumidification loads.
The indoor heat-exchange coil located in the air handler or furnace plenum where low-pressure refrigerant expands, absorbing heat and extracting gallons of humidity from circulating indoor air.
A continuous flexible separation gap engineered into long brick masonry walls, concrete driveways, or tile spans that accommodates natural thermal expansion and contraction without cracking.
A pre-pressurized steel tank containing an internal rubber bladder installed on a closed water supply system to cushion pressure spikes created when cold water expands upon heating in the water heater.
High-plasticity clay soils prevalent throughout Texas that swell significantly when saturated with rain and shrink into deep fissures during hot summer droughts, exerting severe bending forces on home foundations.
The horizontal architectural wooden or composite trim board mounted along the lower edge of a roof overhang, providing a mounting surface for roof gutters.
Impermeable sheet metal (galvanized steel, aluminum, or copper) installed at building junctions, valleys, chimneys, and wall intersections to direct water away from seams and toward gutters.
An electronic water sensor installed in an AC evaporator coil secondary drain pan that instantly shuts down the outdoor condensing unit if condensate backs up, preventing ceiling flooding.
The widened poured-concrete base of a foundation wall, pier, or deck post that spreads structural downward loads across a wider footprint of underlying bearing soil.
An outdoor water spigot designed with a long internal valve stem that shuts off water deep inside the heated wall cavity, preventing exterior freezing when garden hoses are disconnected.
Narrow wood or metal strips anchored to masonry or uneven studs to provide a level backing plane and a thermal air gap for attaching drywall or exterior siding.
A fast-acting life-safety device that monitors electrical balance between hot and neutral wires, cutting power within 25 milliseconds if a minute current leak (4–6 mA) to ground is detected.
The glass panes installed inside window sashes or doors; modern windows use double or triple panes separated by insulating inert argon gas layers to reduce thermal heat transfer.
Thick reinforced concrete beams cast monolithically along the perimeter and interior of a slab foundation to provide structural bending rigidity across shifting Texas soils.
An 8-foot copper or copper-bonded steel rod driven vertically into the earth outside the electrical service entrance to provide an electrical discharge path for high-voltage lightning surges.
A heavy horizontal structural timber, engineered lumber beam, or steel lintel spanning a door, window, or hallway opening in a load-bearing wall to transfer overhead roof loads safely to flanking king studs.
The sealed metal chamber inside a gas furnace where burning natural gas heats curved metal walls; circulating household air blows across the outside while toxic combustion fumes stay sealed inside.
A dual-mode refrigeration system that transfers heat into the home during winter to warm it, and reverses direction in summer to act as a high-efficiency air conditioner.
Routing a dishwasher flexible drain hose upward to anchor against the underside of the kitchen countertop before connecting down to the disposal, preventing dirty sink water from siphoning into clean dishes.
HVAC (Heating, Ventilation, and Air Conditioning)HVAC
[AITCH-vak]
The integrated collection of mechanical equipment, ducting, filters, and controls responsible for regulating indoor air temperature, humidity, and air purity throughout a home.
The physical outward or inward pressure exerted by standing or flowing water in surrounding soil against foundation walls, swimming pool shells, and buried sewer lines.
An engineered structural floor or ceiling beam shaped like a capital letter "I", featuring solid wood top and bottom flanges bonded to a central oriented strand board (OSB) web for long, stiff spans.
The environmental cleanliness and safety of air within a home, evaluated through measurements of particulate concentrations, relative humidity, mold spore counts, VOCs, and carbon monoxide levels.
The uncontrolled leakage of outdoor, unconditioned air into a home through cracks, porous materials, recessed lights, and unsealed doors and windows, significantly increasing summer AC electric bills.
A formed foam or plastic channel fastened between roof rafters at attic eaves to maintain a continuous 2-inch airway for soffit intake air above blown attic insulation.
A preformed J-shaped metal or vinyl trim piece used around exterior doors, windows, and gable ends to cleanly receive and conceal the cut edges of vinyl or fiber-cement siding.
Formed galvanized steel structural brackets used to secure horizontal floor or ceiling joists flush against supporting structural headers and ledger boards without notching wood.
A metal or fire-resistant plastic enclosure housing electrical cable splices and wire-nut connections, preventing electrical sparking or short circuits from touching combustible framing materials.
A specialized angled metal flashing installed at the lowest edge of a roof-to-wall intersection that diverts rushing rainwater away from exterior siding and directly into the gutter.
Pre-stamped circular metal tabs in electrical panel boxes and junction enclosures that can be punched out with a screwdriver to insert conduit fittings and cable clamps.
Toxic paint formulated with heavy lead pigments widely used in residential construction prior to the federal 1978 ban; produces neurotoxic dust when chipping or sanded during home remodeling.
A horizontal L-shaped structural steel angle bar positioned across exterior window and door openings in brick veneer walls to support the heavy dead weight of overhead masonry.
Window glass coated with a microscopic, transparent metallic oxide layer that reflects radiant solar heat away from the home in summer while allowing visible daylight to pass through.
Fresh outside air introduced into a home through dedicated motorized dampers to replace air exhausted by high-capacity kitchen range hoods (>400 CFM) and prevent furnace backdrafting.
A standardized scale from 1 to 16 measuring the particle-trapping efficiency of an HVAC air filter; residential systems in Texas typically perform best with MERV 8 to MERV 11 filters.
The vertical or horizontal structural framing element that physically separates two distinct window units or doors installed within a single rough wall opening.
A small circular drywall bulge or popped fastener head caused when green framing lumber shrinks or foundation settlement causes slight movement between drywall sheets and wall studs.
An insulated terminal strip inside an electrical panel that collects white return neutral wires, carrying alternating current back to the utility transformer.
The standard flexible electrical wiring used in residential homes, consisting of color-coded insulated copper conductors and a bare ground wire wrapped in a fire-resistant PVC jacket.
An engineered structural wood panel manufactured by compressing cross-oriented rectangular wood strands with waterproof resins, widely used for roof decking and exterior wall sheathing.
A U-shaped plumbing pipe section installed beneath plumbing fixtures that retains a standing pool of clean water, forming an airtight barrier that blocks hazardous sewer gases from entering living areas.
Flexible, freeze-tolerant plastic tubing used for modern residential drinking water distribution, joined with crimp rings or expansion collars and resistant to acidic water corrosion.
Infrared safety transmitter and receiver sensors mounted no more than 6 inches above the garage floor that immediately reverse a closing automatic garage door if an obstruction breaks the light beam.
A raised foundation assembly where the wood floor framing rests upon horizontal beams elevated above ground level on masonry or poured concrete piers, creating an accessible crawlspace.
A sheet metal or insulated duct-board distribution box attached directly to the indoor air handler that serves as a central manifold connecting supply and return duct runs.
A flexible grey plastic plumbing pipe used between 1978 and 1995 that is prone to micro-cracking and catastrophic burst failures caused by chlorine additives in municipal drinking water.
A concrete slab-on-grade foundation reinforced with high-strength steel cable tendons greased and encased in plastic sheathing, hydraulically tensioned to 30,000+ pounds of force after concrete curing.
A bell-shaped brass valve installed on the incoming main water service that reduces high municipal water line pressure (often 90–120 PSI) down to a safe residential level (50–65 PSI).
The branch of engineering physics governing the thermodynamic properties of moist air, humidity, temperature splits, and condensation dynamics in building mechanical systems.
An exterior weather-resistant electrical switch box mounted within direct sight of an outdoor AC condenser, pool pump, or spa allowing technicians to de-energize equipment rapidly before maintenance.
A scientific measure of a building material's thermal resistance to heat flow; higher R-values indicate superior insulating capability (Texas attic energy code mandates R-38 insulation).
A highly reflective aluminum foil membrane applied to attic roof rafters or OSB decking that blocks up to 97% of radiant solar heat transfer into attic insulation and living spaces.
A radioactive, odorless, invisible soil gas produced by natural decay of uranium in underlying rock; seeps into homes through slab cracks and represents the leading cause of lung cancer in non-smokers.
Sloping structural dimensional timbers running from the exterior wall top-plate to the central roof ridge to support roof decking and exterior shingles.
Deformed ribbed steel rods cast into concrete foundations, grade beams, and piers to provide high tensile strength and prevent shear cracking under soil movement.
A continuous, low-profile exhaust vent installed along the topmost peak of a pitched roof that allows rising hot attic air to escape while preventing rain and insect entry.
Perimeter framing lumber that caps the open ends of floor joists, tying the floor structure together and transferring exterior wall loads down to the foundation sill plate.
The vertical upright face of a stair step spanning the space between consecutive horizontal step treads; residential building codes mandate a maximum riser height of 7-3/4 inches.
The highest-protection mechanical backflow prevention device, containing dual independent check valves and an automatic hydraulic relief drain to safeguard drinking water from hazardous chemicals.
A magnesium or aluminum rod submerged inside a steel tank water heater that corrodes deliberately through galvanic action, sacrificing itself to prevent the steel water tank from rusting.
A vertical capped pipe nipple installed on a gas supply line immediately before an appliance to capture moisture, pipe shavings, and debris before they can foul gas control valves.
The updated federal standard measuring the cooling efficiency of an air conditioner under real-world external duct static pressures; Texas regulations mandate a minimum rating of 14.3 SEER2.
Underground utility electrical conductors running from a pad-mounted neighborhood transformer to the electric meter base mounted on the exterior of a home.
The bottom horizontal pressure-treated lumber board of a wall framing system that is anchored directly to the concrete foundation slab with steel anchor bolts.
The elevation change of yard soil surrounding a foundation; model codes require a minimum fall of 6 inches over the first 10 feet away from the slab to prevent water ponding against concrete.
The finished horizontal underside of a roof overhang, typically containing perforated or louvered intake vents that draw cool outside air into the attic ventilation loop.
The chipping, flaking, or surface disintegration of concrete or brick masonry caused by internal moisture expansion, rusted internal rebar, or freeze-thaw cycles.
Individual L-shaped metal flashing pieces installed in overlapping steps with each shingle course where a sloped roof meets a vertical brick wall or chimney, preventing side leaks.
The structural decking (typically 3/4-inch tongue-and-groove plywood or OSB) glued and nailed over floor joists to provide a stable, level platform for carpet, tile, or hardwood flooring.
Ground-nesting social insects that require soil moisture to survive and construct earthen mud tubes across concrete foundation edges to infest and consume structural framing lumber.
A wide, shallow graded drainage channel landscaped into a yard to capture surface rainwater and direct it safely around a home toward the street curb or storm drain.
Standard 120-volt electrical wall outlets equipped with internal spring-loaded shutter doors that block insertion of keys, hairpins, or nails unless two plug prongs enter simultaneously.
An area in the building envelope (such as uninsulated wall studs, metal window frames, or headers) that conducts heat significantly faster than surrounding insulation, creating cold spots and energy loss.
A vital automatic safety relief valve mounted on water heaters engineered to pop open and vent scalding water if internal temperature reaches 210°F or pressure reaches 150 PSI, preventing tank explosions.
A small plumbing valve connected to a nearby water supply line that automatically injects a small amount of water into rarely used floor drain P-traps to keep water seals from evaporating dry.
The horizontal top surface of a stair step that people step upon; building codes mandate a minimum depth of 10 inches and a uniform surface to prevent slip-and-fall injuries.
An engineered triangular structural assembly of dimensional lumber joined with pressed metal gusset plates, designed to span wide exterior walls and support roof decking without interior support columns.
A scientific measurement of the rate of non-solar heat transfer through a window or door assembly; lower numbers indicate superior insulating performance (Texas energy code requires U-factors of 0.32 or lower).
Water-resistant synthetic fabric or asphalt-saturated felt rolled over roof decking before shingles are nailed down to provide secondary barrier protection against wind-blown rain.
A moisture-impermeable material (such as 6-mil polyethylene plastic or specialized foil facings) installed to prevent water vapor from diffusing through building cavities and condensing into mold.
The vertical plumbing pipe that penetrates the roof to vent toxic sewer gases outdoors while admitting air pressure so drain lines flow smoothly without vacuum siphonage.
VOC (Volatile Organic Compounds)Environmental & Pest
Carbon-based chemical vapors released into indoor air from paints, new carpets, cabinet glues, and household cleaners that cause respiratory irritation and indoor air degradation.
A loud metallic banging or thudding noise caused when fast-closing valves (in washing machines or dishwashers) abruptly halt moving water, sending hydraulic shockwaves through supply piping.
Vertical openings left in the bottom mortar course of brick veneer walls to allow rainwater that penetrates the masonry to drain harmlessly outside above the foundation slab.
XRF Analyzer (X-Ray Fluorescence)Environmental & Pest
A handheld scientific diagnostic instrument used by licensed environmental inspectors that uses x-ray emissions to measure lead concentrations in paint layers nondestructively in real time.
Your home is a living, breathing structural and mechanical machine. When you understand how it works, small observations stay $25 weekend fixes instead of $25,000 emergencies.
Across Texas—from Gulf Coast hurricanes and gumbo clays to North Texas supercell hail, Hill Country limestone fault zones, and sudden Arctic freezes—residential homes endure environmental extremes unmatched anywhere else in North America.
Written in plain English by field-tested building scientists, this 11-chapter visual reference manual pairs studio 3D architectural cutaways, real field photography, infrared thermal diagnostics, contractor anti-scam playbooks, and model IRC/NEC code benchmarks so you can protect your family’s sanctuary and equity across every season.
62 System Deep Dives & 3D Cutaways
Foundations, roofs, electrical panels, HVAC, plumbing, appliances, pools, wells, septic, mold, termites, and capital lifespans.
Infrared & Field Triage Rubrics
Side-by-side visible vs. FLIR® thermal case studies, 3-stage severity scales, and rapid 30-symptom whole-house lookup.
Texas Soil & Micro-Climate Defense
Tailored maintenance protocols for Gulf Coast humidity, DFW expansive clays, Central Texas hard water, and freeze readiness.
Contractor Vetting & Code Benchmarks
62 trade-specific anti-scam contractor playbooks, equipment serial decoders, crisis protocols, and 2021/2024 IRC & 2023 NEC code cards.
Greater Houston & Gulf CoastAustin & Central Texas Hill CountryDallas–Fort Worth MetroplexSan Antonio & Southeast Texas
24/7 Digital Companion & Direct Texas Dispatch
Scan to open the interactive web edition, search all 62 residential assemblies from your phone, or schedule a building-science inspection across Texas.